


 本文深入探讨了Microsoft Expression Blend,重点是如何使用它将SketchFlow原型转化为Silverlight生产项目。Silverlight是一种提供丰富交互体验的技术,适用于Web和Windows Phone。Blend作为设计工具,允许设计师直接构建用户界面,无需大量编码。文章还介绍了设计师与开发人员的合作流程,以及XAML在声明式用户界面设计中的作用。最后,文章阐述了如何从SketchFlow原型过渡到Blend,创建真实的Silverlight应用项目。
In my previous article we looked at SketchFlow, the prototyping tool that’s part of Microsoft’s Expression Studio suite. We saw how to quickly build a wireframe prototype for a (well, my) simple portfolio viewing application, and how to use the feedback features of SketchFlow to gather stakeholder and user feedback.
在上一篇文章中,我们介绍了SketchFlow,这是Microsoft Expression Studio套件的一部分的原型工具。 我们看到了如何快速(为我的)简单的作品集查看应用程序构建线框原型,以及如何使用SketchFlow的反馈功能来收集涉众和用户反馈。
If you missed the first article, I highly recommend you check it out: Rapid Prototyping with SketchFlow. It’ll introduce you to the Blend interface and explain some of the tool’s core concepts.
如果您错过了第一篇文章,我强烈建议您查看: 使用SketchFlow进行快速原型设计 。 它将向您介绍Blend界面,并解释该工具的一些核心概念。
For this article, we’ll dive deeper into Expression Blend, and look at how to take our portfolio prototype into production using Microsoft Silverlight. We’ll cover navigation, layout, and sample data—all without writing a line of code!
在本文中,我们将更深入地研究Expression Blend,并研究如何使用Microsoft Silverlight将投资组合原型投入生产。 我们将介绍导航,布局和示例数据,所有这些都无需编写代码!
Pay attention because there’s a quiz at the end to test what you’ve learned!
请注意,因为最后会有一个测验来测试您学到的知识 !
By now, you’ve probably encountered Microsoft’s Silverlight technology somewhere on the Web. In a nutshell, Silverlight is Microsoft’s offering to deliver rich interactive experiences online.
到目前为止,您可能已经在Web上的某个地方遇到了Microsoft的Silverlight技术。 简而言之,Silverlight是Microsoft的产品,可在线提供丰富的交互式体验。
Silverlight provides a rich set of features for visual design, animation, media integration, layout, and data visualisation. It features a large range of skinnable controls and powerful mechanisms for defining sophisticated user experiences. Silverlight is also built to interoperate with the web platform. Silverlight applications can easily interoperate with the underlying browser and HTML page, including manipulating the DOM and calling (and being called by) JavaScript.
Silverlight为视觉设计,动画,媒体集成,布局和数据可视化提供了丰富的功能。 它具有各种可换肤的控件和强大的机制,用于定义复杂的用户体验。 Silverlight还可以与Web平台互操作。 Silverlight应用程序可以轻松地与基础浏览器和HTML页面进行互操作,包括操作DOM和调用JavaScript(并由JavaScript调用)。
The Silverlight plugin runs to around 4MB, with support for Internet Explorer, Safari, Firefox, Opera, and Google Chrome. Silverlight runs on Windows and Mac OSX, Linux (through the Mono project), and will soon run on Windows Phone, too.
Silverlight插件的大小约为4MB,并支持Internet Explorer,Safari,Firefox,Opera和Google Chrome。 Silverlight在Windows和Mac OSX,Linux(通过Mono项目)上运行,并且很快也会在Windows Phone上运行。
For developers, one of the key attractions of Silverlight is that it’s a subset of .NET. This means that .NET developers can take advantage of their existing skills when developing rich applications for the Web, and that all developers can take advantage of the rich environment of tools and platforms for .NET provided by Microsoft and others. Being based on .NET, Silverlight applications are most often coded in C# or Visual Basic .NET, but they can be developed in a range of .NET-supported languages, including IronRuby, IronPython, and JavaScript.
对于开发人员来说,Silverlight的主要吸引力之一是它是.NET的子集。 这意味着.NET开发人员在为Web开发丰富的应用程序时可以利用其现有技能,并且所有开发人员都可以利用Microsoft等提供的.NET工具和平台的丰富环境。 由于基于.NET,Silverlight应用程序通常使用C#或Visual Basic .NET进行编码,但是可以使用多种.NET支持的语言(包括IronRuby,IronPython和JavaScript)进行开发。
For designers, the key benefits of working with Silverlight are the clean separation of design from development that the platform provides, and the availability of sophisticated design tools. Silverlight allows designers to work naturally, and be very productive, while requiring little or no coding.
对于设计者而言,与Silverlight一起使用的主要好处是平台与设计之间的设计与开发的清晰分离,以及复杂设计工具的可用性。 Silverlight使设计师可以自然地工作,并且生产力高,而几乎不需要编码。
This brings us to Expression Blend.
这将我们带入Expression Blend。
Expression Blend is part of Microsoft’s Expression Studio suite of design tools. It is the production tool for designing and building user interfaces for Silverlight on the Web and Windows Phone, as well as for WPF (Windows Presentation Foundation) on Windows and Microsoft Surface. Expression Blend also underpins SketchFlow, the rapid prototyping tool we covered in the last article.
Expression Blend是Microsoft Expression Studio设计工具套件的一部分。 它是用于为Web和Windows Phone上的Silverlight以及Windows和Microsoft Surface上的WPF(Windows Presentation Foundation)设计和构建用户界面的生产工具。 Expression Blend也是我们上一篇文章介绍的快速原型制作工具SketchFlow的基础。
The power of Blend is that it allows designers to actually build rich user interface themselves, rather than describing the interface in wireframes, site maps, and comps for someone else to build (and potentially misinterpret). Blend allows designers to create the production interface themselves if they choose to, while still working with familiar tools and concepts. This allows designers not only to be more productive, but to actively work on their design for longer, since there is less need for a formal hand-over to the development team.
Blend的强大之处在于,它允许设计人员自己实际构建丰富的用户界面,而不是在线框,站点地图和comps中描述该界面以供其他人构建(并可能会误解)。 Blend使设计人员可以选择创建自己的生产界面,同时仍使用熟悉的工具和概念。 这使设计师不仅可以提高生产率,而且可以积极地进行更长的设计工作,因为不需要正式移交给开发团队。
When I worked at Microsoft, one of our key messages was the improved designer-developer workflow enjoyed by designers using Blend and developers using Visual Studio. Designers and developers are able to work on the same project simultaneously in Blend and Visual Studio respectively. Designers love this because it makes them fully fledged members of the project team, enabling them to contribute equally to the project, rather than being seen as outsiders who must rely on the kindness of developers to see their work realised.
当我在Microsoft工作时,我们的主要信息之一是使用Blend的设计师和使用Visual Studio的开发人员所享受的改进的设计人员-开发人员工作流程。 设计人员和开发人员能够分别在Blend和Visual Studio中同时处理同一个项目。 设计师之所以喜欢它,是因为它使他们成为项目团队的完整成员,从而使他们能够为项目做出同等的贡献,而不是被视为必须依靠开发人员的仁慈才能实现其工作的局外人。
Underpinning Silverlight and WPF, is the XAML user interface definition language. XAML is an XML-based language for defining the contents, layout, and behaviour of user interfaces. Figure 1, “Underlying your Silverlight experience is the XML-based XAML language” shows a button interface element and the corresponding XAML code that creates the button. While the language’s syntax and mechanics are quite different from HTML, its intention is similar. It’s XAML that makes user interface design tools like Blend possible. As a designer, it’s worth understanding the basics of how XAML works. While it isn’t usually necessary to be able to code in XAML (I haven’t found it necessary yet), it can be helpful to be able to read XAML to help debug any unexplained behaviour in your project.
XAML用户界面定义语言是Silverlight和WPF的基础。 XAML是一种基于XML的语言,用于定义用户界面的内容,布局和行为。 图1“基于XML的XAML语言是您的Silverlight经验的基础”,它显示了一个按钮界面元素以及创建该按钮的相应XAML代码。 尽管该语言的语法和机制与HTML完全不同,但其意图却相似。 XAML使诸如Blend之类的用户界面设计工具成为可能。 作为一名设计师,值得了解XAML的工作原理。 尽管通常不需要使用XAML进行编码(我还没有发现它的必要性),但是能够读取XAML来帮助调试项目中任何无法解释的行为可能会有所帮助。

In the first article, we learned that SketchFlow allows us to create prototypes “on top of” Blend. One of the advantages of this approach is that you can take your initially sketchy prototype and evolve it to a point where it’s very close to the final experience in SketchFlow. You can even connect your prototype to real back-end code. The prototype we constructed in the previous article is shown in Figure 2, “Our SketchFlow prototype”.
在第一篇文章中,我们了解到SketchFlow允许我们在Blend之上创建原型。 这种方法的优点之一是,您可以采用最初的草图原型并将其发展到非常接近SketchFlow最终体验的程度。 您甚至可以将原型连接到真实的后端代码。 我们在前一篇文章中构建的原型如图2“我们的SketchFlow原型”所示 。

The natural question to ask at this point is whether you can convert your SketchFlow prototype into a production project when you’re ready. The answer is yes, sort of…
此时自然要问的问题是,准备就绪后是否可以将SketchFlow原型转换为生产项目。 答案是肯定的……
A SketchFlow prototype is a Blend project like any other. In addition to the elements you define yourself, SketchFlow provides behind-the-scenes mechanisms for wiring everything up, implementing the SketchFlow map, providing the SketchFlow styles, and of course creating the code required for the SketchFlow player. To convert a SketchFlow prototype into a production project, you basically have two options:
SketchFlow原型是任何其他项目的Blend项目。 除了您自己定义的元素之外,SketchFlow还提供了幕后机制,用于将所有内容连接起来,实现SketchFlow映射,提供SketchFlow样式,当然还创建了SketchFlow播放器所需的代码。 要将SketchFlow原型转换为生产项目,基本上有两个选择:
Strip out all the SketchFlow parts of the project. There are instructions to do this in the Blend Help files.
剥离项目的所有SketchFlow部分。 Blend帮助文件中有执行此操作的说明。
Harvest the assets you want to keep and effectively copy and paste them into a new project.
收获要保留的资产,并有效地将其复制并粘贴到新项目中。
For all but the simplest projects, I would recommend option 2. Firstly, it ensures there aren’t any bits of SketchFlow left lying around in your project. Secondly, being part of a prototype, your screens are probably pretty sloppy by production standards. The whole point of rapid prototyping means you probably weren’t really thinking about issues like layout, containment, resizing, naming, or good architectural practices. For this reason, you’re probably better off just going through your prototype and copying out the elements (screens, components, animations, and so on) that you want to use as a starting point for your production project.
对于最简单的项目,我建议使用选项2。首先,它可以确保项目中没有剩余的SketchFlow。 其次,作为原型的一部分,按照生产标准,您的屏幕可能很草率。 快速原型的全部意义是您可能并没有真正考虑布局,封闭,调整大小,命名或良好的建筑规范等问题。 因此,最好只浏览原型并复制要用作生产项目起点的元素(屏幕,组件,动画等)。
In our case, the prototype is so simple that we can get by just by starting again.
在我们的例子中,原型是如此简单,以至于我们只需重新开始就可以得到。
As we learned last time, when we start Expression Blend we’re given the opportunity to start a new project. This time, rather than selecting Silverlight 3 SketchFlow Application, we’ll make a real Silverlight 3 Application + Website, as shown in Figure 3, “Selecting the appropriate project type”.
正如我们上次了解到的那样,当我们启动Expression Blend时,就有机会开始一个新项目。 这次,我们将选择一个真实的Silverlight 3 Application +网站 ,而不是选择Silverlight 3 SketchFlow Application , 如图3“选择适当的项目类型”所示 。

A quick look at the Projects panel in Blend shows us that our new Silverlight project has one page at the moment: MainPage.xaml. That’s where we’ll build our user interface.
快速浏览Blend中的“项目”面板,可以看到我们新的Silverlight项目目前具有一页: MainPage.xaml 。 那就是我们构建用户界面的地方。
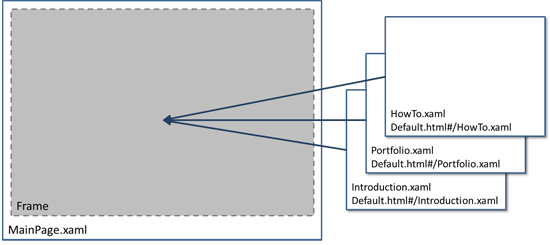
In our SketchFlow prototype, we built three separate pages that SketchFlow linked together with navigation. For our production application, we approach things slightly differently. We’ll make three separate pages, which will be displayed inside MainPage.xaml using a Frame, as illustrated by Figure 4, “A Frame in MainPage.xaml will hold each of our three application pages”. Silverlight’s Frame element allows us to navigate between pages (much like navigating between pages in a browser) but also gives us an extra bonus. Using a Frame element will integrate our Silverlight application with the browser navigation. That means that the browser Back and Forward buttons will actually navigate back and forward in our Silverlight application. It also means that each page in our application will have its own URL, which is really useful for bookmarking.
在SketchFlow原型中,我们构建了三个独立的页面,这些页面将SketchFlow与导航链接在一起。 对于我们的生产应用程序,我们对待方法略有不同。 我们将制作三个单独的页面,这些页面将使用Frame展示在MainPage.xaml内, 如图4所示,“ MainPage.xaml中的一个Frame将容纳我们三个应用程序页面中的每一个” 。 Silverlight的Frame元素使我们可以在页面之间导航(就像在浏览器中的页面之间导航一样),但同时也为我们提供了额外的好处。 使用Frame元素会将我们的Silverlight应用程序与浏览器导航集成在一起。 这意味着浏览器的“ 前进和后退”按钮实际上将在我们的Silverlight应用程序中前后导航。 这也意味着我们应用程序中的每个页面都会有自己的URL,这对于添加书签确实非常有用。
Figure 4. A Frame in MainPage.xaml will hold each of our three application pages
图4. MainPage.xaml中的框架将容纳我们三个应用程序页面中的每个页面
So, before we insert the Frame in MainPage.xaml, let’s make our three pages.
因此,在将Frame插入MainPage.xaml ,让我们制作三个页面。
To make the new pages, we go to the Projects panel, right-click on the Silverlight project (not the Web project), and choose Add New Item…, as shown in Figure 5, “Add New Item…”. Add a new Page and call it Introduction.xaml. While you’re at it, make another one called Portfolio.xaml.
为了创建新页面,我们转到Projects面板,右键单击Silverlight项目(而不是Web项目),然后选择Add New Item… , 如图5“ Add New Item…”所示 。 添加一个新页面,并将其称为Introduction.xaml 。 在使用它时,再创建一个名为Portfolio.xaml 。

Create the Frame element (you’ll find it on the Assets tab under Controls) in MainPage.xaml and set its Source property to point to the XAML page we want it to load first—Introduction.xaml—as depicted in Figure 6, “The Source property determines which XAML file the Frame will initially display at run time”.
创建Frame元素(你会发现它控制下的资产选项卡上)在MainPage.xaml和它的来源属性点设置到我们希望它加载一线的XAML页面Introduction.xaml -如在描绘图6,“ Source属性决定了框架在运行时最初显示的XAML文件 。


 1535
1535

 被折叠的 条评论
为什么被折叠?
被折叠的 条评论
为什么被折叠?
 到【灌水乐园】发言


