


:球弹跳高度的计
快速动画开发 (Rapid Animation Development)
If you’ve been following along, you should now have some idea about how basic frame-by-frame animation works in Flash. But animating a sequence one frame after another is a tedious process – especially when the sequence is a complex one – and Flash comes with some powerful tools to assist in this process.
如果您一直遵循 ,现在应该对Flash中基本的逐帧动画的工作原理有所了解。 但是,一个序列接一个帧地动画序列是一个繁琐的过程,尤其是当序列是一个复杂的序列时,Flash附带了一些强大的工具来协助完成此过程。
This week, I’m going to take a look at the alternative to frame-by-frame animation, a technique known as "tweening" in Flash lingo. I’ll be showing you how Flash’s powerful tweening tools can substantially cut down the time you spend on an animation clip, with some simple demonstrations of how they can be used effectively.
本周,我将介绍逐帧动画的替代方法,该技术在Flash语言中称为“补间”。 我将通过一些简单的演示向您展示Flash强大的补间工具如何显着减少您在动画剪辑上花费的时间。
为了你的酷 (For The Cool In You)
Most people – novices included – consider tweening to be the coolest thing about Flash. It’s not hard to understand why – Flash’s tweening capabilities, combined with some easy-to-learn techniques, allow novices and experts alike to quickly and easily create good-looking animation sequences with minimal effort.
大多数人(包括新手)都认为补间是Flash上最酷的东西。 不难理解为什么– Flash的补间功能与一些易于学习的技术相结合,使新手和专家都能以最少的努力快速轻松地创建外观精美的动画序列。
Find that hard to believe? I’ll do my best to make you a believer by the end of this article – but first, a little theory.
发现难以置信? 在本文结尾处,我会尽力使您成为一个信徒-但首先要讲一点理论。
A tweened animation differs from the frame-by-frame animation you learnt about before in that it doesn’t require the animator to animate each and every frame of the animation clip; instead, the animator need only specify the starting and ending frame of the clip, with Flash creating all the intermediate frames.
补间动画与您之前了解的逐帧动画的不同之处在于,它不需要动画师对动画剪辑的每一帧进行动画处理。 相反,动画师只需指定剪辑的开始和结束帧,而Flash会创建所有中间帧。
Consider a simple example: a stone rolling downhill. In traditional frame-by-frame animation, it would be necessary to animate the stone every step of the way on its downhill journey; with tweening, it’s only necessary to create two frames – the initial frame, with the stone at the top of the hill, and the final frame, with the stone at the bottom – and Flash will do the rest.
考虑一个简单的例子:一块石头滚下山。 在传统的逐帧动画中,在下坡过程中的每一步都必须对石头进行动画处理。 进行补间时,只需要创建两个框架-初始框架(在山顶的石头是石头)和最后一个框架(在石头的底部是石头),剩下的就是Flash。
Flash offers two types of tweening: "shape tweening", used primarily to morph one shape into another; and "motion tweening", used to create the illusion of motion (although, as you’ll see, you can do a lot more with it too). Shape tweening cannot be applied to symbol instances or text blocks, while motion tweening works on symbol instances, grouped elements and text blocks.
Flash提供两种类型的补间:“形状补间”,主要用于将一种形状变形为另一种形状; 和“补间动画”,用于创建运动的幻觉(尽管您会看到,您也可以用它做更多的事情)。 形状补间不能应用于符号实例或文本块,而补间动画适用于符号实例,分组的元素和文本块。
紫色 (The Colour Purple)
Let’s begin with a simple motion tween that will better illustrate the concept. Open up a new Flash movie, and use the Circle tool to draw a simple ellipse. Fill it with your favourite colour.
让我们从一个简单的补间动画开始,它将更好地说明这一概念。 打开一个新的Flash影片,然后使用“圆”工具绘制一个简单的椭圆。 用您喜欢的颜色填充它。
You’ll notice that Flash automatically adds a keyframe at frame #1 when you create the ellipse.
您会注意到,创建椭圆时,Flash会自动在第1帧处添加关键帧。

Convert the ellipse to a graphic symbol – it should show up in the Library window.
将椭圆转换为图形符号–它应显示在“库”窗口中。
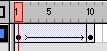
Now, click on frame #10, insert a new keyframe, and move the ellipse to a new location on the Stage. Go back to frame #1, and pop open the Window -> Panels -> Frame panel. Select "Motion" in the Tweening box. The area between frames #1 and #10 should fill up with a light purple colour and a solid arrow – this indicates a motion tween.
现在,单击第10帧,插入一个新的关键帧,然后将椭圆移动到舞台上的新位置。 返回第1帧,然后弹出以打开窗口->面板->框架面板。 在补间框中选择“运动”。 第1帧和第10帧之间的区域应充满浅紫色和实心箭头-这表示补间动画。
Play the animation – your ellipse should move smoothly from its original location to the new location you specified.
播放动画–椭圆应从其原始位置平滑移动到您指定的新位置。
And that’s your very first motion tween. Simple, huh?
这是您的第一个补间动画。 简单吧?
Copyright Melonfire, 2000. All rights reserved.
版权所有Melonfire ,2000。保留所有权利。
淡红色 (A Tint Of Scarlet)
How about something a little more complex? Go back to frame #10, right-click the ellipse, and choose the Scale option. Modify the ellipse by pulling the scaling handles until you have something that looks like this:
有点复杂的东西呢? 返回第10帧,右键单击椭圆,然后选择“缩放”选项。 通过拉动缩放手柄来修改椭圆,直到出现如下所示的内容:
Play the clip again – your ellipse should change shape while it’s moving across the Stage.
再次播放剪辑–椭圆在舞台上移动时,它的形状会改变。
Let’s add a little colour shift as well, shall we? With the instance in frame #10 still selected, pop open the Window -> Panels -> Effect dialog, and choose "Tint" from the drop-down menu. Pick a tint colour – the fill colour of the flattened ellipse in frame #10 should immediately change to the selected colour.
让我们也添加一点色彩偏移,对吧? 仍选择第10帧中的实例,弹出窗口->面板->效果对话框,然后从下拉菜单中选择“色调”。 选择一种颜色-在第10帧中变平的椭圆的填充颜色应立即更改为所选颜色。
When you play the clip, your ellipse will not only change shape, but colour too.
播放剪辑时,椭圆不仅会改变形状,还会改变颜色。
乘风景路线 (Taking The Scenic Route)
By default, Flash chooses the shortest distance between the starting and ending positions of the object as the motion path. If this is not to your requirements, you also have the option of tweening motion along a path that you define.
默认情况下,Flash选择对象的开始位置和结束位置之间的最短距离作为运动路径。 如果这不符合您的要求,则还可以选择沿定义的路径补间运动。
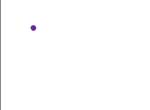
Let’s consider a new example to illustrate this better. Open up a new Flash movie, and at frame #1, create a small dot with the Brush tool. Convert it to a graphic symbol.
让我们考虑一个新的示例来更好地说明这一点。 打开一个新的Flash影片,并在第1帧使用“画笔”工具创建一个小点。 将其转换为图形符号。
Next, move to frame #25, insert a new keyframe and move the dot to the other end of the stage.
接下来,移至第25帧,插入新的关键帧,然后将点移至舞台的另一端。

Create a motion tween and play the clip – your dot will travel horizontally across the Stage, since that’s the shortest distance between the two positions.
创建补间动画并播放剪辑–因为这是两个位置之间的最短距离,所以您的点将在舞台上水平移动。
To add your own motion path, right-click the layer containing the dot, and use the "Add Motion Guide" command to add a new motion guide layer – this layer will hold the path for motion path for your tween.
要添加自己的运动路径,请右键单击包含点的图层,然后使用“添加运动向导”命令添加一个新的运动向导层–该层将保留补间运动路径的路径。
Draw the path that you’d like the symbol to traverse with the Pen, Pencil, Brush or Pen tool.
使用“钢笔”,“铅笔”,“画笔”或“钢笔”工具绘制希望符号穿过的路径。
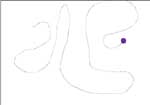
Note that you need to "snap" the symbol to the beginning and end of the motion path after you’re done – you can do this by selecting the symbol with the Arrow tool and dragging it to the appropriate end-point of the path until the symbol’s "registration point" (the little hollow dot in the center) snaps to the end-point of the path. When you play the clip again, the dot should travel along the path you’ve just created.
请注意,完成后需要将符号“捕捉”到运动路径的开头和结尾–您可以通过使用“箭头”工具选择该符号并将其拖动到路径的适当端点,直到完成该操作。符号的“注册点”(中心的小空心点)捕捉到路径的终点。 再次播放剪辑时,圆点应沿刚创建的路径移动。
You can choose to have either the baseline of the symbol, and/or its registration point, oriented towards the motion path, by selecting the "Orient To Path" and "Snap" options respectively in the Frame panel.
通过分别在“框架”面板中选择“定向到路径”和“捕捉”选项,可以选择使符号的基线和/或其注册点朝向运动路径。
Copyright Melonfire, 2000. All rights reserved.
版权所有Melonfire ,2000。保留所有权利。
弹跳球 (Bouncing Balls)
Motion tweening is a great way to create animation clips that look good and are simple to put together – as this next example demonstrates.
补间动画是一种创建看起来不错且易于组合的动画剪辑的好方法–如以下示例所示。
How did I do this? Very simple.
我是怎么做到的? 很简单。
First, draw a circle on the Stage and fill it with a gradient fill – I’ve used blue, but feel free to experiment – to create a smooth bouncing ball. Convert it to a graphic symbol – you’ll be using this symbol throughout the exercise.
首先,在舞台上画一个圆,并用渐变填充填充它-我使用了蓝色,但是可以随意尝试-创建一个光滑的弹跳球。 将其转换为图形符号–您将在整个练习中使用此符号。
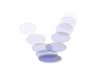
Next, select frame #7, insert a new keyframe, and move the ball vertically downwards. Use the scaling handles to flatten it vertically and stretch it horizontally, so that it looks like it’s been squashed.
接下来,选择第7帧,插入一个新的关键帧,并将球垂直向下移动。 使用缩放手柄将其垂直展平并水平拉伸,使其看起来像被压扁了。
Go back to frame #1 and create a motion tween between the two keyframes (you can also do this by right-clicking anywhere between the two keyframes and selecting the "Create Motion Tween" command).
返回第1帧,并在两个关键帧之间创建补间动画(您也可以通过右键单击两个关键帧之间的任意位置并选择“创建补间动画”命令来执行此操作)。
Now, move on to frame #14, insert a new keyframe, and move the ball back up to its original location. Pop open the Transform panel, and use the Reset button (bottom right corner) to restore the symbol to its original state. Insert a motion tween between frame #7 and frame #14.
现在,移至第14帧,插入新的关键帧,然后将球移回其原始位置。 弹出打开“变换”面板,然后使用“重置”按钮(右下角)将符号恢复到原始状态。 在第7帧和第14帧之间插入补间动画。
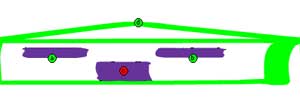
When you play your clip, you’ll see something like this:
播放剪辑时,您会看到以下内容:
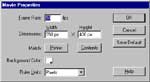
If you think the clip would look better if it played a little faster, you can alter the frame rate through the Modify -> Movie dialog.
如果您认为剪辑播放得快一点会看起来更好,则可以通过“修改”->“电影”对话框更改帧速率。
There are just a couple more steps to this animation. First, select frame #7 (the flattened ball) and move the symbol about 100 pixels to the left. Do the same with frame #14, the final keyframe, except that the symbol should be moved to the right When you play the clip, the ball will appear to bounce across the screen.
此动画仅需几个步骤。 首先,选择第7帧(展平的球),然后将符号向左移动约100个像素。 对第14帧(最后一个关键帧)执行相同的操作,只是符号应移到右侧。在播放剪辑时,球似乎会在屏幕上弹跳。
And finally, the fade-in/fade-out effect. Select the ball in the first frame, and use the Effects panel to add an alpha effect, so that the ball is partially transparent. Do the same for the final keyframe. This time, when you play the clip back, the ball will slowly solidify as it moves downwards, and fade out as it bounces upwards.
最后是淡入淡出效果。 在第一帧中选择球,然后使用“效果”面板添加Alpha效果,以使球部分透明。 对最终关键帧执行相同的操作。 这次,当您播放剪辑时,球将随着向下移动而缓慢固化,并随着向上弹起而逐渐消失。
How long did that take? About five minutes, I’d say – and the result is a pretty good-looking animation clip. Plus, since the entire clip is built using a symbol, you can easily alter the colour and size of the ball in symbol-editing mode, and have your changes immediately reflected in the clip itself. Try it yourself and you’ll see what I mean!
那花了多长时间? 我想说大约五分钟,结果是一个漂亮的动画剪辑。 另外,由于整个剪辑都是使用符号构建的,因此您可以在符号编辑模式下轻松更改球的颜色和大小,并使更改立即反映在剪辑本身中。 自己尝试,您会明白我的意思!
Copyright Melonfire, 2000. All rights reserved.
版权所有Melonfire ,2000。保留所有权利。
放大 (Zooming In)
Another effect that’s simple to accomplish with motion tweening is the so-called "zoom" effect.
通过补间动画可以轻松实现的另一种效果是所谓的“缩放”效果。
As you might have already figured, this is not at all difficult in Flash. For your first keyframe, simply create a symbol – image or text block – which is miniscule in size:
您可能已经知道,在Flash中这一点都不困难。 对于您的第一个关键帧,只需创建一个符号-图片或文本块-尺寸很小:
and then scale it up for your second keyframe.
然后将其放大为第二个关键帧。

When you tween the two together, if you do it right, it will appear as though you are "zooming in" to the image.
将两者补间时,如果做得正确,它将好像您正在“放大”图像。
在正确的地方弯曲 (Curves In All The Right Places)
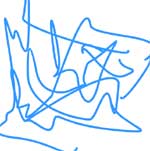
Next up, shape tweening. Open up a new Flash movie and use the Pen tool to draw a random series of curves – you should end up with a mess of lines and curves, which might look something like this.
接下来,补间形状。 打开一个新的Flash电影,然后使用钢笔工具绘制一系列随机曲线–您最终将看到一堆乱七八糟的直线和曲线,看起来像这样。

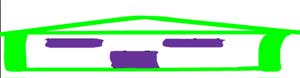
Now click on frame #30, and insert a new keyframe. Delete the shape you just created, and create a new one, again using the Pen tool. Your new shape might look something like this:
现在单击第30帧,然后插入一个新的关键帧。 删除刚创建的形状,然后再次使用钢笔工具创建一个新形状。 您的新形状可能如下所示:
Now that you have two separate shapes, you can proceed to tween them together. Click the first keyframe, and sellect "Shape" as the tweening type in the Frame pop-up. Flash will fill the intermediate frames with a light green tint, and a solid arrow – this indicates a shape tween.
现在您有了两个单独的形状,可以继续将它们补间。 单击第一个关键帧,然后在“框架”弹出窗口中出售“形状”作为补间类型。 Flash将用浅绿色调和中间的箭头填充中间帧,这表示补间形状。
When you play the animation clip back, your first shape will slowly morph into the second shape – like this:
当您播放动画剪辑时,您的第一个形状将慢慢变形为第二个形状–如下所示:
Yes, it serves no artistic value – but it looks cool, nevertheless. And you can also alter the colour of the shape as the transition takes place – simply stroke/fill one or both shapes with a different colour and line style.
是的,它没有艺术价值-但是看起来还是很酷的。 而且,您还可以在过渡时更改形状的颜色-只需用不同的颜色和线条样式描边/填充一个或两个形状。
Note, however, that shape tweening will not work on text blocks and symbols.
但是请注意,形状补间不适用于文本块和符号。
Copyright Melonfire, 2000. All rights reserved.
版权所有Melonfire ,2000。保留所有权利。
提示…或两个…或三个 (Taking A Hint… Or Two… Or Three)
Flash also allows you to control the manner in which the shape morphs happen with a feature known as "shape hints" – essentially, tiny markers that allow you to create a one-to-one correspondence between specific points in the initial and final shapes.
Flash还允许您通过称为“形状提示”的功能来控制形状变形的发生方式-本质上来说,这些微小的标记使您可以在初始形状和最终形状中的特定点之间创建一对一的对应关系。
Let’s suppose you had two shapes, which looked like this.
假设您有两个看起来像这样的形状。

By default, when Flash tweens them together, the sequence looks like this.
默认情况下,当Flash将它们补间时,序列如下所示。
But when I add shape hints to the starting and ending shapes
但是当我在开始和结束形状中添加形状提示时

the shape tween tries to ensure that the marked points correspond to each other during the tween.
补间的形状会尝试确保在补间期间标记的点彼此对应。
You can add a shape hint through the Modify -> Transform -> Add Shape Hint menu command, or with the Ctrl-Shift-H keyboard shortcut.
您可以通过“修改”->“变换”->“添加形状提示”菜单命令或使用Ctrl-Shift-H键盘快捷键来添加形状提示。
And that’s about it for this week. Next time, I’ll be talking about using the Text tool, and I’ll also show you how to create clickable buttons for your animation clip.
这就是本周。 下次 ,我将讨论使用“文本”工具,还将向您展示如何为动画剪辑创建可单击的按钮。
Note: All examples in this article have been tested on Macromedia Flash 5.0. Examples are illustrative only, and are not meant for a production environment. YMMV!Copyright Melonfire, 2000. All rights reserved.
注意:本文中的所有示例均已在Macromedia Flash 5.0上进行了测试。 示例仅是说明性的,并不意味着用于生产环境。 YMMV! 版权所有Melonfire ,2000。保留所有权利。
:球弹跳高度的计


 2283
2283

 被折叠的 条评论
为什么被折叠?
被折叠的 条评论
为什么被折叠?
 到【灌水乐园】发言


