


 本文介绍了如何使用Postman工具来优化API开发工作流程,包括发出请求、授权、环境变量、测试、收藏管理和文档创建等功能。通过示例展示了如何进行测试、验证响应和创建集成测试,以及利用Postman进行文档共享和模拟。文章强调了Postman在API开发中的重要作用,如简化文档生成和团队协作。
postman api使用
Building good APIs is hard, and anyone who had the chance to do so can relate to this. A project can easily grow to become a mess. One can keep trying to adopt an approach to make it more enjoyable, like trying a documentation-first workflow, but something always feels clumsy.
构建良好的API很难,任何有机会这样做的人都可以与此相关。 一个项目很容易成长为一团糟。 可以继续尝试采用一种使它变得更有趣的方法,例如尝试以文档为先的工作流程,但是总有些笨拙。
I was trying out Postman lately, a tool we’ve briefly covered before, and I discovered that they’re doing a great job by providing an integrated environment for different components of an API, like authorization, testing, documentation, versioning, etc.
我最近尝试了Postman ,这是我们之前已经简要介绍过的工具,我发现它们通过为API的不同组件(例如授权,测试,文档,版本控制等)提供集成环境,正在做得很好。

In this article, we’re going to walk through the different features that Postman provides and how we can organize them to make our API workflow less painful.
在本文中,我们将逐步介绍Postman提供的各种功能,以及如何组织它们以减轻API工作流程的痛苦。
发出请求 (Making Requests)
The first step to discovering Postman is making a simple API request and seeing the response.
发现Postman的第一步是发出一个简单的API请求并查看响应。
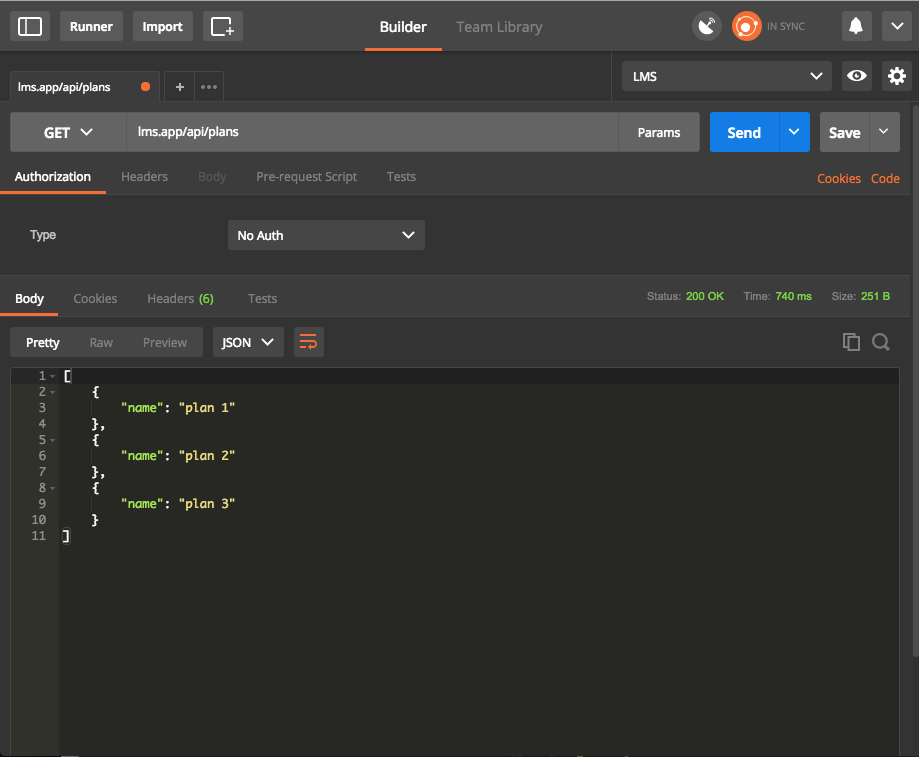
From the screenshot above we can see that the view incorporates different elements. The top bar contains the request method (in this case GET), and right next to it we specify the endpoint to make the request to. If the request has some params we can specify them by clicking the Params button, which will open a table for entering them. When ready, we can click the send button to initiate the request.
从上面的屏幕截图中,我们可以看到视图包含了不同的元素。 顶部栏包含请求方法(在本例中为GET ),在其旁边,我们指定了向其发出请求的端点。 如果请求中包含一些参数,我们可以通过单击“ 参数”按钮来指定它们,这将打开一个用于输入它们的表格。 准备就绪后,我们可以单击发送按钮以发起请求。
The next section contains five tabs:
下一部分包含五个选项卡:
Authorization: Specifies how to authorize the request. Like
Basic Auth,OAuth2, etc.授权:指定如何授权请求。 像
Basic Auth,OAuth2等。Headers: Any header that should be sent with the request. Like
content-type,Authorization, etc.标头:应与请求一起发送的任何标头。 如
content-type,Authorization等。Body: Request body for request types like
Post,PUT, etc.正文:请求正文,例如
Post,PUT等。- Pre-request Script: JS code to be executed before performing the request. (More about this later) 请求前脚本:执行请求之前要执行的JS代码。 (稍后对此有更多介绍)
- Tests: JS code to validate the response payload. 测试:JS代码以验证响应有效负载。
The bottom section contains all the details about the response (status, time and size). The four tabs are self explanatory, except for Tests which contains the tests result if we have any (more about this later).
底部包含有关响应的所有详细信息( status , time和size )。 这四个选项卡不言自明,“ Tests除外,其中包含测试结果(如果有的话)(稍后会对此进行更多介绍)。
授权书 (Authorization)
Postman supports all types of authorization, as we saw above. We’re going to focus on token authorization set via header. You can read more about authorization here.
如上所述,邮递员支持所有类型的授权。 我们将重点介绍通过标头设置的令牌授权。 您可以在此处阅读有关授权的更多信息。
The header format that Postman will use is:
Postman将使用的标头格式为:
Authorization: Bearer <TOKEN>
Now, we’ll go ahead and get a token we can use for our future requests. I’m testing on an in-development application of mine, but you can use any application you have lying around, or set one up quickly with Laravel as described here.
现在,我们将继续获取可用于将来请求的令牌。 我正在测试我正在开发的应用程序,但是您可以使用周围的任何应用程序,也可以按照此处所述使用Laravel快速设置一个应用程序。
Not familiar with Laravel? Try our premium course – it’s a comprehensive introduction, and you’ll get the upcoming newer version of it automatically if you grab it in its current iteration!
不熟悉Laravel? 尝试我们的高级课程 -这是一个全面的介绍,如果您在当前版本中掌握它,就会自动获得即将推出的较新版本!
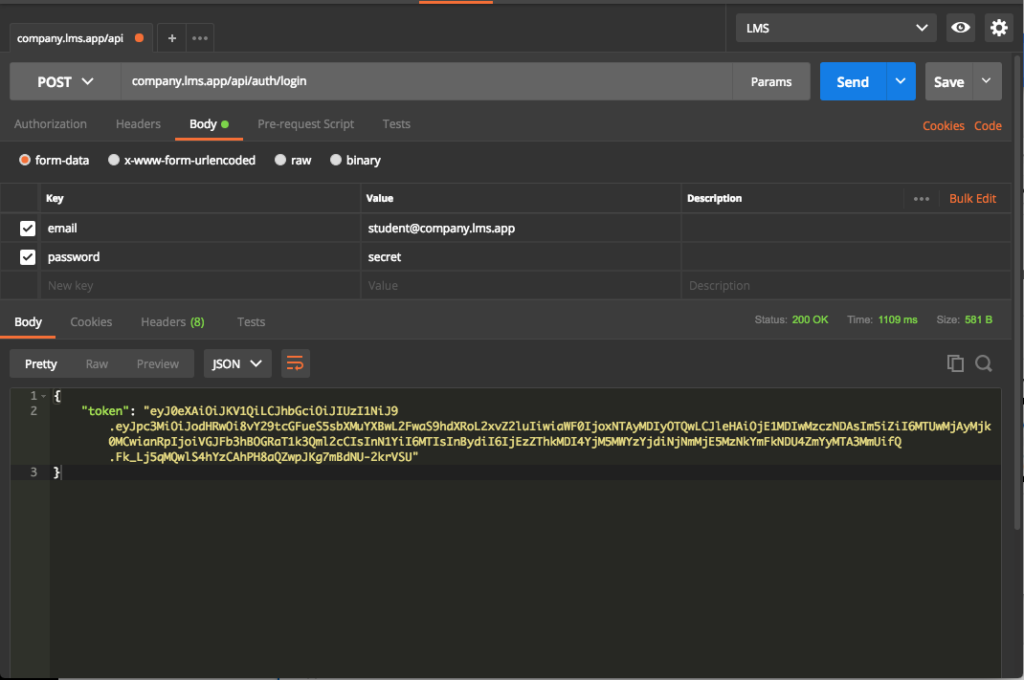
At this point, we have a token to be used for querying data from the API as an authenticated user. However, copying and pasting the token for every request is tedious!
在这一点上,我们已经有了一个令牌,该令牌可以作为经过身份验证的用户从API查询数据。 但是,为每个请求复制和粘贴令牌很繁琐!
环境变量 (Environment Variables)
This nice feature alleviates the pain of copy/paste and groups our variables in one place. An environment is an execution context: we may have a local environment, testing, staging, etc.
这个不错的功能减轻了复制/粘贴的麻烦,并将我们的变量集中在一个位置。 环境是执行上下文:我们可能具有本地环境,测试,暂存等。
Postman has different scopes for variables:
邮递员对变量有不同的范围:
- Global 全球
- Environment 环境
- Local 本地
- Data 数据
The global variables are available everywhere, separately from the selected environment. You can read more in the documentation.
全局变量随处可见,与所选环境分开。 您可以在文档中阅读更多内容 。
We need at least three variables for now:
现在至少需要三个变量:
domain: current active subdomaincompany1,company2, etc.domain:当前活动的子域company1,company2等。url: our app URL.url:我们的应用程序网址。token: Token for future authentication.token:用于将来认证的令牌。
Now we can update our login endpoint to use our new environment, but first we need to select our environment from the top right selection box.
现在,我们可以更新登录端点以使用我们的新环境,但是首先我们需要从右上方的选择框中选择我们的环境。

We can use our variables inside the URL, parameters, tests, etc. But how are we going to use our token now?
我们可以在URL,参数,测试等内部使用变量。但是,现在如何使用令牌?
Well, we have two choices. The first is to copy the token and paste it as a value for the token variable (this is what we’re trying to avoid).
好吧,我们有两个选择。 第一种是复制令牌并将其粘贴为令牌变量的值(这是我们要避免的操作)。
The second method is to set this via code executed after the request is done. This is where tests come into play, let’s find out what they are!
第二种方法是通过在请求完成后执行的代码来设置它。 这是测试起作用的地方,让我们找出它们是什么!
测试中 (Testing)
As we develop our application we need to make sure that we’re getting the proper result from the API before moving forward. Using tests, we can create different types of validation for our response. Let’s start with some basic assertions.
在开发应用程序时,我们需要确保在继续前进之前从API获得正确的结果。 使用测试,我们可以为响应创建不同类型的验证。 让我们从一些基本的断言开始。
In the login request, go to the tests tab, type the following code and send the request.
在登录请求中,转到“测试”选项卡,键入以下代码并发送请求。
tests["Successful request"] = responseCode.code === 200;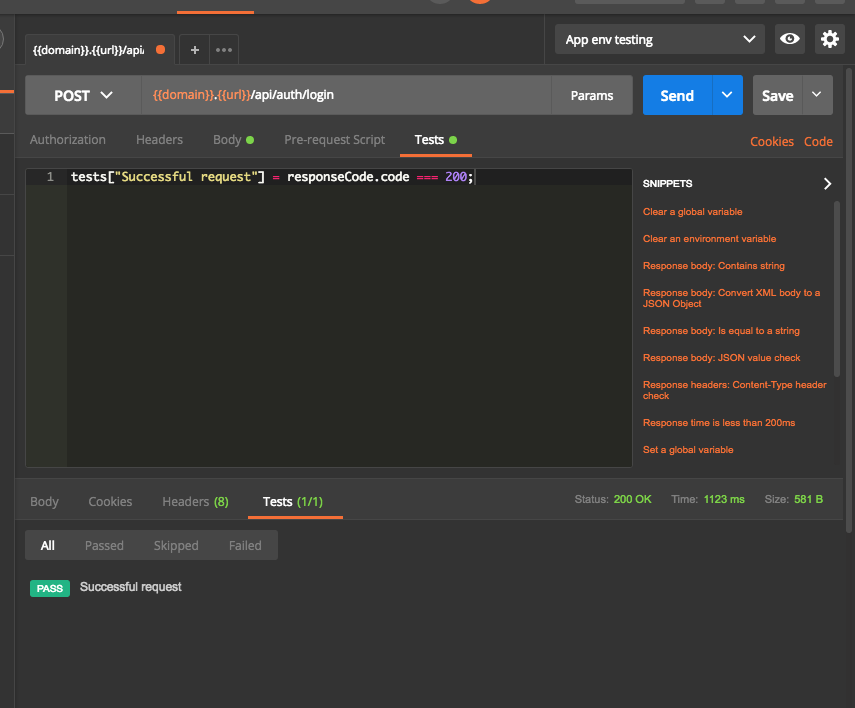
The responseCode contains the response status object, so we use it to validate that the response is a 200 OK. We also have other objects to validate the response body (responseBody), response headers (responseHeaders), response time (responseTime). You can read more about test scripts here.
responseCode包含响应状态对象,因此我们使用它来验证响应是否为200 OK 。 我们还具有其他对象来验证响应主体( responseBody ),响应标头( responseHeaders ),响应时间( responseTime )。 您可以在此处阅读有关测试脚本的更多信息。
The tests object will hold a list of boolean assertions that will be used to decide if everything is going as expected. However, we can add any JS code we want here. For example, we can get our token from the response and set it in our environment variable!
tests对象将保存一个布尔声明列表,这些列表将用于确定一切是否按预期进行。 但是,我们可以在此处添加所需的任何JS代码。 例如,我们可以从响应中获取令牌并将其设置在我们的环境变量中!
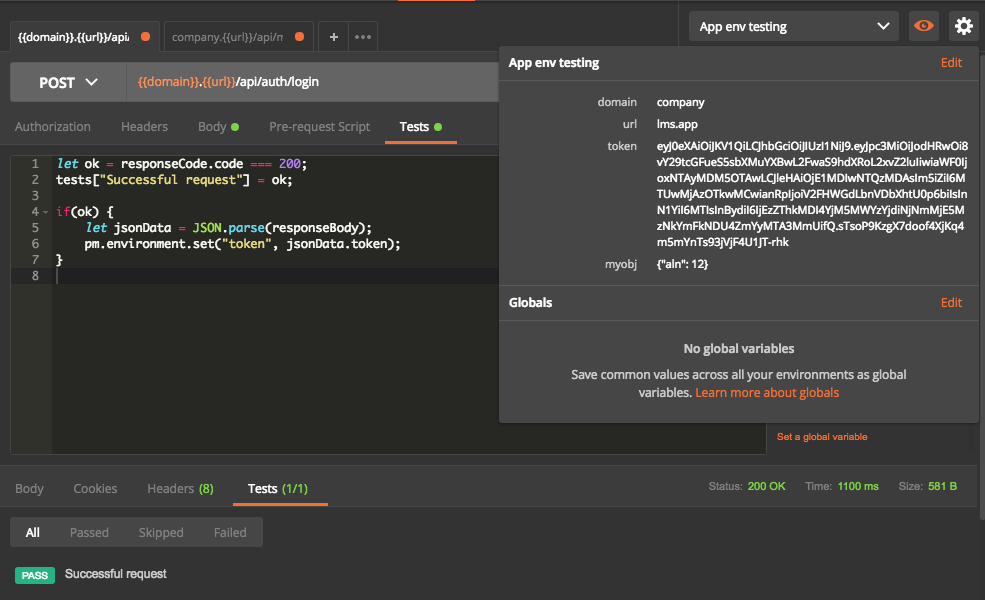
First, we test the status. Next, we parse the response body to JSON and get the token. We can see from the environment variable view that the token is set properly in our environment.
首先,我们测试状态。 接下来,我们将响应主体解析为JSON并获取令牌。 从环境变量视图中可以看到,令牌已在我们的环境中正确设置。
使用控制台 (Using the Console)
This may be obvious, but sometimes you need to play with some objects or examine the response. You can open the console using cmd+alt+C or View > Show Postman Console.
这可能很明显,但是有时您需要玩一些对象或检查响应。 您可以使用cmd+alt+C或View > Show Postman Console打开View > Show Postman Console 。
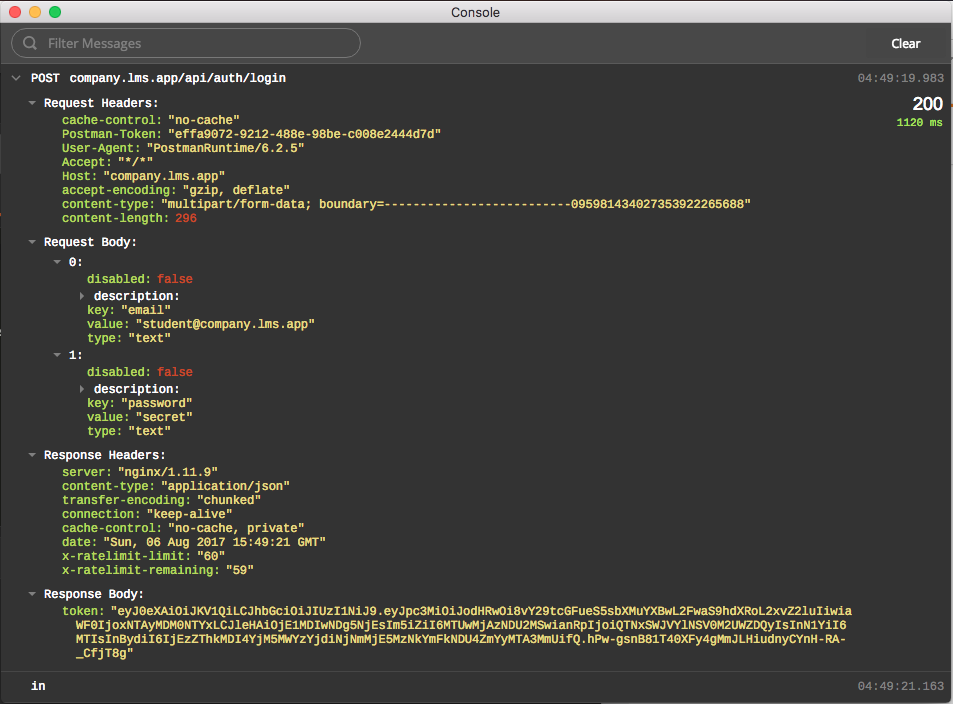
The console logs the request and response objects with extensive details that can help investigate the problem.
控制台记录请求和响应对象的详细信息,这些详细信息可以帮助调查问题。
帮助图书馆 (Help Libraries)
Validating the response and asserting things like JSON structure with attribute types validation from scratch is painful.
从头开始验证响应并使用属性类型验证断言JSON结构之类的事情很痛苦。
Postman includes a set of helpful libraries that we can use to enhance our tests. Most notably Lodash and tv4 JSON schema validator. You can check the full list here.
Postman包括一组有用的库,我们可以使用它们来增强测试。 最著名的是Lodash和tv4 JSON模式验证器 。 您可以在此处查看完整列表。
Let’s continue testing the login endpoint first, and we’ll do another complicated example to make it useful.
让我们先继续测试登录端点,然后再做一个复杂的示例以使其有用。
Since our login endpoint only returns a token value, we can test if the value is set in the response.
由于我们的登录端点仅返回令牌值,因此我们可以测试响应中是否设置了该值。
let jsonData = JSON.parse(responseBody);
let ok = responseCode.code === 200;
tests["Successful request"] = ok;
tests["Token is set"] = _.has(jsonData, "token");

if(ok) {
    pm.environment.set("token", jsonData.token);
}
A more complicated example is testing if a resource is returned, as this can quickly become a nightmare with a test like this:
一个更复杂的示例是测试是否返回了资源,因为这样的测试很快就会成为噩梦:
var data = JSON.parse(responseBody);
tests["Response OK"] = responseCode.code === 200;
tests["Data is OK"] = data.hasOwnProperty("data") && Object.isObject(data.data);

var requiredKeys = ["uuid", "student_number", "title", "first_name", "last_name", "email", "last_login_at"];

tests["Response structure is OK"] = _.every(requiredKeys, _.partial(_.has, data.data));
The above test is asserting the resource keys are present, and that the response status is OK. Imagine having to do this over and over again!
上面的测试声明资源密钥存在,并且响应状态为OK。 想象一次又一次地执行此操作!
The best solution here is using tv4 for validating schema.
最好的解决方案是使用tv4验证架构。
let courseSchema = {
"title": "Course",
"type": "object",
"properties": {
"name": {
"type": "string"
},
"code": {
"type": "string"
},
"uuid": {
"type": "string"
},
"is_active": {
"type": "boolean"
},
"is_free": {
"type": "boolean"
},
"is_enrollable": {
"type": "boolean"
},
"in_catalogue": {
"type": "boolean"
},
"price": {
"type": "integer",
"minimum": 0
},
"total_duration": {
"type": "integer",
"minimum": 0
},
"cover_image": {
"type": ["string", "null"]
},
"demo_video": {
"type": ["string", "null"]
}
}
}
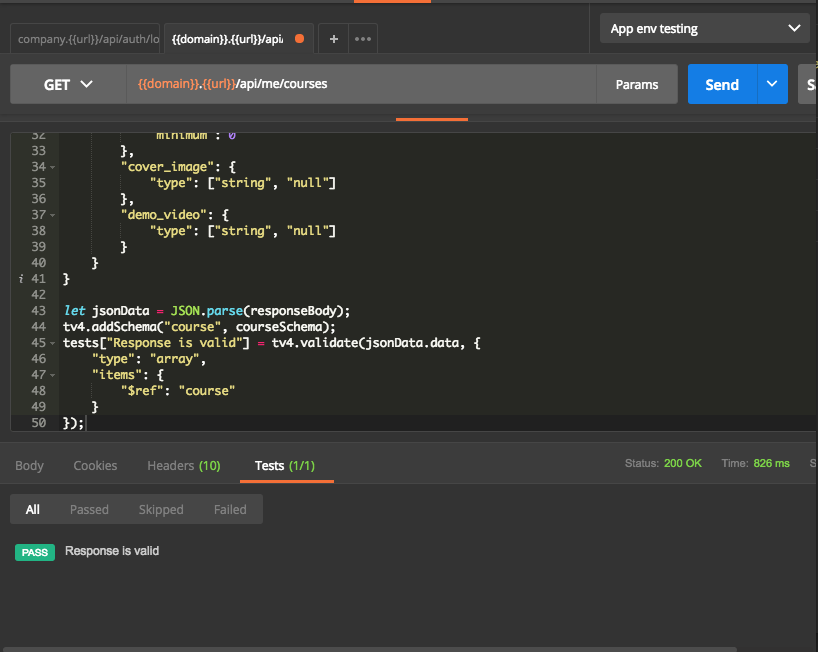
let jsonData = JSON.parse(responseBody);
tv4.addSchema("course", courseSchema);
tests["Response is valid"] = tv4.validate(jsonData.data, {
"type": "array",
"items": {
"$ref": "course"
}
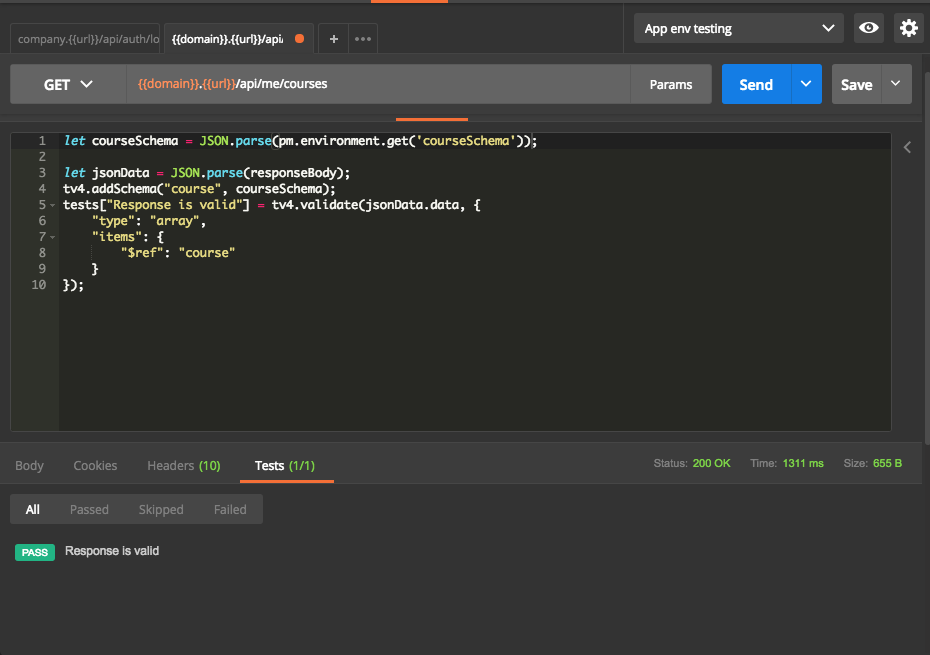
});The above code snippet is creating a schema for our course resource. Then we parse the JSON response and validate it using tv4 validator.
上面的代码段为我们的课程资源创建了一个架构。 然后,我们解析JSON响应并使用tv4验证程序对其进行验证。
You can learn more about building the JSON schema here.
您可以在此处了解有关构建JSON模式的更多信息。
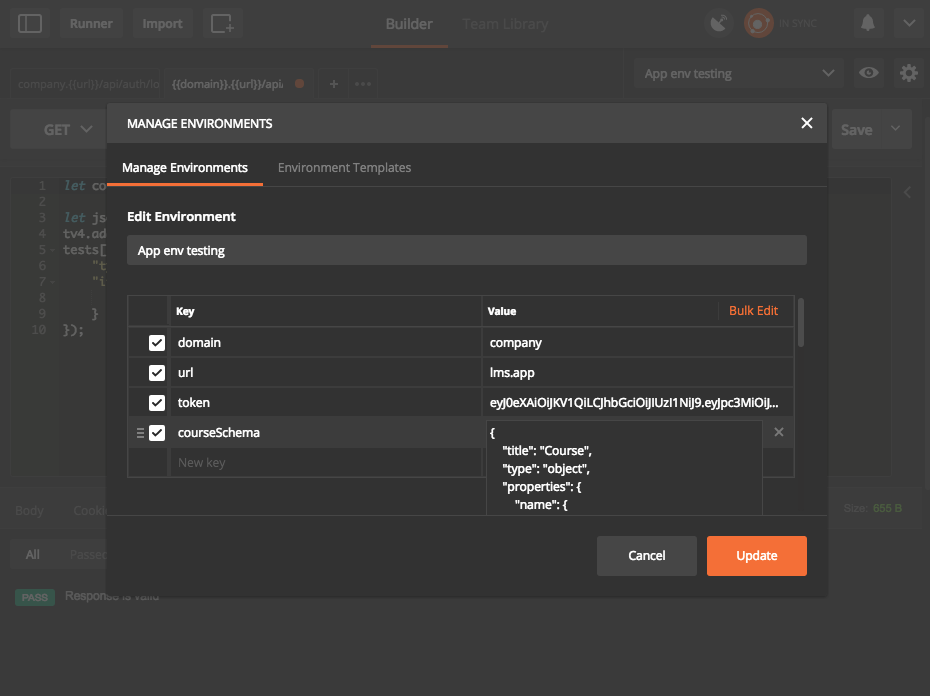
The problem with our current test is copying and pasting the schema from one test to another. To avoid this, we store our schemas inside an environment variable to be reused in other places.
当前测试的问题是将架构从一个测试复制并粘贴到另一个测试。 为了避免这种情况,我们将架构存储在环境变量中,以便在其他地方重用。
Note: It may seem strange to store things like schema inside the environment variable. But it’s totally fine, because they can store anything and are not limited to certain values.
注意 :将诸如架构之类的内容存储在环境变量中似乎有些奇怪。 但这很好,因为它们可以存储任何内容,并且不限于某些值。
Now everything seems fine. However, applications don’t have just two or three endpoints! They grow bigger easily, and will play against us in the near future if not organized properly.
现在一切似乎都很好。 但是,应用程序不只有两个或三个端点! 它们很容易成长壮大,如果组织不当,将在不久的将来与我们竞争。
馆藏 (Collections)
Collections are like folders for grouping things belonging to the same type or category. The documentation provides a good explanation for creating and managing collections, and we’ll try to do the same with examples.
集合就像文件夹,用于将属于相同类型或类别的事物分组。 该文档为创建和管理集合提供了很好的解释,我们将尝试通过示例进行同样的操作。
We can create a new collection by going to the left menu and clicking on the new folder button. When making a new request we can click on the save button and select a folder for it.
我们可以通过转到左侧菜单并单击“新文件夹”按钮来创建新集合。 发出新请求时,我们可以单击保存按钮并为其选择一个文件夹。
We can probably all agree that a simple structure is always the best, and since these can be categorized as integration tests, it’s best to make folders for features.
我们可能都同意简单的结构总是最好的,并且由于可以将它们归类为集成测试,因此最好为功能创建文件夹。
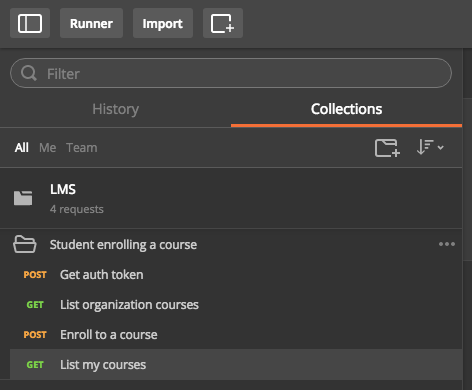
In our application, we have a list of courses for every organization, and a user can enroll to a course. They should then be able to see it in their courses list. We will create a test for this feature and put it in its own folder. But how can we run these tests in the correct order to see the expected result?
在我们的应用程序中,我们为每个组织提供了课程列表,用户可以注册课程。 然后,他们应该能够在课程列表中看到它。 我们将为此功能创建一个测试并将其放在自己的文件夹中。 但是,我们如何才能以正确的顺序运行这些测试以查看预期的结果?
测试集合 (Testing Collections)
This is a very interesting feature – it allows us to chain the execution of requests and tests to achieve a good set of integration tests. This is our chain of tests:
这是一个非常有趣的功能–它使我们可以链接请求和测试的执行,以实现一组良好的集成测试。 这是我们的测试链:
- Get auth token. 获取身份验证令牌。
- List organization courses. 列出组织课程。
- Enroll to a course. 报名课程。
- List my courses. 列出我的课程。
// Get auth token

var jsonData = JSON.parse(responseBody);

tests['Token is set'] = jsonData.hasOwnProperty('token');

pm.environment.set("token", jsonData.token);

postman.setNextRequest("List organization courses");
Notice the postman.setNextRequest method call. This is how we tell Postman to order our tests. Thus, it runs the “List organization courses” test after getting the token, and we can pass null to end the chain.
注意postman.setNextRequest方法调用。 这就是我们告诉邮递员订购测试的方式。 因此,它在获得令牌后运行“列出组织课程”测试,并且我们可以传递null以结束链。
// List organization courses

let jsonData = JSON.parse(responseBody);
let courseSchema = JSON.parse(pm.environment.get('courseSchema'));

tv4.addSchema("course", courseSchema);

tests["Response OK"] = responseCode.code === 200;
tests["Data is OK"] = jsonData.hasOwnProperty("data") && Array.isArray(jsonData.data);
tests["Response is valid"] = tv4.validate(jsonData.data, {
    "type": "array",
    "items": {
        "$ref": "course"
    }
});

pm.environment.set('courseId', jsonData.data[0].uuid);

postman.setNextRequest("Enroll to a course");
The pm.environment.set('courseId', jsonData.data[0].uuid); statement will get the first course from the list and put it in an environment variable for the enroll request.
pm.environment.set('courseId', jsonData.data[0].uuid); 语句将从列表中获取第一门课程,并将其放入用于enroll request的环境变量中。
// Enroll to a course

tests["Response OK"] = responseCode.code === 201;

postman.setNextRequest("List my courses");
// List my courses
let jsonData = JSON.parse(responseBody);
let courseSchema = JSON.parse(pm.environment.get('courseSchema'));
tv4.addSchema("course", courseSchema);
tests["Response OK"] = responseCode.code === 200;
tests["Data is OK"] = jsonData.hasOwnProperty("data") && Array.isArray(jsonData.data);
tests["Response is valid"] = tv4.validate(jsonData.data, {
"type": "array",
"items": {
"$ref": "course"
}
});
tests["Enrolled course added"] = jsonData.data[0].uuid === pm.environment.get('courseId');
postman.setNextRequest(null);We put all our tests inside folder named after our feature.
我们将所有测试放入以功能命名的文件夹中。
运行收藏 (Running the Collection)
To run our collection, we go to the left sidebar, click on the right arrow to open the menu and select run.
要运行我们的集合,我们转到左侧的边栏,单击向右箭头以打开菜单并选择运行。
We can choose to run the whole collection, or just run a folder. If something went wrong while running the tests, we can open the Postman dev console to see the logs. You can check the documentation for more details about testing collections.
我们可以选择运行整个集合,也可以只运行一个文件夹。 如果在运行测试时出现问题,我们可以打开Postman开发控制台以查看日志。 您可以查看文档以获取有关测试集合的更多详细信息。

There is also an interesting feature for running the collection with some pre-defined data. You can read more about that here.
还有一个有趣的功能,可以使用一些预定义的数据运行集合。 你可以在这里阅读更多有关它的内容。
文献资料 (Documentation)
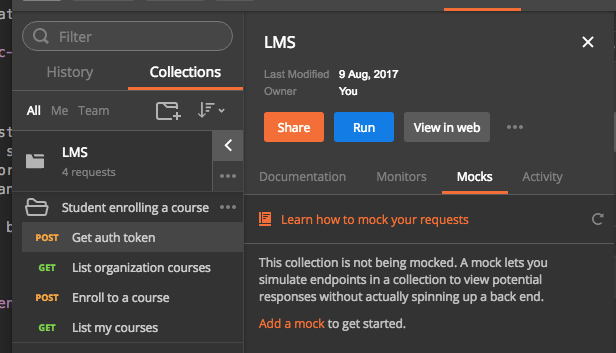
An essential part of an API is the documentation, and Postman does a great job of simplifying this process.
API的重要组成部分是文档,Postman在简化此过程方面做得很好。
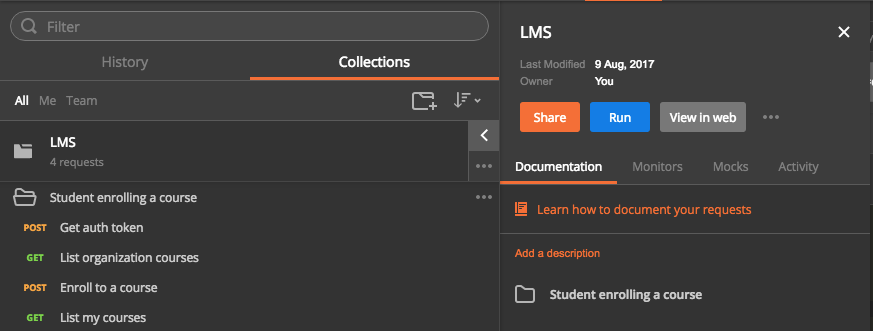
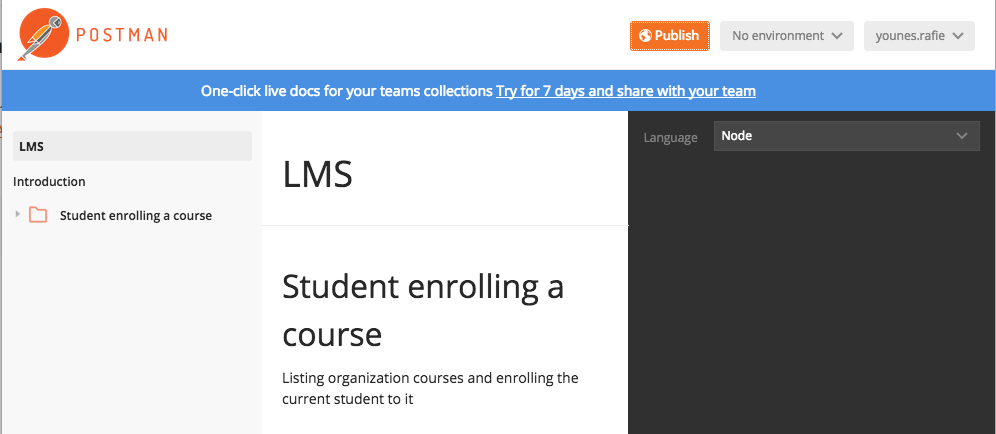
To generate our documentation we select our collection and click on view in web. This will open the documentation for our collection and requests, and we can navigate through it to see every request’s details – body parameters, headers, method, etc. You can read more about generating the documentation here.
要生成我们的文档,我们选择我们的收藏,然后单击view in web 。 这将打开我们的集合和请求的文档,我们可以在其中浏览以查看每个请求的详细信息-正文参数,标头,方法等。您可以在此处阅读有关生成文档的更多信息。
I know you’re thinking about including responses in here, and Postman developers already thought of this. They built the ability to include examples with our documentation.
我知道您正在考虑在此处包含响应,而Postman开发人员已经想到了这一点。 他们建立了在我们的文档中包含示例的功能。
使用范例 (Using Examples)
Examples are response snippets that can be included for API consumers to see what they’re getting from a request without actually having to call it.
示例包括响应片段,API使用者可以包含这些响应片段,以查看他们从请求中得到的内容,而无需实际调用它。
When we execute a request in Postman, we can click the Save response button and define headers, parameters, etc.
在Postman中执行请求时,可以单击“ Save response按钮并定义标题,参数等。
Now, we can go back and view our documentation in the web to see our examples included.
现在,我们可以返回并在网络上查看我们的文档以查看其中的示例。
发布文件 (Publishing Documentation)
Documentation is not just for us – it’s also for API consumers and they need to access it and see how different parts of the API behave. Postman has several ways to share the documentation. We can share private documentation and create teams to collaborate with if we have a pro account, but Postman also generates a sharing link that we can send to others.
文档不仅适合我们,还适用于API使用者,他们需要访问它并查看API的不同部分的行为。 邮递员有几种共享文档的方法。 如果我们有专业人士帐户 ,我们可以共享私人文档并创建团队进行协作,但是Postman还会生成一个共享链接,可以将其发送给其他人。
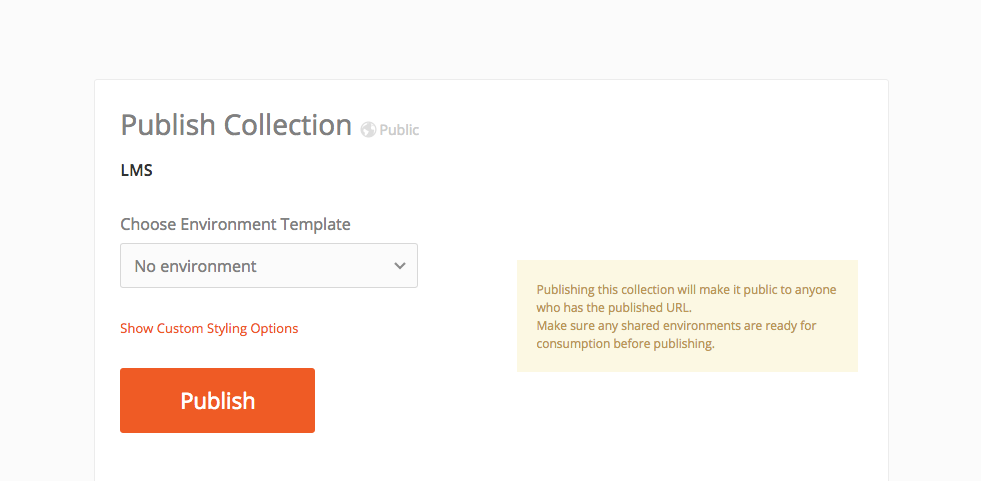
On the view doc page, we have a Publish button at the top of the page.
在查看文档页面上,我们在页面顶部有一个Publish按钮。
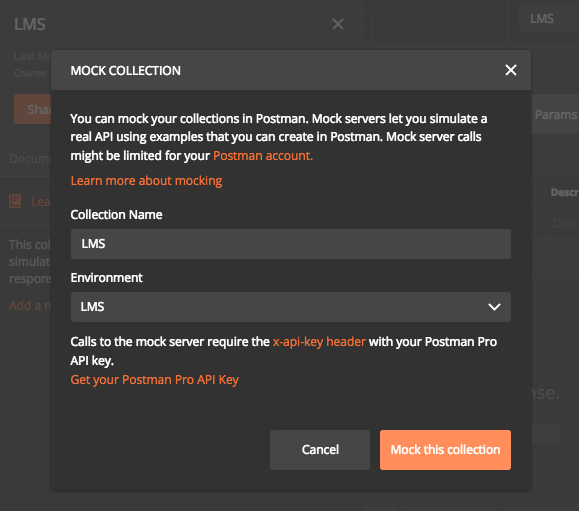
模拟 (Mocking)
Mocking is very useful when prototyping the application and deciding on the API structure. In the case of teams, after agreeing on these mocks everyone can start working on their part (backend, front-end, mobile, etc) separately and only switch environment to the new server after everything is finished.
在对应用程序进行原型设计并确定API结构时,模拟非常有用。 对于团队而言,在就这些模拟达成一致之后,每个人都可以分别开始自己的工作(后端,前端,移动等),并且只有在一切完成后才将环境切换到新服务器。
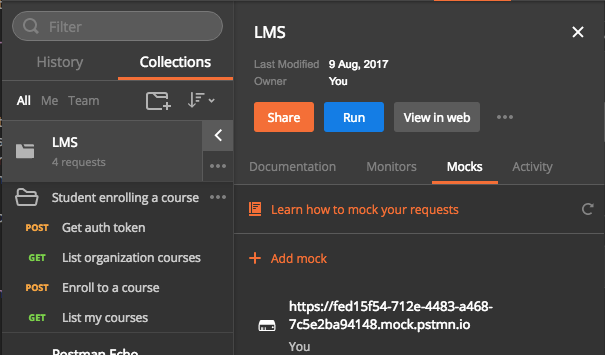
After our mock server link has been generated, we need to get our Postman API key for authentication. From the second screenshot we see a warning about getting the API key. So go ahead and click on the Get your Postman API key link and generate a new key.
生成模拟服务器链接后,我们需要获取Postman API密钥进行身份验证。 在第二张屏幕截图中,我们看到有关获取API密钥的警告 。 因此,继续并单击“ Get your Postman API key链接并生成一个新密钥。
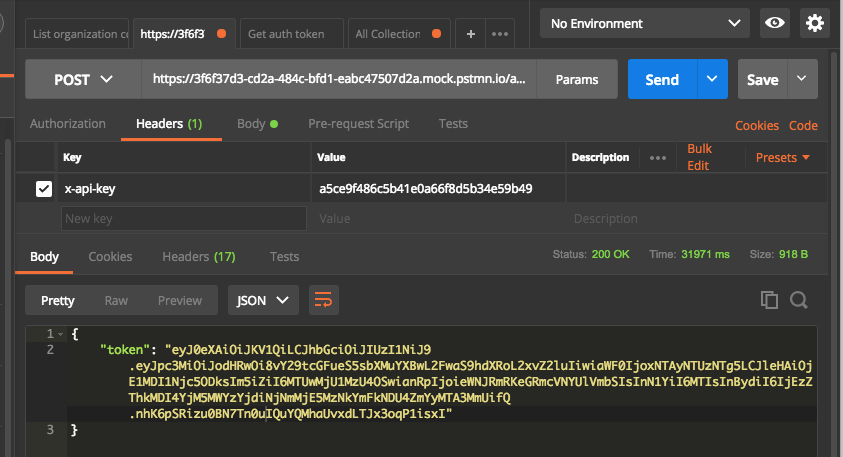
Now with the mock URL and the API key we can call our API endpoints as usual. ex: <mockUrl/api/auth/login>
现在有了模拟URL和API密钥,我们可以照常调用我们的API端点。 例如: <mockUrl/api/auth/login>
Mocking with Postman is a big topic, you can read more here and here.
与Postman嘲笑是一个大话题,您可以在这里和这里阅读更多内容。
汇出/汇入 (Exporting/Importing)
We saw earlier how to share documentation with colleges and consumers. However, an essential part of developing the API is sharing environment, collection progress, etc. Postman offers the ability to export and import almost everything.
我们之前已经了解了如何与大学和消费者共享文档。 但是,开发API的重要部分是共享环境,收集进度等。Postman提供了导出和导入几乎所有内容的功能。
If you have a Postman account, you can easily share anything with your team members. However, we can still use the export/import feature to share things while testing this tool.
如果您拥有邮递员帐户,则可以轻松地与团队成员共享任何内容。 但是,在测试此工具时,我们仍然可以使用导出/导入功能来共享内容。
馆藏 (Collections)
To export a collection, go to the collections list on left sidebar and click on collection menu and click on Export. This will bring a pop-up to select an exporting format, but v2 is the advised choice here.
要导出集合,请转到左侧栏中的集合列表,然后单击集合菜单,然后单击导出 。 这将带来一个弹出窗口来选择导出格式,但是建议在这里使用v2 。
For importing a collection, go to the top menu, click Import, and select your JSON file to be imported.
要导入集合,请转到顶部菜单,单击Import ,然后选择要导入的JSON文件。

环境环境 (Environments)
Same for collections, we can export and import our environments easily from the Manage Environments menu.
与集合相同,我们可以从“ Manage Environments菜单轻松导出和导入环境。

There’s more to sharing that we can’t cover here, like collection runs and other features you can read about in the documentation.
我们这里没有涵盖更多共享内容,例如收集运行和您可以在文档中阅读的其他功能。
有用的资源 (Useful Resources)
- https://www.getpostman.com/docs/ https://www.getpostman.com/docs/
- http://blog.getpostman.com/2017/07/28/api-testing-tips-from-a-postman-professional/ http://blog.getpostman.com/2017/07/28/api-testing-tips-from-a-postman-professional/
- https://medium.com/@codebyjeff/using-postman-environment-variables-auth-tokens-ea9c4fe9d3d7 https://medium.com/@codebyjeff/using-postman-environment-variables-auth-tokens-ea9c4fe9d3d7
结论 (Conclusion)
We learned how to integrate Postman in our API development workflow and we also explored some of the available features, but there are many more things to learn! Be sure to skim through the docs to see how this tool can help you in your API development.
我们学习了如何将Postman集成到我们的API开发工作流程中,并且还探索了一些可用的功能,但是还有很多事情要学习! 请务必浏览所有文档,以了解该工具如何帮助您进行API开发。
If you have any questions, comments or tips about Postman, be sure to post them below. Have you aver used Postman? If yes, what are the most interesting features you use most frequently?
如果您对邮递员有任何疑问,意见或提示,请务必在下面发布。 您平均使用过邮递员吗? 如果是,您最常使用的最有趣的功能是什么?
postman api使用


 1386
1386

 被折叠的 条评论
为什么被折叠?
被折叠的 条评论
为什么被折叠?
 到【灌水乐园】发言


