


Optical Character Recognition (OCR) is the process of converting printed text into a digital representation. It has all sorts of practical applications — from digitizing printed books, creating electronic records of receipts, to number-plate recognition and even circumventing image-based CAPTCHAs.
光学字符识别(OCR)是将打印的文本转换为数字表示的过程。 它具有各种各样的实际应用-从数字化印刷书籍,创建收据的电子记录到车牌识别,甚至规避基于图像的验证码。

Tesseract is an open source program for performing OCR. You can run it on *Nix systems, Mac OSX and Windows, but using a library we can utilize it in PHP applications. This tutorial is designed to show you how.
Tesseract是用于执行OCR的开源程序。 您可以在* Nix系统,Mac OSX和Windows上运行它,但是使用库,我们可以在PHP应用程序中使用它。 本教程旨在向您展示如何进行。
安装 (Installation)
制备 (Preparation)
To keep things simple and consistent, we’ll use a Virtual Machine to run the application, which we’ll provision using Vagrant. This will take care of installing PHP and Nginx, though we’ll install Tesseract separately to demonstrate the process.
为了使事情简单和一致,我们将使用虚拟机来运行应用程序,我们将使用Vagrant进行配置。 尽管我们将分别安装Tesseract来演示该过程,但这将需要安装PHP和Nginx。
If you want to install Tesseract on your own, existing Debian-based system you can skip this next part — or alternatively visit the README for installation instructions on other *nix systems, Mac OSX (hint — use MacPorts!) or Windows.
如果要在自己的,现有的基于Debian的现有系统上安装Tesseract,则可以跳过下一部分-或访问README,以获取其他* nix系统,Mac OSX(提示-使用MacPorts !)或Windows上的安装说明。
流浪汉设置 (Vagrant Setup)
To set up Vagrant so that you can follow along with the tutorial, complete the following steps. Alternatively, you can simply grab the code from Github.
要设置Vagrant,以便您可以按照本教程进行操作,请完成以下步骤。 或者,您可以简单地从Github中获取代码。
Enter the following command to download the Homestead Improved Vagrant configuration to a directory named ocr:
输入以下命令,将Homestead改良型 Vagrant配置下载到名为ocr的目录中:
git clone https://github.com/Swader/homestead_improved ocrLet’s change the Nginx configuration in Homestead.yml from:
让我们从以下位置更改Homestead.yml的Nginx配置:
sites:
    - map: homestead.app
      to: /home/vagrant/Code/Project/public
…to…
…至…
sites:
    - map: homestead.app
      to: /home/vagrant/Code/public
You’ll also need to add the following to your hosts file:
您还需要将以下内容添加到您的主机文件:
192.168.10.10 homestead.app安装Tesseract Binary (Installing the Tesseract Binary)
The next step is to install the Tesseract binary.
下一步是安装Tesseract二进制文件。
Because Homestead Improved uses a Debian-based distribution of Linux, we can use apt-get to install it after logging into the VM with vagrant ssh. It’s as simple as running the following command:
由于Homestead Improvement使用基于Debian的Linux发行版,因此我们可以在使用vagrant ssh VM之后使用apt-get来安装它。 就像运行以下命令一样简单:
sudo apt-get install tesseract-ocrAs I mentioned above, there are instructions for other operating systems in the README.
如上所述, 自述文件中有其他操作系统的说明。
测试和定制安装 (Testing and Customizing the Installation)
We’re going to be using a PHP wrapper, but before we start building around that we can test that Tesseract works using the command-line.
我们将使用PHP包装器,但是在开始构建它之前,我们可以使用命令行测试Tesseract是否正常工作。
First, right-click and save this image.
首先,右键单击并保存该图像 。
(Image courtesy of Clipart Panda)
( 图片由剪贴画熊猫提供 )
Within the VM (vagrant ssh), run the following command to “read” the image and perform the OCR process:
在VM( vagrant ssh )中,运行以下命令以“读取”映像并执行OCR过程:
tesseract sign.png outThis creates a file in the current folder named out.txt which all being well, should contain the word “CAUTION”.
这将在当前文件夹中创建一个名为out.txt文件,一切正常,应包含单词“ CAUTION”。
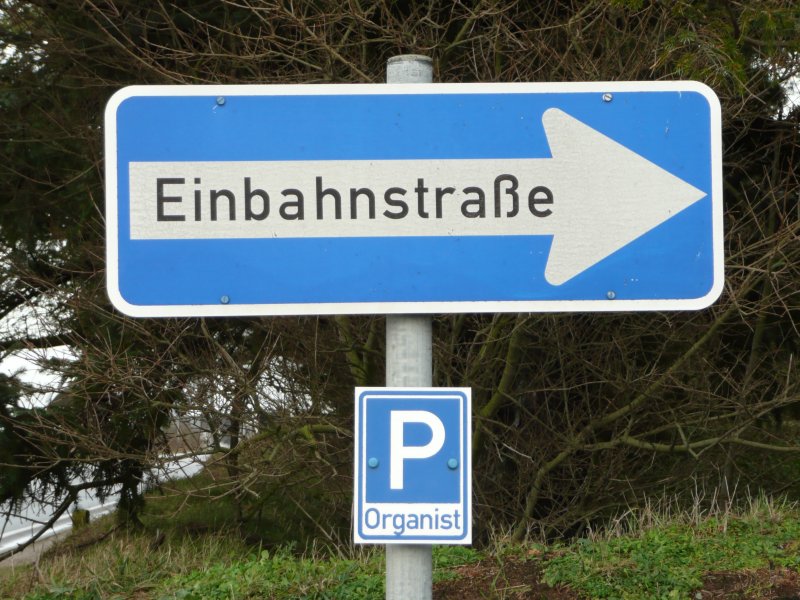
Now try with the file sign2.jpg:
现在尝试使用文件sign2.jpg :
(Image is an adapted version of this one).
( 图像是此图像的改编版本 )。
tesseract sign2.jpg outThis time, you should find that it’s produced the word “Einbahnstral’ie”. It’s close, but it’s not right — even though the text in the image is pretty crisp and clear, it failed to recognize the eszett (ß) character.
这次,您应该发现它产生了“ Einbahnstral'ie”一词。 它很接近,但不正确-即使图像中的文本非常清晰明了,也无法识别eszett(ß)字符。
In order to get Tesseract to read the string properly, we need to install some new language files — in this case, German.
为了使Tesseract正确读取字符串,我们需要安装一些新的语言文件-在这种情况下为德语。
There’s a comprehensive list of available language files here, but let’s just download the appropriate file directly:
有可用的语言文件的完整列表在这里 ,但我们直接下载相应的文件:
wget https://tesseract-ocr.googlecode.com/files/tesseract-ocr-3.02.deu.tar.gz…extract it…
…提取…
tar zxvf tesseract-ocr-3.02.deu.tar.gzThen copy the files into the following directory:
然后将文件复制到以下目录:
/usr/share/tesseract-ocr/tessdatae.g.
例如
cp deu-frak.traineddata /usr/share/tesseract-ocr/tessdata
cp deu.traineddata /usr/share/tesseract-ocr/tessdata
Now run the previous command again, but using the -l switch as follows:
现在再次运行前面的命令,但是使用-l开关,如下所示:
tesseract sign2.jpg out -l deu“deu” is the ISO 639-3 code for German.
“ deu”是德语的ISO 639-3代码 。
This time, the text should be correctly identified as “Einbahnstraße”.
这次,文本应正确标识为“Einbahnstraße”。
Feel free to add additional languages by repeating this process.
重复此过程,即可随意添加其他语言。
设置应用 (Setting up the Application)
We’re going to use this wrapper library to use Tesseract from PHP.
我们将使用该包装器库从PHP使用Tesseract。
We’re going to create a really simple web application which allows people to upload an image, and see the results of the OCR process. We’ll use the Silex microframework to implement it — although don’t worry if you’re unfamiliar with it, as the application itself will be very simple.
我们将创建一个非常简单的Web应用程序,使人们可以上传图像,并查看OCR过程的结果。 我们将使用Silex微框架来实现它-尽管您不熟悉它也不必担心,因为应用程序本身将非常简单。
Remember that all the code for this tutorial is available on Github.
请记住,本教程的所有代码都可以在Github上找到 。
The first step is to install the dependencies using Composer:
第一步是使用Composer安装依赖项:
composer require silex/silex twig/twig thiagoalessio/tesseract_ocr:dev-masterNow create the following three directories:
现在创建以下三个目录:
- public
- uploads
- views
We’ll need an upload form (views\index.twig):
我们需要一个上传表单( views\index.twig ):
<html>
  <head>
    <title>OCR</title>
  </head>
  <body>

    <form action="" method="post" enctype="multipart/form-data">
      <input type="file" name="upload">
      <input type="submit">
    </form>

  </body>
</html>
And a page for the results (views\results.twig):
和结果页面( views\results.twig ):
<html>
<head>
<title>OCR</title>
</head>
<body>
<h2>Results</h2>
<textarea cols="50" rows="10">{{ text }}</textarea>
<hr>
<a href="/">← Go back</a>
</body>
</html>Now create the skeleton Silex app (public\index.php):
现在创建骨架Silex应用程序( public\index.php ):
<?php

require __DIR__.'/../vendor/autoload.php';

use Symfony\Component\HttpFoundation\Request;

$app = new Silex\Application();

$app->register(new Silex\Provider\TwigServiceProvider(), [
  'twig.path' => __DIR__.'/../views',
]);

$app['debug'] = true;

$app->get('/', function() use ($app) {

  return $app['twig']->render('index.twig');

});

$app->post('/', function(Request $request) use ($app) {

    // TODO

});

$app->run();
If you visit the application in your browser, you should see a file upload form. If you’re following along and using Homestead Improved with Vagrant, you’ll find it at the following URL:
如果您在浏览器中访问该应用程序,则应该看到一个文件上传表格。 如果您遵循并使用带有Vagrant的Homestead改进版,则可以在以下URL上找到它:
http://homestead.app/The next step is to perform the file upload. Silex makes this really easy; the $request object contains a files component, which we can use to access any uploaded files. Here’s some code to process the uploaded file (note that this goes in the POST route):
下一步是执行文件上传。 Silex使这变得非常容易。 $request对象包含一个files组件,我们可以使用它访问任何上传的文件。 这是一些处理上传文件的代码(请注意,这是在POST路径中进行的):
// Grab the uploaded file
$file = $request->files->get('upload');

// Extract some information about the uploaded file
$info = new SplFileInfo($file->getClientOriginalName());

// Create a quasi-random filename
$filename = sprintf('%d.%s', time(), $info->getExtension());

// Copy the file
$file->move(__DIR__.'/../uploads', $filename);
As you can see, we’re generating a quasi-random filename to minimize filename conflicts — but ultimately in the context of this application, it doesn’t really matter what we call the uploaded file.
如您所见,我们正在生成一个准随机文件名以最小化文件名冲突-但是最终在此应用程序的上下文中,我们所谓的上载文件并不重要。
Once we have a copy of the file on the local filesystem, we can create an instance of the Tessearct library, passing it the path to the image we want to analyze:
在本地文件系统上拥有文件副本后,我们可以创建Tessearct库的实例,并将其路径传递给我们要分析的图像:
// Instantiate the Tessearct library
$tesseract = new TesseractOCR(__DIR__ . '/../uploads/' . $filename);
Performing OCR on the image is really straightforward. We simply call the recognize() method:
在图像上执行OCR非常简单。 我们只需调用recognize()方法:
// Perform OCR on the uploaded image
$text = $tesseract->recognize();
Finally, we can render the results page, passing it the results of the OCR:
最后,我们可以呈现结果页面,并向其传递OCR的结果:
return $app['twig']->render(
    'results.twig',
    [
        'text'  =>  $text,
    ]
);
Try it out on some images, and see how it performs. If you have trouble getting it to recognise images, you might find it useful to refer to the guide on improving quality.
在一些图像上尝试一下,看看其性能如何。 如果您无法识别图像,可以参考提高质量指南 。
一个实际的例子 (A Practical Example)
Let’s look at a more practical application of OCR technology. In this example, we’re going to attempt to find and format a telephone number embedded within an image.
让我们看一下OCR技术的更实际的应用。 在此示例中,我们将尝试查找并格式化嵌入图像中的电话号码。
Take a look at the following image, and try uploading it to your application:
请看以下图片,然后尝试将其上传到您的应用程序:

The results should look like this:
结果应如下所示:
:ii‘i
Customer Service Helplines


British Airways Helpline

09040 490 541
It hasn’t picked up the body text, which we might expect due to the poor quality of the image. It’s identified the telephone number, but there’s also some additional “noise” in there.
它没有接收到正文,由于图像质量较差,我们可能会期望它。 它可以识别电话号码,但那里也有一些“杂音”。
In order to try and extract the relevant information, there are a few things we can do.
为了尝试提取相关信息,我们可以做一些事情。
You can tell Tesseract to restrict its output to certain character ranges. So, we could tell it to only return digits using the following line:
您可以告诉Tesseract将其输出限制为某些字符范围。 因此,我们可以使用以下行告诉它仅返回数字:
$tesseract->setWhitelist(range(0,9));There’s a problem with this, however. Rather than ignore non-numeric characters, it usually interprets letters as digits instead. For example, the name “Bob” could be interpreted as the number “808”.
但是,这有一个问题。 通常不会将字母解释为数字,而不是忽略非数字字符。 例如,名称“鲍勃”可以解释为数字“ 808”。
Instead, let’s use a two-stage process:
相反,让我们使用两个阶段的过程:
Attempt to extract strings of numbers, which might be telephone numbers
尝试提取数字字符串, 可能是电话号码
- Use a library to validate each candidate in turn, stopping once we find a valid telephone number 使用图书馆依次验证每个候选人,一旦找到有效的电话号码就停止
For the first part, we can use a rudimentary regular expression. To try and determine whether a string of numbers is a valid telephone number, we can use Google’s libphonenumber.
对于第一部分,我们可以使用基本的正则表达式。 要尝试确定一串数字是否是有效的电话号码,我们可以使用Google的libphonenumber 。
Note: I’ve written about libphonenumber here on Sitepoint as part of an article entitled Working with Phone Numbers in JavaScript.
注意 :我在Sitepoint上写过关于libphonenumber的文章,作为题为使用JavaScript中的电话号码的文章的一部分。
Let’s add a PHP port of the libphonenumber library to our composer.json file:
让我们将libphonenumber库的PHP端口添加到我们的composer.json文件中:
"giggsey/libphonenumber-for-php": "~7.0"Don’t forget to update:
别忘了更新:
composer updateNow we can write a function which takes a string, and tries to extract a valid telephone number from it:
现在我们可以编写一个函数,该函数需要一个字符串,并尝试从中提取一个有效的电话号码:
/**
 * Parse a string, trying to find a valid telephone number. As soon as it finds a
 * valid number, it'll return it in E1624 format. If it can't find any, it'll
 * simply return NULL.
 *
 * @param  string   $text           The string to parse
 * @param  string   $country_code   The two digit country code to use as a "hint"
 * @return string | NULL
 */
function findPhoneNumber($text, $country_code = 'GB') {

  // Get an instance of Google's libphonenumber
  $phoneUtil = \libphonenumber\PhoneNumberUtil::getInstance();

  // Use a simple regular expression to try and find candidate phone numbers
  preg_match_all('/(\+\d+)?\s*(\(\d+\))?([\s-]?\d+)+/', $text, $matches);

  // Iterate through the matches
  foreach ($matches as $match) {

    foreach ($match as $value) {

      try {

        // Attempt to parse the number
        $number = $phoneUtil->parse(trim($value), $country_code);

        // Just because we parsed it successfully, doesn't make it vald - so check it
        if ($phoneUtil->isValidNumber($number)) {

          // We've found a telephone number. Format using E.164, and exit
          return $phoneUtil->format($number, \libphonenumber\PhoneNumberFormat::E164);

        }

      } catch (\libphonenumber\NumberParseException $e) {

        // Ignore silently; getting here simply means we found something that isn't a phone number

      }

    }
  }

  return null;

}
Hopefully the comments will explain what the function is doing. Note that if the library fails to parse a string of numbers as a telephone number it’ll throw an exception. This isn’t a problem as such; we simply ignore it and continue onto the next candidate.
希望这些注释可以解释该功能的作用。 请注意,如果库未能将数字字符串解析为电话号码,则会引发异常。 这样不是问题。 我们只是忽略它,然后继续寻找下一个候选人。
If we find a telephone number, we’re returning it in E.164 format. This provides an internationally recognised version of a number, which we could then use for placing a call or sending an SMS.
如果找到电话号码, 则以E.164格式返回。 这提供了国际认可的号码版本,然后我们可以将其用于拨打电话或发送短信。
Now we can use it as follows:
现在我们可以如下使用它:
$text = $tesseract->recognize();

$number = findPhoneNumber($text, 'GB');
We need to provide libphonenumber with a “hint” as to the country a telephone number is based. You may wish to change this for your own country.
我们需要为libphonenumber提供有关电话号码所在国家/地区的“提示”。 您可能希望针对自己的国家/地区更改此设置。
We could wrap all of this up in a new route:
我们可以将所有这些打包成一条新路径:
$app->post('/identify-telephone-number', function(Request $request) use ($app) {

  // Grab the uploaded file
  $file = $request->files->get('upload');

  // Extract some information about the uploaded file
  $info = new SplFileInfo($file->getClientOriginalName());

  // Create a quasi-random filename
  $filename = sprintf('%d.%s', time(), $info->getExtension());

  // Copy the file
  $file->move(__DIR__.'/../uploads', $filename);

  // Instantiate the Tessearct library
  $tesseract = new TesseractOCR(__DIR__ . '/../uploads/' . $filename);

  // Perform OCR on the uploaded image
  $text = $tesseract->recognize();

  $number = findPhoneNumber($text, 'GB');

  return $app->json(
    [
      'number'     =>  $number,
    ]
  );

});
We now have the basis of a simple API — hence the JSON response — which we could use, for example, as the back-end of a simple mobile app for adding contacts or placing calls from a printed telephone number.
现在,我们有了一个简单的API(即JSON响应)的基础,例如,我们可以将其用作简单的移动应用程序的后端,以添加联系人或通过打印的电话号码拨打电话。
摘要 (Summary)
OCR has many applications — and it’s easier to integrate into your applications than you may have anticipated. In this article, we’ve installed an open-source OCR package; and, using a wrapper library, integrated it into a very simple PHP application. We’ve only really touched the surface of what’s possible, but hopefully this has given you some ideas as to how you might use this technology in your own applications.
OCR有许多应用程序-与您预期的相比,它更容易集成到您的应用程序中。 在本文中,我们安装了一个开源OCR包; 然后使用包装器库将其集成到一个非常简单PHP应用程序中。 我们只是真正触及到了可能的表面,但是希望这为您提供了一些有关如何在自己的应用程序中使用该技术的想法。
翻译自: https://www.sitepoint.com/ocr-in-php-read-text-from-images-with-tesseract/


 462
462

 被折叠的 条评论
为什么被折叠?
被折叠的 条评论
为什么被折叠?
 到【灌水乐园】发言


