paypal沙盒用户
Curiosity is one of the most important traits in our job. The other day, I found myself exploring PayPal documentation to find something interesting to learn (and share). After a while I stumbled upon the Log In with PayPal tool.
好奇心是我们工作中最重要的特征之一。 前几天,我发现自己正在探索PayPal文档,以查找一些有趣的知识(并分享)。 一段时间后,我偶然发现了使用PayPal登录工具 。
With the “Log In with PayPal” tool, your users can authenticate into your application using PayPal. It’s the same procedure we already know for Facebook, or maybe Twitter and GitHub.
使用“使用PayPal登录”工具,您的用户可以使用PayPal对您的应用程序进行身份验证。 这是我们对于Facebook或Twitter和GitHub已经知道的相同过程。
Using this type of authentication is recommended if you want to integrate it with an e-commerce website, but you can use it in every situation and application that requires a user account or membership.
如果要将其与电子商务网站集成,建议使用这种身份验证,但是可以在需要用户帐户或成员身份的每种情况和应用程序中使用它。
为什么要使用“使用PayPal登录”? (Why use ‘Log In with PayPal’?)
One of the most important reasons to use it is simplicity. Your user will not need to remember another set of credentials – the same advantage OAuth via FB, Twitter, etc have. Also, the login procedure is absolutely secured: fewer concerns for you. However, it’s not just an email and a password.
使用它的最重要原因之一是简单性 。 您的用户将无需记住另一组凭据-通过FB,Twitter等获得OAuth的相同优势。 此外,登录过程绝对安全:您的顾虑更少。 但是,不仅是电子邮件和密码。
When you create a PayPal account there is a lot of information that you specify. This info, using the APIs, can also be used in your application in many useful ways. One of the best examples I can give is the e-commerce one: why bother your user with asking him for a shipping address if you already know it? He already told PayPal where he lives! In terms of user experience, a simple button is way better than filling a form with many fields… and when it comes to shipping there are at least three or four of them.
创建贝宝帐户时,需要指定许多信息。 使用API的此信息也可以通过许多有用的方式在您的应用程序中使用。 我可以举的最好的例子之一就是电子商务:为什么您已经知道了送货地址,就打扰您的用户呢? 他已经告诉贝宝他住的地方! 就用户体验而言,简单的按钮比在多个字段中填写表格要好得多……而在运输方面,至少有三个或四个。
Another great feature is that we are talking about a standard, because the Log In with PayPal tool is based on OpenID Connect which uses OpenID 2.0 and OAuth 2.0 open standards.
另一个很棒的功能是我们正在谈论一种标准,因为“使用PayPal登录”工具基于使用OpenID 2.0和OAuth 2.0开放标准的OpenID Connect。
Using the PayPal tool also opens many new points of view for the merchant/applications. If you think about it, PayPal actually has more than 100 milions users. You are potentially expanding your user base. Everything also comes with a real time update of user data: if your user changes something about himself on PayPal, your application will “know it” immediately.
使用PayPal工具还为商家/应用程序打开了许多新的视角。 如果您考虑一下,PayPal实际上拥有超过1亿用户。 您可能正在扩展用户群。 一切还附带了用户数据的实时更新:如果您的用户在PayPal上更改了有关他自己的某些内容,您的应用程序将立即“知道”。
I presume that you now have really good reasons to start thinking about it. Let’s see how to implement this solution in a sample application.
我认为您现在有充分的理由开始考虑它。 让我们看看如何在示例应用程序中实现此解决方案。
它是如何工作的? (How does it work?)
Before diving into the implementation procedure, it’s going to be a good thing if you can understand the mechanism under the hood. Like we mentioned before, the Log In with PayPal tool is based on Open ID Connect. In the picture below, you can find all the information about the entire procedure in every single moment.
在深入了解实现过程之前,如果您可以了解其内在机制,那将是一件好事。 就像我们之前提到的,使用PayPal登录工具基于Open ID Connect。 在下面的图片中,您可以随时找到有关整个过程的所有信息。
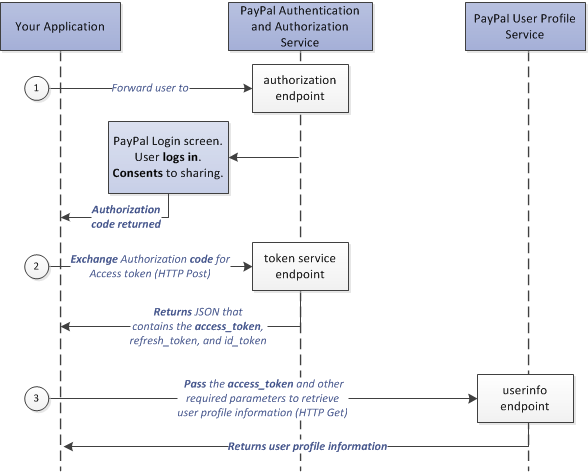
Everything starts with the application that we are developing: it could be the e-commerce we used before as an example. The Log In with PayPal button redirects the user to the PayPal Authentication and Authorization Service. After giving credentials, the user has to agree to share his data with our application. He will be informed of every single datum that he’s going to share with us. If everything goes fine, PayPal gives to the application an authorization code.
一切都始于我们正在开发的应用程序:这可能是我们之前作为示例使用的电子商务。 使用PayPal登录按钮将用户重定向到PayPal身份验证和授权服务。 提供凭据后,用户必须同意与我们的应用程序共享其数据。 他将被告知将要与我们共享的每个数据。 如果一切顺利,贝宝(PayPal)向应用程序提供授权码。
The next step is a communication between the merchant (the application) and the PayPal token service endpoint. The first gives to the second the authorization code, in order to receive the access token and the refresh token.
下一步是商家(应用程序)和PayPal令牌服务端点之间的通信。 第一个给第二个授权码,以便接收访问令牌和刷新令牌 。
Using the access token the application can query the PayPal User Profile Service, getting everything it needs about user data. The signup (or login) procedure can be finished in a matter of seconds.
应用程序可以使用访问令牌查询PayPal用户配置文件服务,获取有关用户数据的所有信息。 注册(或登录)过程可以在几秒钟内完成。
Now that things are more clear than before, we can proceed with the real implementation. Let’s get our hands dirty!
现在,事情已经比以前更清楚了,我们可以继续进行实际的实现了。 让我们弄脏双手吧!
创建贝宝应用程序 (Creating a PayPal application)
First of all, we have to create a PayPal application in order to obtain the Client ID and the Client Secret. We will use them for every single call to the API methods. They will be our credentials for the API services.
首先,我们必须创建一个PayPal应用程序以获得客户ID和客户密钥 。 我们将在每次调用API方法时使用它们。 它们将成为我们提供API服务的凭据。
Go to the developer dashboard at https://developer.paypal.com/. From there, click on “Dashboard”, then on “Applications”. Click on “My apps” to access the list of the PayPal applications.
转到位于https://developer.paypal.com/的开发人员仪表板。 从那里,单击“仪表板”,然后单击“应用程序”。 单击“我的应用程序”以访问PayPal应用程序列表。
If it’s your first time here, you will probably see something like this.
如果这是您第一次来,您可能会看到类似这样的内容。
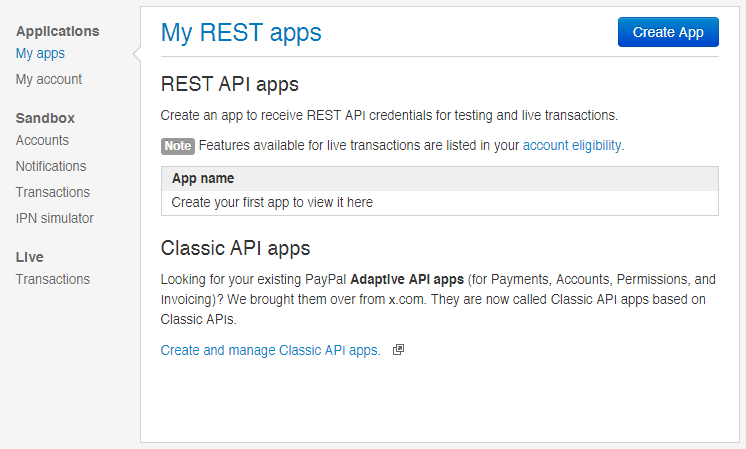
Select “Create App”. You will be asked for a name for the application and a sandbox user as a reference.
选择“创建应用”。 系统将要求您提供应用程序的名称和沙箱用户作为参考。
Note: if this is your first time working with PayPal, you are probably curious about the Sandbox. As the name suggests, the Sandbox is a testing service that PayPal gives you to try your code without any consequences in the real world. It gives you the possibility to create fake users (both merchants and customers) to recreate entire workflows with fake users, to ensure that your code will work as you expect it to. The only difference between the Sandbox and the real life production code will be the endpoint that you will use. However, it will not be something difficult to change: just remove the sandbox prefix from the endpoint. If you need more information take a look at the docs: https://developer.paypal.com/docs/classic/lifecycle/sb_overview/.
注意:如果这是您第一次使用PayPal,则可能对Sandbox感到好奇。 顾名思义,Sandbox是一项测试服务,PayPal为您提供了在不影响现实世界的情况下尝试代码的功能。 它使您可以创建伪造的用户(包括商家和客户),用伪造的用户重新创建整个工作流程,以确保您的代码能够按预期工作。 沙盒和实际生产代码之间的唯一区别是您将使用的端点。 但是,更改并不难:只需从端点中删除沙箱前缀即可。 如果您需要更多信息,请查看以下文档: https : //developer.paypal.com/docs/classic/lifecycle/sb_overview/ 。
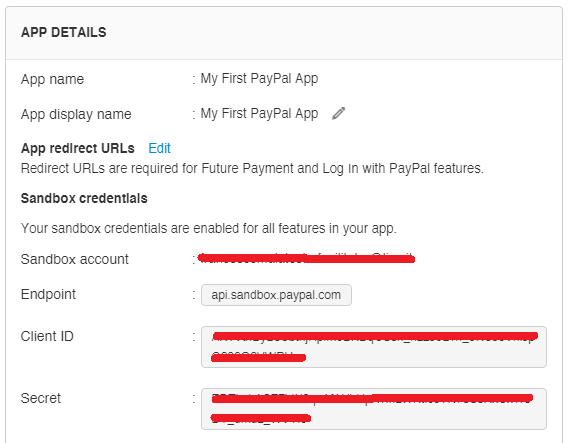
After giving the OK for the application creation, you will immediately see the Client ID and the Client Secret.
确定创建应用程序后,您将立即看到客户端ID和客户端密钥。
Note: don’t forget to set the return page URL here. It is the page where PayPal will redirect the user after the authentication step and it’s where you will have to deal with tokens and data. Click on “Edit” near “App redirect URLs”. You will be able to specify two different URLs: one for testing, one for production. In my case it is going to be something like http://myapp.ext/return.php.
注意:不要忘记在此处设置返回页面URL。 在此页面上,贝宝(PayPal)将在身份验证步骤之后重定向用户,并且您必须在该页面上处理令牌和数据。 点击“应用重定向网址”附近的“编辑”。 您将能够指定两个不同的URL:一个用于测试,一个用于生产。 就我而言,它将类似于http://myapp.ext/return.php 。
Let’s scroll down the page and search for the “App Capabilities” section. This is where we will find the “Log In with PayPal” subsection. Click on “Advanced Options” to customize what data you will really need from your customer and other little things.
让我们向下滚动页面并搜索“ App Capabilities”部分。 在这里,我们将找到“使用PayPal登录”小节。 单击“高级选项”以自定义客户和其他一些小东西您真正需要的数据。
Here’s a complete overview of what you are going to find there:
这是您将在此处找到的内容的完整概述:
- Choose what information we will need from the user: personal data, address data (physical one) and other data, related to the account type; 选择我们需要从用户那里得到的信息:个人数据,地址数据(实体数据)和其他与帐户类型有关的数据;
- Specify links to the privacy policy and the user agreement: in every real world situation we will need them; 指定指向隐私政策和用户协议的链接:在每种现实情况下,我们都将需要它们;
- Additional permissions: other choices about many aspects of the integration. However, nothing that we need now; 附加权限:关于集成许多方面的其他选择。 但是,我们现在不需要任何东西。
Let’s click on “Save” to confirm our choices.
让我们单击“保存”以确认我们的选择。
Our job is done here. Now we have our first PayPal application and we can use it to create our first example project.
我们的工作在这里完成。 现在,我们有了第一个PayPal应用程序,我们可以使用它来创建第一个示例项目。
测试项目:简单集成 (The test project: a simple integration)
In order to stay focused on the integration workflow I decided to make a little test application. Nothing complex: we will just simulate the login procedure on a site that requires authentication. That access will be made by logging in with PayPal. To be more accurate, here’s the complete flow that we are going to follow.
为了专注于集成工作流程,我决定制作一些测试应用程序。 没什么复杂的:我们将只在需要身份验证的站点上模拟登录过程。 该访问将通过使用PayPal登录进行。 为了更准确,这是我们要遵循的完整流程。
- The user arrives on the application page; 用户到达应用程序页面;
- I’m requesting access via PayPal to the user (with the button); 我请求通过PayPal访问该用户(使用按钮);
- The application opens a window with the guided PayPal procedure; 该应用程序将打开一个带有指导的PayPal程序的窗口;
- The user inserts his credentials and gives the requested permissions; 用户插入其凭据并提供所请求的权限;
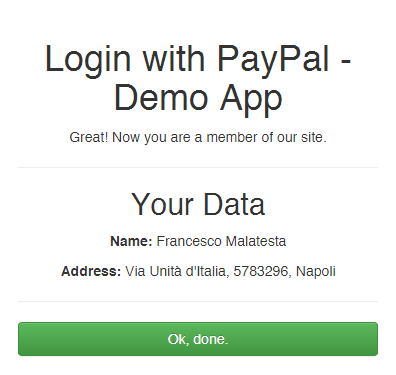
- The user is redirected to a “result page” where he will be able to see his PayPal account data. It is going to be our “confirmation” to understand that our integration worked well; 用户将被重定向到“结果页面”,在那里他将能够看到他的PayPal帐户数据。 了解我们的整合运作良好将是我们的“确认”。
So, this is going to be our final confirmation screen.
因此,这将是我们的最终确认屏幕。
Are you ready? Let’s do it.
你准备好了吗? 我们开始做吧。
配置和安装 (Configuration and Installation)
Even if it is a very small application, I will use the Httpful library in order to make calls to the PayPal API. I like it because it is:
即使它是一个很小的应用程序,我也将使用Httpful库来调用PayPal API。 我喜欢它,因为它是:
- light; 光;
- easy to install (via Composer); 易于安装(通过Composer);
- easy to understand (thanks to an intuitive syntax); 易于理解(由于直观的语法);
So, let’s create a folder for our project, and save a new composer.json file in it, in which we will write:
因此,让我们为项目创建一个文件夹,并在其中保存一个新的composer.json文件,在其中我们将编写:
{
"require": {
"nategood/httpful": "*"
}
}
Just a composer update and we’re done.
只是composer update ,我们就完成了。
After that, create two files: the first one, index.php, will work as a landing page for our example. The second one, result.php is going to receive the authorization code from PayPal and will work with API calls and the resulting data.
之后,创建两个文件:第一个文件index.php将作为示例的登录页面。 第二个result.php是result.php将从PayPal接收授权代码,并将与API调用和结果数据一起使用。
Open the index.php file and, at the same time, go with your browser at https://developer.paypal.com/webapps/developer/docs/integration/direct/identity/button-js-builder/. From here, you will be able to generate dynamically the code for our “Log In with PayPal” button. After generating it, just copy the code and paste it on the index.php page.
打开index.php文件,同时使用浏览器访问https://developer.paypal.com/webapps/developer/docs/integration/direct/identity/button-js-builder/ 。 从这里,您将能够为我们的“使用PayPal登录”按钮动态生成代码。 生成代码后,只需复制代码并将其粘贴到index.php页面上。
Here’s the generator page:
这是生成器页面:
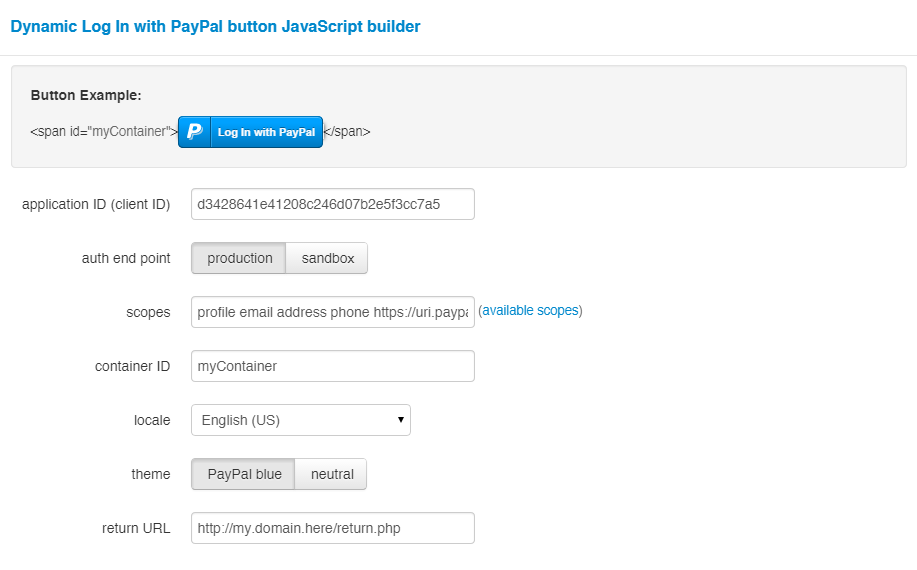
There are not many things to decide about. The first thing that we have to specify is going to be the Client ID that we want to use. Right after you can specify the endpoint you want to use: live production or sandbox (for testing)? Then, you can choose other little things about localization and customization in terms of “aesthetics”.
没有太多要决定的事情。 我们必须指定的第一件事是要使用的客户端ID。 在您可以立即指定要使用的端点之后:实时生产或沙箱(用于测试)? 然后,您可以根据“美学”选择其他有关本地化和自定义的小知识。
You will also have to fill the “return URL” again. Yes, use the same URL as before.
您还必须再次填写“返回URL”。 是的,使用与以前相同的URL。
When you’re done, getting the generated code is really easy: just scroll down the page, you will find it there.
完成后,获取生成的代码非常简单:只需向下滚动页面,即可在其中找到它。
index.php文件 (The index.php file)
The index file now looks like this:
索引文件现在看起来像这样:
<!DOCTYPE html>
<html>
<head>
<!-- Latest compiled and minified CSS -->
<link rel="stylesheet" href="https://maxcdn.bootstrapcdn.com/bootstrap/3.2.0/css/bootstrap.min.css">

<!-- Optional theme -->
<link rel="stylesheet" href="https://maxcdn.bootstrapcdn.com/bootstrap/3.2.0/css/bootstrap-theme.min.css">

<!-- Latest compiled and minified JavaScript -->
<script src="https://maxcdn.bootstrapcdn.com/bootstrap/3.2.0/js/bootstrap.min.js"></script>

<title>Login with PayPal - Demo App</title>

<style type="text/css">
body {
text-align: center;
}
</style>
</head>
<body>
<h1>Login with PayPal - Demo App</h1>
<p>Welcome! No boring signup here. Just use the following button to login.</p>

<hr/>

<p><span id="myContainer"></span></p>

<script src="https://www.paypalobjects.com/js/external/api.js"></script>
<script>
paypal.use( ["login"], function(login) {
login.render ({
"appid": "my-application-client-id",
"authend": "sandbox",
"scopes": "profile email address phone https://uri.paypal.com/services/paypalattributes",
"containerid": "myContainer",
"locale": "en-us",
"returnurl": "http://sandbox.hellofrancesco.com/paypal_test/return.php"
});
});
</script>
</body>
</html>
In this specific case, as you can see from the code, I created a button for the sandbox. However, there is nothing else you can’t understand: as I often do, I used Bootstrap via CDN to give a basic style to the page. Now, save and run the page: we can already verify that the button works great! Here’s what we will find clicking on it.
在这种特定情况下,如您从代码中看到的,我为沙箱创建了一个按钮。 但是,您没有什么其他您无法理解的:我经常通过CDN使用Bootstrap为页面提供基本样式。 现在,保存并运行页面:我们已经可以验证该按钮是否正常工作! 这是我们将其单击的内容。
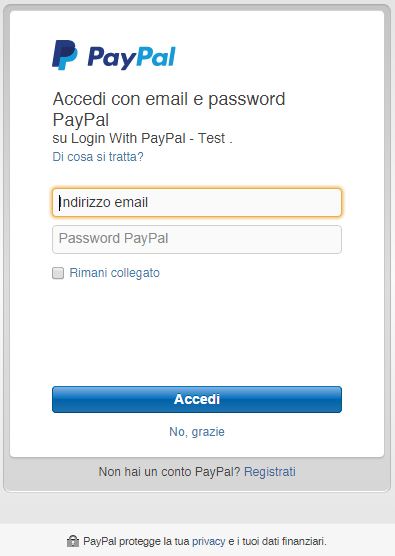
Note: don’t worry if you don’t understand what you read. I’m italian and I use PayPal in my language, actually.
注意:如果您不了解所读内容,请不要担心。 我是意大利人,实际上我使用的是PayPal。
We have to implement the login after the access in the result.php file, now.
现在,我们必须在result.php文件中访问后实现登录。
result.php文件 (The result.php file)
Open result.php and give it this content:
打开result.php并提供以下内容:
<?php require('paypal_login.inc.php') ?>

<!DOCTYPE html>
<html>
<head>
<!-- Latest compiled and minified CSS -->
<link rel="stylesheet" href="https://maxcdn.bootstrapcdn.com/bootstrap/3.2.0/css/bootstrap.min.css">

<!-- Optional theme -->
<link rel="stylesheet" href="https://maxcdn.bootstrapcdn.com/bootstrap/3.2.0/css/bootstrap-theme.min.css">

<!-- Latest compiled and minified JavaScript -->
<script src="https://maxcdn.bootstrapcdn.com/bootstrap/3.2.0/js/bootstrap.min.js"></script>

<title>Login with PayPal - Demo App</title>

<style type="text/css">
body {
text-align: center;
padding:20px;
}
</style>
</head>
<body>
<h1>Login with PayPal - Demo App</h1>
<p>Great! Now you are a member of our site.</p>

<hr/>

<h2>Your Data</h2>
<p><b>Name:</b> <?php echo htmlspecialchars_decode($user->given_name . ' ' . $user->family_name); ?></p>
<p><b>Address:</b> <?php echo htmlspecialchars_decode($user->address->street_address . ', ' . $user->address->locality); ?></p>

<hr/>

<p><button class="btn btn-success form-control" type="button" onclick="window.close()">Ok, done.</button></p>
</body>
</html>
It is a simple screen with user data. We are using the $user object where all user information is stored. You will also notice that at the beginning of the file there is the inclusion of a paypal_login.inc.php file.
这是一个包含用户数据的简单屏幕。 我们正在使用$user对象存储所有用户信息。 您还将注意到,在文件的开头,包含了paypal_login.inc.php文件。
Create this new file now:
立即创建此新文件:
<?php
// helper package autoload.
require('vendor/autoload.php');

// setting some variables here.
$clientId = 'your-client-id';
$clientSecret = 'your-client-secret';
$requestData = '?grant_type=authorization_code&code='.$_GET['code'].'&return_url=http://sandbox.hellofrancesco.com/paypal_test/return.php';

// here we exchange the authorization code with access and refresh tokens.
$response = \Httpful\Request::get('https://api.sandbox.paypal.com/v1/identity/openidconnect/tokenservice' . $requestData)
->authenticateWith($clientId, $clientSecret)
->send();

$jsonResponse = json_decode($response->raw_body);

// checking out for errors.
if(isset($jsonResponse->error))
{
die('Error: just got some problems during operations. Try again.');
}

// getting user data, using the Identity APIs.
$response = \Httpful\Request::get('https://api.sandbox.paypal.com/v1/identity/openidconnect/userinfo/?schema=openid')
->contentType("application/json")
->authorization($jsonResponse->access_token)
->authenticateWith($clientId, $clientSecret)
->send();

// user data is here!
$user = json_decode($response->raw_body);
In the first section you can see the Composer autoload.php and some variable settings:
在第一部分中,您可以看到Composer autoload.php和一些变量设置:
- the Client ID that we received right after the application’s creation; 在创建应用程序后我们立即收到的客户ID;
- the Client Secret, obtained the same way; 客户机密,以相同的方式获得;
the variable
$requestDatawith all the information that we are going to pass to the token exchange endpoint;变量
$requestData带有我们要传递给令牌交换端点的所有信息;
Note: in $_GET['code'] you will find the authorization code that PayPal passes to our result.php page. As this is a test application, I used the value as it is. In a real world situation don’t forget to keep everything safe at the best you can by filtering this input.
注意:在$_GET['code']您会找到PayPal传递到我们的result.php页面的授权代码。 由于这是一个测试应用程序,因此按原样使用该值。 在现实世界中,不要忘了通过过滤此输入来使一切保持最佳安全。
Right after that you can find our first API call to the token dedicated service. As the comment also suggests, the get() method of the \Httpful\Request prepares the API call specifying what verb must be used. The syntax is really easy to understand – the chained method authenticateWith() sets up the authentication data using the Client ID and the Client Secret.
之后,您可以找到我们对令牌专用服务的第一个API调用。 就像注释还暗示的那样, \Httpful\Request的get()方法准备API调用,指定必须使用的动词。 语法非常容易理解–链接方法authenticateWith()使用客户端ID和客户端密钥来设置身份验证数据。
At that point, the send() method starts the call. The results are stored into the $response variable, instance of the Response class. Right after that, we take and decode the raw_body attribute. After a generic check to find possible errors, if everything is alright we can make the second API call, this time directly to the Identity API that handles the user data.
那时, send()方法开始调用。 结果存储在$response变量中,该变量是Response类的实例。 之后,我们获取并解码raw_body属性。 经过通用检查以查找可能的错误后,如果一切正常,我们可以进行第二次API调用,这一次直接调用处理用户数据的Identity API。
The returned object is another one of the same type as before, Response. This time, the request results are stored into a $user variable, the same that is going to be used in the result.php file that we saw before.
返回的对象是与前面相同类型的另一个对象Response 。 这次,请求结果存储在$user变量中,该变量将在我们之前看到的result.php文件中使用。
Our first example application is complete. We respected and implmented the entire workflow as we saw before, in the picture at the beginning of this article.
我们的第一个示例应用程序已完成。 在本文开头的图片中,我们尊重并实现了之前所看到的整个工作流程。
结论与考虑 (Conclusions and considerations)
This application we just made is an extremely basic example. In a real world case, of course, you will have to implement many other things: first of all, a mechanism to store tokens in order to keep your user logged in. Also, you will have to consider making some calls to the token renewal service when it expires. You will have to use the refresh token to do it, with with this method.
我们刚刚制作的这个应用程序是一个非常基本的示例。 当然,在实际情况下,您将必须实现许多其他事情:首先,一种存储令牌的机制以使用户保持登录状态。此外,您还必须考虑对令牌更新进行一些调用。服务到期时。 您必须使用带刷新令牌的方法来执行此操作 。
We already talked about the reasons about why you should implement a similar solution on your application.
我们已经讨论了为什么要在应用程序上实现类似解决方案的原因。
However, one of the best tools you can use with the Log In with PayPal is the Seamless Checkout. Used togheter, those two tools will let your customer complete an order and pay for it without leaving the website.
但是,可以与“使用PayPal登录”一起使用的最佳工具之一是Seamless Checkout 。 使用过的togheter,这两个工具将使您的客户无需离开网站即可完成订单并付款。
The “Log In with PayPal” feature is something that you can try and evaluate, in particular if you want to give your user an experience of a deeper integration of your application with one of the best (and most used) online payment services in the world.
您可以尝试使用“使用PayPal登录”功能进行评估,特别是如果您想为用户提供与应用程序中最好的(和最常用的)在线支付服务进行更深层次集成的体验。世界。
Have you already tried it? What do you think? Let us know.
你已经尝试过了吗? 你怎么看? 让我们知道
paypal沙盒用户


 2820
2820

 被折叠的 条评论
为什么被折叠?


