


aws stack
This article introduces what is probably one of the simplest ways of setting up and running an elastic LAMP stack on the cloud – using Zend Server on AWS.
本文介绍了在AWS上使用Zend Server可能是在云上设置和运行弹性LAMP堆栈的最简单方法之一。
Note: to be clear elastic does not refer to ElasticSearch here.
注意:为清楚起见,弹性此处不指ElasticSearch 。
More specifically, the workflow described here includes launching a pre-configured AWS CloudFormation template that sets up all the components of a LAMP stack: Zend Server’s certified PHP stack plus all of Zend Server’s add-on features (including Z-Ray), a MySQL database, a Zend Server elastic group consisting of additional Zend Server instances, an elastic load balancer, and other pre-configured security definitions.
更具体地说,此处描述的工作流程包括启动预配置的AWS CloudFormation模板,该模板设置LAMP堆栈的所有组件:Zend Server的认证PHP堆栈以及Zend Server的所有附加功能(包括Z-Ray),一个MySQL数据库,一个Zend Server弹性组,该组由其他Zend Server实例,一个弹性负载平衡器和其他预配置的安全性定义组成。
This article is perfect for those contemplating moving their production environment to the cloud or those who already have one set up on AWS.
对于那些打算将生产环境迁移到云中的人或已经在AWS上建立了生产环境的人来说,本文非常适合。
基本概念 (Basic concepts)
Zend Server is an application platform for web and mobile PHP apps, which comes with an advanced PHP stack and a set of tools for developing, debugging, deploying and monitoring applications. If you are not familiar with Zend Server, check out Bruno Skvorc’s article for some background.
Zend Server是一个用于Web和移动PHP应用程序的应用程序平台,它带有一个高级PHP堆栈以及用于开发,调试,部署和监视应用程序的一组工具。 如果您不熟悉Zend Server,请查看Bruno Skvorc的文章以了解一些背景知识。
CloudFormation enables the creation and provisioning of AWS deployments using Amazon EC2, load balancing, auto scaling and other AWS products, to build applications in the cloud. Using a template file to create a collection of resources together as a single stack, CloudFormation enables you to quickly deploy your PHP apps without having to worry about creating and configuring the underlying infrastructure.
CloudFormation支持使用Amazon EC2,负载平衡,自动扩展和其他AWS产品创建和配置AWS部署,以在云中构建应用程序。 通过使用模板文件以单个堆栈的形式一起创建资源集合,CloudFormation使您可以快速部署PHP应用程序,而不必担心创建和配置基础架构。
To follow the steps outlined here, all you need is a valid AWS account and 30 minutes of spare time.
要按照此处概述的步骤进行操作,您只需要一个有效的AWS账户和30分钟的空闲时间。
步骤1:启动堆栈 (Step 1: Launching the stack)
We’re going to start by opening and logging into the AWS marketplace.
我们将首先打开并登录AWS市场 。
Entering Zend Server in the search box at the top of the page gives us a list of all the available Zend Server AMIs (Amazon Machine Instances). The list includes a wide variety of versions and editions, each supporting different PHP versions and Linux distros. There is even a PHP 5.3 LTS instance available.
在页面顶部的搜索框中输入Zend Server,将为我们提供所有可用的Zend Server AMI(Amazon机器实例)的列表。 该列表包括各种版本,每个版本都支持不同PHP版本和Linux发行版。 甚至还有可用PHP 5.3 LTS实例。
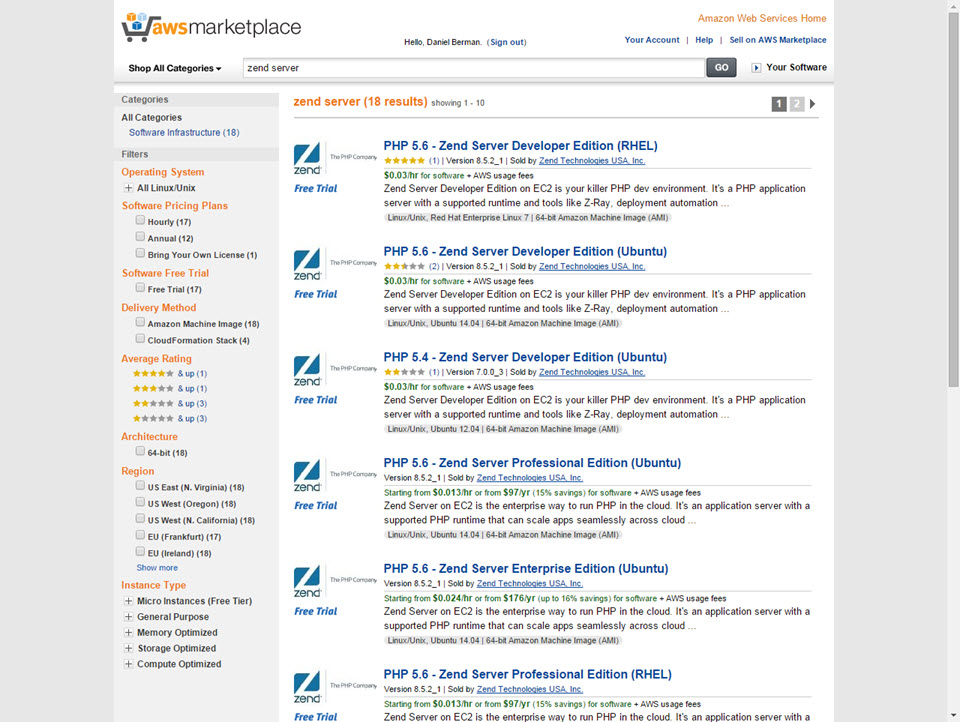
In this case, we’re going to select the “PHP 5.6 – Zend Server Professional Edition (Ubuntu)” instance.
在这种情况下,我们将选择“ PHP 5.6 – Zend Server Professional Edition(Ubuntu)”实例。
It’s worth noting that only the Professional and Enterprise editions of Zend Server support clustering, so if you’re interested in setting up a development environment the Developer edition would suit your needs perfectly.
值得注意的是,只有Zend Server的专业版和企业版支持群集,因此,如果您对设置开发环境感兴趣,那么开发者版将非常适合您的需求。
On the AMIs page, we now see some general info about the product, support details, a list of useful resources to check out, and pricing details.
现在,在AMI页面上,我们可以看到有关该产品的一些常规信息,支持详细信息,要检出的有用资源列表以及价格详细信息。

Under Delivery Methods, a Zend Server Cluster option is displayed, and clicking View gives us a description of what a Zend Server cluster looks like together with a detailed diagram of the CloudFormation template.
在“交付方法”下,将显示“ Zend Server群集”选项,然后单击“ 视图”为我们提供Zend Server群集外观的描述以及CloudFormation模板的详细图表。
We are now faced with two options. We can either download the template file and subsequently manually upload it into a separate AWS CloudFormation wizard, or – we can take a closer look at the template in the CloudFormation Designer.
我们现在面临两个选择。 我们可以下载模板文件,然后手动将其上传到单独的AWS CloudFormation向导中,或者–我们可以在CloudFormation Designer中仔细查看模板。
The CloudFormation Designer is a relatively new visual tool that allows you to easily create and modify CloudFormation templates using a very easy-to-use interface.
CloudFormation Designer是一个相对较新的可视化工具,可让您使用非常易于使用的界面轻松创建和修改CloudFormation模板。
We’re going to opt for the latter option by clicking the link at the bottom of the dialog.
我们将通过单击对话框底部的链接来选择后者。
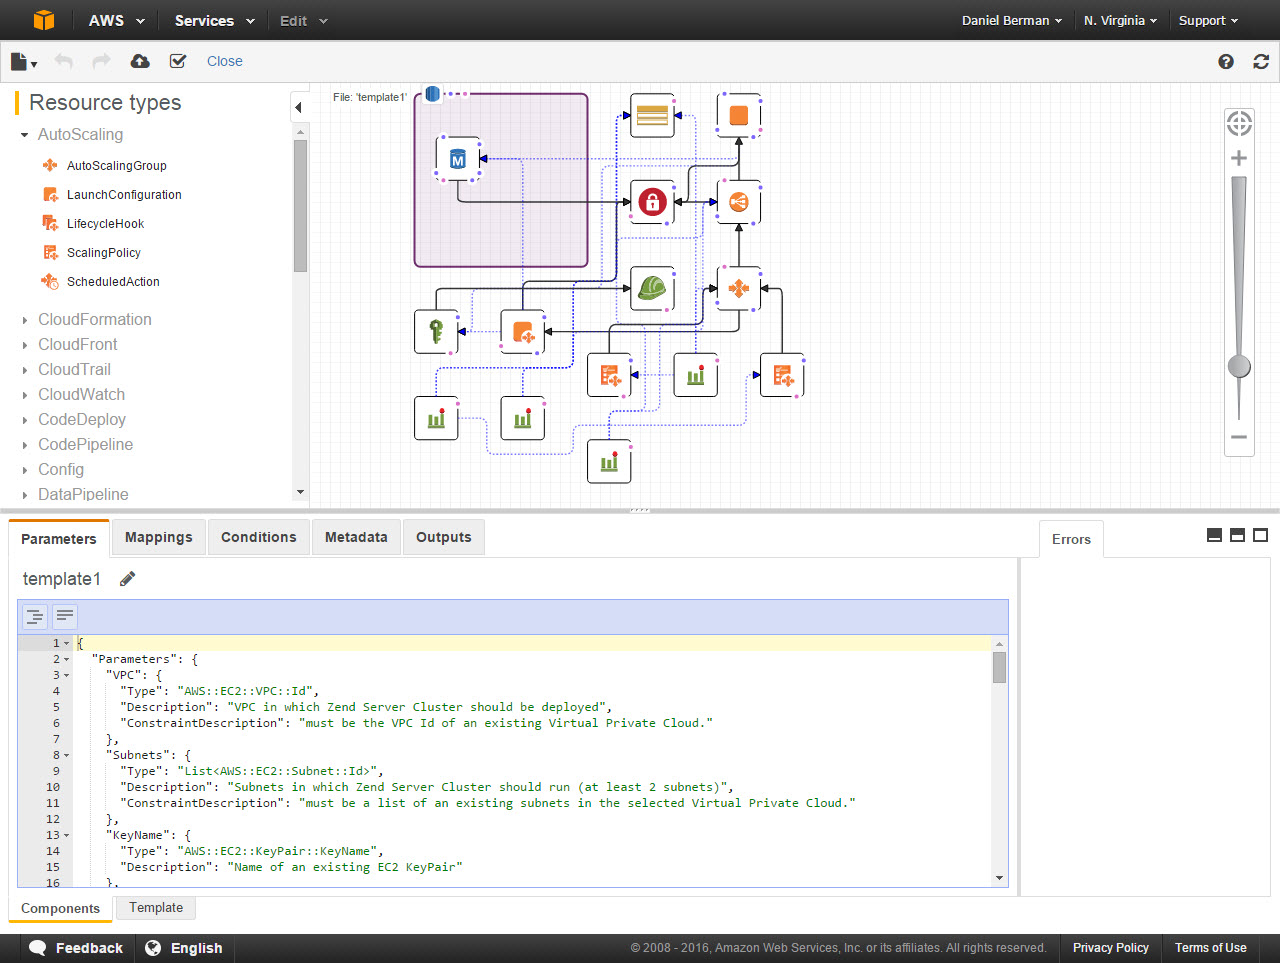
The CloudFormation Designer is opened with our pre-configured template displayed. The diagram in the center of the Designer displays all the various parts of the stack: Zend Server, MySQL database, elastic load balancer, Cloud Alarms, VPC Security Group and the auto-scaling group consisting of additional Zend Server instances.
将打开CloudFormation Designer,并显示我们的预配置模板。 Designer中心的图显示了堆栈的所有各个部分:Zend Server,MySQL数据库,弹性负载平衡器,Cloud Alarms,VPC Security Group和由其他Zend Server实例组成的自动扩展组。
If needed, you could easily drag-and-drop additional components into the template. Or, you could change the settings of any of the existing components by simply selecting it in the diagram and editing the text file displayed below. It’s worth pointing out that playing with the template should be done with caution and only if you know exactly what you’re doing.
如果需要,您可以轻松地将其他组件拖放到模板中。 或者,您可以通过简单地在图中选择它并编辑下面显示的文本文件来更改任何现有组件的设置。 值得指出的是,仅当您确切知道自己在做什么时,才应谨慎使用模板。
In our case, we’re going to use the default template settings and continue on.
在本例中,我们将使用默认模板设置并继续。
The next step is to create the stack. To do this, we’re going to click the Create Stack icon at the top of the page.
下一步是创建堆栈。 为此,我们将单击页面顶部的“ 创建堆栈”图标。
We’re now sent to the AWS Create a New Stack wizard, and we can see that on the first page, our CloudFormation template is already selected.
现在,我们被发送到AWS Create a New Stack向导,我们可以在第一页上看到已经选择了CloudFormation模板。
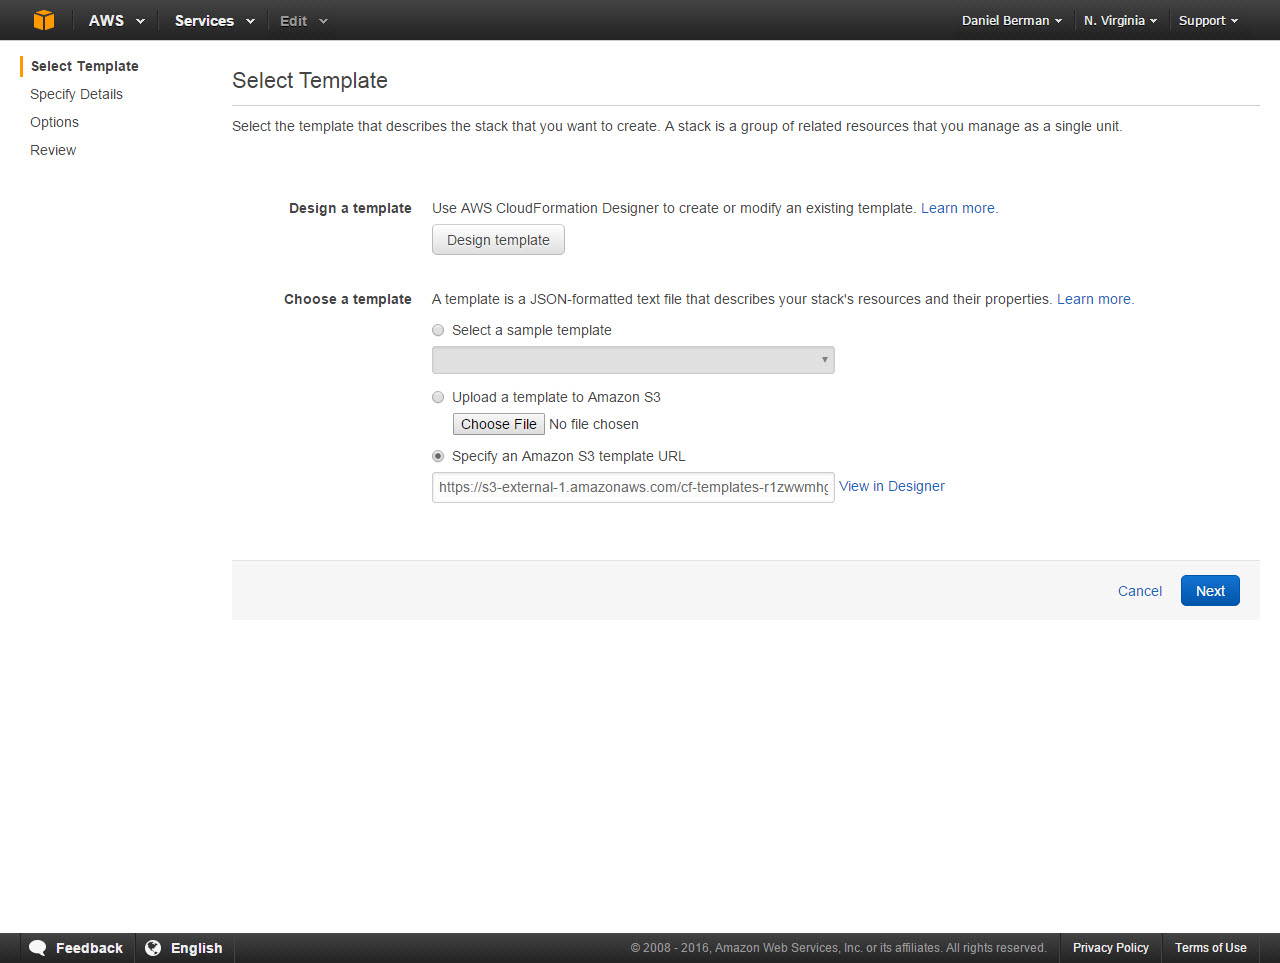
Clicking Next, we now have to specify the details of the stack about to be launched.
单击下一步 ,我们现在必须指定将要启动的堆栈的详细信息。
First, we’re going to enter a name for the stack for general identification and display purposes.
首先,我们将为堆栈输入一个名称,以进行一般标识和显示。
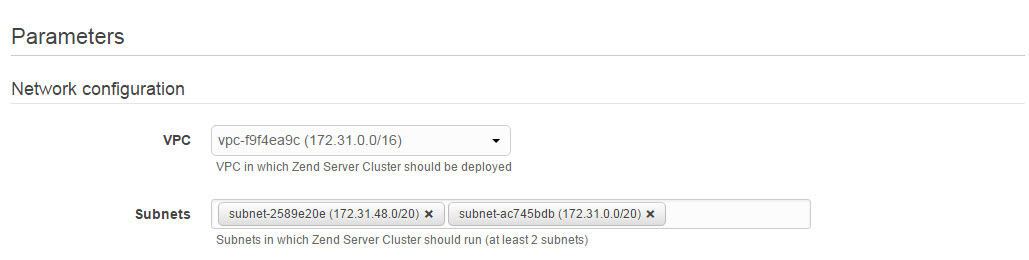
Second, we need to configure the network configurations. We have to select a VPC in which to run the cluster, and two subnets.
其次,我们需要配置网络配置。 我们必须选择要在其中运行群集的VPC和两个子网。
The next step is to configure access to our cluster.
下一步是配置对集群的访问。
We need to first select an existing EC2 keypair to use for accessing the cluster. If you do not have one already set up, do so using the EC2 console. Then, we’re going to enter a password for accessing the Zend Server cluster user interface (please make note of this cluster as we will need it in the next steps of the tutorial), and a username and password for accessing the cluster database. We also have the option to enter an email for receiving notifications from AWS on operational issues.
我们需要首先选择一个现有的EC2密钥对以用于访问集群。 如果尚未设置,请使用EC2控制台。 然后,我们将输入用于访问Zend Server集群用户界面的密码(请记下该集群,因为在本教程的后续步骤中将需要它),以及用于访问集群数据库的用户名和密码。 我们还可以选择输入电子邮件,以接收来自AWS的有关操作问题的通知。
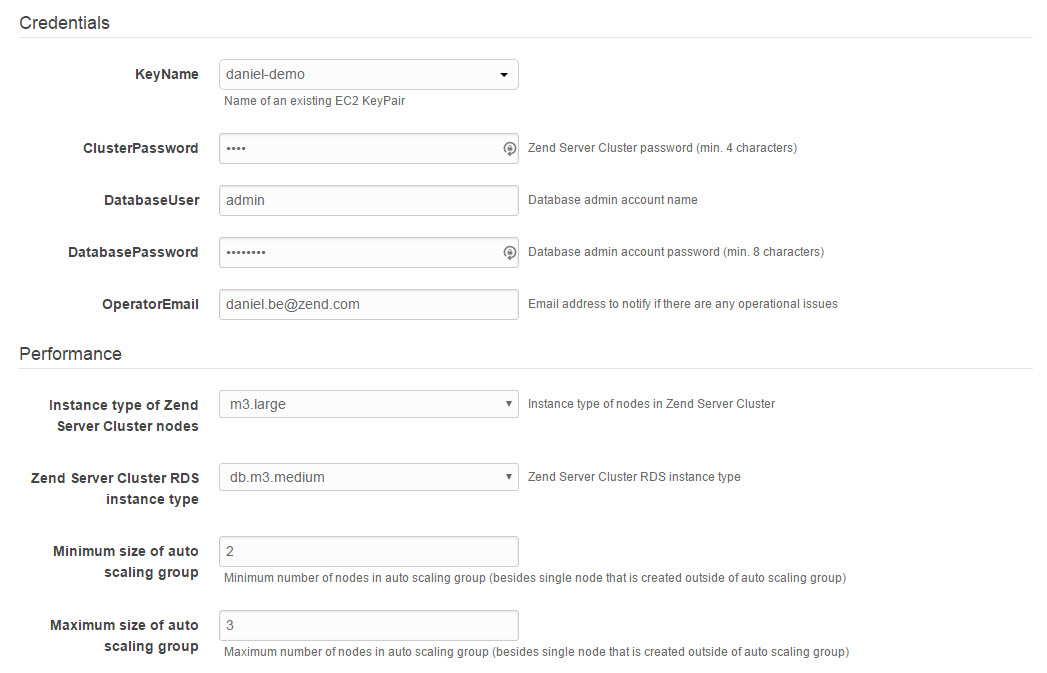
The last step on this page of the wizard is to select the instance types for the Zend Server nodes constructing the cluster, and the cluster database. These settings determine the hardware configurations for these components (CPU, memory, storage, etc.), and the default settings (m3.large and db.m3.medium, respectively) should suffice for running a cluster of a few nodes (up to 5) with a medium load (50-60 requests per second). Each Instance type has a different pricing, so you need to take that into consideration.
向导的此页面上的最后一步是为构造集群的Zend Server节点和集群数据库选择实例类型。 这些设置确定这些组件(CPU,内存,存储设备等)的硬件配置,默认设置(分别为m3.large和db.m3.medium)应足以运行由几个节点组成的集群(最多5)中等负载(每秒50-60个请求)。 每种实例类型都有不同的定价,因此您需要考虑到这一点。
In this step we also need to determine the minimum and maximum size of our auto-scaling group, or in other words – the amount of servers we want the cluster to start with and the maximum amount of servers our cluster can scale to in case of an increase in traffic load.
在此步骤中,我们还需要确定自动扩展组的最小和最大大小,换句话说,即我们希望群集开始的服务器数量,以及在以下情况下群集可以扩展的最大服务器数量:交通流量增加。
Clicking Next takes us to the Options page.
单击下一步将带我们进入“选项”页面。
Here we can configure tags for the stack, which are basically key-value pairs used to identify the stack for purposes such as cost allocation, and a set of other advanced options.
在这里,我们可以为堆栈配置标签,这些标签基本上是键值对,用于标识堆栈,例如成本分配和其他一组高级选项。
For example, we can configure the number of minutes before stack creation times out or we can define the resources that you want to protect from unintentional updates during a stack update.
例如,我们可以配置堆栈创建超时之前的分钟数,或者可以定义要在堆栈更新期间防止意外更新保护的资源。
We’re going to run with the default value and advance to the last and final page of the wizard – the Review page.
我们将使用默认值运行,并前进到向导的最后一页和最后一页–“查看”页面。
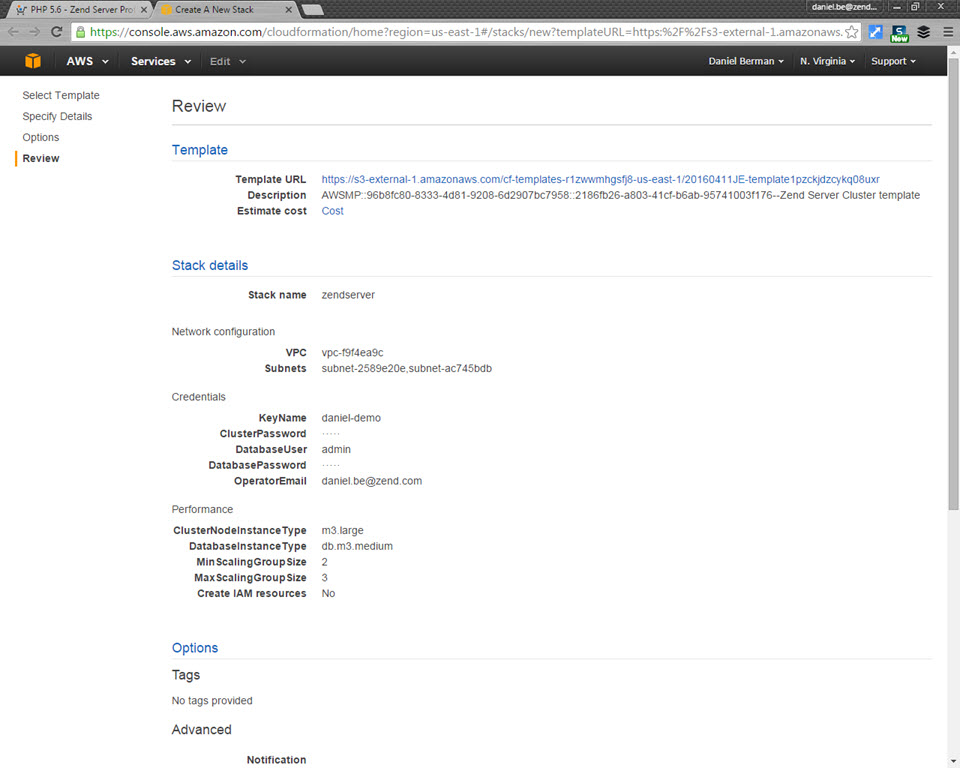
Here we have a final chance of taking a look at the entire stack before we hit the launch button. If we do decide we want to change any of the configurations, now’s the time to do so.
在这里,我们有最后的机会在点击启动按钮之前先查看整个堆栈。 如果我们决定要更改任何配置,现在是时候了。
One final step we need to take here is to select the check-box at the bottom of the page – this acknowledges that we are aware that the template file is going to create a new IAM profile.
我们需要在此处采取的最后一步是选中页面底部的复选框-这承认我们知道模板文件将创建一个新的IAM配置文件。
Since we’re fine with the current setup, we’re going to click the Create button at the bottom of the page.
由于我们对当前的设置感到满意,因此我们将单击页面底部的“ 创建”按钮。
The CloudFormation management console is displayed, and after a minute or two the stack we just launched is displayed in the Stacks list.
将显示CloudFormation管理控制台,在一两分钟后,我们刚刚启动的堆栈将显示在堆栈列表中。
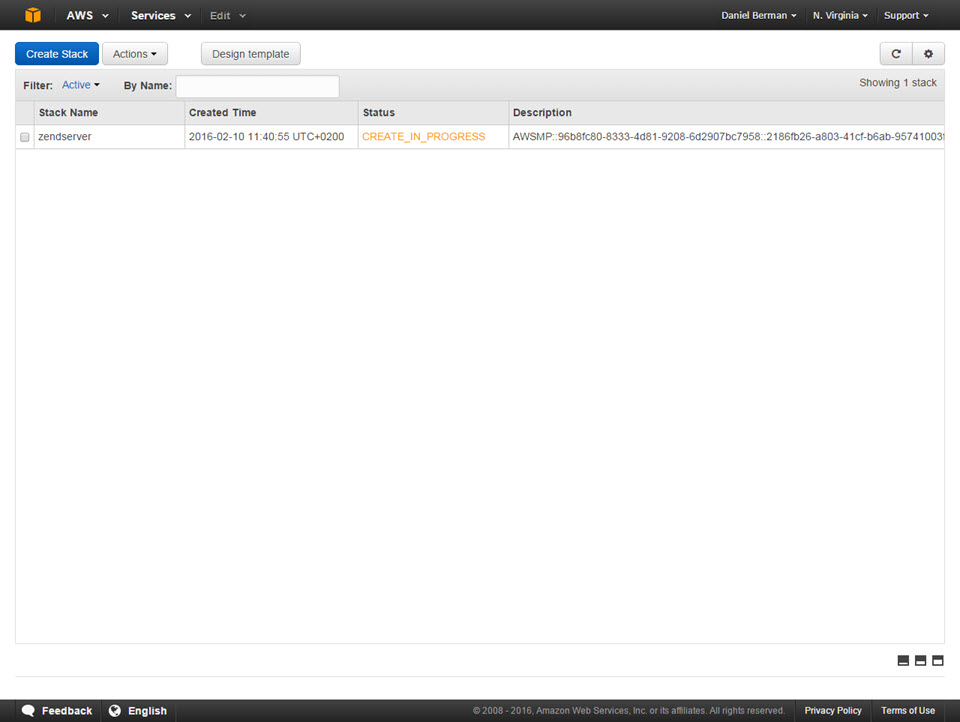
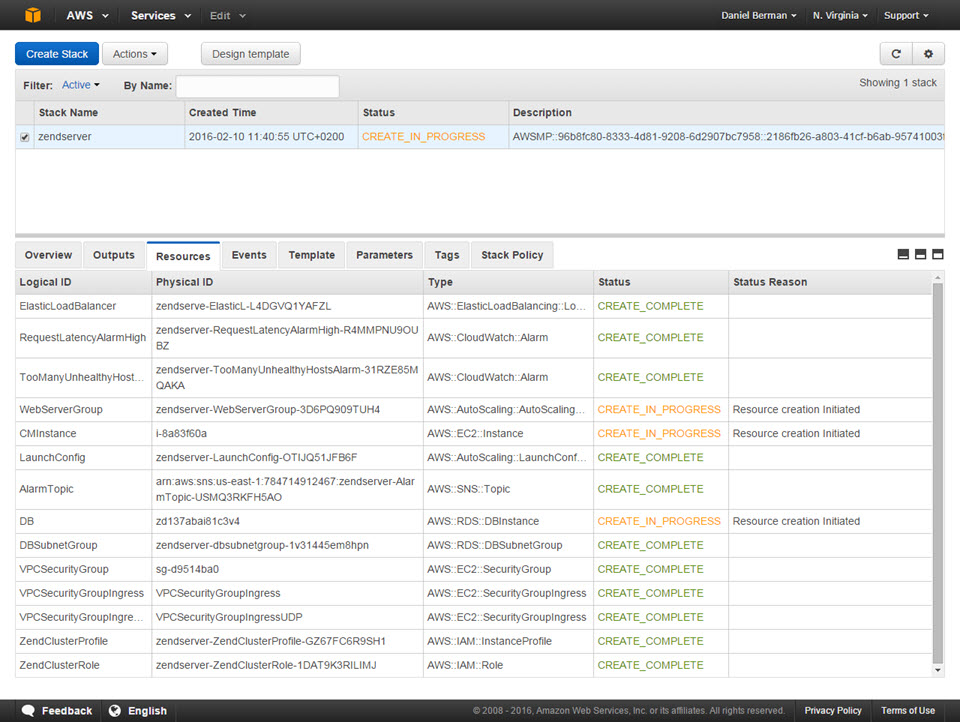
Selecting it, and opening up the display tabs at the bottom of the page, we can see that deployment is in progress.
选择它,然后打开页面底部的显示选项卡,我们可以看到部署正在进行中。
This may take a few minutes to complete. In the meantime, we can select the Resources tab and view all the different stack components being built.
这可能需要几分钟才能完成。 同时,我们可以选择资源选项卡并查看所有正在构建的不同堆栈组件。
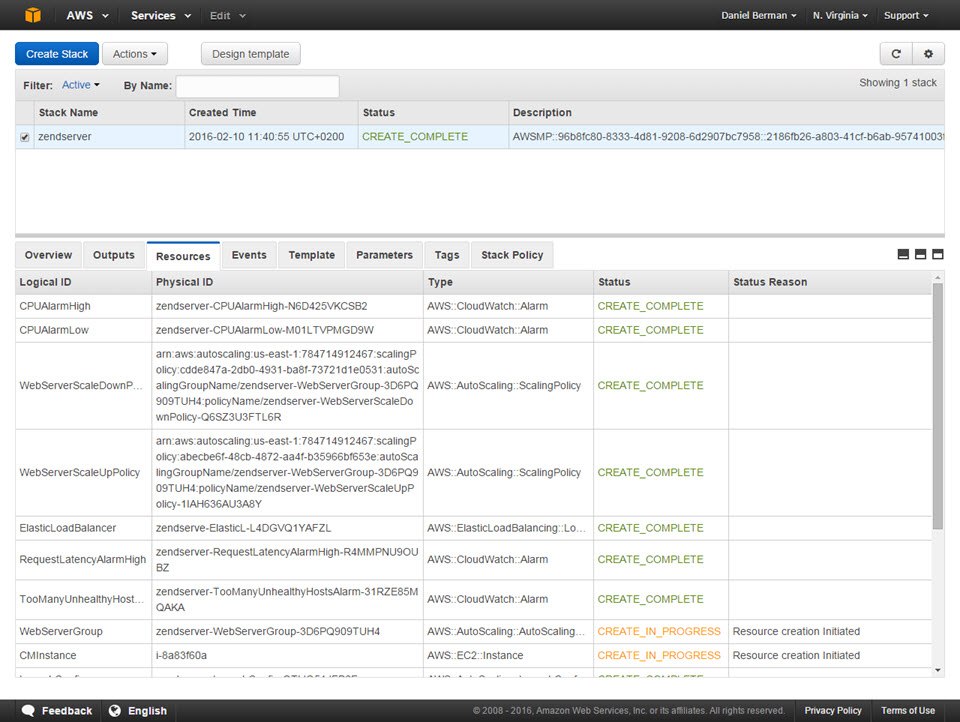
After a while, the status of the stack changes to complete, and the deployment process of the cluster is finished.
一段时间后,堆栈的状态更改为完成,集群的部署过程完成。
步骤2:管理堆栈 (Step 2: Managing the stack)
In just a few clicks, we succeeded in setting up an elastic and auto-scaling PHP cluster on the cloud which includes all the components of a production-grade LAMP stack.
只需单击几下,我们就成功地在云上建立了一个弹性且可自动伸缩PHP集群,其中包括生产级LAMP堆栈的所有组件。
Our next step is to understand how to manage the main components constructing the stack: Zend Server, PHP, and our RDS MySQL database instance.
下一步是了解如何管理构建堆栈的主要组件:Zend Server,PHP和我们的RDS MySQL数据库实例。
First, let’s take a closer look at our cluster of Zend Server nodes. One way to do this is to open the Instances list in the EC2 Console.
首先,让我们仔细看一下我们的Zend Server节点集群。 一种方法是在EC2控制台中打开“实例”列表。
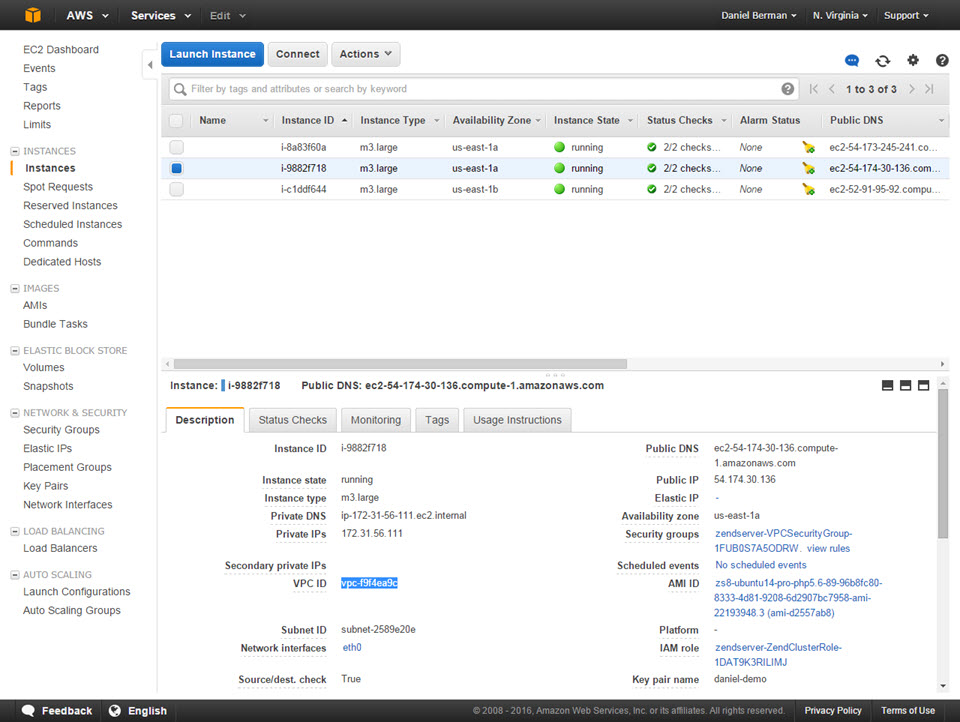
The three servers we defined when launching the stack are up and running. In case of an increase in traffic, we could actually observe how servers are slowly added to the cluster in accordance with the scaling policy we defined.
我们在启动堆栈时定义的三台服务器已启动并正在运行。 如果流量增加,我们实际上可以观察到如何根据我们定义的扩展策略将服务器缓慢添加到群集中。
The EC2 Console is also the place to manage our load balancer. Simply click Load Balancers in the menu on the left.
EC2控制台也是管理我们的负载均衡器的地方。 只需单击左侧菜单中的负载均衡器 。
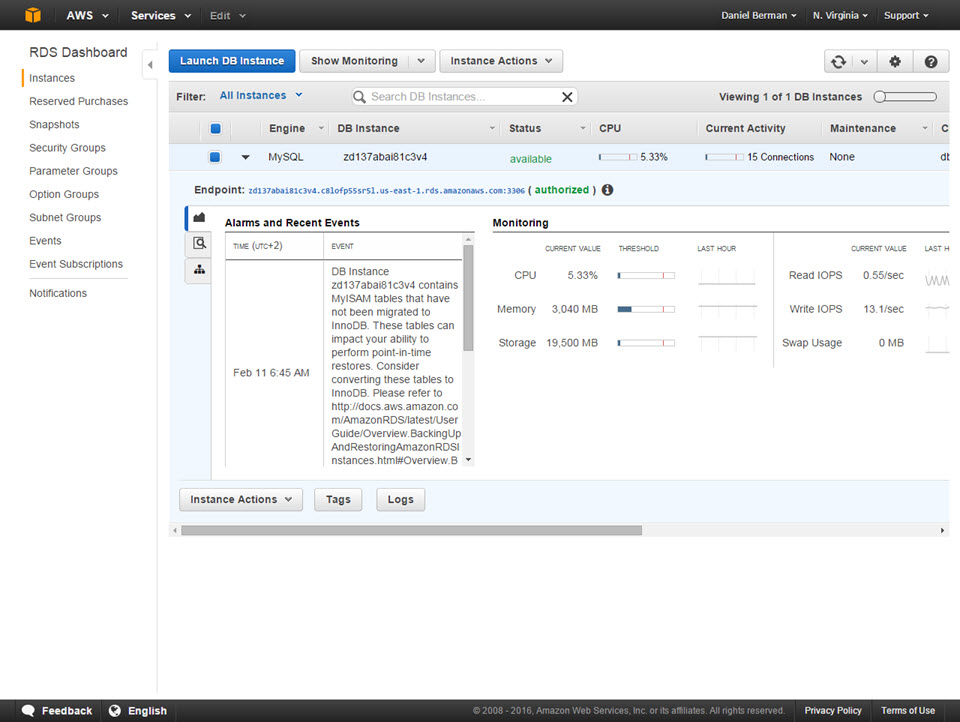
Second, we’re going to open the RDS Console where we can view and manage our MySQL instance.
其次,我们将打开RDS控制台 ,在其中可以查看和管理我们MySQL实例。
Last but not least, we’re now going to access Zend Server. To do this, go back to the CloudFormation Console.
最后但并非最不重要的一点是,我们现在要访问Zend Server。 为此,请返回CloudFormation控制台 。

Select the Outputs tab, and click the URL of the Zend Server Cluster.
选择输出选项卡,然后单击Zend Server群集的URL。
The Zend Server login page is then displayed, and to access Zend Server, all we have to do is enter the password we defined earlier in the wizard for accessing the cluster user interface, and click Login.
然后将显示Zend Server登录页面,并且要访问Zend Server,我们要做的就是输入我们先前在向导中定义的用于访问集群用户界面的密码,然后单击Login 。
The Zend Server UI loads, and we’re presented with the Zend Server Guide Page. This page contains some useful resources for learning about Zend Server and some sample applications that can be deployed. We’ll get back to this page in the next step.
将加载Zend Server用户界面,并且向我们提供了Zend Server指南页面。 该页面包含一些有用的资源,用于了解Zend Server和可以部署的一些示例应用程序。 下一步,我们将返回此页面。
The Extensions page (PHP | Extensions) allows us to easily configure and manage our PHP for the entire cluster. We can enable and disable PHP extensions and configure directives. The best way to do this is to use the search box at the top-right corner of the page to locate a specific directive or extension.
扩展页面( PHP |扩展 )使我们能够轻松地配置和管理整个集群PHP。 我们可以启用和禁用PHP扩展以及配置指令。 最好的方法是使用页面右上角的搜索框找到特定的指令或扩展名。
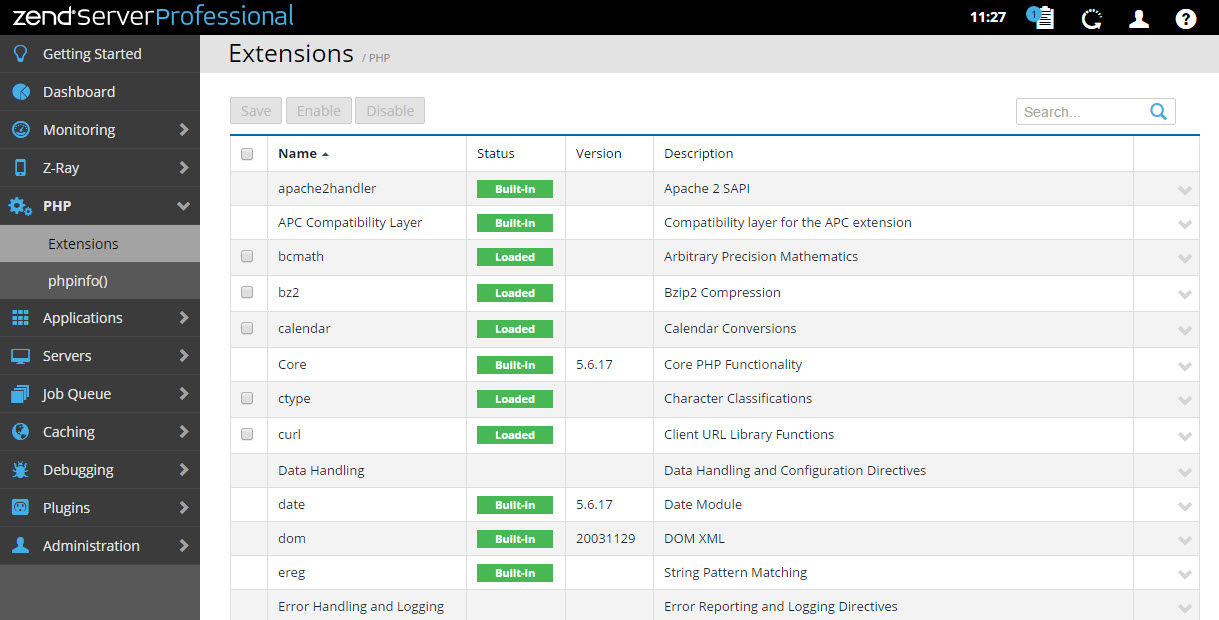
Once saved, the new configurations are propagated across the entire cluster. This is an important benefit that should be understood since usually, the task of syncing the PHP .ini file across a cluster and restarting Apache is not a simple one to say the least.
保存后,新配置将在整个群集中传播。 这是一个重要的优点,应该理解,因为通常来说,跨集群同步PHP .ini文件并重新启动Apache的任务并不是一件容易的事。
步骤3:部署应用程序 (Step 3: Deploying an application)
It’s time to get our hands dirty and deploy some code onto the cluster.
是时候让我们动手了,并将一些代码部署到集群上了。
To do this, we’re going to use the WordPress sample application which is available on the Getting Started page. As mentioned before, the Getting Started page is a great place to start learning about the various features available in Zend Server and is recommended for first-time users.
为此,我们将使用“入门”页面上的WordPress示例应用程序。 如前所述,“入门”页面是开始学习Zend Server中可用的各种功能的好地方,建议初学者使用。
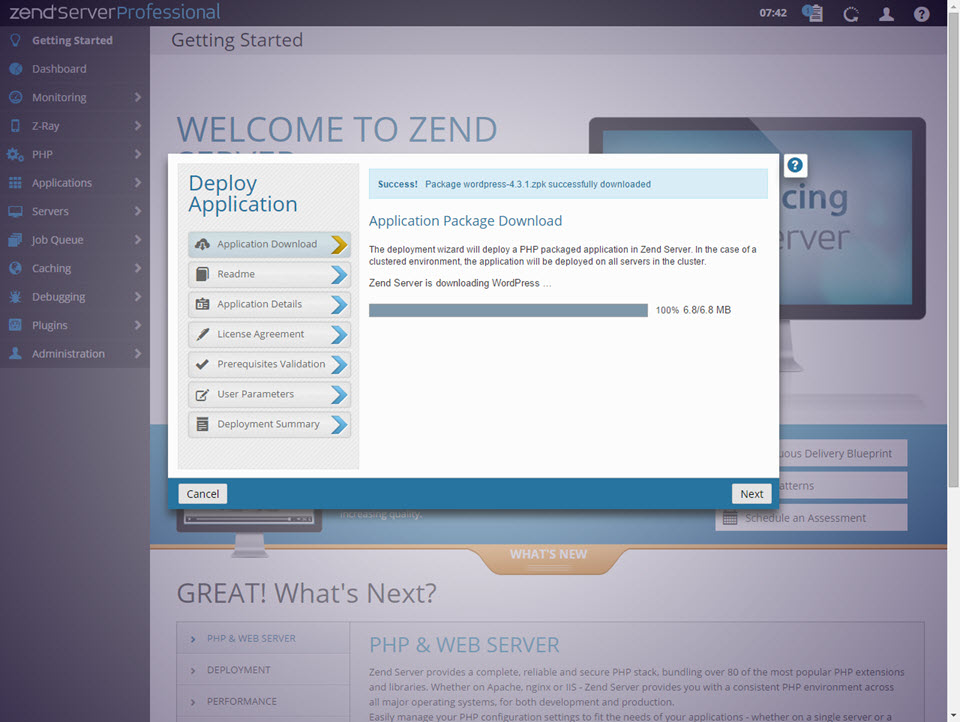
Clicking the WordPress icon in the Deploy Sample Apps page, Zend Server downloads a ready-made WordPress .ZPK file and uploads it into the Deploy Application wizard.
单击“部署示例应用程序”页面中的WordPress图标,Zend Server将下载现成的WordPress .ZPK文件,并将其上传到“部署应用程序”向导中。
A few words about Zend deployment before we continue. A .ZPK file (Zend Deployment Package) is a standardized application package that includes all of the application’s source code, together with metadata that defines the parameters and prerequisites necessary for deploying the application (e.g. database credentials, required PHP extensions) and any additional hook scripts you would like to use during the various stages of deployment.
在继续之前,请先简要介绍一下Zend部署。 .ZPK文件(Zend部署软件包)是一个标准化的应用程序软件包,其中包括所有应用程序的源代码以及元数据,该元数据定义了部署应用程序所需的参数和先决条件(例如数据库凭据,所需PHP扩展名)以及任何其他钩子您希望在部署的各个阶段中使用的脚本。
This feature is a huge help in standardizing and automating the deployment process and is used for creating a seamless continuous delivery pipeline.
此功能对标准化和自动化部署过程有巨大帮助,可用于创建无缝的连续交付管道。
Let’s continue. Advancing on in the wizard, we’re presented with the WordPress readme file, which we can take a look at and continue on.
让我们继续。 在向导中继续前进,我们将看到WordPress自述文件,我们可以对其进行研究并继续。
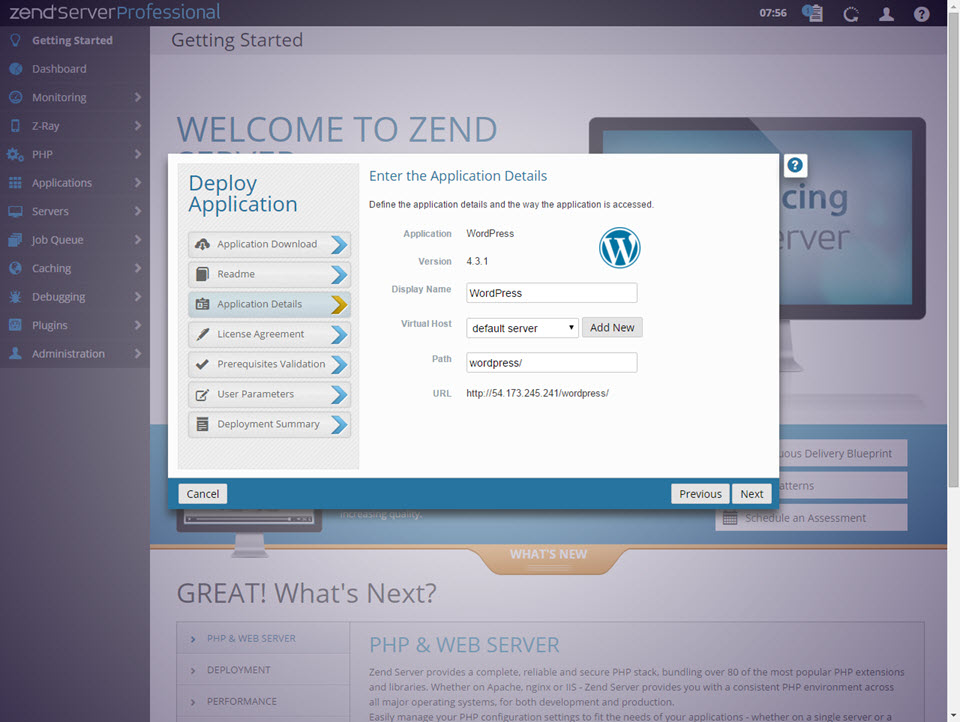
On the Application Details page, we need to set a path for our application. If we had defined a new virtual host, this would be the place to select it, but we can make do with the default server host for now.
在“应用程序详细信息”页面上,我们需要为应用程序设置路径。 如果我们定义了一个新的虚拟主机,则可以在其中选择它,但是现在我们可以使用默认服务器主机了。
After reading and accepting the license agreement on the next page, we see a list of all the application prerequisites as defined in the package.
阅读并接受下一页的许可协议后,我们会看到该软件包中定义的所有应用程序必备组件的列表。
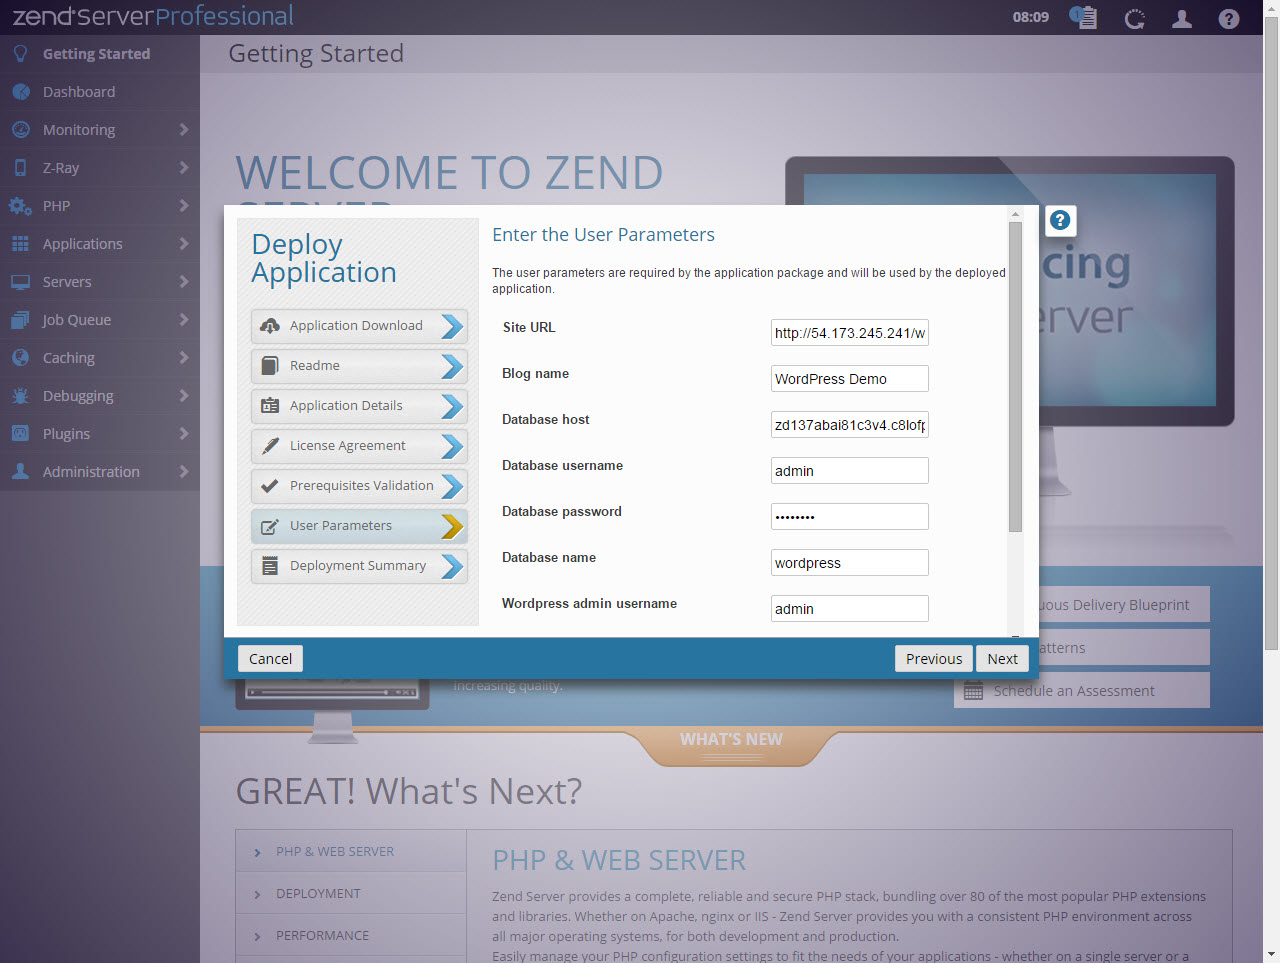
Next, we need to enter all the user parameters needed to deploy the application. Again, these were defined in the application package. To fill in the fields here, we need to access our RDS instance (from the RDS Console) and enter the database host, username and password. We will also need to enter the credentials for accessing the WordPress admin panel.
接下来,我们需要输入部署应用程序所需的所有用户参数。 同样,这些是在应用程序包中定义的。 要在此处填写字段,我们需要访问RDS实例(从RDS控制台 )并输入数据库主机,用户名和密码。 我们还需要输入凭据以访问WordPress管理面板。
Please note, that for real-life applications, it is recommended to use a second and separate RDS instance and not the same database used for the Zend Server cluster. This ensures optimized performance and high availability.
请注意 ,对于实际应用程序,建议使用第二个单独的RDS实例,而不要使用与Zend Server群集相同的数据库。 这样可以确保优化的性能和高可用性。
Then, all we have to do is click the Deploy button on the Summary page and the WordPress application is deployed on the cluster.
然后,我们要做的就是单击“摘要”页面上的“部署”按钮,然后将WordPress应用程序部署到群集中。
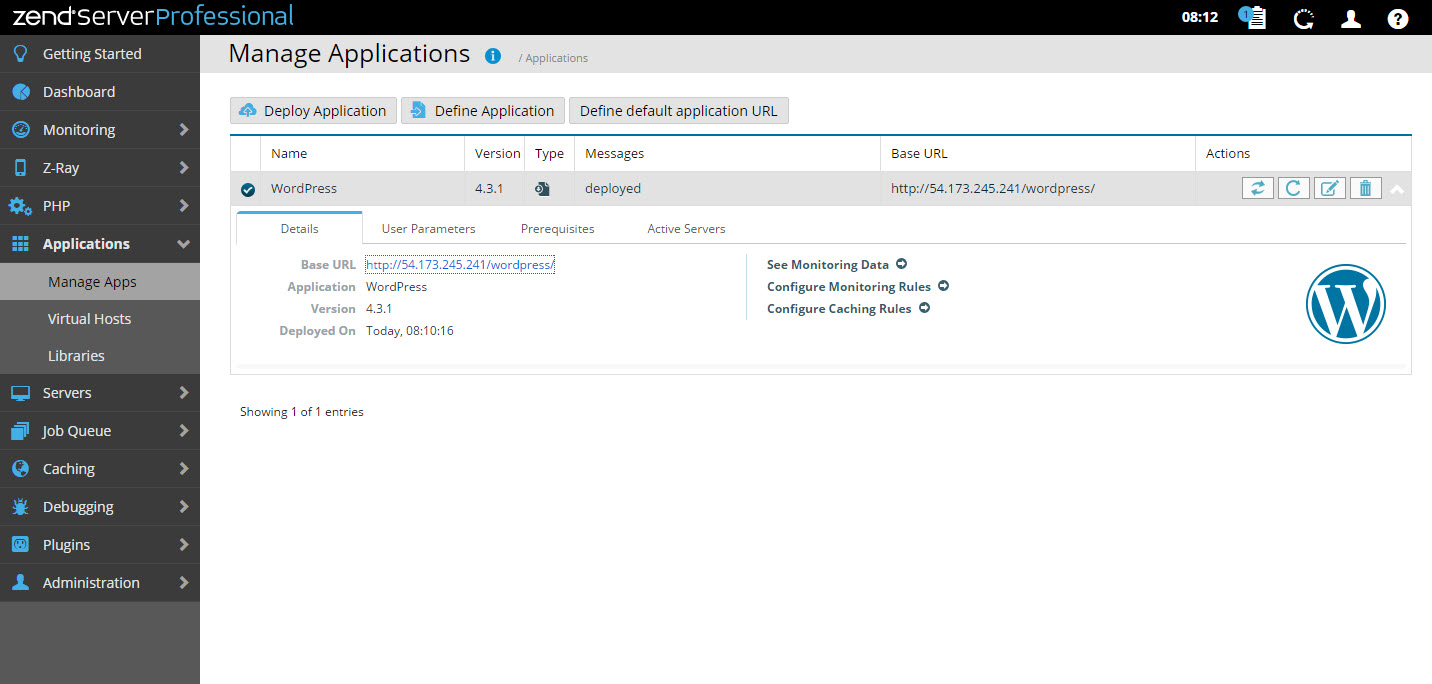
To take a look at the application, select it in the Applications list and click the URL.
要查看该应用程序,请在“应用程序”列表中将其选中,然后单击URL。
Tip: Z-Ray is disabled by default. To enable it, go to Z-Ray | Access and turn it on.
提示:默认情况下,禁用Z射线。 要启用它,请转到Z-Ray | 访问并打开它。
步骤4:监视堆栈 (Step 4: Monitoring the stack)
Our final step is to understand some of the application and server monitoring features available in Zend Server.
我们的最后一步是了解Zend Server中可用的一些应用程序和服务器监视功能。
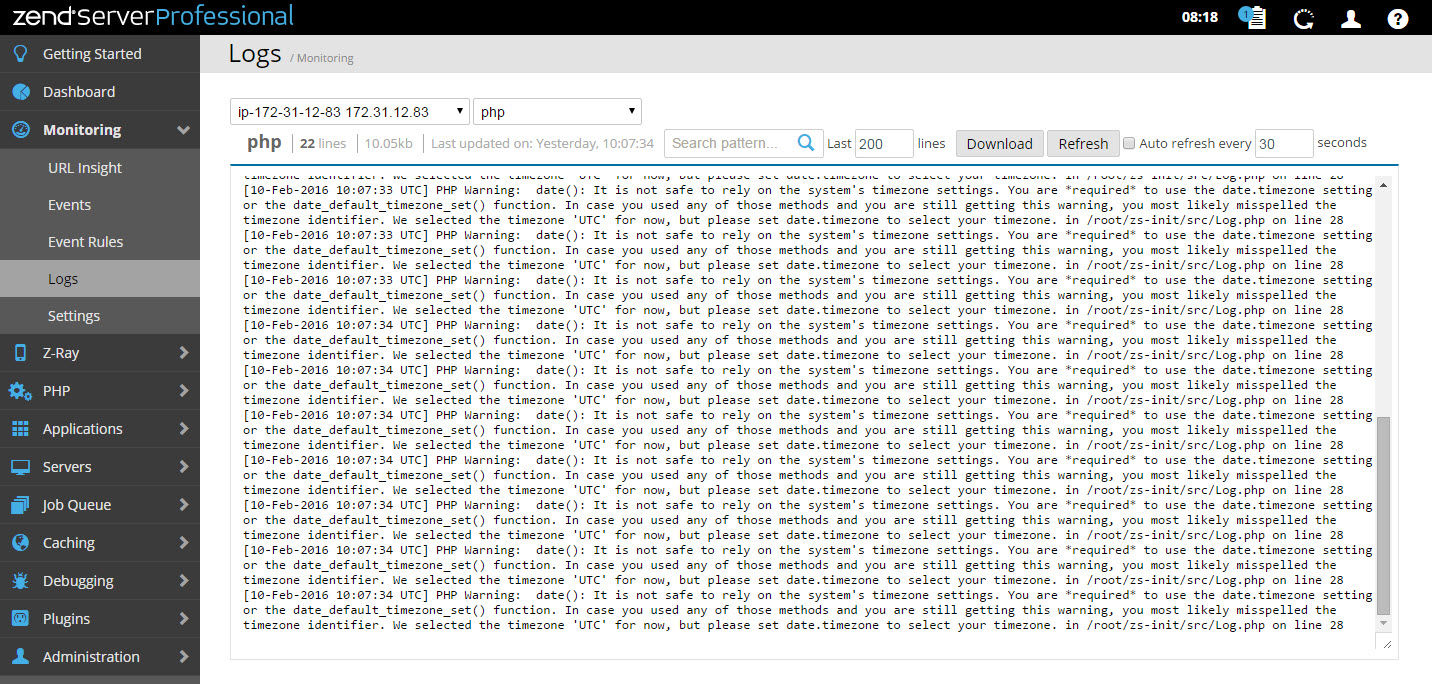
On the server and PHP level, Zend Server simplifies log analysis in a cluster scenario by allowing you to centrally examine log files for all the nodes in the cluster. Instead of manually going through each log file on each server, you can access the logs via the user interface.
在服务器和PHP级别,Zend Server通过允许您集中检查群集中所有节点的日志文件来简化群集方案中的日志分析。 您可以通过用户界面访问日志,而不必手动浏览每个服务器上的每个日志文件。
To do this, go to Monitoring | Logs. Select the server you want to monitor and the specific log file.
为此,请转到“ 监视” |“监视”。 日志 。 选择要监视的服务器和特定的日志文件。
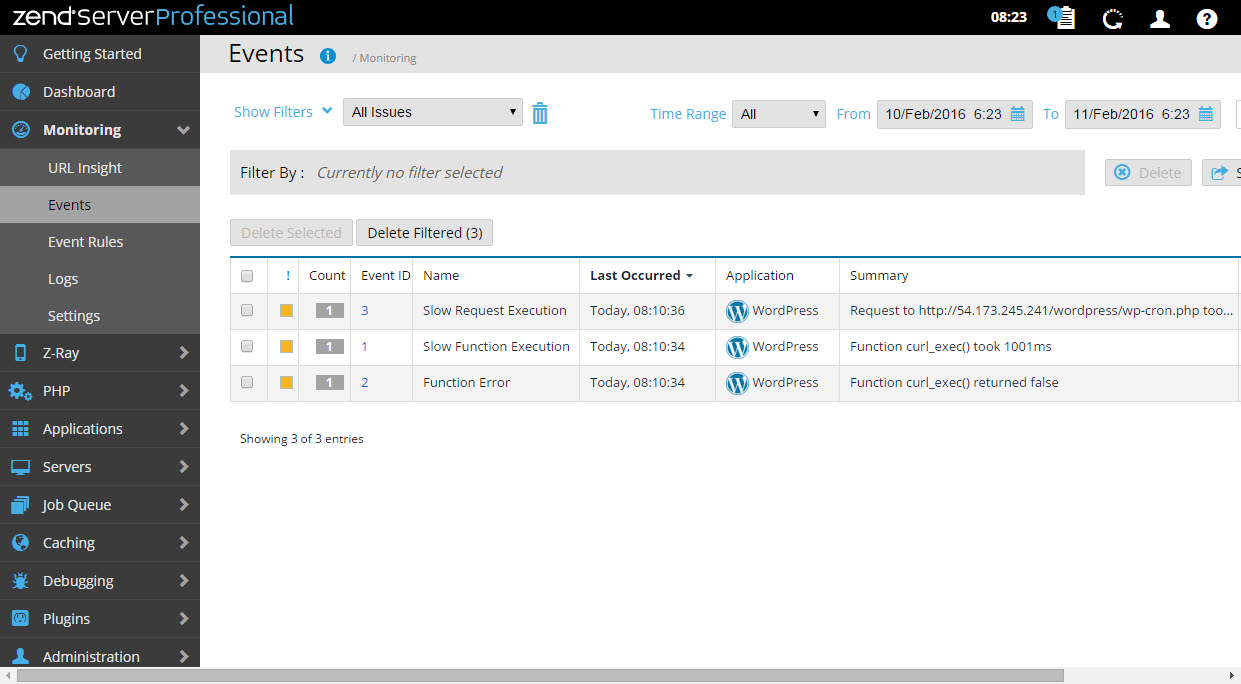
On the application level, Zend Server offers a set of advanced monitoring capabilities that will notify us when something went wrong during execution.
在应用程序级别,Zend Server提供了一组高级监视功能,这些功能将在执行过程中出现问题时通知我们。
Zend Monitoring for example, triggers and displays events when thresholds we defined are crossed. If for example, a request took too long to execute, an event is triggered and we can be notified by email of the event.
例如,Zend Monitoring会在超过我们定义的阈值时触发并显示事件。 例如,如果请求执行时间太长,则会触发事件,并且可以通过电子邮件将事件通知我们。
URL Insight is another useful tool which displays reports on critical URLs. For example, we can view a list of the ten most visited URLs, or – the ten slowest URLs.
URL Insight是另一个有用的工具,可显示有关关键URL的报告。 例如,我们可以查看十个访问量最大的URL列表,或–十个最慢的URL。
结论 (Conclusion)
Running PHP clusters on the cloud is a huge task which usually involves a long list of challenges. From executing a scaling policy, to database handling, log analysis, session sharing and PHP synchronization. While there are numerous existing solutions to handle these tasks, most include manual labor and hand holding. Writing and managing scripts to execute all of the above is of course a valid option, but also time and resource consuming.
在云上运行PHP集群是一项艰巨的任务,通常涉及很多挑战。 从执行扩展策略到数据库处理,日志分析,会话共享和PHP同步。 现有许多解决方案可解决这些任务,但大多数解决方案包括体力劳动和手持。 编写和管理脚本以执行上述所有操作当然是有效的选择,但同时也浪费时间和资源。
The elastic LAMP stack provided by Zend Server on AWS provides a very compelling alternative. Simplifying cluster management, this solution provides an easy answer to most of the common tasks involved in running a PHP cluster.
由Zend Server在AWS上提供的弹性LAMP堆栈提供了一种非常引人注目的替代方案。 该解决方案简化了集群管理,为运行PHP集群所涉及的大多数常见任务提供了简单的答案。
Hope you enjoyed the read!
希望您喜欢阅读!
翻译自: https://www.sitepoint.com/running-an-elastic-lamp-stack-on-aws/
aws stack


 684
684

 被折叠的 条评论
为什么被折叠?
被折叠的 条评论
为什么被折叠?
 到【灌水乐园】发言


