


intro.min.js
In a previous article, An Introduction to Product Tours with Intro.js, we discussed the importance of creating product tours and how we can use Intro.js to create awesome product tours. Unfortunately, we configured each step manually – a methodology that is not suitable for users with limited programming knowledge. However, the real power of Intro.js comes from its ability to create product tours on dynamic content without much programming. This tutorial will teach you how to integrate Intro.js into WordPress.
在上一篇文章Intro.js产品导览中 ,我们讨论了创建产品导览的重要性以及如何使用Intro.js创建很棒的产品导览。 不幸的是,我们手动配置了每个步骤,这种方法不适用于编程知识有限的用户。 但是,Intro.js的真正功能来自于无需过多编程即可在动态内容上创建产品导览的能力。 本教程将教您如何将Intro.js集成到WordPress中。
构建一个Intro.js WordPress插件 (Building an Intro.js WordPress Plugin)
Plugins are the recommended components for adding custom behavior into WordPress. We will be using a plugin to integrate Intro.js into WordPress. Begin by creating a new folder within the wp-content/plugins folder and name it wpintrojs. Next, create the main plugin file, index.php, and use the following code to define the plugin.
推荐使用插件将自定义行为添加到WordPress。 我们将使用一个插件将Intro.js集成到WordPress中。 首先在wp-content/plugins文件夹中创建一个新文件夹,并将其命名为wpintrojs 。 接下来,创建主插件文件index.php ,并使用以下代码定义插件。
<?php
/*
Plugin Name: Introjs Tours
Plugin URI:
Description: Integrating intro.js powered product tours into WordPress
Author: Your Name
Version: 1.0
Author URI: http://www.innovativephp.com/
*/
Next, login as admin and activate the plugin in the Plugins section.
接下来,以admin身份登录并在“插件”部分中激活插件。
创建产品浏览步骤 (Creating Product Tour Steps)
In the previous tutorial, we configured each step manually by assigning the necessary data-attributes and values. Here, we need a simpler way to configure tour steps, as the content is generated dynamically within WordPress. So, it’s essential to build a plugin specific page to configure the steps. Let’s start by adding new a plugin specific page using the following code.
在上一教程中,我们通过分配必要的data-attributes和值来手动配置每个步骤。 在这里,我们需要一种更简单的方法来配置游览步骤,因为内容是在WordPress中动态生成的。 因此,必须构建特定于插件的页面来配置步骤。 首先,使用以下代码添加新的插件特定页面。
add_action( 'admin_menu', 'wpintro_menu_page' );

function wpintro_menu_page(){
  add_menu_page( 'Product Tours', 'Product Tours', 'manage_options', 'wpintro_tour', 'wpintro_menu_page_display', plugins_url( 'myplugin/images/icon.png' ), 6 );
  add_submenu_page( 'wpintro_tour', 'Manage Steps', 'Manage Steps', 'manage_options', 'wpintro_tour_steps', 'wpintro_manage_steps_display' );
}
In this code, we have a main admin page as well as a sub menu page. The main menu page is used to configure the steps, while the sub menu page is used to configure the order of the steps within the tour. First, we are going to look at the product step creation page by implementing the wpintro_menu_page_display function used in the previous code block. This function is shown below.
在这段代码中,我们有一个主管理页面和一个子菜单页面。 主菜单页面用于配置步骤,子菜单页面用于配置游览中步骤的顺序。 首先,我们将通过实现上一个代码块中使用的wpintro_menu_page_display函数来查看产品步骤创建页面。 该功能如下所示。
function wpintro_menu_page_display() {
global $wip_message;
$pages = get_pages();
$html = '';
if ($wip_message != '') {
$html .= '<div style="background:#9FD09F;padding:5px;">' . $wip_message . '</div>';
}
$html .= '<h2>Create Product Tour</h2>';
$html .= '<form action="" method="post">';
$html .= '<table class="form-table"><tbody>';
$html .= ' <tr valign="top">
<th scope="row"><label>Select Page</label></th>
<td><select class="regular-text" id="wpi_page" name="wpi_page">';
foreach ($pages as $page) {
$html .= '<option value="' . get_page_link($page->ID) . '">';
$html .= $page->post_title;
$html .= '</option>';
}
$html .= ' </select></td>
</tr>';
$html .= ' <tr valign="top">
<th scope="row"><label>Intro Text</label></th>
<td><textarea class="regular-text" id="wpi_intro_text" name="wpi_intro_text"></textarea></td>
</tr>';
$html .= ' <tr valign="top">
<th scope="row"><label>Element ID</label></th>
<td><input type="text" class="regular-text" id="wpi_element_id" name="wpi_element_id"/></td>
</tr>';
$html .= ' <tr valign="top">
<th scope="row"><label></label></th>
<td><input type="hidden" class="regular-text" id="wpi_action" name="wpi_action" value="save_steps" />
<input type="submit" class="regular-text" id="wpi_submit" name="wpi_submit" value="Save" /></td>
</tr>';
$html .= '</tbody></table></form>';
echo $html;
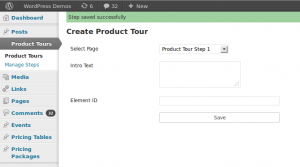
}This function is used to display the contents of the menu page. The page consists of a heading and a HTML form for generating steps. The form contains three fields for adding new steps.
此功能用于显示菜单页面的内容。 该页面包含一个标题和一个用于生成步骤HTML表单。 该表格包含三个用于添加新步骤的字段。
- Element ID – This is used to define the ID of the HTML element used for the step. 元素ID –用于定义用于步骤HTML元素的ID。
- Select Page – This is used to select the page containing the assigned Element ID. 选择页面–用于选择包含分配的元素ID的页面。
- Intro Text – This is used to define the description to be displayed with each step in product tour. 简介文本–用于定义要在产品浏览的每个步骤中显示的描述。
Once implemented, the step creation screen will resemble the following image.
一旦实现,步骤创建屏幕将类似于下图。
You can use the Product Tour page to add any number of steps to the tour. Next, let’s move into the data saving process.
您可以使用“产品浏览”页面向该浏览添加任意数量的步骤。 接下来,让我们进入数据保存过程。
add_action('init', 'wpintro_save_steps');

function wpintro_save_steps() {
  global $wip_message;

  if (isset($_POST['wpi_action']) && $_POST['wpi_action'] == 'save_steps') {
    $intro_text = $_POST['wpi_intro_text'];
    $page = $_POST['wpi_page'];
    $element_id = $_POST['wpi_element_id'];
    $step_data = get_option('wpi_step_data', '');

    if ($step_data != '') {
      $step_data = unserialize($step_data);
      $step_data["wip" . rand(1000, 1000000)] = array("desc" => $intro_text, "url" => $page, "id" => $element_id);
    } else {
      $step_data = array("wip" . rand(1000, 1000000) => array("desc" => $intro_text, "url" => $page, "id" => $element_id));
    }

    $step_data = serialize($step_data);
    update_option('wpi_step_data', $step_data);
    $wip_message = "Step saved successfully";
  } else {
    $wip_message = "";
  }
}
Here, we have used the init action to define a function called wpintro_save_steps. Generally, the init action is used to intercept user submitted data through $_GET or $_POST. We used a hidden field inside the form to define an action for the saving process. We have to check the action as this function can intercept user submitted data though other forms. Then, we assign the $_POST data into variables.
在这里,我们使用了init操作来定义一个名为wpintro_save_steps的函数。 通常, init操作用于通过$_GET或$_POST拦截用户提交的数据。 我们在表单内部使用了一个隐藏字段来定义保存过程的操作。 我们必须检查操作,因为此功能可以通过其他形式拦截用户提交的数据。 然后,我们将$_POST数据分配给变量。
Next, we check the existing step data from the database using the wpi_step_data key in the wp_options table. Since we are saving the first step, the wpi_step_data key will not be available in the database. Therefore, we assign the values into an array with random unique keys, and save to database as a serialized value. For the remaining steps, we can unserialize the existing values, add the new values, and save the values again as serialized value. Finally, we display a success message to the user.
接下来,我们使用wp_options表中的wpi_step_data键检查数据库中现有的步骤数据。 由于我们保存了第一步,因此wpi_step_data键在数据库中将不可用。 因此,我们将这些值分配给具有随机唯一键的数组,并将其作为序列化值保存到数据库。 对于剩余的步骤,我们可以反序列化现有值,添加新值,然后再次将这些值另存为序列化值。 最后,我们向用户显示一条成功消息。
Up until this point, we looked at how to create and save product steps into database. Next, we are going to look at the sub menu page for ordering steps.
到目前为止,我们研究了如何创建产品步骤并将其保存到数据库中。 接下来,我们将在子菜单页面上查看订购步骤。
配置步骤顺序 (Configuring the Order of Steps)
We can add any number of steps using the previous form, and they will be saved in the order of creation by default. Unless you have a very good plan for the product tour, it’s difficult to create the steps in the correct order. And, in some cases you may need to add new steps to the middle of the tour. In such cases, it’s important to have the ability to configure the ordering of the steps. Drag and drop is the easiest way of enabling step reordering. We can use jQuery UI’s sortable functionality to create the sort order for the steps.
我们可以使用以前的表格添加任意数量的步骤,默认情况下,它们将按照创建顺序保存。 除非您有一个很好的产品计划,否则很难以正确的顺序创建步骤。 而且,在某些情况下,您可能需要在游览的中间添加新的步骤。 在这种情况下,具有配置步骤顺序的能力很重要。 拖放是启用步骤重新排序的最简单方法。 我们可以使用jQuery UI的可排序功能来创建步骤的排序顺序。
Let’s display all the available steps for sorting, within the sub menu page created earlier.
让我们在前面创建的子菜单页面中显示所有可用的排序步骤。
function wpintro_manage_steps_display() {
$step_data = get_option('wpi_step_data', '');
if ($step_data != '') {
$step_data = unserialize($step_data);
}
echo "<div id='sortable'>";
foreach ($step_data as $key => $data) {
echo "<div class='wip_sort' style='margin:5px; border:2px solid; background: #fff;' data-identifier=" . $key . " >
<ul>
<li>" . $data['url'] . "</li>
<li>" . $data['desc'] . "</li>
<li>" . $data['id'] . "</li>
</ul>
</div>";
}
echo "</div>";
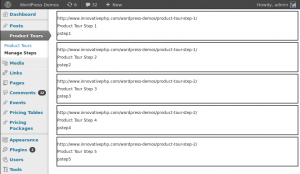
}The wpi_step_data option is used to retrieve the existing steps from the database. After unserializing the data, we use div containers to display the steps inside a container with the ID sortable. Your screen should now look similar to the following image.
wpi_step_data选项用于从数据库检索现有步骤。 将数据反序列化后,我们使用div容器显示ID为sortable的容器中的步骤。 现在,您的屏幕应类似于下图。
Next, we have to integrate jQuery UI for enabling drag and drop. Let’s move to the code block for inserting the necessary JavaScript files.
接下来,我们必须集成jQuery UI以启用拖放功能。 让我们转到用于插入必要JavaScript文件的代码块。
function wpintro_admin_scripts() {
  wp_enqueue_script('jquery-ui-core');
  wp_enqueue_script('jquery-ui-sortable');
  wp_register_script('wpintro_admin', plugin_dir_url(__FILE__) . 'admin.js', array('jquery'));
  wp_enqueue_script('wpintro_admin');

  $config_array = array(
    'ajaxURL' => admin_url('admin-ajax.php'),
  );

  wp_localize_script('wpintro_admin', 'conf', $config_array);
}

add_action('admin_enqueue_scripts', 'wpintro_admin_scripts');
It is good practise to use the admin_enqueue_scripts action hook for assigning scripts and styles required for the admin section. Here, we have used wp_enqueue_script for the jQuery UI core and sortable source files, as they are available by default inside WordPress core. We have to use both the wp_register_script and wp_enqueue_script functions, as admin.js is a custom JavaScript file. Finally, we use the wp_localize_script function for adding necessary configuration data to admin.js.
优良作法是使用admin_enqueue_scripts操作挂钩来分配admin部分所需的脚本和样式。 在这里,我们将wp_enqueue_script用于jQuery UI核心和可排序的源文件,因为它们在WordPress核心中默认可用。 我们必须同时使用wp_register_script和wp_enqueue_script函数,因为admin.js是自定义JavaScript文件。 最后,我们使用wp_localize_script函数向admin.js添加必要的配置数据。
Let’s look at the admin.js file (shown below) for handling sort order of steps.
让我们看一下用于处理步骤排序顺序的admin.js文件(如下所示)。
jQuery(document).ready(function() {
  jQuery("#sortable").sortable({
    update: function() {
      var selected_ids = "";

      jQuery(".wip_sort").each(function() {
        selected_ids += jQuery(this).attr("data-identifier")+"@";
      });

      jQuery.post(conf.ajaxURL, {
        action: "wpintro_update_step_order",
        data: selected_ids,
      }, function(data) { }, "json");
    }
  });

  jQuery("#sortable").disableSelection();
});
We enable the sortable functionality on the #sortable container. All the main div elements inside the #sortable container will get the drag and drop features. We can move the div elements to setup the correct order of steps. jQuery UI will execute the update function each time we move the elements by drag and drop.
我们在#sortable容器上启用了sortable功能。 #sortable容器中的所有主要div元素都将具有拖放功能。 我们可以移动div元素以设置正确的步骤顺序。 每次我们通过拖放移动元素时,jQuery UI都会执行update功能。
Once the update function is executed, we can get the element order using the random ID’s we assigned earlier. Then, we make an AJAX request to the server with the ID’s. On the server side, we have to rearrange the step data using the order of ID’s received from the AJAX request.
一旦执行了update功能,我们就可以使用之前分配的随机ID来获得元素顺序。 然后,我们使用ID向服务器发出AJAX请求。 在服务器端,我们必须使用从AJAX请求接收到的ID的顺序重新排列步骤数据。
add_action( 'wp_ajax_nopriv_wpintro_update_step_order', 'wpintro_update_step_order');
add_action('wp_ajax_wpintro_update_step_order', 'wpintro_update_step_order');

function wpintro_update_step_order() {
  $step_data = get_option('wpi_step_data', '');
  $step_data = unserialize($step_data);
  $updates_step_order = array();
  $step_order = explode('@', $_POST['data']);
  array_pop($step_order);

  for ($i = 0; $i < count($step_order); $i++) {
    $updates_step_order[$step_order[$i]] = $step_data[$step_order[$i]];
  }

  $step_data = serialize($updates_step_order);
  update_option('wpi_step_data', $step_data);
  echo json_encode($updates_step_order);
  exit;
}
The wpintro_update_step_order function is used to handle AJAX requests on the server side. First, we retrieve the existing step data from the database. Then, we loop through the step ID’s and rearrange the step data according to the updated order. Finally, we save the updated step data into the database.
wpintro_update_step_order函数用于处理服务器端的AJAX请求。 首先,我们从数据库中检索现有的步骤数据。 然后,我们遍历步骤ID,并根据更新的顺序重新排列步骤数据。 最后,我们将更新的步骤数据保存到数据库中。
We have completed the backend functionality of the product tour. At this point, we have all the product step data for implementing the tour. In the next section, we are going to look at the implementation of the product tour on the frontend.
我们已经完成了产品导览的后端功能。 至此,我们已经有了用于实现导览的所有产品步骤数据。 在下一节中,我们将研究前端的产品导览的实现。
将步骤数据与Intro.js集成 (Integrating Step Data with Intro.js)
It’s time to build the product tour by using existing step data with Intro.js. First, we must include the JavaScript and CSS files with the configuration data. I assume you have already read the previous tutorial and downloaded the Intro.js related files. Copy the intro.js and introjs.css files into the wpintrojs folder. The following code shows the inclusion of the script files on the frontend.
现在是时候通过将现有步骤数据与Intro.js结合使用来构建产品导览了。 首先,我们必须在配置数据中包含JavaScript和CSS文件。 我认为您已经阅读了上一教程并下载了Intro.js相关文件。 将intro.js和introjs.css文件复制到wpintrojs文件夹中。 以下代码显示了脚本文件在前端的包含。
add_action('wp_enqueue_scripts', 'wpintro_enqueue_script');

function wpintro_enqueue_script() {
  wp_enqueue_script('jquery');
  wp_register_script('introjs', plugin_dir_url(__FILE__) . 'intro.js');
  wp_enqueue_script('introjs');
  wp_register_style('introjscss', plugin_dir_url(__FILE__) . 'introjs.css');
  wp_enqueue_style('introjscss');
  wp_register_script('wpintro_custom', plugin_dir_url(__FILE__) . 'custom.js', array('jquery'));
  wp_enqueue_script('wpintro_custom');
  $step_data = get_option('wpi_step_data', '');
  $step_data = unserialize($step_data);
  $step_data = array_values($step_data);
  $stepdata_array = array(
    'steps' => json_encode($step_data),
  );
  wp_localize_script('wpintro_custom', 'stepData', $stepdata_array);
}
We used admin_enqueue_scripts for the backend script inclusion. wp_enqueue_scripts is the recommended action for including scripts on the frontend. In the last section, we get the step data from the database and assign it to a new JavaScript file called custom.js as a JSON encoded string. Finally, we have to create the custom.js file and include the following code to initialize the product tour.
我们将admin_enqueue_scripts用于后端脚本包含。 建议使用wp_enqueue_scripts在前端包含脚本。 在上一部分中,我们从数据库中获取步骤数据,并将其作为JSON编码的字符串分配给名为custom.js的新JavaScript文件。 最后,我们必须创建custom.js文件,并包含以下代码来初始化产品浏览。
jQuery(document).ready(function() {
var currentstep = 0;
if(QueryString.currentstep){
currentstep = QueryString.currentstep;
}
var steps_json = stepData.steps;
var wip_index=0;
steps_json = jQuery.parseJSON(steps_json);
jQuery.each(steps_json, function(k, v) {
wip_index++;
jQuery("#"+v.id).attr("data-step", wip_index).attr("data-intro", v.desc).attr("data-url", v.url);
});
jQuery("#flexi_form_start").click(function() {
introJs().setOption("doneLabel", "Next page").start().oncomplete(function() {
window.location.href = steps_json[currentstep].url + "?multipage=true¤tstep=" + currentstep;
}).onbeforechange(function(targetElement) {
currentstep = jQuery(targetElement).attr("data-step");
});
});
});First, we set the current step to zero. We use a custom function called QueryString to retrieve the query parameters from the URL. You can find the implementation of the QueryString function inside the source codes folder.
首先,我们将当前步长设置为零。 我们使用一个名为QueryString的自定义函数来从URL中检索查询参数。 您可以在源代码文件夹中找到QueryString函数的实现。
Then, we pass the step data through the jQuery.parseJSON function to create a JavaScript object. Next, we have to add the Intro.js specific data attribues to the step elements. While looping through step data, we find the element with the given ID and assign the data attributes using the values in the steps_json object.
然后,我们通过jQuery.parseJSON函数传递步骤数据以创建一个JavaScript对象。 接下来,我们必须将Intro.js特定的数据属性添加到step元素。 在遍历步骤数据时,我们找到具有给定ID的元素,并使用steps_json对象中的值分配数据属性。
Finally, we initialize Intro.js on button click as we did in the previous tutorial. Here, it’s slightly different from the previous tutorial as we are using the product tour across multiple pages instead of a standalone page. Hence, we set the URL of the page with the Intro.js multipage attribute after the completion of the first page. Also, we change the value of currentstep on each step change.
最后,我们像在上一个教程中一样,在单击按钮时初始化Intro.js。 在这里,它与上一教程略有不同,因为我们使用跨多个页面而不是独立页面的产品浏览。 因此,我们设定与Intro.js页面的URL multipage的第一页完成后属性。 同样,我们在每次步进更改时都会更改currentstep的值。
Once the user completes the product tour steps on the first page, he/she will be redirected to the next page with the multipage parameter. Let’s see how to handle the steps of subsequent pages using the following code.
用户完成首页上的产品浏览步骤后,将使用multipage参数将其重定向到下一页。 让我们看看如何使用以下代码处理后续页面的步骤。
if (RegExp("multipage", "gi").test(window.location.search)) {
var introObj = introJs();
introObj.setOption("doneLabel", "Next page").start().oncomplete(function() {
if (steps_json[currentstep]) {
window.location.href = steps_json[currentstep].url + "?multipage=true¤tstep=" + currentstep;
}
}).onbeforechange(function(targetElement) {
currentstep = jQuery(targetElement).attr("data-step");
if (steps_json.length <= (parseInt(currentstep) + 1)) {
introObj.setOption("doneLabel", "Done");
}
});
}We have to use regular expressions to filter the multipage attribute as Intro.js depends on this parameter for enabling multipage support. Inside the if statement, we have to use the same code as we did previously to enable recursive page support. We are using the completion button as Next Page. We have to check for the last step of the tour and set the label as Done using the last section of code.
我们必须使用正则表达式来过滤multipage属性,因为Intro.js依赖于此参数来启用多页支持。 在if语句内部,我们必须使用与以前相同的代码来启用递归页面支持。 我们将完成按钮用作下一页 。 我们必须检查游览的最后一步,并使用代码的最后一部分将标签设置为“完成” 。
Now it’s time to see the product tour in action. Follow the steps given here to generate the product tour and see it in action.
现在是时候观看产品导览了。 请遵循此处给出的步骤来生成产品导览并进行实际操作。
- Create a few empty pages and assign content. 创建一些空白页并分配内容。
- On each page create few HTML elements and add ID’s. 在每个页面上创建几个HTML元素并添加ID。
- Navigate to the product tour section of the plugin and select the previously created page. 导航到插件的产品浏览部分,然后选择先前创建的页面。
- Repeat the previous steps for all the steps in all the created pages. 对所有已创建页面中的所有步骤重复上述步骤。
- Finally, add the following code to one of the pages and click the link to start the tour 最后,将以下代码添加到页面之一,然后单击链接以开始浏览
<a id="flexi_form_start">Start Tour</a>扩展插件 (Extending the Plugin)
The goal of this tutorial was to introduce you to dynamic implementations of product tours with Intro.js. At this stage, the functionality of this plugin is very basic to match the scope of this tutorial. You can extend the plugin using the following suggestions to make it more effective on your WordPress site.
本教程的目的是向您介绍Intro.js的产品导览的动态实现。 在此阶段,此插件的功能非常基本,可以匹配本教程的范围。 您可以使用以下建议扩展插件,以使其在WordPress网站上更有效。
- Validate step creation with mandatory fields. 使用必填字段验证步骤创建。
- Add step removing capabilities to the step ordering section. 在步骤订购部分中添加步骤删除功能。
- Enable the ability to create multiple product tours instead of standalone product tour. 启用创建多个产品浏览而不是独立产品浏览的功能。
- Enable other configuration options of Intro.js like positions, labels, exit functions, etc. 启用Intro.js的其他配置选项,例如位置,标签,退出功能等。
结论 (Conclusion)
This tutorial has introduced you to dynamic product tours with Intro.js. So, we integrated Intro.js into WordPress for simplifying the dynamic product tour creation process. You can use the following links to download and view the demo.
本教程向您介绍了Intro.js的动态产品导览。 因此,我们将Intro.js集成到WordPress中,以简化动态产品导览创建过程。 您可以使用以下链接下载和查看演示。
Download Source CodesPreview the Demo
Let us know your experiences of using Intro.js as well as suggestions for improving the features of this plugin.
让我们知道您使用Intro.js的经验以及改善此插件功能的建议。
翻译自: https://www.sitepoint.com/creating-intro-js-powered-tours-wordpress/
intro.min.js


 918
918

 被折叠的 条评论
为什么被折叠?
被折叠的 条评论
为什么被折叠?
 到【灌水乐园】发言


