


Intro.js
介绍
Intro.js 是一个开源普通轻量级的 Javascript / CSS 库,用于添加分步介绍或提示。只有 10kB 并且没有外部依赖!
不仅提供了自定义选项,可以控制引导窗口的外观和行为。还可以设置样式、主题和动画效果,以及自定义事件和回调函数,以便在引导的不同阶段执行自定义操作
安装使用
使用npm安装
npm install intro.js --save
引入intro方法和样式
import intro from 'intro.js'
import 'intro.js/minified/introjs.min.css'
安装 Introjs 后,有两种方法可以实现引导样式
方法一:使用html
将data-intro和data-step属性添加到 HTML 元素中;然后调用 introJs().start()
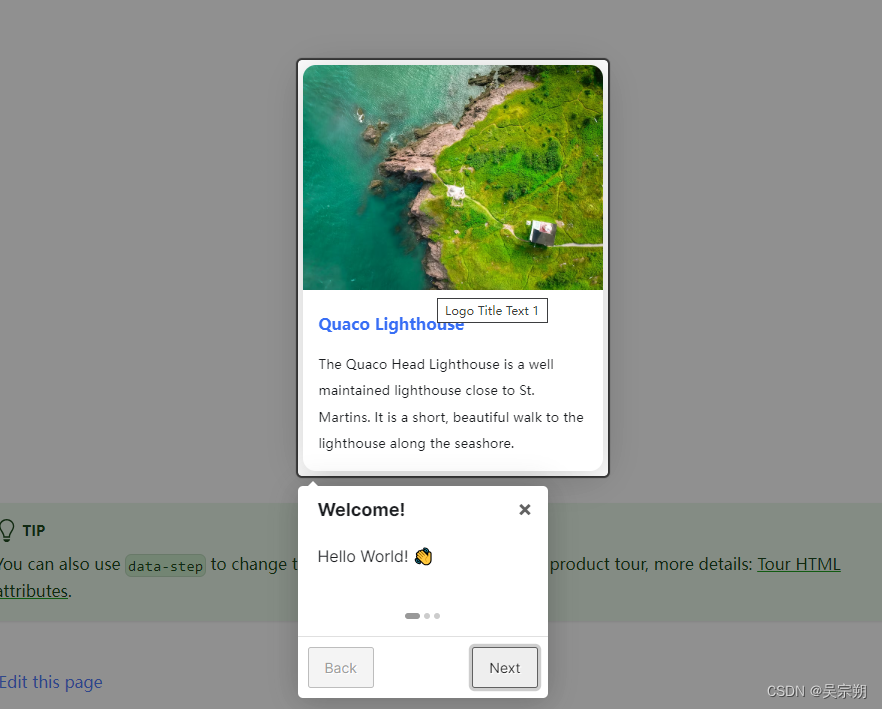
<div data-title="Welcome!" data-intro="Hello World! 👋" class="card-demo">
  <div class="card shadow--md">
    <div class="card__image" data-intro="Intro.js can highlight on elements">
      <img
        src="..."
        alt="Image alt text"
        title="Logo Title Text 1"
      />
    </div>
    <div class="card__body" data-title="Farewell!" data-intro="And this is the last step!">
      <h4>Quaco Lighthouse</h4>
      <small>
        The Quaco Head Lighthouse is a well maintained lighthouse close to St.
        Martins. It is a short, beautiful walk to the lighthouse along the
        seashore.
      </small>
    </div>
  </div>
</div>
const introJs = intro();
introJs().start();
HTML中可配置如下属性属性:
- data-intro:步骤的提示文本
- data-step:(可选)定义步骤的编号(优先级)
- data-tooltipClass:(可选)为提示定义CSS类
- data-highlightClass:(可选)将CSS类附加到helperLayer
- data-position:定义提示的位置,top,left,right,bottom,bottom-left-aligned(同bottom), bottom-middle-aligned,bottom-right-aligned或auto(检测元件的位置,并自动分配正确的位置)。默认是bottom
- data-scrollTo:滚动到的元素,element或tooltip。默认值为element。
方法二:使用 JSON 定义
在setOptions里面加入需要引导的dom节点
introJs().setOptions({
  steps: [{
    title: 'Welcome',
    intro: 'Hello World! 👋'
  },
  {
    element: document.querySelector('.card-demo'),
    intro: 'This step focuses on an image'
  },
  {
    title: 'Farewell!',
    element: document.querySelector('.card__image'),
    intro: 'And this is our final step!'
  }]
}).start();

Intro.js 会自动查找工具提示的最佳位置,但也可以使用配置 position 显式定义每个步骤的工具提示位置
introJs().setOptions({
  steps: [
  {
    element: document.querySelector('.card-demo'),
    intro: 'Tooltip has position right',
    position: 'right'
  },
  ]
}).start();

虽然说大小只有10kb,但是intro.js依然可以轻松创建引导教程,它提供了简单的 API,可以根据需要定义步骤、提示文本和高亮显示的元素。
github:https://github.com/usablica/intro.js


 609
609


 被折叠的 条评论
为什么被折叠?
被折叠的 条评论
为什么被折叠?
 到【灌水乐园】发言


