


支付宝沙箱设置
This is the second post in a three part series focused on setting up EC2 as a sandbox for application developers. I assume you have an AWS account with Amazon; if you don’t, please read Part 1 to learn how easy it is to sign up. In this installment we’ll see how to configure our development environment and install an Amazon Machine Instance (AMI) to run our applications.
这是一个由三部分组成的系列文章的第二篇,该系列文章致力于将EC2设置为应用程序开发人员的沙箱。 我假设您在亚马逊拥有一个AWS账户; 如果您不这样做,请阅读第1部分,以了解注册的难易程度。 在本期中,我们将介绍如何配置我们的开发环境以及如何安装Amazon Machine Instance(AMI)以运行我们的应用程序。
配置您的开发环境 (Configuring your Development Environment)
Before we get too carried away, let’s make sure our local client is ready to go. Amazon provides a rich set of command line tools that wraps the AWS Management Console nicely. If you’ve made it this far, chances are you prefer the command line.
在我们太过困惑之前,让我们确保我们的本地客户已准备就绪。 Amazon提供了一组丰富的命令行工具,可以很好地包装AWS管理控制台。 如果到目前为止,您可能更喜欢命令行。
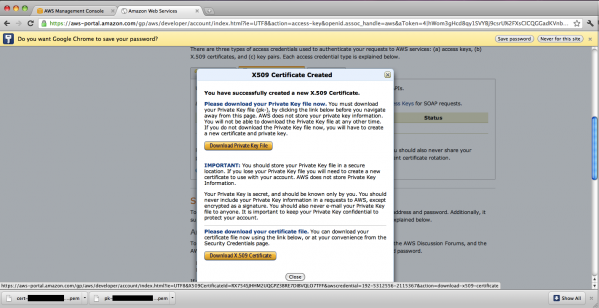
First we need to download our X.509 Certificate, which is a Public Key that allows us to make secure SOAP requests to Amazon, and our corresponding Private Key. You can download your X.509 Certificate at any point, but Amazon only gives you your Private Key once and doesn’t store it. Make sure you keep it, do not share it, and keep in mind that there is no way to recover it if it ever gets lost.
首先,我们需要下载X.509证书(这是一个公共密钥,它使我们能够向Amazon发出安全的SOAP请求)以及相应的私有密钥。 您可以随时下载X.509证书,但Amazon仅会给您一次私钥,而不会存储它。 确保保留它,不要共享它,并记住如果丢失了它就无法恢复 。
Click on Account in the top menu; this will take us to your account page. Then, click Security Credentials from the right column. Scroll down to Access Credentials, select the X.509 tab and click Create a new Certificate. A dialog will appear that has links to the two aforementioned files, your Private Key and the X.509 Certificate (Public Key). Remember that this is your only chance to download your Private Key. Be sure to do so, and store it in a secure location.
点击顶部菜单中的帐户; 这会将我们带到您的帐户页面。 然后,单击右列中的“安全凭据”。 向下滚动到“访问凭据”,选择“ X.509”选项卡,然后单击“创建新证书”。 将出现一个对话框,其中包含指向上述两个文件(您的私钥和X.509证书(公钥))的链接。 请记住, 这是您下载私钥的唯一机会 。 确保这样做,并将其存储在安全的位置。
Next, we need to download the Amazon EC2 API Tools which is the client interface to Amazon’s EC2 web services. Go to http://aws.amazon.com/developertools/.
接下来,我们需要下载Amazon EC2 API工具,它是Amazon EC2 Web服务的客户端界面。 转到http://aws.amazon.com/developertools/ 。
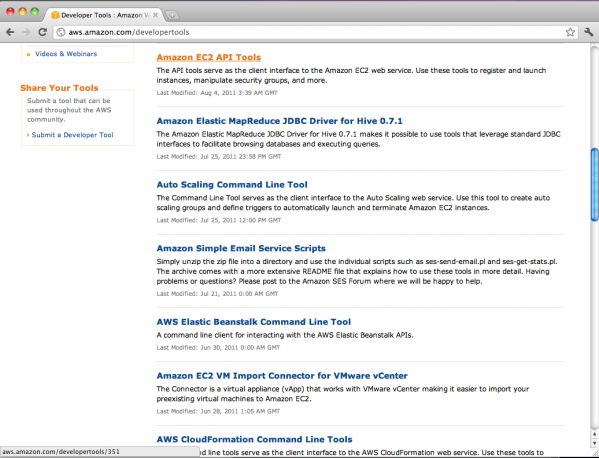
Locate and click on Amazon EC2 API Tools. Unzip the download and we should have the following files.
找到并单击Amazon EC2 API Tools。 解压缩下载文件,我们应该有以下文件。

Next, let’s open a shell and get our workstation configured to talk to Amazon and interact with our EC2 environment.
接下来,让我们打开一个外壳,并将工作站配置为与Amazon对话并与我们的EC2环境进行交互。
First, create the hidden .ec2 directory in your home directory.
首先,在您的主目录中创建隐藏的.ec2目录。
Last login: Wed Aug 17 22:34:19 on ttys000
MacBook-Pro:~ john2$ mkdir ~/.ec2
Next, move the X.509 Certificate, the Private Key file, and the ec2-api-tools folder into ~/.ec2.
接下来,将X.509证书,私钥文件和ec2-api-tools文件夹移动到~/.ec2 。
MacBook-Pro:~ john2$ cd .ec2
MacBook-Pro:.ec2 john2$ mv ../Downloads/*.pem .
MacBook-Pro:.ec2 john2$ mv ../Downloads/ec2-api-tools-1.4.4.0 .
MacBook-Pro:.ec2 john2$ ls -las
total 16
0 drwxr-xr-x   5 john2  staff  170 Aug 17 22:38 .
0 drwxr-xr-x+ 16 john2  staff  544 Aug 17 22:35 ..
8 -rw-r--r--@  1 john2  staff  916 Aug 17 22:28 cert-{YOUR-HASH}.pem
0 drwxr-xr-x@  7 john2  staff  238 Aug  3 04:24 ec2-api-tools-1.4.4.0
8 -rw-r--r--@  1 john2  staff  924 Aug 17 22:28 pk-{YOUR-HASH}.pem
MacBook-Pro:.ec2 john2$ ls -las ec2-api-tools-1.4.4.0/
total 120
 0 drwxr-xr-x@   7 john2  staff    238 Aug  3 04:24 .
 0 drwxr-xr-x    5 john2  staff    170 Aug 17 22:38 ..
96 -rw-r--r--@   1 john2  staff  46468 Aug  3 04:19 THIRDPARTYLICENSE.TXT
 0 drwxr-xr-x@ 510 john2  staff  17340 Aug  3 04:24 bin
 0 drwxr-xr-x@  33 john2  staff   1122 Aug  3 04:24 lib
16 -rw-r--r--@   1 john2  staff   4852 Aug  3 04:19 license.txt
 8 -rw-r--r--@   1 john2  staff    539 Aug  3 04:19 notice.txt
Next, it’s a good idea to edit ~/.bash_profile to provide our machine with the necessary EC2 paths.
接下来,最好编辑~/.bash_profile我们的机器提供必要的EC2路径。
MacBook-Pro:.ec2 john2$ vi ~/.bash_profile
export EC2_HOME=~/.ec2/ec2-api-tools-1.4.4.0
export PATH=$PATH:$EC2_HOME/bin
export EC2_PRIVATE_KEY=pk-{YOUR-HASH}.pem
export EC2_CERT=cert-{YOUR-HASH}.pem
export JAVA_HOME=/System/Library/Frameworks/JavaVM.framework/Home/
Afterwards, be sure to source ~/.bash_profile to make use of these variables in the current session.
之后,请确保使用~/.bash_profile作为源,以在当前会话中使用这些变量。
MacBook-Pro:.ec2 john2$ source ~/.bash_profile
Now we have our local development environment configured to talk to EC2 and issue remote commands via the ec2 client interface. The next step is to create a key pair that we can use to launch instances; and, once launched, connect via ssh. This is a new and different set of keys than we created when configuring our SOAP client to Amazon EC2 itself.
现在,我们已将本地开发环境配置为与EC2对话并通过ec2客户端界面发出远程命令。 下一步是创建一个可用于启动实例的密钥对。 并在启动后通过ssh连接。 这是一组新的密钥,与我们将SOAP客户端配置为Amazon EC2本身时创建的密钥不同。
MacBook-Pro:.ec2 john2$ ec2-create-keypair john2.kp > john2.kp
MacBook-Pro:.ec2 john2$ ec2-describe-keypairs
KEYPAIR	john2.kp	42:a8:19:7d:85:fc:aa:e7:a8:13:cc:c2:2b:92:b9:ee:c6:6e:07:f5
MacBook-Pro:.ec2 john2$ chmod 600 john2.kp
MacBook-Pro:.ec2 john2$ cat john2.kp
KEYPAIR	john2.kp	42:a8:19:7d:85:fc:aa:e7:a8:13:cc:c2:2b:92:b9:ee:c6:6e:07:f5
-----BEGIN RSA PRIVATE KEY-----
SUPER SECRET STUFF
-----END RSA PRIVATE KEY-----
If you run into any ec2-xxx-xxxx command not found messages, be sure that ~/.bash_profile has been sourced in that particular terminal session and that the EC2-specific paths therein are correct.
如果遇到任何未找到ec2-xxx-xxxx命令的消息,请确保~/.bash_profile已在该特定终端会话中发出,并且其中EC2特定的路径正确。
寻找一个AMI (Finding an AMI)
The next step is to find an Amazon Machine Instance (AMI). An AMI is a ready-to-run image of an operating system instance. You can find a variety of AMI providers for many operating systems from Windows to Red Hat. A good place to start is http://aws.amazon.com/amis.
下一步是查找Amazon Machine Instance(AMI)。 AMI是操作系统实例的现成映像。 您可以找到从Windows到Red Hat的许多操作系统的各种AMI提供程序。 http://aws.amazon.com/amis是一个不错的起点。
If you are interested in running Ubuntu, Alestic provides reliable Ubuntu-based AMI’s. Simply go to http://alestic.com/, choose your region and browse the available images.
如果您对运行Ubuntu感兴趣,则Alestic可提供可靠的基于Ubuntu的AMI。 只需访问http://alestic.com/ ,选择您的地区并浏览可用的图像。
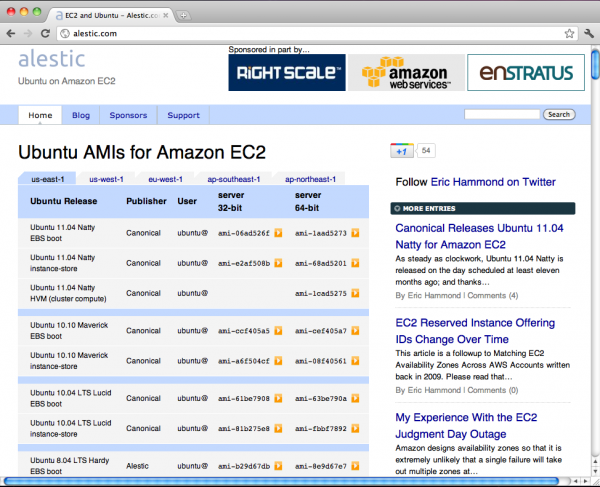
I’ll choose us-east-1 Ubuntu 11.04 Natty EBS boot server 64-bit. We can use ec2-describe-images to ensure Amazon recognizes our image ID and review the details of the image.
我选择us-east-1 Ubuntu 11.04 Natty EBS boot server 64-bit 。 我们可以使用ec2-describe-images来确保Amazon识别我们的图像ID并查看图像的详细信息。
MacBook-Pro:.ec2 john2$ ec2-describe-images ami-1aad5273
IMAGE	ami-1aad5273	099720109477/ebs/ubuntu-images/ubuntu-natty-11.04-amd64-server-20110426	099720109477	available	public		x86_64	machine	aki-427d952b			ebs	paravirtual	xen
BLOCKDEVICEMAPPING	/dev/sda1		snap-7d8f0f12	8
Now we’re ready to launch our first instance! We’ll use the key we created earlier by specifying the -k parameter. This is important because this same key will be used to connect to our instance via ssh in subsequent steps. The --instance-type argument will ultimately save a lot of money; we are building a development sandbox and we shouldn’t need more resources than a micro instance provides. Finally, we pass the ID of the chosen AMI and we have a running Ubuntu server in Amazon’s EC2 Cloud!
现在,我们准备启动我们的一审! 我们将通过指定-k参数使用先前创建的密钥。 这很重要,因为在后续步骤中将使用同一密钥通过ssh连接到我们的实例。 --instance-type参数最终可以节省很多钱; 我们正在构建开发沙箱,我们不需要比微型实例提供更多的资源。 最后,我们传递所选AMI的ID,并且在Amazon EC2 Cloud中有一个正在运行的Ubuntu服务器!
MacBook-Pro:.ec2 john2$ ec2-run-instances -k john2.kp --instance-type t1.micro ami-1aad5273
RESERVATION	r-5be89134	582155754520	default
INSTANCE	i-c795bfa6	ami-1aad5273			pending	john2.kp	0		t1.micro	2011-08-22T00:21:03+0000	us-east-1b	aki-427d952b			monitoring-disabled					ebs				paravirtual	xen		sg-f5a0899c	default
MacBook-Pro:.ec2 john2$ ec2-describe-instances
RESERVATION	r-03751f6c	582155754520	default
INSTANCE	i-c97328a8	ami-1aad5273			terminated	john2.kp	0		t1.micro	2011-08-20T00:48:15+0000	us-east-1a	aki-427d952b			monitoring-disabled					ebs			paravirtual	xen		sg-f5a0899c	default
RESERVATION	r-5be89134	582155754520	default
INSTANCE	i-c795bfa6	ami-1aad5273	ec2-75-101-238-254.compute-1.amazonaws.com	ip-10-245-202-88.ec2.internal	running	john2.kp	0		t1.micro	2011-08-22T00:21:03+0000	us-east-1b	aki-427d952b			monitoring-disabled	75.101.238.254	10.245.202.88			ebs					paravirtual	xen		sg-f5a0899c	default
BLOCKDEVICE	/dev/sda1	vol-58923732	2011-08-22T00:21:26.000Z
Before we connect via ssh, let’s stop our instance, start it up again, and while doing so have a look at the AWS Management Console.
在通过ssh连接之前,让我们停止实例,重新启动它,并在此过程中查看AWS管理控制台。
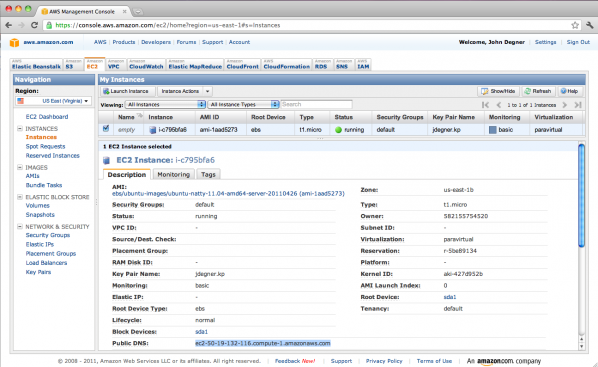
When we started our instance via ec2-run-instances, Amazon returned a unique instance ID. In the case above, it returned i-c795bfa6. This instance ID is what we use to invoke future instance specific actions, for example starting, stopping, creating AMIs, and terminating (deleting) our instance. Spend a moment here stopping and starting your instance and watching the Status column in the AWS Management Console for this instance transition from running to stopping to stopped.
当我们通过ec2-run-instances启动ec2-run-instances ,Amazon返回了唯一的实例ID。 在上述情况下,它返回了i-c795bfa6 。 我们使用该实例ID来调用将来的特定于实例的操作,例如,启动,停止,创建AMI和终止(删除)实例。 在此处花一些时间停止和启动实例,并在AWS管理控制台中查看“状态”列,以了解此实例从运行到停止再到停止的过渡。
MacBook-Pro:.ec2 john2$ ec2-stop-instances i-c795bfa6
INSTANCE	i-c795bfa6	running	stopping
In the future, you won’t need to stop and start the instance via the command line, but it is helpful to be familiar with the process. It also helps to understand the distinction between the two key pair families. The former, X.509, is for interacting with EC2 from the command line. These key pairs give us access to the 124 ec2 commands. The latter, the john2.kp keys give us access to the instance itself. Why did we only see one key from the latter’s family? We saw the Private Key, Amazon kept the Public Key. In the future, however, we can execute many of the actions provided by the command line client with the AWS Management Console. To invoke these actions select the checkbox of the instance you want to perform an action on and then find the appropriate action in the Instance Actions dropdown at the top of the My Instances section.
将来,您无需通过命令行停止和启动实例,但是熟悉该过程将很有帮助。 它还有助于理解两个密钥对家族之间的区别。 前者X.509用于从命令行与EC2进行交互。 这些密钥对使我们可以访问124 ec2命令。 后者, john2.kp键使我们可以访问实例本身。 为什么我们只看到后者家中的一把钥匙? 我们看到了私钥,亚马逊保留了公钥。 但是,将来,我们可以使用AWS管理控制台执行命令行客户端提供的许多操作。 要调用这些操作,请选中要对其执行操作的实例的复选框,然后在“我的实例”部分顶部的“实例操作”下拉列表中找到适当的操作。
Let’s start our instance back up and connect via ssh for the first time. Remember the Private Key Amazon gave us when we ran ec2-create-keypair and that we used to launch our instance via ec2-run-instances? We need that to connect to our instance via ssh. We’ll also need the public DNS entry for this instance. You can find this in the EC2-Instance details section of a selected instance within the AWS Management Console. Copy and paste this into your ssh command. We need to use the -i (identity file) flag to connect to our instance for the first time. Different AMIs have different rules for connecting for the first time, but the Ubuntu image we chose allows the user ubuntu to connect.
让我们开始备份实例,并通过ssh进行第一次连接。 还记得我们运行ec2-create-keypair时亚马逊给我们的私钥,并且我们曾经通过ec2-run-instances吗? 我们需要通过ssh连接到我们的实例。 我们还将需要此实例的公共DNS条目。 您可以在AWS管理控制台中所选实例的EC2实例详细信息部分中找到此内容。 将其复制并粘贴到ssh命令中。 我们需要使用-i (身份文件)标志来首次连接到我们的实例。 不同的AMI首次具有不同的连接规则,但是我们选择的Ubuntu映像允许用户ubuntu进行连接。
Before connecting via ssh, we need to open the necessary ports using ec2-authorize.
通过ssh连接之前,我们需要使用ec2-authorize打开必要的端口。
MacBook-Pro:.ec2 john2$ ec2-authorize default -p 22
MacBook-Pro:.ec2 john2$ ec2-authorize default -p 80
MacBook-Pro:.ec2 john2$ ssh -i john2.kp ubuntu@ec2-50-19-132-116.compute-1.amazonaws.com
This concludes Part 2 of our 3 part series on setting up a development sandbox on Amazon EC2. We have gone from a brand new account to a running Ubuntu instance. Stay tuned to enjoy the payoff of running servers at Amazon. Next we will cover setting up a LAMP stack and creating our own images!
至此,我们有关在Amazon EC2上设置开发沙箱的3部分系列的第2部分结束了。 我们已经从一个全新的帐户变成了一个正在运行的Ubuntu实例。 请继续关注,享受在亚马逊上运行服务器的收益。 接下来,我们将介绍设置LAMP堆栈并创建我们自己的图像!
Image via Lightspring / Shutterstock
图片来自Lightspring / Shutterstock
翻译自: https://www.sitepoint.com/from-zero-to-cloud-setting-up-an-ec2-sandbox-part-2/
支付宝沙箱设置


 1万+
1万+

 被折叠的 条评论
为什么被折叠?
被折叠的 条评论
为什么被折叠?
 到【灌水乐园】发言


