


There are few things that people like to do more than give their opinion about a subject of interest to them – especially on the Web. This can be very useful for engaging your site’s visitors, measuring their interest in a topic, or just allowing them to express themselves. Web 2.0, and the advent of Rich Internet Applications (RIAs), allow for the installation of polling widgets on your web site, making it easier than ever to take the pulse of your community.
人们最喜欢做的事情就是发表自己对自己感兴趣的主题的看法,尤其是在Web上。 这对于吸引网站访问者,衡量他们对某个主题的兴趣或只是让他们表达自己的意见非常有用。 Web 2.0和富Internet应用程序(RIA)的出现允许在您的网站上安装轮询小部件,从而比以往任何时候都更容易获得社区的支持。
There are several different technologies you could use to build an interactive voting widget, but the end user needs to be considered carefully. For instance, you could use Ajax – but this approach can introduce issues with client-side compatibility. You could use Applets, but that’s not a popular choice at the moment – too many web surfers disable the Java VM in their browsers.
您可以使用几种不同的技术来构建交互式投票窗口小部件,但是最终用户需要仔细考虑。 例如,您可以使用Ajax –但是这种方法可能会引入客户端兼容性问题。 您可以使用Applet,但这不是一个流行的选择-太多的网络冲浪者在其浏览器中禁用了Java VM。
A very good option, on the other hand, is Flash. Practically everyone has it installed – who hasn’t come across a link to YouTube at some point and wanted to watch a video?
另一方面,Flash是一个很好的选择。 几乎每个人都安装了该软件–谁在某个时候没有遇到指向YouTube的链接并想观看视频?
But what if you’re not across Flash? And isn’t Flash really an animator’s tool anyway? Well, as we’ll see, it’s easy for developers to build Flash applications using the Flex framework – freely available as open source from Adobe. In this article, the first of two on this complex subject, we’ll walk through the process of building a Flash widget for voting using the Flex framework.
但是,如果您不使用Flash怎么办? 而且Flash真的不是动画师的工具吗? 好了,正如我们将要看到的,开发人员可以很容易地使用Flex框架构建Flash应用程序- 可从Adobe免费开源 。 本文是这个复杂主题的第二篇,我们将逐步介绍构建Flash小部件以使用Flex框架进行投票的过程。
Download the code archive for this article if you’d like to play along at home.
如果您想在家玩,请下载本文的代码档案 。
Pay attention – there will be a quiz at the end! The first 100 people to complete the quiz will win a copy of my book, Getting Started With Flex 3, delivered to their front door for FREE, thanks to Adobe. You can also download the book in PDF format for free for a limited time.
请注意-最后会有测验 ! 前100名完成测验的人将赢得我的书《 Flex 3入门》 ,这本书是免费的,这要归功于Adobe。 您也可以在限定时间内免费下载PDF格式的图书 。
Flex基础 (Flex Basics)
Before we go any further, we’ll pause for a minute to talk about the Flex and Flash applications and where they fit into the client landscape. Take a look at the following graphic.
在继续之前,我们将暂停一分钟以讨论Flex和Flash应用程序以及它们在客户端环境中的适用位置。 看一下下面的图形。
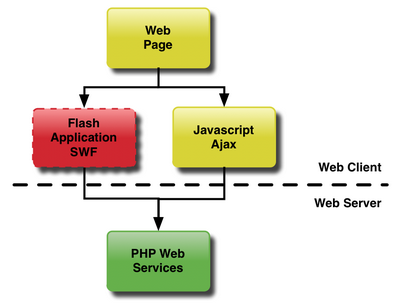
This diagram demonstrates how a Web 2.0 web page interacts with a PHP web server. The web page uses one of several tools to communicate with the web server. It can use Javascript and Ajax to make a request of the server, then update the page with the new data. Or it can use a Flash application to provide functionality to the user. This Flash application can either take up the entire page, or it may be contained to a widget that takes up just a portion of it. Flex has been used very successfully in both scenarios.
此图演示了Web 2.0网页如何与PHP Web服务器交互。 该网页使用多种工具之一与Web服务器通信。 它可以使用Javascript和Ajax发出服务器请求,然后使用新数据更新页面。 或者,它可以使用Flash应用程序向用户提供功能。 该Flash应用程序可以占用整个页面,也可以包含在仅占其一部分的小部件中。 在这两种情况下,Flex都已成功使用。
Flex applications are made of roughly three parts: the MXML that defines the interface, the ActionScript code that contains the application logic, and resources such as images and audio. To draw an analogy with web technologies, the MXML and ActionScript would be HTML and JavaScript respectively.
Flex应用程序大致由三部分组成:定义接口的MXML,包含应用程序逻辑的ActionScript代码以及诸如图像和音频之类的资源。 为了与Web技术进行类比,MXML和ActionScript分别为HTML和JavaScript。
Now you could download the SDK and program your application using a simple text editor, but there’s a better option – a really good IDE called Flex Builder 3, available free from Adobe as a 30-day trial.
现在,您可以下载SDK并使用简单的文本编辑器对应用程序进行编程,但是还有一个更好的选择–名为Flex Builder 3的非常好的IDE, 可以从Adobe免费获得 30天的试用期。
The following diagram shows Flex Builder 3 and how its function fits into the life cycle of generating a Flash application SWF.
下图显示了Flex Builder 3及其功能如何适应生成Flash应用程序SWF的生命周期。
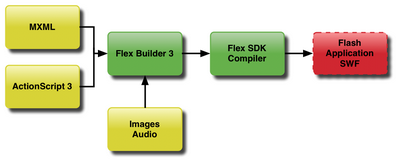
Flex Builder manages the MXML, ActionScript, and resources as a project. It uses the Flex SDK compiler to continuously compile the project as you make changes. That temporary output SWF file is then launched in your default browser to do the testing.
Flex Builder将MXML,ActionScript和资源作为项目进行管理。 当您进行更改时,它使用Flex SDK编译器连续编译项目。 然后在您的默认浏览器中启动该临时输出SWF文件以进行测试。
Hopefully this provides some context for getting started with Flex. If you’d like a more detailed walk-through of this subject, I recommend you try this excellent tutorial on Flex for beginners.
希望这为Flex入门提供了一些背景。 如果您想更详细地了解本主题,建议您尝试一下Flex上适合初学者的出色教程。
启动并运行Flex (Getting Flex Up and Running)
The Flex Builder 3 installer comes with everything you need built in. It automatically installs the Flex SDK, as well as the Eclipse-based IDE and the AIR runtime (which is useful if you want to build a desktop application rather than a web app.
Flex Builder 3安装程序附带了您所需的所有内置组件。它会自动安装Flex SDK,基于Eclipse的IDE和AIR运行时(如果要构建桌面应用程序而不是Web应用程序,这将非常有用。
Once you have Flex Builder 3 installed on your machine, launch it and you should see something like this.
在计算机上安装Flex Builder 3后,启动它,您应该会看到类似的内容。

This is the empty Flex IDE. The next step is to create our first Flex project. Select Flex Project from the New menu and you should see this window.
这是空的Flex IDE。 下一步是创建我们的第一个Flex项目。 从“新建”菜单中选择“ Flex项目”,您应该会看到此窗口。
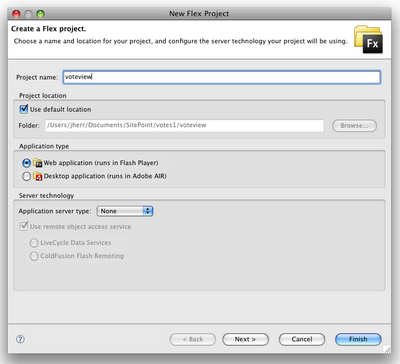
You can name your project whatever you like. I chose Voteview, since for the purposes of this article I’m only going to build an application that views the current vote totals. We’ll discover the interactive widget in the next article.
您可以随意命名项目。 我选择了Voteview ,因为出于本文的目的,我将仅构建一个查看当前投票总数的应用程序。 我们将在下一篇文章中找到交互式小部件。
After you hit Finish to build the project, you should see the result pictured below.
在单击“完成”以构建项目后,您应该会看到如下图所示的结果。
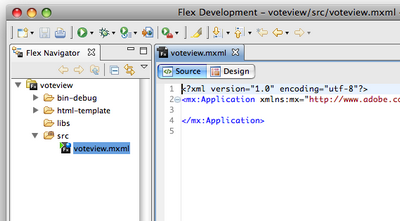
Flex Builder 3 automatically creates an MXML application with the same name as the project. In this case, the “voteview” project has one source file, voteviewer.mxml.
Flex Builder 3自动创建一个与项目同名的MXML应用程序。 在这种情况下,“ voteview”项目只有一个源文件voteviewer.mxml 。
At this point, you’re probably thinking, “I thought we were doing Flex, so what’s this MXML?” MXML is one of the two major technologies in a Flex application; it’s a tag-based language used to build user interfaces. The other is ActionScript 3, which is the programming language that we use to add interactivity to the interface.
此时,您可能在想:“我以为我们在做Flex,那么MXML是什么?” MXML是Flex应用程序中的两种主要技术之一。 它是用于构建用户界面的基于标记的语言。 另一个是ActionScript 3,这是我们用来向界面添加交互性的编程语言。
To make sure that everything’s working okay, we’ll add just a single tag to the MXML file, as shown here:
为确保一切正常,我们将仅向MXML文件添加一个标签,如下所示:
<?xml version="1.0" encoding="utf-8"?>
<mx:Application xmlns:mx="http://www.adobe.com/2006/mxml" layout="vertical">
<mx:Label text="Hello World" fontSize="20" />
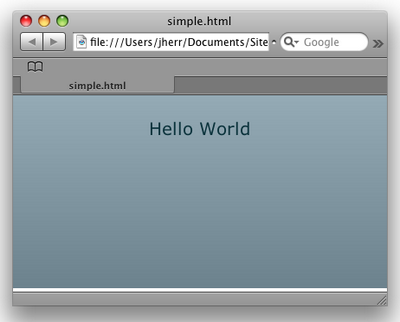
</mx:Application>The <mx:Label> tag specifies that we want a control of type Label with the text of Hello World where the font size is 20px. This figure shows the result of launching it in Flex Builder.
<mx:Label>标记指定我们想要一个Label类型为Label的控件,其文本为Hello World ,字体大小为20px。 该图显示了在Flex Builder中启动它的结果。
If that works, you know that everything is installed correctly and you’re all set to start developing in Flex.
如果这行得通,则说明一切都已正确安装,并且都准备开始在Flex中进行开发。
The next step is to put an XML file on a web server that will contain the current vote totals. This is the data that the Flex application will fetch and display.
下一步是将XML文件放在包含当前投票总数的Web服务器上。 这是Flex应用程序将获取并显示的数据。
You can format your XML any way you choose, but something along these lines is simple enough:
您可以选择任何格式来格式化XML,但是遵循这些原则就足够简单了:
<votes>

  <topic>What is the best Star Wars movie?</topic>

  <options>

    <option count="150" name="Episode IV" />

    <option count="250" name="Episode V" />

    <option count="50" name="Episode III" />

  </options>

</votes>
This XML defines that there is one question with three options, where each option has a name and a count of votes.
该XML定义了一个带有三个选项的问题,其中每个选项都有一个名称和一个投票数。
Once this XML file is up on your server somewhere (in my case, the localhost Apache server on my Mac), we can add some more tags to the MXML and get this party started!
一旦此XML文件在您服务器上的某个位置(在我的情况下为Mac上的localhost Apache服务器)上,我们就可以向MXML添加更多标签,并开始这个聚会!
Here’s a simple Flex application that reads the data from the XML file and then displays the question in a Label control, and the current votes in a DataGrid control:
这是一个简单的Flex应用程序,该应用程序从XML文件读取数据,然后在Label控件中显示问题,并在DataGrid控件中显示当前投票:
<?xml version="1.0" encoding="utf-8"?>

<mx:Application xmlns:mx="http://www.adobe.com/2006/mxml" layout="vertical"

  creationComplete="votes.send()">

  <mx:HTTPService id="votes" resultFormat="object" url="http://localhost/votes.xml" />

  <mx:Label fontSize="20" text="{votes.lastResult.votes.topic}" />

  <mx:DataGrid width="100%" dataProvider="{votes.lastResult.votes.options.option}">

    <mx:columns>

      <mx:DataGridColumn dataField="name" headerText="Movie" />

      <mx:DataGridColumn dataField="count" headerText="Vote Count" />

    </mx:columns>

  </mx:DataGrid>

</mx:Application>
There are two key elements involved in the code above. The first is the mx:HTTPService tag that defines where we will retrieve the data, and specifies an id for the data source. This service is invoked by the code attached to the creationComplete event on the Application tag.
上面的代码包含两个关键元素。 第一个是mx:HTTPService标记,该标记定义我们将在何处检索数据,并指定数据源的id 。 该服务由Application标签上的creationComplete事件附带的代码调用。
The data display is handled automatically by Flex through the magic of the Flex event model. When the HTTService has successfully downloaded the XML, the lastResult variable on the service notifies the Label and the DataGrid that it has changed. Those controls then update themselves automatically to show the new values returned by the server.
Flex通过Flex事件模型的魔力自动处理数据显示。 当HTTService成功下载XML后,服务上的lastResult变量将通知Label和DataGrid它已更改。 然后,这些控件会自动更新以显示服务器返回的新值。
Here’s the result of launching this in Flex Builder.
这是在Flex Builder中启动它的结果。
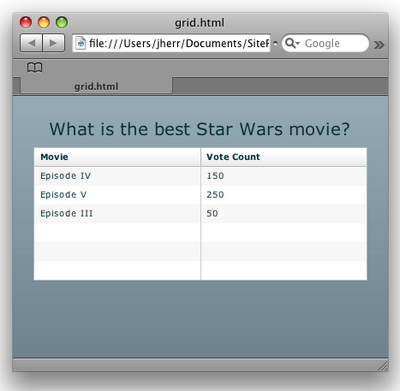
Well, it works okay, but it’s not very sexy in appearance, is it? I’m all about the sexy look, so I’m going to use Flex’s built-in charting service to display the votes in a pie chart instead of a DataGrid.
那么,它的作品不错,但它不是很性感的外观,是吗? 我全神贯注于性感的外观,因此我将使用Flex的内置图表服务在饼图中而不是DataGrid显示选票。
This updated code is shown below:
此更新的代码如下所示:
<?xml version="1.0" encoding="utf-8"?>

<mx:Application xmlns:mx="http://www.adobe.com/2006/mxml" layout="vertical"

  creationComplete="votes.send()">

  <mx:HTTPService id="votes" resultFormat="object" url="http://localhost/votes.xml" />

  <mx:Label fontSize="20" text="{votes.lastResult.votes.topic}" />

  <mx:PieChart width="100%" height="100%"

    showAllDataTips="true"

    dataProvider="{votes.lastResult.votes.options.option}">

    <mx:series>

      <mx:PieSeries field="count" labelField="name" nameField="name" explodeRadius="0.1" />

    </mx:series>

  </mx:PieChart>

</mx:Application>
The only change here is that we replaced the DataGrid with a PieChart control. When we run this in Flex Builder, we’ll see the window shown here.
唯一的变化是我们用PieChart控件替换了DataGrid 。 当在Flex Builder中运行此代码时,我们将看到此处显示的窗口。
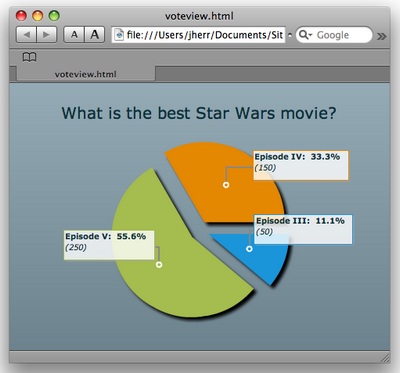
Now, that’s certainly better. A picture is worth a thousand words, as they say. But could it be even cooler? As it turns out, it can; the Elixir data visualization components available from ILOG offers a set of amazing charting controls that you can use on a trial basis.
现在,那肯定更好。 正如他们所说,一张图片值一千个字。 但是它会更凉吗? 事实证明,它可以做到; ILOG提供的Elixir数据可视化组件提供了一组令人惊叹的图表控件,您可以在试用的基础上使用它们。
Once we’ve installed the ILOG Elixir controls on the machine, we can link them into the project by referencing the Elixir libraries. From there, we add a reference to the Elixir PieChart3D instead of to the original PieChart control.
在计算机上安装ILOG Elixir控件后,可以通过引用Elixir库将它们链接到项目中。 从那里,我们添加对Elixir PieChart3D的引用,而不是对原始PieChart控件的引用。
This updated code is shown below:
此更新的代码如下所示:
<?xml version="1.0" encoding="utf-8"?>

<mx:Application xmlns:mx="http://www.adobe.com/2006/mxml" layout="vertical"

  creationComplete="votes.send()" xmlns:ilog="http://www.ilog.com/2007/ilog/flex">

  <mx:HTTPService id="votes" resultFormat="object" url="http://localhost/votes.xml" />

  <mx:Label fontSize="20" text="{votes.lastResult.votes.topic}" />

  <ilog:PieChart3D width="100%" height="100%"

    showAllDataTips="true"

    dataProvider="{votes.lastResult.votes.options.option}" elevationAngle="30">

    <ilog:series>

      <ilog:PieSeries3D field="count" nameField="name" explodeRadius="0.1" />

    </ilog:series>

  </ilog:PieChart3D>

</mx:Application>
And when brought up in Flex Builder 3, it looks like this figure.
当在Flex Builder 3中启动时,它看起来像这个图。
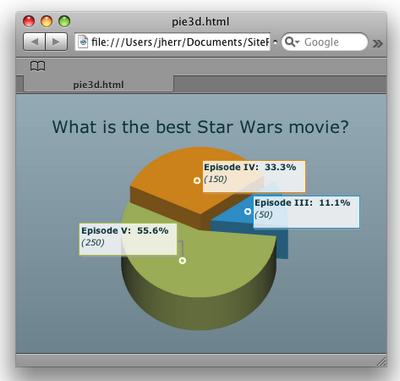
Now we’re really cooking with gas! With Elixir we can change the rotation of the chart, the colors, the viewing angle, the lighting, and more. We can even do all that on the fly by responding to mouseclick events and changing the parameters on the chart using ActionScript. This functionality allows the voter to spin the chart around and view it from different angles.
现在我们真的在用煤气做饭! 使用Elixir,我们可以更改图表的旋转,颜色,视角,照明等。 我们甚至可以通过响应鼠标单击事件并使用ActionScript更改图表上的参数来即时进行所有操作。 此功能允许投票者旋转图表并从不同角度查看它。
This is about as far as I’m going to go with the interface in this article series. To finish up, I’ll demonstrate how to use a different data transport technology, AMF, instead of XML. AMF is easier to use, particularly when you’re both reading and writing data – more on this in the next instalment!
就本系列文章中的界面而言,这已经足够了。 最后,我将演示如何使用其他数据传输技术AMF代替XML。 AMF更易于使用,尤其是在您同时读取和写入数据时–在下一期中将详细介绍!
NOTE: AMF and XML aren’t the only ways that Flex can access data. Your applications can read JSON, text, AMF, or go direct to binary data through sockets. In other words, wherever your data is and whatever the format, Flex applications can get to it.
注意 :AMF和XML并不是Flex访问数据的唯一方式。 您的应用程序可以读取JSON,文本,AMF或通过套接字直接访问二进制数据。 换句话说,无论您的数据在哪里,无论采用什么格式,Flex应用程序都可以使用它。
前往AMF (Going to AMF)
Let’s use the free AMFPHP package to build an AMF service on the web server. AMFPHP comes with a built-in service browser, which I’ll show you in a minute, plus a directory where you put your services. In this case, we’ll add a new service to a new “votes” directory called VoteService.
让我们使用免费的AMFPHP软件包在Web服务器上构建AMF服务。 AMFPHP带有一个内置的服务浏览器,稍后我将向您展示它,以及一个放置服务的目录。 在这种情况下,我们将新服务添加到名为VoteService的新“ votes”目录中。
Here’s the PHP code for VoteService:
这是VoteServicePHP代码:
<?php

include_once(AMFPHP_BASE . "shared/util/MethodTable.php");

class VoteService

{

  function getVotes()

  {

    return array( 'topic' => 'What is the best Star Wars movie?',

        'votes' => array(

            array( 'name' => 'Episode IV', 'count' => 150 ),

            array( 'name' => 'Episode V', 'count' => 250 ),

            array( 'name' => 'Episode III', 'count' => 50 )

          )

        );

  }

}
For this example, we’re just going to return the same data as we’d have gained from the XML file on the server. That way, if the results look the same we know everything’s in order.
对于此示例,我们将返回与从服务器上的XML文件获得的数据相同的数据。 这样,如果结果看起来相同,我们就会知道一切井井有条。
To test the service, navigate to the amfphp/browser directory in your browser. You should see something like this.
要测试服务,请在amfphp/browser导航到amfphp/browser目录。 您应该会看到类似这样的内容。
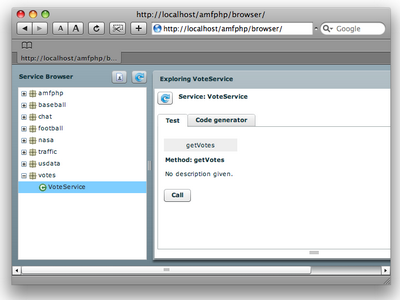
Next, click on the votes/VoteService and hit the Call button. This causes the AMF browser to invoke the service and display the results, as shown here.
接下来,单击votes/VoteService ,然后单击“呼叫”按钮。 这将导致AMF浏览器调用服务并显示结果,如下所示。
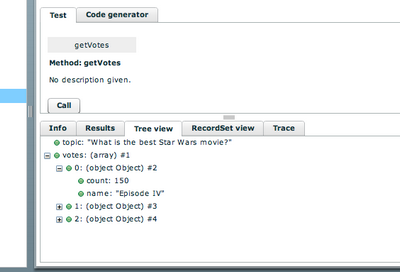
We can see that the data is returned correctly as an ActionScript object that’s very easy to manipulate.
我们可以看到,数据作为ActionScript对象正确返回了,该对象非常易于操作。
From here, we can change the HTTPService from the original PieChart application to a RemoteObject service. The RemoteObject class connects to the AMF endpoint and then defines a bunch of methods. You can see this in the updated source:
从这里,我们可以将HTTPService从原始PieChart应用程序更改为RemoteObject服务。 RemoteObject类连接到AMF端点,然后定义一堆方法。 您可以在更新的源代码中看到以下内容:
<?xml version="1.0" encoding="utf-8"?>

<mx:Application xmlns:mx="http://www.adobe.com/2006/mxml" layout="vertical"

  creationComplete="voteRO.getVotes.send()">

<mx:RemoteObject id="voteRO"

  endpoint="http://localhost/amfphp/gateway.php"

  source="votes.VoteService" destination="votes.VoteService"

  showBusyCursor="true">

<mx:method name="getVotes" />

</mx:RemoteObject>

  <mx:Label fontSize="20" text="{voteRO.getVotes.lastResult.topic}" />

  <mx:PieChart width="100%" height="100%"

    showAllDataTips="true"

    dataProvider="{voteRO.getVotes.lastResult.votes}">

...

  </mx:PieChart>

</mx:Application>
Yes, that’s a lot more code than the HTTPService required to achieve the same outcome (don’t forget to download the code archive for this article). But using AMF instead of XML will make it a lot easier to perform both the vote collection and vote addition from the widget that we’ll create in the next article of this series.
是的,这比实现相同结果所需的HTTPService多得多的代码(请不要忘记下载本文的代码档案 )。 但是,使用AMF代替XML将使我们在本系列下一篇文章中将创建的小部件中执行投票收集和投票添加变得更加容易。
下一步是什么 (What’s Next)
So far, we’ve installed Flex Builder and created an application that displays some vote tallies from either an XML or an AMF data source. In the next article, we’ll upgrade this example to provide the voter with a way to submit votes before seeing the vote tallies.
到目前为止,我们已经安装了Flex Builder,并创建了一个显示来自XML或AMF数据源的投票记录的应用程序。 在下一篇文章中,我们将升级此示例,以向投票者提供一种在看到投票记录之前提交投票的方法。
测验自己! (Quiz Yourself!)
Test your understanding of this article with a short quiz, and receive a FREE PDF of my book, Getting Started With Flex 3. The first 100 people to complete the quiz will also receive a paper copy delivered to their door for FREE, thanks to Adobe Systems.
通过简短的测验 ,测试您对本文的理解,并获得我的书《 Flex 3入门》的免费PDF。 借助Adobe Systems,完成测验的前100人也将免费获得纸质副本到他们的门口。


 125
125

 被折叠的 条评论
为什么被折叠?
被折叠的 条评论
为什么被折叠?
 到【灌水乐园】发言


