


rsync is a protocol built for Unix-like systems that provides unbelievable versatility for backing up and synchronizing data. It can be used locally to back up files to different directories or can be configured to sync across the Internet to other hosts.
rsync是为类似Unix的系统构建的协议,它为备份和同步数据提供了令人难以置信的多功能性。 它可以在本地用于将文件备份到其他目录,也可以配置为通过Internet同步到其他主机。
It can be used on Windows systems but is only available through various ports (such as Cygwin), so in this how-to we will be talking about setting it up on Linux. First, we need to install/update the rsync client. On Red Hat distributions, the command is “yum install rsync” and on Debian it is “sudo apt-get install rsync.”
它可以在Windows系统上使用,但只能通过各种端口(例如Cygwin)使用,因此在本操作方法中,我们将讨论在Linux上进行设置。 首先,我们需要安装/更新rsync客户端。 在Red Hat发行版中,命令是“ yum install rsync”,在Debian上是“ sudo apt-get install rsync”。
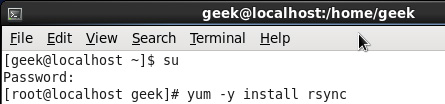
The command on Red Hat/CentOS, after logging in as root (note that some recent distributions of Red Hat support the sudo method).
以root用户身份登录后,在Red Hat / CentOS上的命令(请注意,最近发行的Red Hat发行版支持sudo方法)。
The command on Debian/Ubuntu.
Debian / Ubuntu上的命令。
使用rsync进行本地备份 (Using rsync for local backups)
In the first part of this tutorial, we will back up the files from Directory1 to Directory2. Both of these directories are on the same hard drive, but this would work exactly the same if the directories existed on two different drives. There are several different ways we can approach this, depending on what kind of backups you want to configure. For most purposes, the following line of code will suffice:
在本教程的第一部分中,我们将文件从Directory1备份到Directory2。 这两个目录都位于同一硬盘驱动器上,但是如果目录存在于两个不同的驱动器上,则这将完全相同。 我们可以采用几种不同的方法来实现此目标,具体取决于您要配置哪种备份。 对于大多数目的,下面的代码行就足够了:
$ rsync -av --delete /Directory1/ /Directory2/
$ rsync -av --delete /Directory1/ /Directory2/
The code above will synchronize the contents of Directory1 to Directory2, and leave no differences between the two. If rsync finds that Directory2 has a file that Directory1 does not, it will delete it. If rsync finds a file that has been changed, created, or deleted in Directory1, it will reflect those same changes to Directory2.
上面的代码会将Directory1的内容同步到Directory2,并且两者之间没有任何区别。 如果rsync发现Directory2具有Directory1没有的文件,它将删除它。 如果rsync在Directory1中找到已更改,创建或删除的文件,则它将对Directory2反映相同的更改。
There are a lot of different switches that you can use for rsync to personalize it to your specific needs. Here is what the aforementioned code tells rsync to do with the backups:
您可以使用很多不同的开关来使rsync个性化以满足您的特定需求。 以下是上述代码告诉rsync处理备份的内容:
1. -a = recursive (recurse into directories), links (copy symlinks as symlinks), perms (preserve permissions), times (preserve modification times), group (preserve group), owner (preserve owner), preserve device files, and preserve special files. 2. -v = verbose. The reason I think verbose is important is so you can see exactly what rsync is backing up. Think about this: What if your hard drive is going bad, and starts deleting files without your knowledge, then you run your rsync script and it pushes those changes to your backups, thereby deleting all instances of a file that you did not want to get rid of? 3. –delete = This tells rsync to delete any files that are in Directory2 that aren’t in Directory1. If you choose to use this option, I recommend also using the verbose options, for reasons mentioned above.
1. -a =递归(递归到目录),链接(将符号链接复制为符号链接),权限(保留权限),时间(保留修改时间),组(保留组),所有者(保留所有者),保留设备文件和保留特殊文件。 2. -v =详细。 我认为详细很重要的原因是,您可以确切地看到rsync正在备份什么。 考虑一下:如果硬盘坏了,并且在不知情的情况下开始删除文件,然后运行rsync脚本,它将这些更改推送到备份中,从而删除了您不想获取的文件的所有实例,该怎么办?摆脱? 3. –delete =这告诉rsync删除Directory2中所有不在Directory1中的文件。 如果选择使用此选项,出于上述原因,我建议也使用详细选项。
Using the script above, here’s the output generated by using rsync to backup Directory1 to Directory2. Note that without the verbose switch, you wouldn’t receive such detailed information.
使用上面的脚本,这是使用rsync将Directory1备份到Directory2生成的输出。 请注意,没有详细的开关,您将不会收到这样的详细信息。
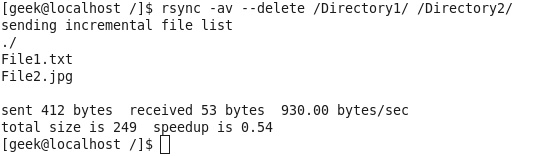
The screenshot above tells us that File1.txt and File2.jpg were detected as either being new or otherwise changed from the copies existent in Directory2, and so they were backed up. Noob tip: Notice the trailing slashes at the end of the directories in my rsync command – those are necessary, be sure to remember them.
上面的屏幕截图告诉我们,从Directory2中存在的副本中检测到File1.txt和File2.jpg是新文件还是其他更改,因此已对其进行了备份。 新手提示:请注意我的rsync命令中目录末尾的斜杠–那些是必需的,请务必记住它们。
We will go over a few more handy switches towards the end of this tutorial, but just remember that to see a full listing you can type “man rsync” and view a complete list of switches to use.
在本教程结束时,我们将介绍一些方便的开关,但请记住,要查看完整列表,您可以键入“ man rsync”并查看要使用的开关的完整列表。
That about covers it as far as local backups are concerned. As you can tell, rsync is very easy to use. It gets slightly more complex when using it to sync data with an external host over the Internet, but we will show you a simple, fast, and secure way to do that.
就本地备份而言,有关内容涵盖了该内容。 如您所知,rsync非常易于使用。 使用它通过Internet与外部主机同步数据时,它会变得稍微复杂一些,但是我们将向您展示一种简单,快速且安全的方法。
使用rsync进行外部备份 (Using rsync for external backups)
rsync can be configured in several different ways for external backups, but we will go over the most practical (also the easiest and most secure) method of tunneling rsync through SSH. Most servers and even many clients already have SSH, and it can be used for your rsync backups. We will show you the process to get one Linux machine to backup to another on a local network. The process would be the exact same if one host were out on the internet somewhere, just note that port 22 (or whatever port you have SSH configured on), would need to be forwarded on any network equipment on the server’s side of things.
可以通过几种不同的方式为外部备份配置rsync,但我们将介绍通过SSH隧道化rsync的最实用(也是最简单,最安全)的方法。 大多数服务器甚至许多客户端都已经具有SSH,并且可以将其用于rsync备份。 我们将向您展示使一台Linux机器备份到本地网络上的另一台机器的过程。 如果一台主机在Internet上的某个地方出局,则过程完全相同,只需注意端口22(或配置SSH的任何端口)都需要在服务器方面的任何网络设备上转发。
On the server (the computer that will be receiving the backups), make sure SSH and rsync are installed.
在服务器(将接收备份的计算机)上,确保已安装SSH和rsync。
# yum -y install ssh rsync
#yum -y install ssh rsync
# sudo apt-get install ssh rsync
#sudo apt-get install ssh rsync
Other than installing SSH and rsync on the server, all that really needs to be done is to setup the repositories on the server where you would like the files backed up, and make sure that SSH is locked down. Make sure the user you plan on using has a complex password, and it may also be a good idea to switch the port that SSH listens on (default is 22).
除了在服务器上安装SSH和rsync之外,真正需要做的就是在服务器上设置要备份文件的存储库,并确保SSH被锁定。 确保计划使用的用户具有复杂的密码,并且切换SSH侦听的端口也是一个好主意(默认值为22)。
We will run the same command that we did for using rsync on a local computer, but include the necessary additions for tunneling rsync through SSH to a server on my local network. For user “geek” connecting to “192.168.235.137” and using the same switches as above (-av –delete) we will run the following:
我们将运行与在本地计算机上使用rsync相同的命令,但包括必要的附加功能,以便通过SSH将rsync隧道传输到本地网络上的服务器。 对于连接到“ 192.168.235.137”并使用与上述相同的开关(-av –delete)的用户“ geek”,我们将运行以下命令:
$ rsync -av –delete -e ssh /Directory1/ geek@192.168.235.137:/Directory2/
$ rsync -av –delete -e ssh /Directory1/ geek@192.168.235.137:/Directory2/
If you have SSH listening on some port other than 22, you would need to specify the port number, such as in this example where I use port 12345:
如果您在22以外的其他端口上进行SSH侦听,则需要指定端口号,例如在本示例中,我使用端口12345:
$ rsync -av –delete -e 'ssh -p 12345' /Directory1/ geek@192.168.235.137:/Directory2/
$ rsync -av –delete -e 'ssh -p 12345' /Directory1/ geek@192.168.235.137:/Directory2/
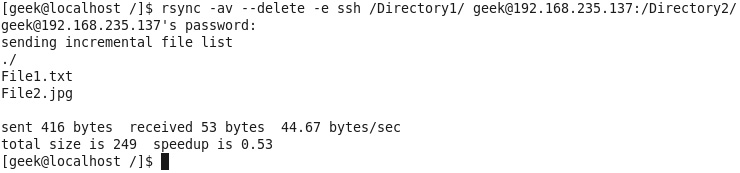
As you can see from the screenshot above, the output given when backing up across the network is pretty much the same as when backing up locally, the only thing that changes is the command you use. Notice also that it prompted for a password. This is to authenticate with SSH. You can set up RSA keys to skip this process, which will also simplify automating rsync.
从上面的屏幕快照中可以看到,通过网络备份时给出的输出与本地备份时几乎相同,唯一改变的是您使用的命令。 还要注意,它提示您输入密码。 这是通过SSH进行身份验证。 您可以设置RSA密钥来跳过此过程,这也将简化rsync的自动化。
自动化rsync备份 (Automating rsync backups)
Cron can be used on Linux to automate the execution of commands, such as rsync. Using Cron, we can have our Linux system run nightly backups, or however often you would like them to run.
Cron可以在Linux上用于自动执行命令,例如rsync。 使用Cron,我们可以让我们的Linux系统每晚运行备份,或者您经常希望它们运行。
To edit the cron table file for the user you are logged in as, run:
要为您登录的用户编辑cron表文件,请运行:
$ crontab -e
$ crontab -e
You will need to be familiar with vi in order to edit this file. Type “I” for insert, and then begin editing the cron table file.
您将需要熟悉vi才能编辑此文件。 键入“ I”进行插入,然后开始编辑cron表文件。
Cron uses the following syntax: minute of the hour, hour of the day, day of the month, month of the year, day of the week, command.
Cron使用以下语法:每小时,每天的小时,每月的某天,一年中的某月,一周中的某天,命令。
It can be a little confusing at first, so let me give you an example. The following command will run the rsync command every night at 10 PM:
刚开始时可能会有些混乱,所以让我举个例子。 以下命令将在每晚晚上10点运行rsync命令:
0 22 * * * rsync -av --delete /Directory1/ /Directory2/
0 22 * * * rsync -av --delete /Directory1/ /Directory2/
The first “0” specifies the minute of the hour, and “22” specifies 10 PM. Since we want this command to run daily, we will leave the rest of the fields with asterisks and then paste the rsync command.
第一个“ 0”指定小时数,“ 22”指定10 PM。 由于我们希望该命令每天运行,因此我们将其余字段保留星号,然后粘贴rsync命令。
After you are done configuring Cron, press escape, and then type “:wq” (without the quotes) and press enter. This will save your changes in vi.
完成Cron的配置后,按Escape键,然后键入“:wq”(不带引号)并按Enter。 这将保存您在vi中所做的更改。
Cron can get a lot more in-depth than this, but to go on about it would be beyond the scope of this tutorial. Most people will just want a simple weekly or daily backup, and what we have shown you can easily accomplish that. For more info about Cron, please see the man pages.
Cron可以比这更深入,但是继续进行下去将超出本教程的范围。 大多数人只希望每周或每天进行一次简单备份,而我们向您展示的内容可以轻松实现。 有关Cron的更多信息,请参见手册页。
其他有用的功能 (Other useful features)
Another useful thing you can do is put your backups into a zip file. You will need to specify where you would like the zip file to be placed, and then rsync that directory to your backup directory. For example:
您可以做的另一件事是将备份放入zip文件中。 您将需要指定要放置zip文件的位置,然后将该目录重新同步到备份目录。 例如:
$ zip /ZippedFiles/archive.zip /Directory1/ && rsync -av --delete /ZippedFiles/ /Directory2/
$ zip /ZippedFiles/archive.zip /Directory1/ && rsync -av --delete /ZippedFiles/ /Directory2/
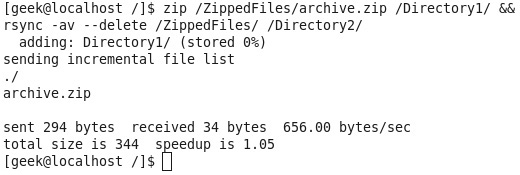
The command above takes the files from Directory1, puts them in /ZippedFiles/archive.zip and then rsyncs that directory to Directory2. Initially, you may think this method would prove inefficient for large backups, considering the zip file will change every time the slightest alteration is made to a file. However, rsync only transfers the changed data, so if your zip file is 10 GB, and then you add a text file to Directory1, rsync will know that is all you added (even though it’s in a zip) and transfer only the few kilobytes of changed data.
上面的命令从Directory1中获取文件,将它们放在/ZippedFiles/archive.zip中,然后将该目录rsync到Directory2。 最初,您可能会认为这种方法对于大型备份而言效率低下,因为每次对文件进行最小的更改时zip文件都会更改。 但是,rsync仅传输更改后的数据,因此,如果您的zip文件为10 GB,然后将文本文件添加到Directory1,则rsync将知道您添加的全部内容(即使它在zip中),并且仅传输了几千字节更改的数据。
There are a couple of different ways you can encrypt your rsync backups. The easiest method is to install encryption on the hard drive itself (the one that your files are being backed up to). Another way is to encrypt your files before sending them to a remote server (or other hard drive, whatever you happen to be backing up to). We’ll cover these methods in later articles.
有两种不同的方法可以加密rsync备份。 最简单的方法是在硬盘驱动器本身(文件要备份到的硬盘驱动器)上安装加密。 另一种方法是先将文件加密,然后再将其发送到远程服务器(或其他硬盘驱动器,无论您碰巧要备份到哪个文件)。 我们将在以后的文章中介绍这些方法。
Whatever options and features you choose, rsync proves to be one of the most efficient and versatile backup tools to date, and even a simple rsync script can save you from losing your data.
无论选择什么选项和功能,rsync都是迄今为止最有效,用途最广泛的备份工具之一,即使是简单的rsync脚本也可以避免丢失数据。
翻译自: https://www.howtogeek.com/135533/how-to-use-rsync-to-backup-your-data-on-linux/


 2944
2944

 被折叠的 条评论
为什么被折叠?
被折叠的 条评论
为什么被折叠?
 到【灌水乐园】发言


