


禁止文件夹 icloud

When you install the iCloud client on your Windows computer, it configures the shared folder in a specific location. You can, however, move this folder to another location, even another shared cloud folder or backup drive.
在Windows计算机上安装iCloud客户端时,它将在特定位置配置共享文件夹。 但是,您可以将该文件夹移动到另一个位置,甚至另一个共享的云文件夹或备份驱动器。
We talked about installing iCloud on Windows, which will then allow you to sync your photo stream and use iCloud Photo Sharing, manage your iCloud storage, and even sync your Chrome, Firefox, and Internet Explorer bookmarks.
我们讨论了在Windows上安装iCloud的问题 ,这将使您能够同步照片流并使用iCloud照片共享,管理iCloud存储,甚至同步Chrome,Firefox和Internet Explorer书签。
The iCloud folder is initially installed in your Windows’ Photos folder, which is a special folder that itself can be moved. That said, if you want to simply move your iCloud photos folder, then you can relocate it to another location other than your Photos folder.
iCloud文件夹最初安装在Windows的“照片”文件夹中,该文件夹本身是可以移动的特殊文件夹。 就是说,如果您只想移动iCloud照片文件夹,则可以将其重新定位到“照片”文件夹以外的其他位置。
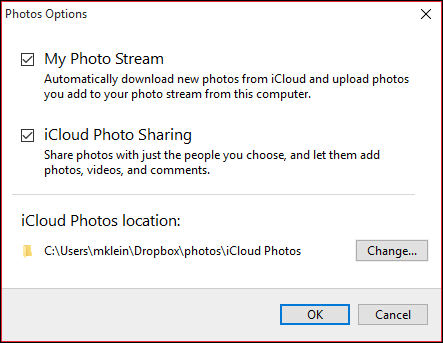
To move your iCloud Photos folder, first open the application. Notice next to “Photos” there’s an “Options…” button, which you need to click.
要移动您的iCloud Photos文件夹,请首先打开该应用程序。 注意,“照片”旁边有一个“选项...”按钮,您需要单击该按钮。

Here you can turn off “My Photo Stream” and “iCloud Photo Sharing” but what we want to focus on is the “iCloud Photos location:” at the bottom of the dialog box. Click “Change…” to move the iCloud Photos folder to a new location.
在这里,您可以关闭“我的照片流”和“ iCloud照片共享”,但是我们要关注的是对话框底部的“ iCloud照片位置:”。 单击“更改...”将iCloud Photos文件夹移动到新位置。
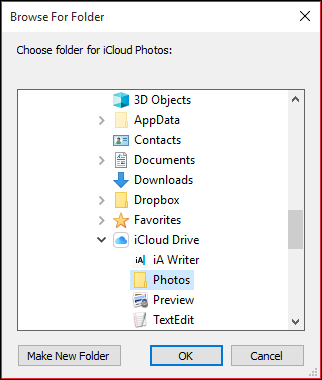
Those comfortable using Windows will be more than familiar with the next step. You will need to browse for a new folder where you want to relocate your iCloud Photos folder. In this case, we’re moving our photos folder from our Dropbox location, to our iCloud Drive folder, in our user folder.
那些习惯使用Windows的人将比下一步更熟悉。 您将需要浏览以查找要在其中重新定位iCloud Photos文件夹的新文件夹。 在这种情况下,我们会将照片文件夹从Dropbox位置移动到用户文件夹中的iCloud Drive文件夹。
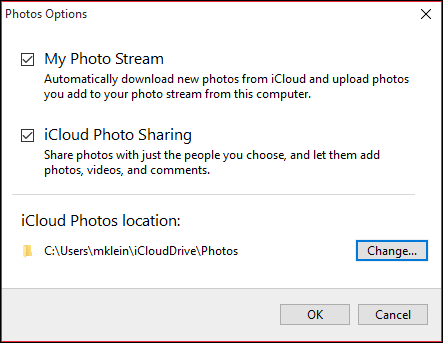
Once you click “OK” you will be taken back to the Photos Options. You will still need to click “OK” again to completely confirm your location change. Once you do, your iCloud Photos folder will be moved to the new folder or drive.
单击“确定”后,将返回到“照片选项”。 您仍然需要再次单击“确定”以完全确认您的位置更改。 完成后,您的iCloud Photos文件夹将被移至新文件夹或驱动器。
If you actually pay for iCloud, then you’re surely going to have a lot more photos to store on it. While iCloud is ideal for Apple-centric households, you may also still want to share items from your PC with it.
如果您实际上为iCloud付费,那么您肯定会在其中存储更多照片。 尽管iCloud非常适合以Apple为中心的家庭,但您可能仍然希望与其共享PC上的项目。
In that sense, it makes perfect sense to move the folder to something like a Dropbox or OneDrive folder so you can then access your iCloud photos on multiple devices. If you’re unsure which cloud service is right for you, we recommend you read our breakdown on the subject.
从这种意义上讲,将文件夹移至Dropbox或OneDrive文件夹之类的东西非常合理,这样您便可以在多个设备上访问iCloud照片。 如果您不确定哪种云服务适合您,我们建议您阅读有关该主题的细分 。
We hope you found this article useful. If you have any questions or comments you would like to add, please leave your feedback in our discussion forum.
我们希望您觉得本文有用。 如果您有任何疑问或意见要补充,请在我们的论坛中发表您的反馈意见。
翻译自: https://www.howtogeek.com/231486/how-to-change-your-windows-icloud-photos-folder-location/
禁止文件夹 icloud


 3478
3478

 被折叠的 条评论
为什么被折叠?
被折叠的 条评论
为什么被折叠?
 到【灌水乐园】发言


