


android tv存储
Android TV is an excellent set-top box platform, but many of the units available on the market today have extremely limited storage. As the ATV catalog grows, users are going to want to install more apps than ever before, even if you don’t consider the newer, space-eating games. The good news is that you can actually expand the storage on your Android TV box.
Android TV是一个出色的机顶盒平台,但是当今市场上的许多设备的存储空间都非常有限。 随着ATV目录的增长,即使您不考虑使用新的占用空间的游戏,用户也将希望安装比以往更多的应用程序。 好消息是您实际上可以扩展Android电视盒上的存储空间。
Before we get into how to do it, here’s a quick look at what you’ll need:
在我们开始做这件事之前,这里快速看一下您将需要什么:
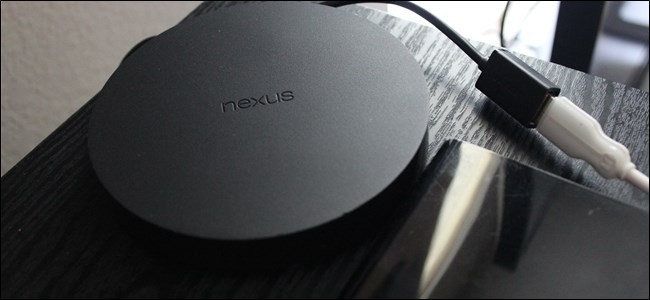
A USB OTG cable: Not all Android TV devices will require this, so you’ll need to check the back of your unit first. If it only has a one microUSB port (like Nexus Player, for example), then you’ll need an OTG cable. If it has a full size USB port (like NVIDIA SHIELD), then you won’t.
USB OTG电缆 :并非所有的Android TV设备都需要此电缆 ,因此您需要先检查设备的背面。 如果只有一个microUSB端口(例如Nexus Player),则需要一根OTG电缆。 如果它具有完整尺寸的USB端口(如NVIDIA SHIELD),则不会。
A hard drive: You could also use a flash drive, but I wouldn’t mess with anything smaller than 32GB. To really maximize your storage space, go for an external hard drive—500GB should take quite a while to fill.
硬盘驱动器 :您也可以使用闪存驱动器,但是我不会碰任何小于32GB的东西。 要真正最大化存储空间,请使用外部硬盘驱动器-500GB的存储空间将花费相当长的时间。
Once you have all the necessary hardware, it’s time to plug in and expand. When worded like that, this sounds way more intense than it actually is. We’ll be using SHIELD Android TV for this tutorial, but I’ve also tested this on Nexus Player running Android 7.0 and verified that the process is nearly identical.
拥有所有必要的硬件后,就可以插入并扩展了。 当这样说的时候,听起来比实际强度更大。 在本教程中,我们将使用SHIELD Android TV,但我也在运行Android 7.0的Nexus Player上进行了测试,并验证了该过程几乎相同。
The first thing you’ll want to do is connect the USB OTG cable if it’s required, then plug in your drive. Otherwise, just plug the drive straight in—a menu might pop up here (depending on your particular ATV device), which allows you to manipulate the drive without a lot of issues. If it does, jump down four paragraphs and start from there. If not, read on.
您要做的第一件事是连接USB OTG电缆(如果需要),然后插入驱动器。 否则,只需直接插入驱动器-此处可能会弹出一个菜单(取决于您的特定ATV设备),使您可以毫无问题地操作驱动器。 如果是这样,请跳下四个段落并从此处开始。 如果没有,请继续阅读。
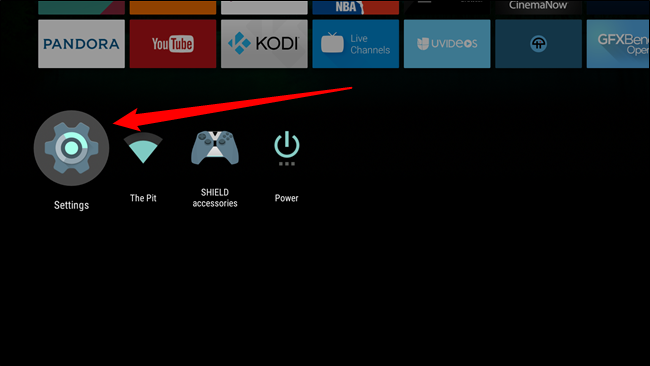
With the drive plugged in, you’ll want to jump into Android TV’s Settings menu—just scroll down to the bottom of the screen and click on the cog icon.
插入驱动器后,您将要跳到Android TV的“设置”菜单-只需向下滚动到屏幕底部,然后单击齿轮图标。
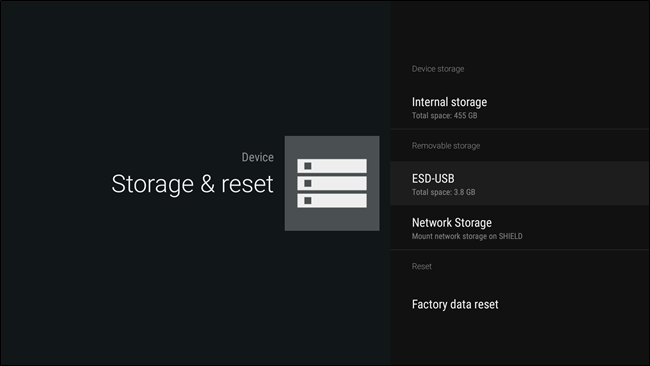
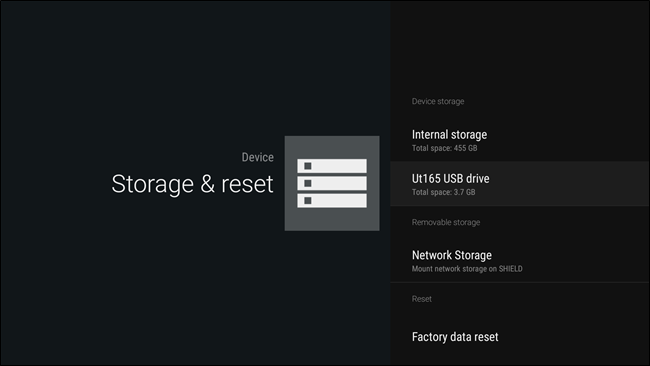
From here, scroll over to the “Storage & reset” menu.
从这里,滚动到“存储和重置”菜单。

Here, your new drive should show up. Since this is the first time you’ve put it in the device, it should show up as removable storage—that’s great for pictures, videos, and the like, but if you want to use it for apps and games, you’ll need to convert it to internal storage. Scroll down to the new drive, then click on it.
在这里,您的新驱动器应该会出现。 由于这是您第一次将其放入设备中,因此它应该显示为可移动存储-非常适合图片,视频等,但是如果您想将其用于应用和游戏,则需要将其转换为内部存储。 向下滚动到新驱动器,然后单击它。
This menu will show a couple of different options: “Eject” and “Set up as internal storage.” You want the latter.
此菜单将显示几个不同的选项:“弹出”和“设置为内部存储”。 您想要后者。

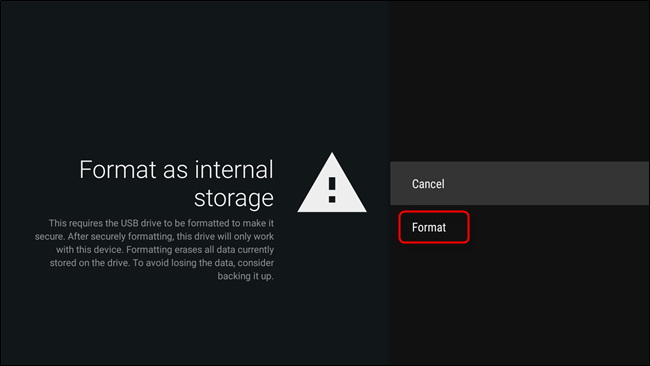
A warning will pop up letting you know that the current contents of the drive will be erased so it can be re-formatted as internal storage. If you’re cool with that, go ahead and click the “Format” button.
将弹出警告,通知您驱动器的当前内容将被删除,因此可以将其重新格式化为内部存储器。 如果您对此感到满意,请继续并单击“格式”按钮。
Depending on the size of your drive, formatting can take a bit of time. Just let it do its thing—go grab a sandwich or something. Actually, bring me one, too. Thanks.
根据驱动器的大小,格式化可能需要一些时间。 随它去吧,快来拿个三明治或其他东西。 其实也给我一个 谢谢。

Once it’s finished formatting, there will be two options: “Move now” and “Move later”—these are in reference to the apps and games that are already stored on your device. You must move data before you can start using the device. As the options suggest, you can do this now, or you can do it later. Totally your call—just keep in mind that it’ll take a while to move your data over, especially if your device’s current storage is full. Since we just ate, let’s get some coffee this time. Sugar and cream, please.
格式化完成后,将有两个选项:“立即移动”和“以后移动” —它们是指已存储在设备上的应用程序和游戏。 您必须先移动数据,然后才能开始使用设备。 如选项所示,您可以立即执行此操作,也可以稍后再执行。 完全是您的通话,请记住,转移数据将花费一些时间,尤其是在设备的当前存储空间已满的情况下。 由于我们刚吃完饭,所以这次让我们喝点咖啡。 请加糖和奶油。
Back in the Storage & reset menu, the new drive should now be listed “Device storage.” That’s what you want.
返回“存储和重置”菜单,新驱动器现在应列为“设备存储”。 那正是你想要的。
If, for any reason, you ever want to remove this drive from your Android TV device, you’ll have to go through some steps:
如果出于任何原因想要从Android TV设备中删除此驱动器,则必须执行一些步骤:
Move all apps and games back to local storage. There’s no bulk way to do this, so you’ll have to do them one at a time. That’ll take a while. Godspeed.
将所有应用程序和游戏移回本地存储。 没有大量的方法可以执行此操作,因此您一次只能执行一次。 这需要一段时间。 上帝的速度。
Erase & format the drive. Once everything is moved off of the drive, you can wipe it in the “Storage & reset” menu—just select the drive, then “Erase & format.”
擦除并格式化驱动器。 将所有内容从驱动器中移出后,您可以在“存储和重置”菜单中擦除它-只需选择驱动器,然后选择“擦除和格式化”。
Eject. Once it’s clean, eject it. Or leave it as “Removable storage.” Whatever you want.
喷射。 干净后,将其弹出。 或将其保留为“可移动存储”。 无论你想要什么。
That’s pretty much that—you’re finished with the drive and it’s safe to remove.
差不多了,您已经完成了驱动器的安装,可以安全地卸下它。
Android TV’s expandability and option of using an external device like internal storage is clutch when it comes to having a good set-top box experience. As the TV library grows, you want your device to grow with it. Shout out to Google for being forward-thinking and making that happen.
当拥有良好的机顶盒体验时,Android TV的可扩展性以及使用诸如内部存储之类的外部设备的选择是至关重要的。 随着电视库的增长,您希望设备随其增长。 喊出Google的前瞻性思维并实现这一目标。
翻译自: https://www.howtogeek.com/264981/how-to-hook-an-external-drive-up-to-android-tv/
android tv存储


 69
69


 被折叠的 条评论
为什么被折叠?
被折叠的 条评论
为什么被折叠?
 到【灌水乐园】发言


