


In our last guide, we covered how to install everything we need to get started with upgrading from AngularJS to Angular. We also covered the basics of rewriting and downgrading components.
在上一指南中 ,我们介绍了如何安装从AngularJS升级到Angular所需的一切。 我们还介绍了重写和降级组件的基础。
Now, let's learn how to work with services in an ngUpgrade project. You'll learn how to:
现在,让我们学习如何在ngUpgrade项目中使用服务。 您将学习如何:
- Rewrite an AngularJS service to Angular 将AngularJS服务重写为Angular
- Convert an observable to a promise 将可观察到的转化为承诺
- Downgrade the service so it still works with our AngularJS code 降级服务,使其仍可与我们的AngularJS代码一起使用
- Convert a promise to an observable 将承诺转化为可观察的
我们的出发点 ( Our Starting Point )
Take a minute to clone or fork this sample project on GitHub (don’t forget to run npm install in both the public and server folders). Checkout this commit to see our starting point:
花一点时间在GitHub上克隆或创建此示例项目 (不要忘记在public和server文件夹中运行npm install )。 查看此提交以查看我们的起点:
git checkout 083ee533d44c05db003413186fbef41f76466976
git checkout 083ee533d44c05db003413186fbef41f76466976
We've got a simple Order System project that we can use to work through ngUpgrade. It's using component architecture, TypeScript, and Webpack (with builds for both development and production). We've also got Angular and ngUpgrade set up and bootstrapped, and the home component has been rewritten to Angular.
我们有一个简单的Order System项目,可用于完成ngUpgrade。 它使用组件体系结构,TypeScript和Webpack(具有用于开发和生产的构建)。 我们还设置了Angular和ngUpgrade并进行了引导,并将home组件重写为Angular。
(If you're lost on any of that, we cover it all in the comprehensive video course Upgrading AngularJS.)
(如果您迷失了其中的任何一个,我们将在全面的视频课程Upgradeing AngularJS中介绍所有内容 。)
 One quick note: Things change quickly in Angular and RxJS. If you're using Angular 4.3+ or 5+, you'll see a couple slight discrepancies here compared to the sample project. The sample project uses Http in services for HTTP calls like GET and POST. We're going to use the new, much simpler HttpClient that was added as of version 4.3+. For the purposes of this tutorial, the functionality is basically the same, so just follow along here. RxJS also made some changes as of version 5.5 in the way things are imported, so we'll use that new style here.
快速说明: Angular和RxJS中的事情变化很快。 如果您使用的是Angular 4.3+或5+,则与示例项目相比,这里会出现一些细微的差异。 该示例项目在服务中将Http用于GET和POST类的HTTP调用。 我们将使用从4.3+版本开始添加的新的,更简单的HttpClient 。 就本教程而言,功能基本上是相同的,因此请按照此处进行操作。 RxJS从5.5版开始还对导入方式进行了一些更改,因此我们将在此处使用该新样式。
让我们重写AngularJS服务 ( Let's Rewrite an AngularJS Service )
When doing an ngUpgrade, it's smart to pick one route at a time and work from the bottom up. This is because it's very easy to make Angular code available to AngularJS, and we can take advantage of keeping Angular and AngularJS running side by side without worrying about breaking the app.
进行ngUpgrade时,明智的做法是一次选择一条路线,然后从下往上进行工作。 这是因为使Angular代码可用于AngularJS非常容易,并且我们可以利用保持Angular和AngularJS并排运行而不必担心破坏应用程序的优势。
Since we did the home route in the last guide, we're now ready to start on the customers route. We'll start by rewriting the CustomerService and downgrading it to make it available to our AngularJS components. Then, we'll take a look at using both observables and promises in the service, so that you can choose for yourself which will work best for you in your migration process.
由于我们在上一指南中介绍了本国路线,因此现在可以开始从customers路线出发了。 我们将从重写CustomerService并将其降级以使其可用于我们的AngularJS组件开始。 然后,我们将研究在服务中同时使用可观察性和承诺,以便您可以自己选择在迁移过程中最适合您的方法。
将HttpClient添加到NgModule (Add HttpClient to NgModule)
Before we rewrite the CustomerService, we have to explicitly import Angular's HttpClientModule into our NgModule for the app (app.module.ts) in order to make HTTP calls. This is different than in Angular JS, where everything was included by default. In Angular, we need to be explicit about which parts of Angular we want to use. While it may seem inconvient at first, this is great because it helps reduce the footprint of our application by not automatically importing unused code.
在重写CustomerService之前,我们必须将Angular的HttpClientModule显式导入到应用程序( app.module.ts )的NgModule中,以便进行HTTP调用。 这与Angular JS不同,后者默认包含所有内容。 在Angular中,我们需要明确要使用的Angular部分。 乍一看似乎并不方便,但这很好,因为它可以通过不自动导入未使用的代码来减少应用程序的占用空间。
So after line 3, we'll import it like this:
因此,在第3行之后,我们将以如下方式导入它:
import { HttpClientModule } from '@angular/common/http';
import { HttpClientModule } from '@angular/common/http';
Then, we need to add that module to our imports array after the UpgradeModule on line 12:
然后,我们需要在第12行的UpgradeModule之后将该模块添加到我们的imports数组中:
//app.module.ts
@NgModule({
    imports: [
        BrowserModule,
        UpgradeModule,
        HttpClientModule
    ],
    declarations: [
        HomeComponent
    ],
    entryComponents: [
        HomeComponent
    ]
})
Now we're able to use the HttpClientModule throughout our application. We only need to import it once and we can use it for all the rest of our services throughout the application.
现在,我们可以在整个应用程序中使用HttpClientModule。 我们只需要导入一次,就可以在整个应用程序中将其用于所有其他服务。
改写客户服务 ( Rewrite the Customer Service )
Now that we've got HttpClientModule added to our Angular app module, we're ready to rewrite the CustomerService in Angular. We'll then downgrade it so that we can still use it in our Angular JS components as well as our Angular components.
既然我们已经将HttpClientModule添加到了我们的Angular应用程序模块中,就可以用Angular重写CustomerService了。 然后,我们将其降级 ,以便仍可以在Angular JS组件和Angular组件中使用它。
The first thing we'll do is rename the customerService.ts file tocustomer.service.ts so that it follows the current naming conventions.
我们要做的第一件事是重命名customerService.ts文件customer.service.ts以便它跟随当前的命名约定。
Now, let's open the file. You'll see that we're using an ES2015 class already:
现在,让我们打开文件。 您会看到我们已经在使用ES2015类:
//customer.service.ts
class CustomerService{
    $http: any;
    constructor($http) {
        this.$http = $http;
    }

    getCustomers(){
        return this.$http.get('/api/customers')
            .then((response) => response.data);
    }

    getCustomer(id){
        return this.$http.get(`/api/customers/${id}`)
            .then((response) => response.data);
    }

    postCustomer(customer){
        return this.$http.post('/api/customers', customer)
            .then((data) => data);
    }
}

CustomerService.$inject = ['$http'];
export default CustomerService;
Angular 2+ services are equally straightforward. They're also just classes that we export, but we add the Injectable() annotation. Gone are the days of trying to remember factories, services, providers, and how to create each one. In Angular, a service is a service, and it's just an exported class with the injectable annotation. Isn't that a huge relief?
Angular 2+服务同样简单明了。 它们也只是我们导出的类,但是我们添加了Injectable()批注。 记住工厂,服务,提供商以及创建每个工厂的日子已经一去不复返了。 在Angular中,服务就是服务,它只是带有可注入批注的导出类。 这不是很大的缓解吗?
准备代码 (Prepare the Code)
The first thing we can do is delete the last two lines in this file. We no longer need the AngularJS $inject array, and instead of using export default, we're going to add the export keyword before the class declaration:
我们可以做的第一件事是删除此文件中的最后两行。 我们不再需要AngularJS $inject数组,而不是使用export default ,我们将在类声明之前添加export关键字:
export CustomerService { //etc.
export CustomerService { //etc.
Now I'm ready to import two things from Angular up at the top of the file. The first is the Injectable() annotation that I mentioned:
现在,我准备从文件顶部的Angular导入两件事。 第一个是我提到的Injectable()批注:
import { Injectable } from '@angular/core';
import { Injectable } from '@angular/core';
Next we need the HttpClient:
接下来,我们需要HttpClient:
import { HttpClient } from '@angular/common/http';
import { HttpClient } from '@angular/common/http';
Great. Now we're ready to make this an Angular service!
大。 现在,我们准备使它成为Angular服务!
将服务类更新为Angular (Update the Service Class to Angular)
First, let's add the Injectable() annotation to our CustomerService, just above the class:
首先,让我们在类上方添加Injectable()批注到我们的CustomerService:
@Injectable()
@Injectable()
There's no options object that gets passed into this annotation.
没有选项对象传递到此批注中。
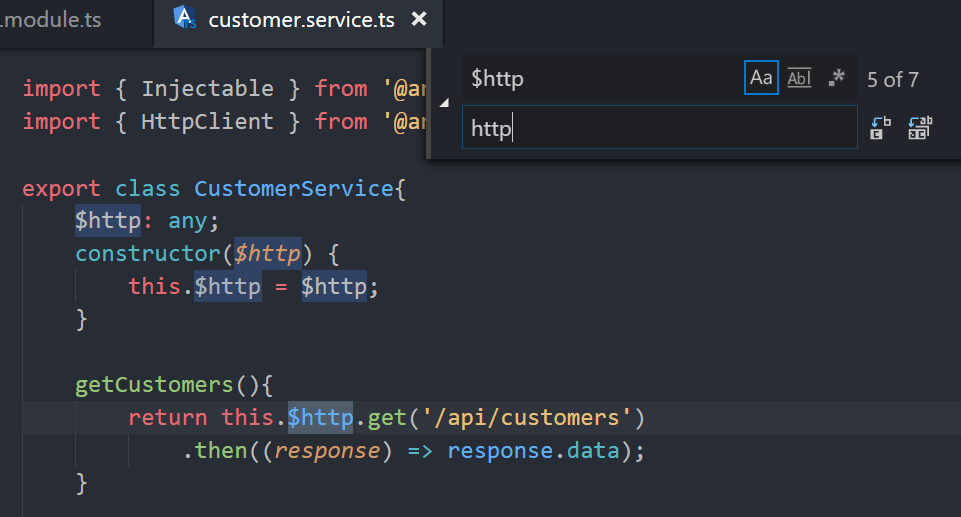
The next thing we need to do is replace all of our references to AngularJS's $http service with Angular's HttpClient. We're going to use the shorthand http for this instead, so the easiest thing to do is a find and replace in this document of $http to http, given that most of the calls will actually largely be the same:
接下来需要做的是用Angular的HttpClient替换所有对AngularJS的$http服务的引用。 我们将使用速记http代替它,因此,最简单的方法是在本文档中将$ http替换为http,因为大多数调用实际上基本上是相同的:
Now we need to change one thing about how our http property is created. Instead of this:
现在,我们需要更改有关如何创建http属性的一件事。 代替这个:
//customer.service.ts
class CustomerService{
    http: any;
    constructor(http) {
        this.http = http;
    }
...we're going to delete line six that declares a public property of http of type any. Instead, in our constructor, let's add the private keyword before http and specify that it's of type HttpClient:
...我们将删除第六行,该行声明了any类型的http的公共属性。 相反,在我们的构造函数中,让我们在http之前添加private关键字,并指定其类型为HttpClient :
//customer.service.ts
export class CustomerService{
    constructor(private http: HttpClient) {  }
With Angular's dependency injection, we're instantiating a private instance of the HttpClient service on our CustomerService.You can also see that, with the private keyword, we don't need to set our class instance of http equal to our injected instance (it does this behind the scenes for us).
通过Angular的依赖注入,我们在我们的CustomerService上实例化了HttpClient服务的私有实例。您还可以看到,使用private关键字,我们不需要将我们的http类实例设置为等于我们的注入实例(它为我们在后台执行此操作)。
What we have now is the bare bones of an Angular service, but you'll now see those red squiggly lines underneath our everywhere we use .then. You can see that the IntelliSense is telling us that property then does not exist on type observable of response:
我们现在拥有的只是Angular服务的基础,但是现在您将在我们使用的所有.then下面看到这些弯曲的红色线条。 您可以看到IntelliSense告诉我们那时可观察到的响应类型上不存在该属性:
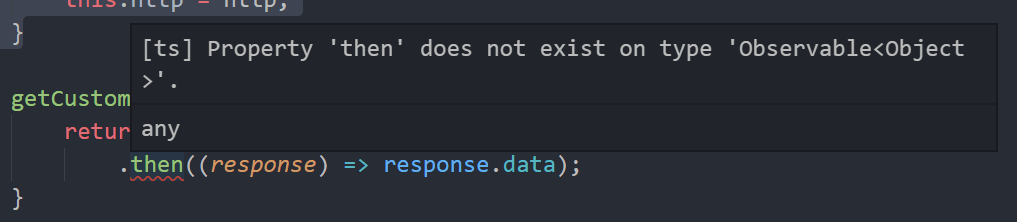
What's going on there? Let's tackle that next.
那里发生了什么事? 接下来让我们解决。
承诺还是可观察的? ( Promises or Observables? )
We've got our customer service largely rewritten to be an Angular service, but we've got a little bit of a problem with trying to use .then on these http calls. That's because the HttpClient in Angular returns an observable instead of a promise. We've got two choices here:
我们已经将客户服务很大程度上重写为Angular服务,但是尝试在这些http调用上使用.then时遇到了一些问题。 这是因为Angular中的HttpClient返回一个可观察的而不是一个Promise。 这里有两个选择:
- The practical way: convert these responses to promises and the rest of our application will work the same, or 实用的方法:将这些响应转换为承诺,然后我们的其他应用程序将按相同方式工作,或者
- The fun way: keep these responses as observables and update our components. 一种有趣的方式:将这些响应保持为可观察的状态并更新我们的组件。
With any large scale refactor or upgrade, the goal is always to lose as little up time in your application as possible. My recommended approach is to first convert the calls to promises. That way, you can determine what components and other parts of the application are dependent on the service and its calls. After you've done that, you can convert the calls one at a time to observables, and update each component accordingly. So, first, get a service over to Angular and get it working. Then worry about using observables when you feel the time is right. Or, as a friend of mine says, "First migrate, then get fancy."
对于任何大规模的重构或升级,目标始终是尽可能减少应用程序的正常运行时间。 我推荐的方法是首先将调用转换为承诺。 这样,您可以确定应用程序的哪些组件和其他部分取决于服务及其调用。 完成此操作后,您可以一次将一个调用转换为可观察的调用,并相应地更新每个组件。 因此,首先,将服务转移到Angular并使其正常运行。 然后,当您认为时间合适时,请担心使用可观察变量。 或者,正如我的一位朋友所说:“先移居,然后幻想。”
So let's first learn how to convert the calls to promises. Don't worry though - in a bit we'll do the fun thing and convert a call to an observable.
因此,让我们首先学习如何将调用转换为Promise。 不过请放心,我们会做一些有趣的事情,并将通话转换为可观察的。
toPromise运算子 (The toPromise Operator)
To convert observables to promises, we first need to import from RxJS, the library that handles observables. After our Angular imports, we just need to add:
要将可观察变量转换为承诺,我们首先需要从RxJS导入,该库处理可观察变量。 在导入Angular之后,我们只需要添加:
import { Observable } from 'rxjs/Observable';
import { Observable } from 'rxjs/Observable';
This lets us use various functions for the observable object provided by RxJS.
这使我们可以对RxJS提供的可观察对象使用各种功能。
The toPromise method lets us convert observables to promises. It used to be a separate import in previous versions of RxJS, but has now been rolled into Observable. Importing individual operators is a common pattern in RxJS, but figuring out which operators you need and where they reside in the library can be a little daunting. Be sure to go through the documentation resources that RxJS provides, as well as the Angular documentation on RxJS.
toPromise方法使我们可以将可观察值转换为承诺。 在以前的RxJS版本中,它曾经是一个单独的导入,但现在已被卷入Observable 。 导入单个运算符是RxJS中的一种常见模式,但是弄清楚您需要哪些运算符以及它们在库中的位置可能会有些困难。 确保阅读RxJS提供的文档资源以及RxJS上的Angular文档 。
Now we can use the toPromise operator before each .then in our calls. When you do that, you'll also see an error that says that .data is not a property that exists on the type "object". That's because the response already returns the data object inside of the HTTP response. All we need to do then is remove the .data. This is different than in the days of the original Http service, where we needed to call a .json function to return the data.
现在,我们可以使用toPromise每个运营商面前.then在我们的电话。 当您执行此操作时,还将看到一条错误消息,指出.data不是类型“ object”上存在的属性。 这是因为响应已经在HTTP响应内部返回了数据对象。 然后,我们需要做的就是删除.data 。 这与原始Http服务的时代不同,在原始Http服务中,我们需要调用.json函数以返回数据。
One more thing. Since we have the benefits of TypeScript, let's add the return type to each of these functions. It's always best in TypeScript to specify types when possible, even though, technically, it's not required. So, after each function name, we'll add :Promise<any>.
还有一件事。 由于我们拥有TypeScript的优势,因此我们将返回类型添加到每个函数中。 在TypeScript中最好总是在可能的情况下指定类型,即使从技术上讲并不是必需的。 因此,在每个函数名称之后,我们将添加:Promise<any> 。
The finished functions in the service will look like this:
服务中完成的功能将如下所示:
//customer.service.ts
getCustomers():Promise<any> {
   return this.http.get('/api/customers')
       .toPromise()
        .then(response => response);
}

getCustomer(id):Promise<any> {
    return this.http.get(`/api/customers/${id}`)
        .toPromise()
        .then(response => response);
}

postCustomer(customer):Promise<any> {
    return this.http.post('/api/customers', customer)
       .toPromise()
       .then(data => data);
}
Awesome, we've successfully converted the observales in our calls to promises!
太棒了,我们已经在兑现诺言的呼叫中成功地转换了观测值!
降级客户服务 ( Downgrade Customer Service )
Now that we've converted our observables to promises, we're ready to downgrade the customer service so that the not-yet-migrated AngularJS components can still use it.
现在,我们已经将可观察变量转换为承诺,我们准备降级客户服务,以便尚未迁移的AngularJS组件仍可以使用它。
This process is very similar to when we downgraded the home component in the previous guide. The first thing we need to do is import the downgradeInjectable function from the ngUpgrade library, just like we imported downgradeComponent for the home component. So after line two, we'll add:
此过程与上一指南中降级home组件的过程非常相似。 我们需要做的第一件事是从ngUpgrade库中导入downgradeInjectable函数,就像我们为home组件导入downgradeComponent一样。 因此,在第二行之后,我们将添加:
import { downgradeInjectable } from '@angular/upgrade/static';
import { downgradeInjectable } from '@angular/upgrade/static';
We also need to declare a variable called angular just like we did in our home component. So after line four, we'll add:
就像在home组件中一样,我们还需要声明一个名为angular的变量。 因此,在第四行之后,我们将添加:
declare var angular: angular.IAngularStatic;
declare var angular: angular.IAngularStatic;
Then at the bottom of our file, we'll register our service as a downgraded factory. So, after the end of the class, we'll type:
然后在文件的底部,将我们的服务注册为降级的工厂。 因此,在课程结束后,我们将输入:
angular.module('app')
    .factory('customerService', downgradeInjectable(CustomerService));
And voíla! We've downgraded the CustomerService to be available to AngularJS. Here's the finished service:
瞧! 我们已将CustomerService降级,以供AngularJS使用。 这是完成的服务:
//customer.service.ts
import { Injectable } from '@angular/core';
import { HttpClient } from '@angular/common/http';
import { Observable } from 'rxjs/Observable';
import { downgradeInjectable } from '@angular/upgrade/static';
declare var angular: angular.IAngularStatic;

@Injectable()
export class CustomerService {
    constructor(private http: HttpClient) {}

    getCustomers():Promise<any> {
        return this.http.get('/api/customers')
            .toPromise()
            .then(response => response);
    }

    getCustomer(id):Promise<any> {
        return this.http.get(`/api/customers/${id}`)
            .toPromise()
            .then(response => response);
    }

    postCustomer(customer):Promise<any> {
        return this.http.post('/api/customers', customer)
            .toPromise()
            .then((data) => data);
    }
}

angular.module('app')
    .factory('customerService', downgradeInjectable(CustomerService));
将服务移至Angular模块 ( Move the Service to the Angular Module )
Our customer service has been rewritten to an Angular service and downgraded to be available to AngularJS. Now we need to remove our reference in our AngularJS module and add it to our Angular module.
我们的客户服务已被重写为Angular服务,并降级为可用于AngularJS。 现在我们需要在AngularJS模块中删除引用,并将其添加到Angular模块中。
从AngularJS模块中删除 (Remove from the AngularJS Module)
First, let's open up our AngularJS module (app.module.ajs.ts). You can remove line 22:
首先,让我们打开AngularJS模块( app.module.ajs.ts )。 您可以删除第22行:
import CustomerService from './customers/customerService';
import CustomerService from './customers/customerService';
...as well as line 41:
...以及第41行:
.service('customerService', CustomerService)
.service('customerService', CustomerService)
That's it!
而已!
移至Angular模块 (Move to Angular Module)
Now let's add our service to our NgModule in app.module.ts so that our Angular code can access it. The first thing we need to do is import the service after line seven:
现在,将我们的服务添加到NgModule中的app.module.ts以便我们的Angular代码可以访问它。 我们需要做的第一件事是在第七行之后导入服务:
import { CustomerService } from './customers/customer.service';
import { CustomerService } from './customers/customer.service';
Now to register our customer service in our application, we need to add an array of providers to our NgModule after our entryComponents array and add our CustomerService there:
现在要在我们的应用程序中注册我们的客户服务,我们需要在entryComponents数组之后向NgModule添加一个providers数组,并在其中添加我们的CustomerService:
//app.module.ts
providers: [
        CustomerService
    ]
The providers array is where we'll register all of our services in the application. And now we've got our customer service registered in our NgModule and ready to go!
providers数组是我们将在应用程序中注册所有服务的位置。 现在,我们已经在NgModule中注册了我们的客户服务,随时可以使用!
AOT编译快速说明 (A Quick Note on AOT Compiling)
This method of downgrading -- registering the downgraded service in the service file and removing it from the AngularJS module file -- works perfectly well for development or if you plan on quickly rewriting your application before you deploy. However, the Angular AOT compiler for production won't work with this method. Instead, it wants all of our downgraded registrations in the AngularJS module. Here in this sample project, we don't need to worry about that, but I'd be remiss if I didn't mention it for use in the real world.
这种降级方法-将降级的服务注册在服务文件中,并将其从AngularJS模块文件中删除-对于开发或计划在部署之前快速重写应用程序而言,这种方法非常适用。 但是,用于生产的Angular AOT编译器不适用于此方法。 相反,它希望在AngularJS模块中所有降级的注册。 在此示例项目中,我们不必担心这一点,但是如果我不提及它在现实世界中的使用,那我将被忽略。
The downgrade is identical, but instead you'd:
降级是相同的,但是您可以:
- Import
downgradeInjectableinapp.module.ajs.ts(you've already gotangularin there so you don't need to declare it). 在app.module.ajs.ts导入downgradeInjectable(您已经在其中找到了angular,因此您无需声明它)。 - Change the import of
CustomerServicetoimport { CustomerService } from './customers/customer.service';since we switched to a named export. 将CustomerService的导入更改为import { CustomerService } from './customers/customer.service';因为我们切换到命名出口。 - Change the service registration to the exact same factory registration shown above. 将服务注册更改为与上面显示的完全相同的工厂注册。
让我们确定这项工作 (Let's Make Sure This Works)
We'd better make sure our application is still running. Let's start our Express API, then run our Webpack development server. Open a terminal and run these commands to start Express:
我们最好确保我们的应用程序仍在运行。 让我们启动Express API,然后运行Webpack开发服务器。 打开终端并运行以下命令以启动Express:
cd server
npm start
Then open another terminal and run these commands to start Webpack:
然后打开另一个终端并运行以下命令以启动Webpack:
cd public
npm run dev
You should see everything compile and bundle correctly.
您应该看到所有内容都能正确编译和捆绑。
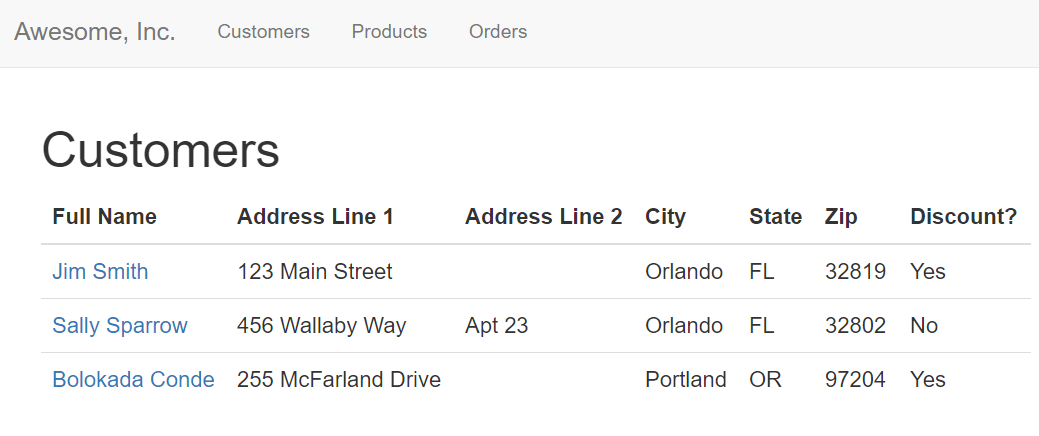
Now, open a browser and head over to localhost:9000. Let's navigate to our customers route and see if the service is working:
现在,打开浏览器并转到localhost:9000 。 让我们导航到我们的客户路线,看看该服务是否正常运行:
We can double-check that we're using the rewritten Angular service by going to the sources tab in the Chrome developer tools, navigating down to the customers folder, and clicking on the CustomerService source:
我们可以转到Chrome开发人员工具中的“来源”标签,向下导航到“ customers”文件夹,然后单击“ CustomerService”来源,以再次检查是否正在使用重写的Angular服务:
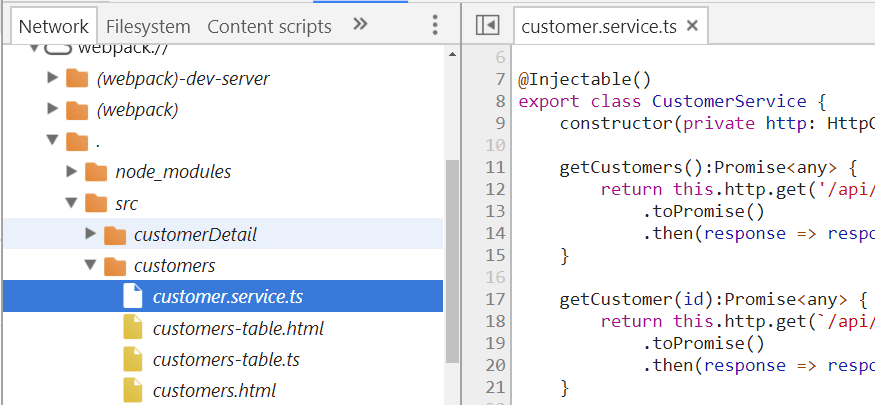
Yep, there it is - our rewritten service!
是的,这就是-我们重写的服务!
That's pretty cool, because we've updated the service to Angular, but it's being used in both the customers component and the customer table component, both of which are still in AngularJS!
太酷了,因为我们已经将服务更新到Angular,但是,它仍在customers组件和customer table组件中使用,而这两个组件仍在AngularJS中!
可以观察到的GetCustomers ( GetCustomers As Observable )
Now that we've got the CustomerService downgraded and working, let's have some fun and use that getCustomers call as an observable. That way we can start taking advantage of all the new features of observables. This is going to be a little bit tricky, because we're using the call in both the customers component and the orders component, neither of which have been rewritten to Angular yet. Don't worry - I'll show you step-by-step how to do this.
现在,我们已将CustomerService降级并正常工作,让我们玩得开心,将getCustomers调用用作可观察的对象。 这样,我们就可以开始利用可观察物的所有新功能。 这将有点棘手,因为我们在customers组件和orders组件中都使用了调用,而这两个函数都尚未重写为Angular。 不用担心-我将逐步向您展示如何执行此操作。
Back in the customer service code, the first thing that we need to do is change the return type on line 16 to Observable<any>. Of course now, TypeScript is complaining to us because we're converting toPromise, so we just need to delete both the toPromise and then functions. Super easy! It looks like this now:
回到客户服务代码中,我们要做的第一件事是将第16行的返回类型更改为Observable<any> 。 当然,现在,打字稿抱怨我们,因为我们转换toPromise,所以我们只需要同时删除toPromise和then的功能。 超级容易! 现在看起来像这样:
getCustomers():Observable<any> {
      return this.http.get('/api/customers');
}
Now we need to update our customers component to use an observable instead of a promise. We'll do that next.
现在,我们需要更新我们的客户组件,以使用可观察的代替承诺。 接下来,我们将做。
在客户组件中使用可观察对象 (Using an Observable in the Customers Component)
Our getCustomers call is now returning on observable. Let's update our customers component (customers.ts) to use an observable instead of a promise. The customers component is still an AngularJS component and that's fine, we don't need to mess with it yet, but let's use a little TypeScript to help us out. Let's import our CustomerService at the very top of our file:
我们的getCustomers调用现在可观察返回。 让我们更新客户组件( customers.ts )以使用可观察的代替承诺。 customer组件仍然是AngularJS组件,这很好,我们还不需要弄乱它,但是让我们使用一些TypeScript来帮助我们。 让我们在文件的最顶部导入我们的CustomerService:
import { CustomerService } from './customer.service';
import { CustomerService } from './customer.service';
Now that we've imported the CustomerService, we can specify the type of our injected CustomerService in our controller function definition:
现在,我们已经导入了CustomerService,我们可以在控制器函数定义中指定注入的CustomerService的类型:
//customers.ts
function customersComponentController(customerService: CustomerService){
We now have the advantage of TypeScript complaining about our .then just like it did in our CustomerService. It knows that the getCustomers call is supposed to return an observable and that .then doesn't exist on an observable.
现在,我们拥有TypeScript抱怨.then的优势,就像在CustomerService中所做的那样。 它知道getCustomers调用应该返回一个可观察的对象,而.then不存在于该可观察对象上。
The way we use an observable in a component, whether it's an AngularJS or Angular component, is to subscribe to it. Before we can subscribe to this observable, we need to import Observable just like we did in the service. So, above our CustomerService import, we'll add:
无论组件是AngularJS还是Angular组件,我们在组件中使用可观察对象的方式是订阅它。 在我们可以订阅该Observable之前,我们需要像在服务中一样导入Observable 。 因此,在我们的CustomerService导入上方,我们将添加:
import { Observable } from 'rxjs/observable';
import { Observable } from 'rxjs/observable';
This will let us use all the basic functions on observable, including subscribe. So, now on line 18 inside of our $onInit function, we can just change the then to subscribe, and everything else can stay the same.
这将使我们能够使用可观察的所有基本功能,包括subscribe 。 所以,现在我们的线18的内部$onInit功能,我们就可以改变then以subscribe ,以及其他一切可以保持不变。
Let's go look at the browser and see if this actually worked. If you head over to the customers route, you should see that everything is working the same. However, if we go over to the Orders tab, we see a big problem: no data and TypeError: Cannot read property 'fullName' of undefined in the console. What's going on here?
让我们看一下浏览器,看看它是否真的有效。 如果您转到客户路线,您应该会看到一切正常。 但是,如果转到“订单”选项卡,则会看到一个大问题:无数据和TypeError: Cannot read property 'fullName' of undefined控制台TypeError: Cannot read property 'fullName' of undefined 。 这里发生了什么?
It turns out the orders component also uses the getCustomers call, but it's still trying to use it as a promise. Let's fix that.
事实证明,orders组件也使用getCustomers调用,但仍在尝试将其用作promise。 让我们修复它。
修复订单组件 ( Fix the Orders Component )
When we rewrote our getCustomers call to be an observable instead of a promise, we accidentally broke our orders component (orders/orders.ts), which is still in AngularJS. That's because in our $onInit function, we're using $q.all to wait for two promises to return before we assign any of the data to our view model:
当我们将getCustomers调用改写为可观察的代替诺言时,我们意外地破坏了仍在AngularJS中的订单组件( orders/orders.ts )。 这是因为在我们的$onInit函数中,我们使用$q.all等待两个诺言返回,然后再将任何数据分配给视图模型:
vm.$onInit = function() {
        let promises = [orderService.getOrders(), customerService.getCustomers()];
        return $q.all(promises).then((data) => {
            vm.orders = data[0];
            vm.customers = data[1];
            vm.orders.forEach(function (order) {
                var customer = _.find(vm.customers, function (customer) {
                    return order.customerId === customer.id;
                });
                order.customerName = customer.fullName;
            });
        });
    };
This was a really common pattern in AngularJS.
这是AngularJS中非常常见的模式。
The most straightforward solution to this problem would be to just rewrite the orders component to Angular, and also rewrite the order service. But, in the real world, that's just not always possible right away. Remember, in any large-scale refactoring, the first priority is to make sure we minimize down time and be able to have a continuously deliverable application that we can always deploy to production.
解决此问题的最直接的方法是将订单组件重写为Angular,然后再重写订单服务。 但是,在现实世界中,这并非总是马上就能实现的。 请记住,在任何大规模的重构中,首要任务是确保我们将停机时间减至最少,并能够拥有一个可连续交付的应用程序,并始终将其部署到生产环境中。
So, despite the fact that the orders component is pretty simple, let's imagine that this is actually a very complicated piece of our application, or a very mission-critical piece of our application, and we just don't have time to rewrite it. In that case, we have two choices: we can either convert our getCustomers call to a promise in the orders component, or we can convert the getOrders promise to an observable.
因此,尽管订单组件非常简单,但让我们想象这实际上是我们应用程序中非常复杂的部分,或者是我们应用程序中非常关键的任务,而我们没有时间重写它。 在这种情况下,我们有两种选择:我们可以将getCustomers调用转换为orders组件中的promise,或者可以将getOrders转换为可观察的。
To convert getCustomers to a promise in the component, we'd just do exactly the same thing we did earlier in the service - import Observable from RxJS and add the toPromise operator after getCustomers. It's that easy, and it's a super handy trick if you just can't don't have time to refactor this component to use observables quite yet. However, it's not completely desirable, as our long-range goal is to completely get rid of promises and switch entirely to observables. So, Iet's learn how to convert our getOrders call to an observable here.
要将getCustomers转换为组件中的Promise,我们将做与之前在RxJS的service-import Observable中所做的toPromise操作,并在getCustomers之后添加toPromise运算符。 就是这么简单,如果您还没有时间重构此组件以使用可观察对象,那么这是一个超级方便的技巧。 但是,这并不是完全理想的,因为我们的长期目标是完全摆脱承诺,而完全转向可观察的事物。 因此,Iet在这里学习如何将我们的getOrders调用转换为可观察的。
将getCustomers转换为Promise (Convert getCustomers to a Promise)
Let's convert the getOrders to an observable. The first thing we're going to do is import our CustomerService at the top of the file just like we did in the customer component:
让我们将getOrders转换为可观察的。 我们要做的第一件事就是将我们的CustomerService导入文件的顶部,就像我们在客户组件中所做的一样:
import { CustomerService } from '../customers/customer.service';
import { CustomerService } from '../customers/customer.service';
Then we can specify the type of our injected CustomerService in our controller function definition:
然后,我们可以在控制器函数定义中指定注入的CustomerService的类型:
//orders.ts
function ordersComponentController(orderService, customerService: CustomerService, $q) {
In order to convert the getOrders call to observable, we're going to use two static methods on observable called fromPromise and forkJoin. The fromPromise method lets us convert a promise to an observable, and forkJoin lets us subscribe to multiple observables. So, you might have guessed by now that the first thing we need to do is import those two methods at the top of our file:
为了将getOrders调用转换为observable,我们将在observable上使用两个静态方法fromPromise和forkJoin 。 fromPromise方法使我们可以将promise转换为可观察对象,而forkJoin可以使我们预订多个可观察对象。 因此,您可能现在已经猜到,我们需要做的第一件事是将这两个方法导入文件顶部:
import { fromPromise } from 'rxjs/observable/fromPromise';
import { forkJoin } from 'rxjs/observable/forkJoin';.
Now we can do some work in our $onInit function. Above line 21, let's to declare a variable called ordersData and use the fromPromise method:
现在我们可以在$onInit函数中做一些工作。 在第21行上方,让我们声明一个名为ordersData的变量,并使用fromPromise方法:
let ordersData = fromPromise(orderService.getOrders());
let ordersData = fromPromise(orderService.getOrders());
Now let re-write $q.all to use forkJoin instead. So, first we'll just replace return $q.all with forkJoin. We need to pass in an array, so let's move the promises array and add ordersData to the front of it and then just get rid of the promises declaration. Lastly, let's change .then to .subscribe just as with a single observable. Here's our finished $onInit function:
现在,让我们重写$q.all来使用forkJoin 。 因此,首先我们将用forkJoin代替return $q.all forkJoin 。 我们需要传递一个数组,因此让我们移动promises数组,并在它的前面添加ordersData ,然后摆脱promises声明。 最后,让我们改变.then到.subscribe就如同一个可观察的。 这是我们完成的$onInit函数:
vm.$onInit = function() {
        let ordersData = fromPromise(orderService.getOrders());
        forkJoin([ordersData, customerService.getCustomers()]).subscribe((data) => {
            vm.orders = data[0];
            vm.customers = data[1];
            vm.orders.forEach(function (order) {
                var customer = _.find(vm.customers, function (customer) {
                    return order.customerId === customer.id;
                });
                order.customerName = customer.fullName;
            });
        });
    };
Let's recap what we've done here. First, we called fromPromise and converted our getOrders call from a promise to an observable. Then, we used forkJoin to subscribe to both the ordersData and the getCustomers call. Just like with $q.all, the subscribe for forkJoin will return an array of our data in the order that we've listed them. So, data[0] will be our order, and data[1] will be our customers.
让我们回顾一下我们在这里所做的事情。 首先,我们调用fromPromise并将getOrders调用从promise转换为可观察的。 然后,我们使用forkJoin订阅了ordersData和getCustomers调用。 就像使用$q.all ,该认购forkJoin将在我们列出的顺序返回我们的数据阵列。 因此, data[0]将成为我们的订单, data[1]将成为我们的客户。
Let's do one more thing to clean this up. We can remove the $q dependency from line 16 in our $inject array and line 167 in our function definition.
让我们再做一件事来清理它。 我们可以从$inject数组的第16行和函数定义的第167行删除$q依赖项。
工作正常吗? (Is it working?)
Let's go look at the browser one more time and make sure this worked. You should see that our application compiles and loads correctly, so check out the orders tab:
让我们再来看一次浏览器,并确保它能正常工作。 您应该看到我们的应用程序可以正确编译和加载,因此请查看订单标签:

There it is! Our data is loading correctly! This is great, because now you've seen how to translate back and forth between promises and observables, which is really useful when you're working on a large application where you can't just convert everything to observables all at once as you're upgrading.
在那里! 我们的数据正在正确加载! 这非常好,因为现在您已经了解了如何在Promise和Observable之间来回转换,这在处理大型应用程序时非常有用,在该应用程序中,您不能立即将所有内容立即转换为Observables。重新升级。
下一步去哪里 ( Where to Go Next )
From here, use this guide and the last one to convert the customersTable component and the products route. You'll need to learn a few new tricks with Angular's template syntax, but otherwise you'll have everything you need.
从这里开始,使用本指南和最后一篇指南来转换customersTable组件和products路线。 您将需要学习Angular模板语法的一些新技巧,否则您将拥有所需的一切。
If you liked this guide, I’ve got 200+ detailed videos, quiz questions, and more for you in my comprehensive course Upgrading AngularJS. I created it for everyday, normal developers and it’s the best ngUpgrade resource on the planet. Head over and sign up for our email list to get a free Upgrade Roadmap Checklist so you don’t lose track of your upgrade prep. And, while you’re there, check out our full demo. You're gonna love it!
如果您喜欢本指南,在我的综合课程《 升级AngularJS》中 ,有200多个详细的视频,测验问题以及更多内容供您选择。 我为日常的普通开发人员创建了它,它是地球上最好的ngUpgrade资源。 前往并注册我们的电子邮件列表,以获取免费的升级路线图清单,以免您忘记升级准备。 而且,当您在那里时,请查看我们的完整演示。 你会爱上它!
See you next time, Scotchers!
下次见,苏格兰人!
翻译自: https://scotch.io/tutorials/migrate-your-angularjs-services-to-angular-with-ngupgrade


 734
734

 被折叠的 条评论
为什么被折叠?
被折叠的 条评论
为什么被折叠?
 到【灌水乐园】发言


