


 本文介绍了Sanity.io作为无头CMS的优势,包括其高度的自定义性、灵活的定价和出色的社区支持。作者分享了如何创建入门项目,包括使用Gatsby的静态网站和Sanity Studio,并强调了管理和部署Sanity仪表板的责任。文章还涵盖了自定义架构的过程,展示了Sanity在数据类型控制方面的便捷性。
sanity测试
If you're looking for a headless CMS with amazing features and tons of customization, look no further than Sanity.io. I recently migrated my personal site from embedded Markdown files to Sanity, and it's been a great experience so far. So, I figured I would share what I learned with you.
如果您正在寻找具有惊人功能和大量自定义功能的无头CMS, 那么Sanity.io就是您的最佳选择 。 最近,我将个人网站从嵌入式Markdown文件迁移到Sanity,到目前为止,这是非常不错的体验。 因此,我想与您分享我学到的东西。
为什么我选择理智 ( Why I Chose Sanity )
After considering many options, I chose Sanity for three reasons.
在考虑了多种选择之后,出于三个原因,我选择了Sanity。
可定制性 (Customizability)
With Sanity, there's no centralized dashboard. Because of that, you have to manage it yourself, and this has some pretty interesting implications. You get full customization over the dashboard, but you also have the extra responsibility of managing it. More on this to come.
有了Sanity,就没有集中式仪表板。 因此,您必须自己管理它,这具有一些非常有趣的含义。 您可以通过仪表板获得完全的自定义,但是您还要承担管理它的额外责任。 关于此的更多信息。
价钱 (Pricing)
One of my big concerns with Headless CMS options is the jump from free tier to a paid tier. For personal projects, I don't want to pay $50+ per month. Well, with Sanity, they do have a pricing jump, but they also have pay-as-you-go options. If you need more file storage, you can pay just a few bucks a month to add it. Check out the full Sanity pricing.
我对Headless CMS选项的最大担忧之一是从免费套餐过渡到付费套餐。 对于个人项目,我不想每月支付$ 50 +。 好吧,有了理智,他们确实有价格上的飞跃,但是他们也有按需付费的选择。 如果您需要更多文件存储空间,则每月只需支付几美元即可添加它。 查看完整的理智定价 。
Side Note: If you want more control over your headless CMS costs, you can look into self-hosting your own headless CMS like WordPress, Ghost, or Strapi.
旁注 :如果您想更好地控制无头CMS成本,则可以考虑自行托管自己的无头CMS,例如WordPress , Ghost或Strapi 。
支持 (Support)
After looking for advice on Twitter the co-founder of Sanity reached out to offer some clarifications and help. I also had Knut, a developer advocate at Sanity, join me for a series of streams to help through my migration to Sanity. There's nothing more impactful than getting some hands-on assistance from the Sanity team itself!
在Twitter上寻求建议后,Sanity的联合创始人伸出手来提供一些说明和帮助。 我还让Sanity的开发者拥护者Knut参加了我的一系列活动,以帮助我迁移到Sanity。 没有什么比从Sanity团队本身获得一些动手帮助更具影响力的了!
创建入门项目 ( Creating the Starter Project )
To get started with Sanity, we are going to use one of the starter projects. You can find the list of starter projects, here.
要开始使用Sanity,我们将使用一个入门项目。 您可以在此处找到入门项目的列表。

I'm personally a fan of Gatsby (static site generator built with React), so in this demo, we will choose "Blog with Gatsby".
我个人是Gatsby(使用React构建的静态网站生成器)的粉丝,因此在此演示中,我们将选择“ Blog with Gatsby”。
To take full advantage of this starter template, log in with both your Github and Netlify accounts. This will allow Sanity to create a new Github repository for you and then deploy the Sanity studio AND the Gatsby site to Netlify.
要充分利用此入门模板,请同时使用Github和Netlify帐户登录。 这将使Sanity可以为您创建一个新的Github存储库,然后将Sanity Studio和Gatsby站点部署到Netlify。

While many other Headless CMS options will host the dashboard for you, I want to stress again that it's your responsibility to manage the Sanity dashboard. You get full customizability, but you have to deploy/host it yourself. Thankfully, the starter generator took care of the initial deployment to Netlify for you.
尽管许多其他Headless CMS选项将为您托管仪表板,但我想再次强调,管理Sanity仪表板是您的责任。 您可以获得完全的可定制性,但是您必须自己部署/托管它。 值得庆幸的是,启动程序生成器已为您完成了Netlify的初始部署。
With Sanity, it's your responsibility to manage and deploy the dashboard.
使用Sanity,您有责任管理和部署仪表板。
Alright, let's look at what Sanity created for us by opening up the Sanity studio.
好吧,让我们看看Sanity通过开设Sanity工作室为我们创造了什么。

Click the "Open Sanity Studio" button. You will probably be prompted to log in.
单击“打开Sanity Studio”按钮。 可能会提示您登录。

Now, look at the `Netlify Sites` section.
现在,查看“ Netlify网站”部分。
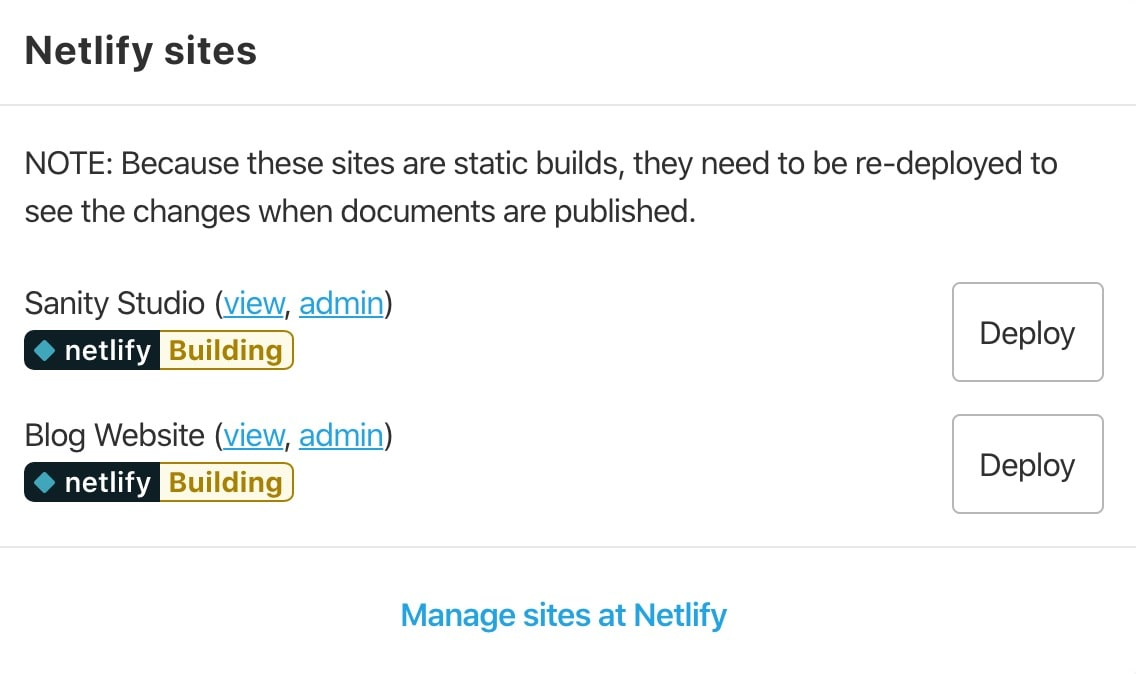
Two sites were created. You'll also notice that there are Netlify widgets with each of the sites. These show the current status of the sites. They will originally be in the building state but will update as the builds finish.
创建了两个站点。 您还将注意到,每个站点都有Netlify小部件。 这些显示站点的当前状态。 它们最初将处于构建状态,但会随着构建完成而更新。
盖茨比网站 (Gatsby Site)
Once the build has finished, you can open your deployed Gatsby site. Click the link to open your brand new site!
构建完成后,您可以打开已部署的Gatsby站点。 单击链接打开您的全新网站!

Not too bad eh?
还不错吧?
理智工作室 (Sanity Studio)
The Sanity Studio is also deployed inside of Netlify. This is the site that you are currently viewing. Click on the desk button/logo at the top of the page. Here, you'll see the content creator/editor. Notice there are a few data types created for us in this starter project: blog posts, authors, and categories. We'll take a closer look at these in a bit.
Sanity Studio也部署在Netlify内部。 这是您当前正在查看的网站。 单击页面顶部的桌面按钮/徽标。 在这里,您将看到内容创建者/编辑者。 请注意,在这个入门项目中为我们创建了一些数据类型:博客文章,作者和类别。 我们将仔细研究这些内容。

Github中的项目存储库 (Project Repository in Github)
Lastly, the starter project created a repository for us. You can find the link to the repo under the `Project Info` section.
最后,入门项目为我们创建了一个存储库。 您可以在“项目信息”部分下找到指向仓库的链接。

Go ahead and open the repo.
继续并打开仓库。

We'll check out the code locally next, but you might have noticed you get some warnings on vulnerabilities. We'll take a look at updating those in a bit as well.
接下来,我们将在本地检查代码,但是您可能已经注意到您收到有关该漏洞的一些警告。 我们还将介绍一下这些内容的更新。
查看源代码 ( Check out the Source Code )
Grab the clone URL and clone the repo to your computer with the following command.
抓住克隆URL,并使用以下命令将存储库克隆到您的计算机。
git clone <CLONE_URL>
git clone <CLONE_URL>
Then, open it in your favorite text editor, which in my case, is VS Code. Once you get the code open, you'll notice there are two main folders, studio and web. You can probably guess what those correlate to at this point.
然后,在您喜欢的文本编辑器(在我的情况下为VS Code)中打开它。 打开代码后,您会注意到有两个主要文件夹, studio和web 。 您可能会猜到这些相关的内容。
To run both of these locally, you'll need to install NPM packages.
要在本地运行这两个程序,您需要安装NPM软件包。
盖茨比项目 (Gatsby Project)
For the Gatsby app, cd into the web directory and then run npm install.
对于Gatsby应用程序,将cd插入web目录,然后运行npm install 。
After that finishes, run npm run dev and you should see that your app has started at localhost:8000. If you open it up, it should look exactly like the deployed app we saw earlier. Although the focus of this article isn't on Gatsby, you have full control over your Gatsby site.
完成之后,运行npm run dev ,您应该看到您的应用npm run dev localhost:8000启动。 如果您打开它,它应该看起来像我们之前看到的已部署应用程序。 尽管本文的重点不在Gatsby上,但是您可以完全控制Gatsby网站。
理智工作室 (Sanity Studio)
For the Sanity studio app, cd into the studio directory and run npm install. After that finishes, run npm run dev. This will start the Sanity studio at localhost:3333. You can open that and see the locally running studio.
对于Sanity studio应用程序,将其cd进入studio目录并运行npm install 。 完成后,运行npm run dev 。 这将在localhost:3333启动Sanity studio。 您可以打开它并查看本地运行的工作室。
升级理智仪表板 ( Upgrade the Sanity Dashboard )
As you saw earlier in the Github repo, you might have some outdated packages. If you do, you'll need to upgrade the Sanity dashboard, which luckily is pretty easy.
如您在Github存储库中前面所看到的,您可能有一些过时的软件包。 如果这样做,则需要升级Sanity仪表板,幸运的是,这很容易。
Inside of the studio directory, run sanity upgrade to update all of your packages.
在studio目录中,运行sanity upgrade以更新所有软件包。

After all of that finishes, make sure to run another npm install to ensure that the package.lock.json file gets updated to match the new versions of the packages. I missed this step earlier and learned the hard way.
完成所有这些操作后,请确保运行另一个npm install以确保package.lock.json文件得到更新以匹配软件包的新版本。 我较早地错过了这一步,并学到了艰难的方法。
From there, you can add all of the updates to your master branch and push. This will trigger a new build of your site in Netlify.
从那里,您可以将所有更新添加到master分支并进行推送。 这将在Netlify中触发您的网站的新版本。
自定义架构 ( Customizing the Schema )
Finally, let's take a look at customization. Unlike other Headless CMS options, with Sanity, you get full control over your dashboard including the types of data you work with.
最后,让我们看一下定制。 与其他Headless CMS选项不同,有了Sanity,您可以完全控制仪表板,包括使用的数据类型。
All of your data types are defined in the schemas/documents directory. If you look, you'll see the corresponding schemas for author, category, and post. Go ahead and update the post schema, post.js.
您的所有数据类型都在schemas/documents目录中定义。 如果您看的话,将会看到作者,类别和帖子的相应架构。 继续并更新发布架构post.js
Inside of the fields array is where all of the individual fields for this data type are stored. They typically have the following properties.
在fields数组内部是存储此数据类型的所有单个字段的位置。 它们通常具有以下属性。
- name 名称
- type 类型
- title 标题
- description 描述
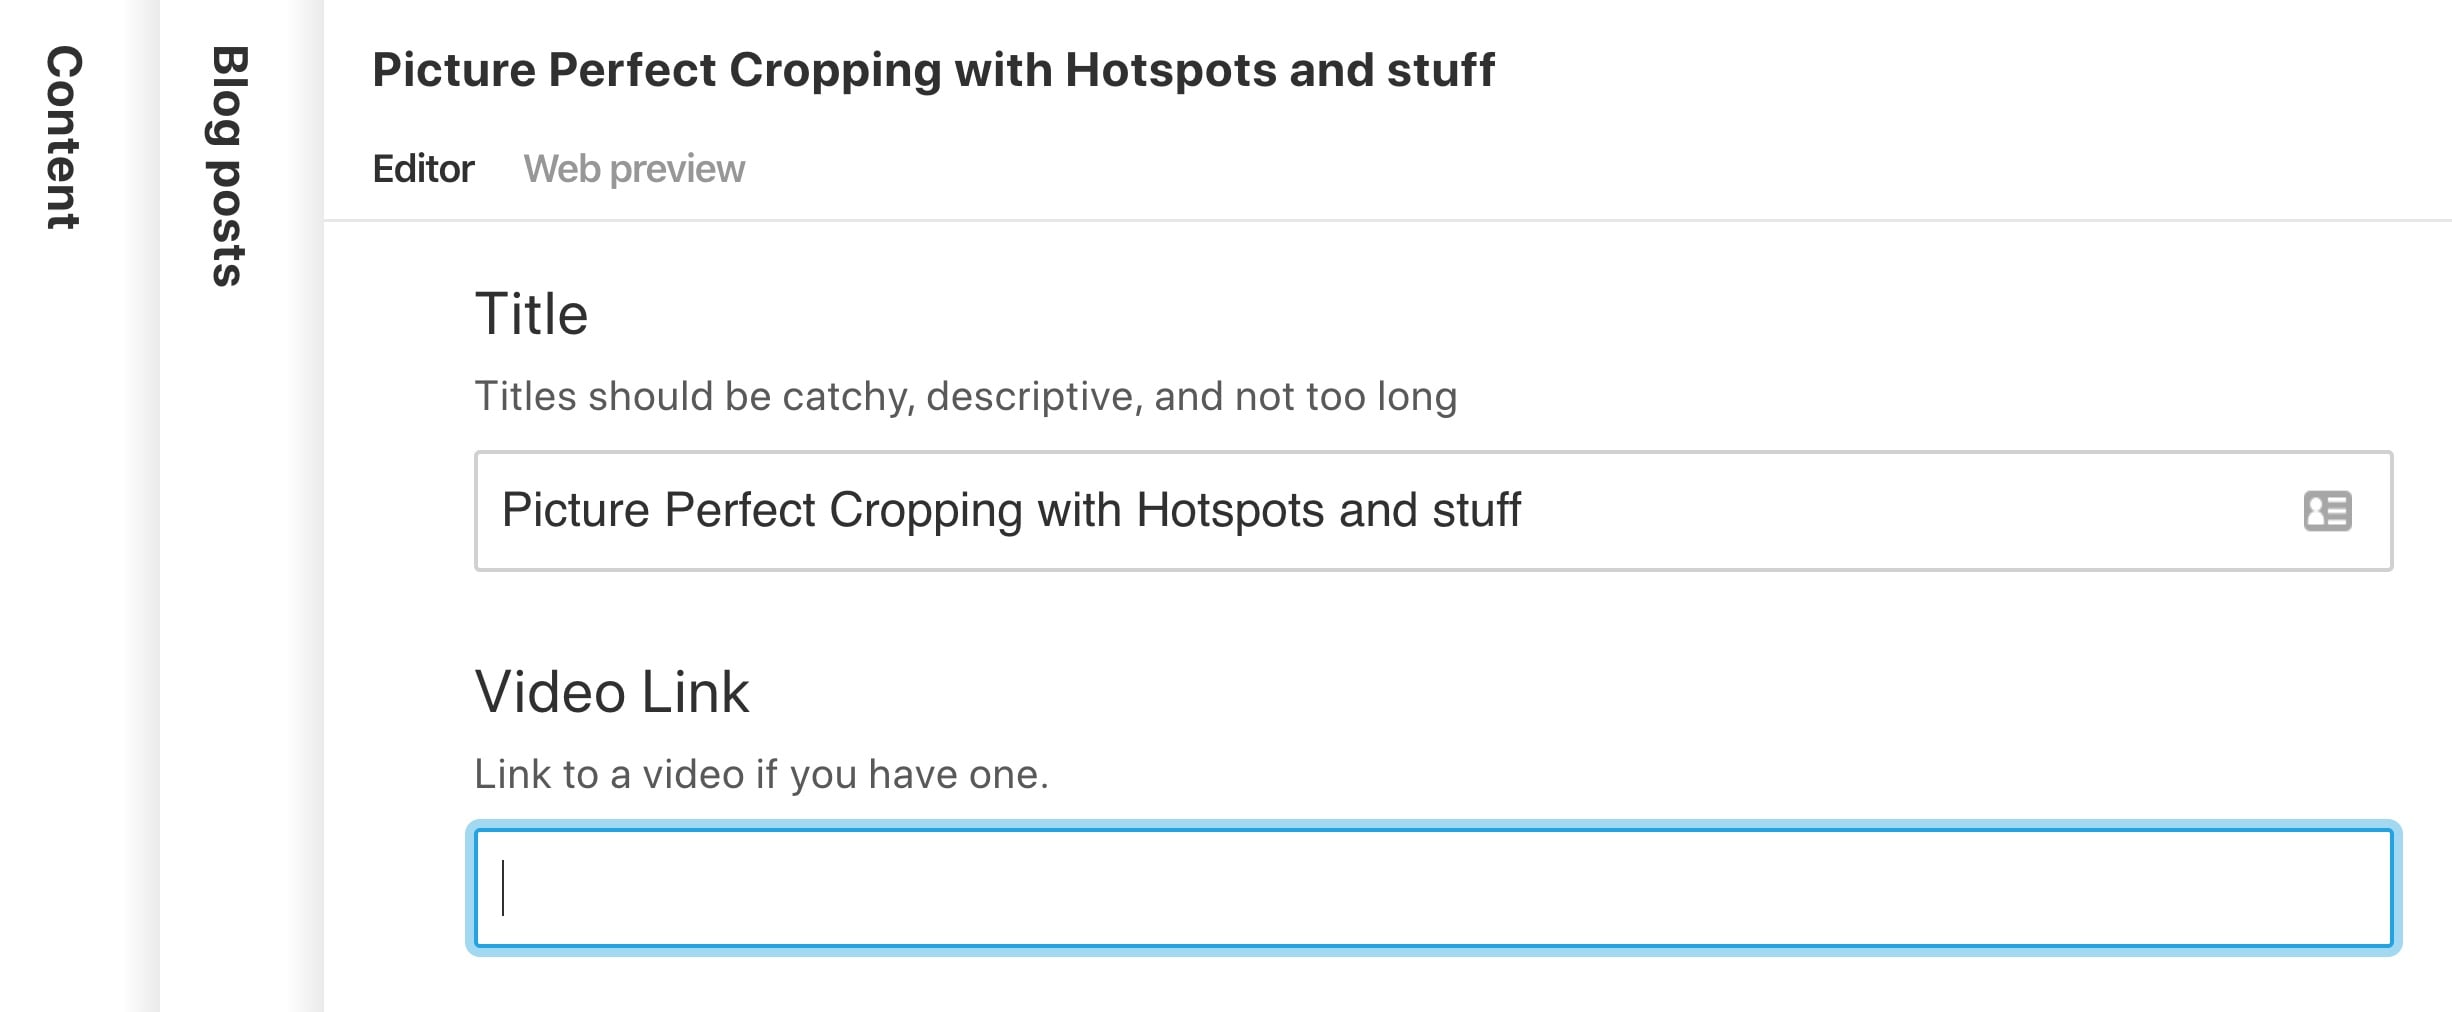
So, to add a new field, it's pretty easy. Just add another object to the fields array. For my blog posts, they often include an embedded YouTube video (like the one above), so I might want to add a link for a YouTube video.
因此,添加一个新字段非常简单。 只需将另一个对象添加到fields数组即可。 对于我的博客文章,它们通常包含嵌入式YouTube视频(如上述视频),因此我可能想添加YouTube视频的链接。
{
    name:  'videoLink',
    type:  'string',
    title:  'Link for the Video',
    description:  'link for the video'
},
After doing so, restart the Sanity studio locally (if it wasn't still running) and check out one of your posts. You'll see a new field for the video link!
这样做之后,请在本地重新启动Sanity Studio(如果它仍未运行)并签出您的其中一篇文章。 您会在视频链接中看到一个新字段!
That's super easy but there are two important things to know. Any time you update your types, you'll need to make sure you deploy the changes to the Sanity GraphQL layer. To do so, run sanity graphql deploy.
超级简单,但有两点要知道。 每次更新类型时,都需要确保将更改部署到Sanity GraphQL层。 为此,运行sanity graphql deploy 。
Secondly, if you add a completely new data type, you'll need to import that data type into the schema.js file. You can think of this file as being the definition of all of your types in one place. This is the schema that the GraphQL layer uses.
其次,如果添加全新的数据类型,则需要将该数据类型导入schema.js文件。 您可以将此文件视为一个位置上所有类型的定义。 这是GraphQL层使用的架构。
结语 ( Wrap Up )
If you're looking for a new Headless CMS to try out, Sanity is a great one to start with. I love the pricing tier and the customizability, but also the community. The team at Sanity is engaged and extremely helpful.
如果您正在寻找一种新的Headless CMS进行试用,那么Sanity就是一个不错的选择。 我喜欢定价层和可定制性,也喜欢社区。 Sanity的团队敬业度高,乐于助人。
I'm curious, what CMS options are you using? How do you like it? Let us know in the comments below.
我很好奇,您正在使用哪些CMS选项? 你喜欢吗? 在下面的评论中让我们知道。
翻译自: https://scotch.io/tutorials/getting-started-with-sanityio-a-headless-cms-you-can-customize
sanity测试


 5327
5327

 被折叠的 条评论
为什么被折叠?
被折叠的 条评论
为什么被折叠?
 到【灌水乐园】发言


