


构建express
Building web pages with user authentication can be a huge pain. You typically need to set up some sort of database to manage users even if you're not using the database for anything else. You would then need to store their password hashes, and you almost need a degree on internet security to know the safest ways to do that.
使用用户身份验证构建网页可能会非常痛苦。 即使您没有将数据库用于其他任何事情,通常也需要设置某种数据库来管理用户。 然后,您需要存储他们的密码哈希,并且几乎需要获得Internet安全学位,才能知道最安全的方法。
What if I told you it didn't have to be so complicated? Using Okta and Express, I'll show you how to really quickly set up a website that has secure user authentication, without the need for a separate database. Everything you need you could deploy anywhere that you can run Node.
如果我告诉过您,它不必那么复杂怎么办? 我将使用Okta和Express向您展示如何真正快速地建立具有安全用户身份验证的网站,而无需单独的数据库。 您所需的一切都可以部署到可以运行Node的任何位置。
在Express中创建新应用 ( Create a New App in Express )
Creating a new app in Express doesn't take a lot of code. You'll need to set up your project structure and install some dependencies, which you can do with just a few commands:
在Express中创建新应用不需要花费很多代码。 您将需要设置项目结构并安装一些依赖项,只需执行以下几个命令即可:
mkdir new-project
cd new-project
npm init -y
npm install express@4.16.4 hbs@4.0.1
npm install --save-dev nodemon@1.18.4 standard@12.0.1
Edit the "scripts" section of your package.json to look like this:
编辑package.json的"scripts"部分,如下所示:
"scripts": {
  "start": "nodemon .",
  "test": "standard"
},
Now create a new file index.js :
现在创建一个新文件index.js :
index.js
索引 。 js
const express = require('express')
const path = require('path')

const app = express()

app.set('views', path.join(__dirname, 'views'))
app.set('view engine', 'hbs')

app.use(express.urlencoded({ extended: true }))
app.use('/static', express.static('public'))

// @TODO add auth middleware
// @TODO add registration page
// @TODO add logout route

app.use('/', require('./routes/index'))

const port = process.env.PORT || 3000
app.listen(port, () => console.log(`App listening on port ${port}`))
Make a few new folders as well:
还要创建几个新文件夹:
mkdir -p public/images routes viewsPut a fun greeting image in `public/images/greeting.jpg` that you will use to greet users.
在“ public / images / greeting.jpg”中放置一个有趣的问候图像,用于问候用户。
Express allows for a templating engine. You already set up Handlebars (hbs) above, so now you can create a couple of views. One will be the HTML skeleton that contains the basic markup, and the other will be your homepage (the index view).
Express允许使用模板引擎。 您已经在上面设置了把手(hbs),因此现在可以创建几个视图。 一个将是包含基本标记HTML框架,另一个将是您的主页( index视图)。
views/layout.hbs
views / layout.hbs
<!doctype html>
<html lang="en">

<head>
  <!-- Required meta tags -->
  <meta charset="utf-8">
  <meta name="viewport" content="width=device-width, initial-scale=1, shrink-to-fit=no">

  <!-- Bootstrap CSS -->
  <link rel="stylesheet" href="https://stackpath.bootstrapcdn.com/bootstrap/4.1.3/css/bootstrap.min.css" integrity="sha384-MCw98/SFnGE8fJT3GXwEOngsV7Zt27NXFoaoApmYm81iuXoPkFOJwJ8ERdknLPMO"
    crossorigin="anonymous">

  <title>Simple Auth in 15 Minutes</title>
</head>

<body>
  <nav class="navbar navbar-expand-lg navbar-dark bg-dark">
    <div class="container">
      <a class="navbar-brand" href="/">Navbar</a>
      <button class="navbar-toggler" type="button" data-toggle="collapse" data-target="#navbarNavAltMarkup"
        aria-controls="navbarNavAltMarkup" aria-expanded="false" aria-label="Toggle navigation">
        <span class="navbar-toggler-icon"></span>
      </button>
      <div class="collapse navbar-collapse" id="navbarNavAltMarkup">
        <div class="navbar-nav">
          {{!-- @TODO add auth links --}}
        </div>
      </div>
    </div>
  </nav>
  <main class="container pt-4">{{{body}}}</main>

  <!-- Optional JavaScript -->
  <!-- jQuery first, then Popper.js, then Bootstrap JS -->
  <script src="https://code.jquery.com/jquery-3.3.1.slim.min.js" integrity="sha384-q8i/X+965DzO0rT7abK41JStQIAqVgRVzpbzo5smXKp4YfRvH+8abtTE1Pi6jizo"
    crossorigin="anonymous"></script>
  <script src="https://cdnjs.cloudflare.com/ajax/libs/popper.js/1.14.3/umd/popper.min.js" integrity="sha384-ZMP7rVo3mIykV+2+9J3UJ46jBk0WLaUAdn689aCwoqbBJiSnjAK/l8WvCWPIPm49"
    crossorigin="anonymous"></script>
  <script src="https://stackpath.bootstrapcdn.com/bootstrap/4.1.3/js/bootstrap.min.js" integrity="sha384-ChfqqxuZUCnJSK3+MXmPNIyE6ZbWh2IMqE241rYiqJxyMiZ6OW/JmZQ5stwEULTy"
    crossorigin="anonymous"></script>
</body>

</html>
This layout will get rendered for each view, with the specific view replacing the {{{body}}} tag.
将为每个视图呈现此layout ,并用特定视图替换{{{body}}}标签。
Now you can create the indexview. This will just display the image you put in public/images/greeting.jpg :
现在,您可以创建index视图。 这只会显示您放入public/images/greeting.jpg :
views/index.hbs
views / index.hbs
<div class="d-flex justify-content-center">
  <img class="rounded img-fluid" src="/static/images/greeting.jpg" />
</div>
To tell the homepage to use that file when rendering, you'll also need to create a router. You already required routes/index.jsin the index.js file of your app, so now you just need to create that file:
要告诉主页在渲染时使用该文件,您还需要创建一个路由器。 您已经在应用程序的index.js文件中require d routes/index.js ,因此现在只需要创建该文件:
routes/index.js
路线/index.js
const express = require('express')
const router = express.Router()

router.get('/', (req, res) => {
  res.render('index')
})

module.exports = router
The call to res.render('index') tells Express to use the render the index.hbs view and respond with the results back to the client. You can also pass in some context, but it's not needed here just yet.
对res.render('index')的调用告诉Express使用渲染index.hbs视图并将结果返回给客户端。 您也可以在某些情况下传递消息,但现在还不需要。
Now you can run your server with the following command (as you make changes, the server will reload and you'll just need to refresh the page):
现在,您可以使用以下命令运行服务器(进行更改后,服务器将重新加载,您只需要刷新页面即可):
npm startGo to http://localhost:3000 to see your greeting.
转到http://localhost:3000查看您的问候。

向您的Express应用添加身份验证 ( Add Authentication to Your Express App )
You now have a simple web server with a homepage and a lovely greeting image. The next step I promised to show you is to add secure user authentication. This is where Okta comes in to play. Okta is a cloud service that allows developers to create, edit, and securely store user accounts and user account data, and connect them with one or multiple applications. Our API enables you to:
现在,您将拥有一个带有主页和漂亮的问候图像的简单Web服务器。 我答应向您展示的下一步是添加安全的用户身份验证。 Okta就是在这里玩的。 Okta是一项云服务,允许开发人员创建,编辑和安全地存储用户帐户和用户帐户数据,并将它们与一个或多个应用程序连接。 我们的API使您能够:
Authenticate and authorize your users
Store data about your users
存储有关您的用户的数据
Perform password-based and social login
执行基于密码的社交登录
Secure your application with multi-factor authentication
通过多因素身份验证保护您的应用程序
And much more! Check out our product documentation
以及更多! 查看我们的产品文档
If you don't already have one, sign up for a forever-free developer account.
如果您还没有一个,请注册一个永久性的开发者帐户 。
You're going to need to save some information to use in the app. Create a new file named .env in the root of your application. In it, enter your organization URL.
您将需要保存一些信息以在应用程序中使用。 在应用程序的根目录中创建一个名为.env的新文件。 在其中输入您的组织网址。
HOST_URL=http://localhost:3000
OKTA_ORG_URL=https://{yourOktaOrgUrl}
You will also need a random string to use as an App Secret for sessions. You can generate this with the following command:
您还需要一个随机字符串作为会话的“应用程序秘密”。 您可以使用以下命令生成它:
npm install -g uuid-cli
echo "APP_SECRET=`uuid`" >> .env
Next, log in to your Okta developer console, navigate to Applications, then click Add Application. Select Web, then click Next.
接下来,登录到Okta开发人员控制台,导航至“ 应用程序” ,然后单击“ 添加应用程序” 。 选择“ Web” ,然后单击“ 下一步” 。
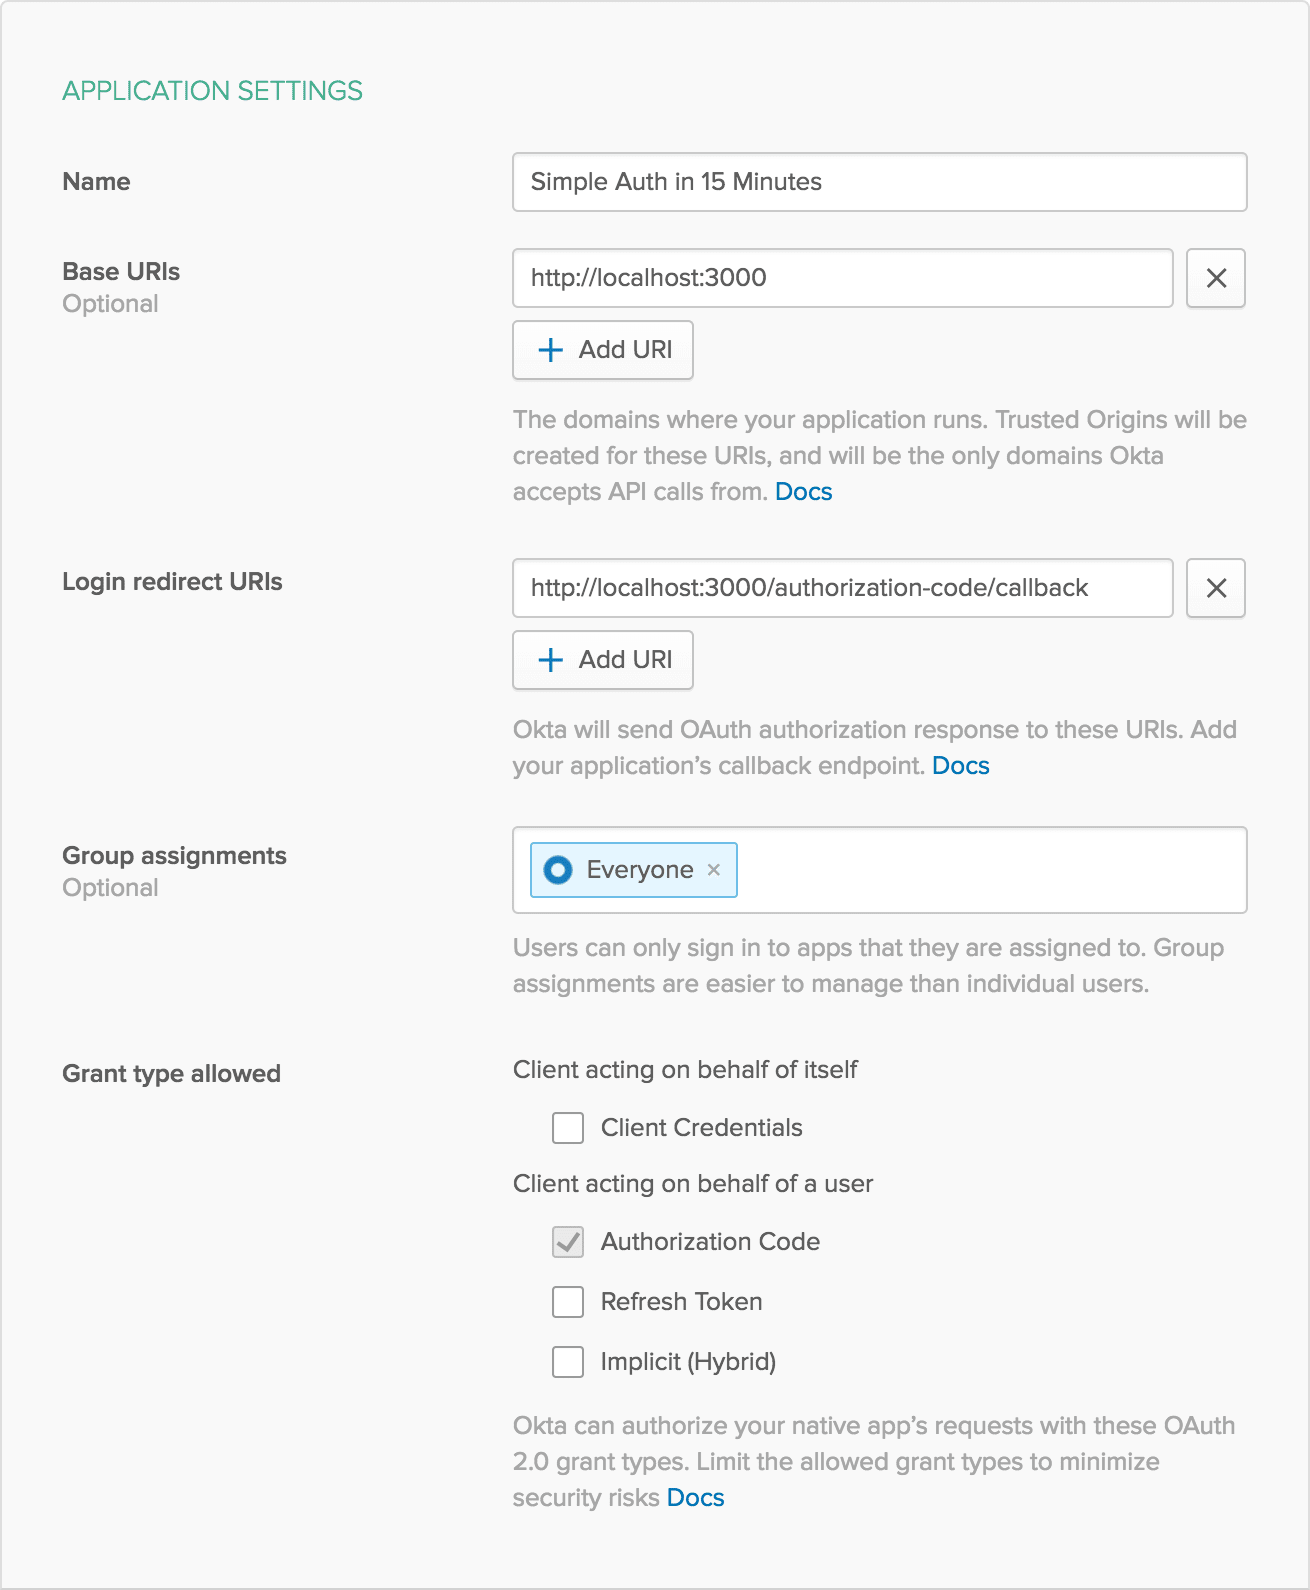
The page you come to after creating an application has some more information you need to save to your .env file. Copy in the client ID and client secret.
创建应用程序后进入的页面包含需要保存到.env文件的更多信息。 复制客户ID和客户机密。
OKTA_CLIENT_ID={yourClientId}
OKTA_CLIENT_SECRET={yourClientSecret}
At the time of this writing, the default application creation page does not allow you to add a Logout redirect URI, but you can add one after creating the application. After creating the application, click Edit, then next to Logout redirect URIs click Add URI. Add a logout redirect URI of http://localhost:3000 and click Save.
在撰写本文时,默认的应用程序创建页面不允许您添加注销重定向重定向URI,但是您可以在创建应用程序后添加一个。 创建应用程序后,单击“ 编辑” ,然后在“ 注销重定向URI”旁边单击“ 添加URI” 。 添加注销重定向URI http://localhost:3000 ,然后单击保存 。
The last piece of information you need from Okta is an API token. In your developer console, navigate to API -> Tokens, then click on Create Token. You can have many tokens, so just give this one a name that reminds you what it's for, like "15 Minute Auth". You'll be given a token that you can only see right now. If you lose the token, you'll have to create another one. Add this to .env also.
Okta需要的最后一条信息是API令牌。 在开发人员控制台中,导航到API- > 令牌 ,然后单击创建令牌 。 您可以有很多令牌,因此只需给它一个名称即可提醒您它的用途,例如“ 15分钟验证”。 系统会为您提供一个令牌,您现在只能看到它。 如果丢失令牌,则必须创建另一个令牌。 也将此添加到.env 。
OKTA_TOKEN={yourOktaAPIToken}将Auth中间件添加到您的Express应用 (Add Auth Middleware to Your Express App)
Okta provides some middleware that will give you information about whether the user is registered or not. It also gives you a login page by default at /login . Add the following dependencies:
Okta提供了一些中间件,这些中间件将为您提供有关用户是否已注册的信息。 默认情况下,它还会在/login提供一个登录页面。 添加以下依赖项:
npm install dotenv@6.1.0 express-session@1.15.6 @okta/oidc-middleware@1.0.2 @okta/okta-sdk-nodejs@1.2.0In your index.js page, replace the // @TODO add auth middleware comment with the following code:
在index.js页面中,将// @TODO add auth middleware注释替换为以下代码:
app.use(require('express-session')({
  secret: process.env.APP_SECRET,
  resave: true,
  saveUninitialized: false
}))

const { ExpressOIDC } = require('@okta/oidc-middleware')
const oidc = new ExpressOIDC({
  issuer: `${process.env.OKTA_ORG_URL}/oauth2/default`,
  client_id: process.env.OKTA_CLIENT_ID,
  client_secret: process.env.OKTA_CLIENT_SECRET,
  redirect_uri: `${process.env.HOST_URL}/authorization-code/callback`,
  scope: 'openid profile'
})

app.use(oidc.router)
Also, make sure to add the following to the very top of index.js . This needs to be there before any other code in order to load your environment variables, so it should be the very first line of the file:
另外,请确保将以下内容添加到index.js的最顶部。 为了加载环境变量,此代码必须在任何其他代码之前存在,因此它应该是文件的第一行:
require('dotenv').config()创建注册页面 (Create a Registration Page)
You should now be able to login by going to /login . This will redirect you to your Okta developer page, and after you sign in you'll be redirected back to the homepage.
现在,您应该可以通过/login 。 这会将您重定向到Okta开发人员页面,并且在您登录后将您重定向回首页。
For people who aren't registered yet, they'll need a registration page. At the time of this writing, Okta doesn't provide a registration page out of the box, but you can build one pretty quickly. Create a new view for your route:
对于尚未注册的人,他们将需要一个注册页面。 在撰写本文时,Okta并没有提供现成的注册页面,但是您可以快速建立一个注册页面。 为您的路线创建一个新视图:
views/register.hbs
views / register.hbs
<form method="post">
  {{#each fields}}
  <div class="form-group">
    <label>{{this.label}}</label>
    <input
      required
      name="{{this.name}}"
      type="{{this.type}}"
      class="form-control {{#if this.error}}is-invalid{{/if}}"
      value="{{this.value}}"
    />
    <div class="invalid-feedback">{{this.error}}</div>
  </div>
  {{/each}}
  <button type="submit" class="btn btn-primary">Register</button>
</form>
You'll also need a new route:
您还需要一条新路线:
routes/register.js
路由/register.js
const okta = require('@okta/okta-sdk-nodejs')
const express = require('express')

const router = express.Router()

const client = new okta.Client({
  orgUrl: process.env.OKTA_ORG_URL,
  token: process.env.OKTA_TOKEN
})

// Take the user to the homepage if they're already logged in
router.use('/', (req, res, next) => {
  if (req.userContext) {
    return res.redirect('/')
  }
  next()
})

const fields = [
  { name: 'firstName', label: 'First Name' },
  { name: 'lastName', label: 'Last Name' },
  { name: 'email', label: 'Email', type: 'email' },
  { name: 'password', label: 'Password', type: 'password' }
]

router.get('/', (req, res) => {
  res.render('register', { fields })
})

router.post('/', async (req, res) => {
  const { body } = req

  try {
    await client.createUser({
      profile: {
        firstName: body.firstName,
        lastName: body.lastName,
        email: body.email,
        login: body.email
      },
      credentials: {
        password: {
          value: body.password
        }
      }
    })

    res.redirect('/')
  } catch ({ errorCauses }) {
    const errors = {}

    errorCauses.forEach(({ errorSummary }) => {
      const [, field, error] = /^(.+?): (.+)$/.exec(errorSummary)
      errors[field] = error
    })

    res.render('register', {
      errors,
      fields: fields.map(field => ({
        ...field,
        error: errors[field.name],
        value: body[field.name]
      }))
    })
  }
})

module.exports = router
To tie this all together, in your root index.js file, make sure to replace the // @TODO add registration page comment with the following:
为了将这些结合在一起,请确保在您的根index.js文件中,将// @TODO add registration page注释替换为以下内容:
app.use('/register', require('./routes/register'))You can now have users register. If they run into an error, it will be displayed with the field that caused the error.
您现在可以让用户注册。 如果他们遇到错误,将显示导致错误的字段。

添加注销路线 (Add a Logout Route)
At the time of this writing, Okta's middleware doesn't provide a default /logout route. Luckily, adding one is fairly simple. In your index.js file, replace the // @TODO add logout route comment with:
在撰写本文时,Okta的中间件没有提供默认的/logout路由。 幸运的是,添加一个非常简单。 在index.js文件中,将// @TODO add logout route注释替换为:
app.get('/logout', (req, res) => {
  if (req.userContext) {
    const idToken = req.userContext.tokens.id_token
    const to = encodeURI(process.env.HOST_URL)
    const params = id_token_hint=${idToken}&post_logout_redirect_uri=${to}
    req.logout()
    res.redirect(${process.env.OKTA_ORG_URL}/oauth2/default/v1/logout?${params})
  } else {
    res.redirect('/')
  }
})
If you're logged in, this will invalidate the token and delete the user's session. It will then redirect you back to the homepage. If you're not logged in, it just takes you back to the homepage.
如果您已登录,这将使令牌无效并删除用户的会话。 然后它将把您重定向回主页。 如果您尚未登录,则只需将您带回到主页。
在Express App中添加指向新路线的链接 (Add Links to the New Routes in Your Express App)
To more easily expose these routes to the user, you can add some buttons. You'll need to expose the user context to the view to know if a user is logged in or not so you know which buttons to display, and potentially greet the user.
为了更轻松地向用户显示这些路由,可以添加一些按钮。 您需要向视图公开用户上下文,以了解用户是否已登录,以便知道要显示哪些按钮,并可能打招呼。
In routes/index.js replace the res.render('index') line with the following:
在routes/index.js将res.render('index')行替换为以下内容:
routes/index.js
路线/index.js
const { userContext } = req
res.render('index', { userContext })
While you're at it, you can also prevent the user from seeing your greeting unless they're logged in. Change your views/index.hbs file to the following:
进行此操作时,还可以防止用户看到您的问候语,除非他们已经登录。将您的views/index.hbs文件更改为以下内容:
views/index.hbs
views / index.hbs
{{#if userContext}}
  <h1 class="text-center">Hi {{userContext.userinfo.given_name}}!</h1>
  <div class="d-flex justify-content-center">
    <img class="rounded img-fluid" src="/static/images/greeting.jpg" />
  </div>
{{else}}
  <h1 class="text-center">Please log in</h1>
{{/if}}
Now to add the buttons. In views/layout.hbs, replace the {{!-- @TODO add auth links --}} comment with the following:
现在添加按钮。 在views/layout.hbs ,将{{!-- @TODO add auth links --}}注释替换为以下内容:
views/layout.hbs
views / layout.hbs
{{#if userContext}}
  <a class="nav-item nav-link" href="/logout">Log out</a>
{{else}}
  <a class="nav-item nav-link" href="/login">Log in</a>
  <a class="nav-item nav-link" href="/register">Register</a>
{{/if}}
Check out the final product to make sure it works
检查最终产品以确保其正常工作

了解有关Node,Express和Okta的更多信息 ( Learn more about Node, Express, and Okta )
That's it! In just a few minutes, you went from an empty folder to a secure website with user registration and login. You didn't even have to set up a database! If you want to see the final code sample for reference, you can find it on GitHub.
而已! 在短短的几分钟内,您便从一个空文件夹转到具有用户注册和登录信息的安全网站。 您甚至不必设置数据库! 如果要查看最终代码示例以供参考,可以在GitHub上找到它。
If you'd like to learn more about Node and Express check out some of these other posts on the Okta developer blog:
如果您想了解有关Node和Express的更多信息,请查看Okta开发人员博客上的其他一些文章:
Build and Understand a Simple Node.js Website with User Authentication
Build Secure Node Authentication with Passport.js and OpenID Connect
If you have any questions about this post, please add a comment below. For more awesome content, follow @oktadev on Twitter, like us on Facebook, or subscribe to our YouTube channel.
如果您对此帖子有任何疑问,请在下面添加评论。 有关更多精彩内容, 请在Twitter上关注@oktadev , 在Facebook上关注我们,或订阅我们的YouTube频道 。
翻译自: https://scotch.io/tutorials/build-simple-authentication-in-express-in-15-minutes
构建express


 269
269

 被折叠的 条评论
为什么被折叠?
被折叠的 条评论
为什么被折叠?
 到【灌水乐园】发言


