构建meteor应用程序
TLDR As the years go by, developers are constantly faced with new and more complex challenges in software development. Managers want to roll out new products quickly and project deadlines are getting crazier by the day. Software is eating the world, thus the demand for it has been on a crazy exponential rise. How do developers rise above these challenges? One way is automating as much as possible and using available developer tools to do more of the work so you can simply focus on the business logic.
TLDR随着时间的流逝,开发人员在软件开发中不断面临着新的,更复杂的挑战。 经理们希望Swift推出新产品,并且项目截止日期越来越疯狂。 软件正在吞噬整个世界,因此对它的需求呈指数级增长。 开发人员如何克服这些挑战? 一种方法是尽可能地自动化,并使用可用的开发人员工具来完成更多的工作,以便您可以专注于业务逻辑。
In this tutorial, we’ll look at how you can quickly build an app by taking advantage of the most recent and controversial software development trend: Serverless Architecture.
在本教程中,我们将研究如何利用最新和有争议的软件开发趋势: 无服务器架构快速构建应用程序。
Introduction to Serverless Architecture
无服务器架构简介
In a traditional software development approach, the developer has to not only write the code but also focus on hosting, provisioning, availability and scalability of servers to ensure successful software deployments and 99% uptime. In a serverless architecture, there is the absence of the server concept during software development. Developers write code that implements business logic. The business logic is the core focus and not servers! Read more about Serverless here.
在传统的软件开发方法中,开发人员不仅必须编写代码,而且还要专注于服务器的托管,供应,可用性和可伸缩性,以确保成功进行软件部署和99%的正常运行时间。 在无服务器体系结构中,在软件开发过程中没有服务器概念。 开发人员编写实现业务逻辑的代码。 业务逻辑是核心重点,而不是服务器! 在此处阅读有关无服务器的更多信息。
In the serverless realm, there are several providers. AWS Lambda, Windows Azure Functions, Google Cloud Functions and Auth0 Webtask. We’ll employ the services of Auth0 Webtask here because of its incredible simplicity.
在无服务器领域,有多个提供程序。 AWS Lambda,Windows Azure Functions,Google Cloud Functions和Auth0 Webtask。 由于Auth0 Webtask的 简单性,我们将在这里使用它们的服务。
Introduction to Auth0 Webtask
Auth0 Webtask简介
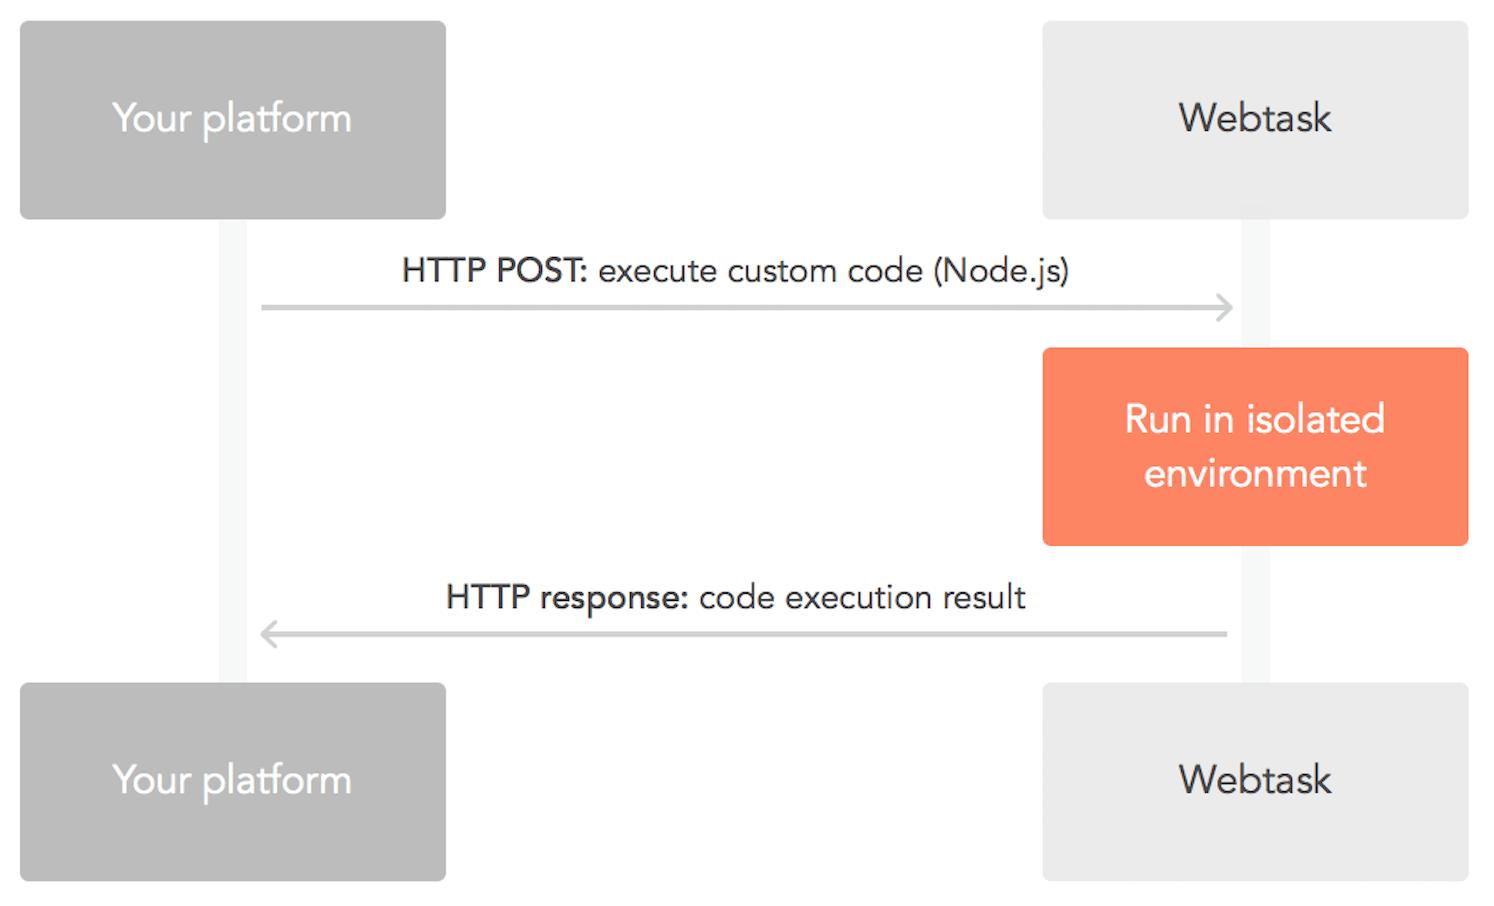
Webtask is a serverless platform that allows developers to execute custom code . It allows safe and low latency execution of custom, untrusted Node.js code in a multi-tenant environment. With webtask, you can run javascript code with an HTTP call. No provisioning. No deployment. Tomasz Janczuk has an excellent article explaining how to do more with Webtask here.
Webtask是一个无服务器平台,允许开发人员执行自定义代码。 它允许在多租户环境中安全,低延迟地执行自定义,不受信任的Node.js代码。 使用webtask,您可以通过HTTP调用运行javascript代码。 没有配置。 没有部署。 Tomasz Janczuk的出色文章在这里解释了如何使用Webtask做更多的事情。
The Challenge
挑战
Your boss just walked in and requested a custom messaging app that the contact centre agents in the company can use for quick customer service operations.
您的老板刚刚走进来,并要求一个自定义的消息传递应用程序,公司中的联络中心代理可以将其用于快速的客户服务操作。
Now, here’s the catch: You have only 5 minutes! Wait, what???
现在,要抓住的是:您只有5分钟! 等等,什么?
*Developer: *How’s that even possible?
*开发人员:*那怎么可能?
*Boss: *Go build, or go home!!!
*老板:*去建造,或回家!!!
The Solution - Webtask & Nexmo to the Rescue
解决方案-Webtask和Nexmo进行救援
1. Sign-up for a Webtask & Nexmo Account
1.注册Webtask和Nexmo帐户

Webtask
网络任务
Go to nexmo.com and also sign up for an account
转到nexmo.com并注册一个帐户

Nexmo
Nexmo
2. Install the command-line tool for Webtask
2.安装用于Webtask的命令行工具
https://github.com/auth0/wt-cli
https://github.com/auth0/wt-cli
3. Run the wt-init command to set up your webtask script
3.运行wt-init命令来设置您的Web任务脚本

The verification code will be sent to your email as shown below:
验证码将发送到您的电子邮件,如下所示:

4. Write the code
4.编写代码
Create a new file** sms.js** in your working directory. Let’s write the code that enables us to send SMS in a minute. Webtask currently supports over 800 node.js modules that you can use in your node.js scripts. You can check here to find out whatever module it supports.
在您的工作目录中创建一个新文件** sms.js **。 让我们编写使我们能够在一分钟内发送SMS的代码。 Webtask当前支持您可以在node.js脚本中使用的800多个node.js模块。 您可以在此处查看以了解其支持的模块。
sms.js
sms.js
var request = require('request');

module.exports = function(context, cb) {

  var required_params = ['phoneno', 'message', 'apiKey', 'apiSecret'];

  for (var i in required_params) {
        if (typeof context.data[required_params[i]] === 'undefined') {
            return cb(null, 'Missing ' + required_params[i] + '. Please supply the value.' );
        }
  };

  /**
   * Data to be sent to the Nexmo SMS API Service
   * @type Object
   */
  var API_KEY = context.data.apiKey;
  var API_SECRET = context.data.apiSecret;
  var message = context.data.message;
  var from = 'Auth0';
  var to = context.data.phoneno;

  /**
   * Make a get request to the Nexmo SMS API Service with the appropriate details
   */
  request
    .get('https://rest.nexmo.com/sms/json?api_key=' + API_KEY + '&api_secret=' + API_SECRET + '&from=' + from + '&to=' + to +'&text=' + message)
    .on('response', function(response) {

        if (response.statusCode !== 200) {
            return cb(null, response.body);
        }

        return cb(null, "Awesome...Message sent successfully");
    })
    .on('error', function(err) {
        if (err) {
            return cb(null, 'Sending of message failed:' + err);
        }
    });
};
This code is simple. We are basically making a request to Nexmo SMS API Service using the request module. Look at this piece of code below:
这段代码很简单。 我们基本上是使用请求模块向Nexmo SMS API服务发出请求 。 请看下面的这段代码:
var API_KEY = context.data.apiKey;
  var API_SECRET = context.data.apiSecret;
  var message = context.data.message;
  var from = 'Auth0';
  var to = context.data.phoneno;
Where does context.data. *come from? Webtask makes use of a model that accepts two parameters: *context and **callback. The context parameter is a JavaScript object that contains various properties such as query,** secrets, and **body. The context *parameter also offers access to the *context.storage. ** API which allow access to Webtasks durable storage. Find out more about ** context in the webtask documentation.
context.data在哪里。 *来自? Webtask使用一个接受两个参数的模型:* context 和** callback 。 context参数是一个JavaScript对象,其中包含各种属性,例如query ,** secrets 和** body。 context * 参数还提供对* context.storage的访问 。 **允许访问Webtasks持久存储的API。 在webtask文档中 找到有关**上下文的更多信息。
In this code, we made use of Nexmo Api key and secret. You can get that from the dashboard.
在此代码中,我们使用了Nexmo Api密钥和机密。 您可以从信息中心获取。
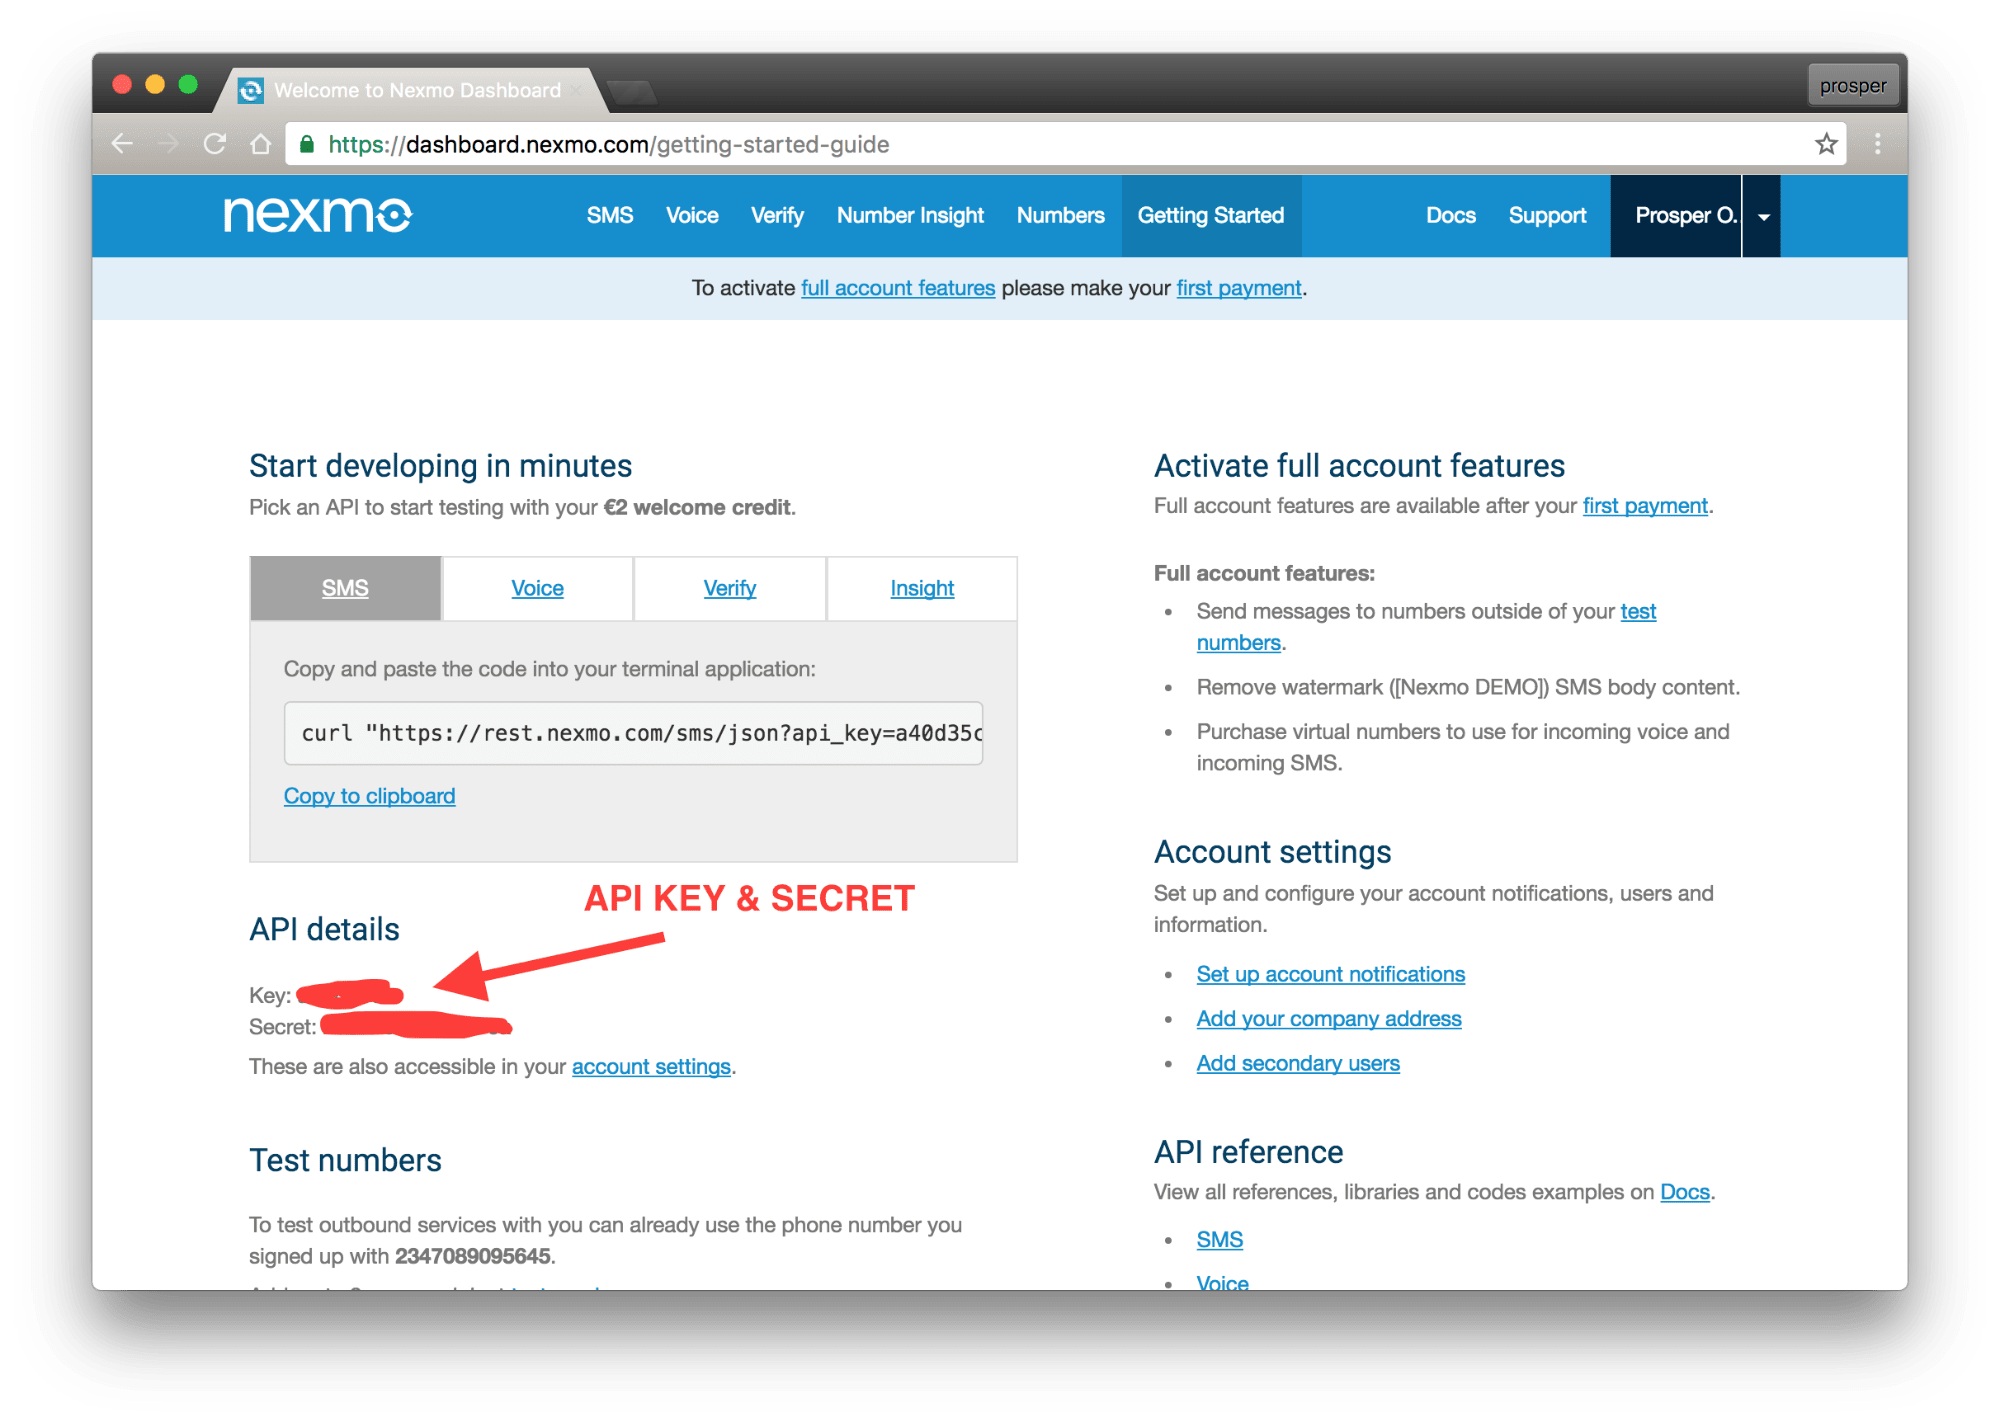
One more thing. If you are using a free account, you need to add the numbers you want to send to messages to as test numbers on the nexmo dashboard.
还有一件事。 如果您使用的是免费帐户,则需要在nexmo仪表板上添加要发送到邮件的号码作为测试号码。
5. Create the webtask url
5.创建webtask网址
We have our code in sms.js file. Now, navigate to your terminal and run the wt create command to create the webtask service for this app like so:
我们的代码在sms.js文件中。 现在,导航到您的终端并运行wt create命令为该应用创建webtask服务,如下所示:

In the image above, we passed two secrets - apiKey and apiSecret. Remember we defined them in our code? Yes, Webtask stores your secrets for you at the point of url creation.
在上图中,我们传递了两个秘密-apiKey和apiSecret。 还记得我们在代码中定义它们吗? 是的, Webtask在创建URL时会为您存储秘密。
A Webtask url has been created to run the service. Now, all you need to do is grab that url & run this in your browser and pass parameters to it like so:
已创建一个Webtask URL以运行该服务。 现在,您需要做的就是获取该url并在浏览器中运行它,然后将参数传递给它,如下所示:

In the message above, we passed in the phone number & the message. Viola, the text message has been sent!!!
在上面的消息中,我们传递了电话号码和消息。 中提琴,短信已发送!!!
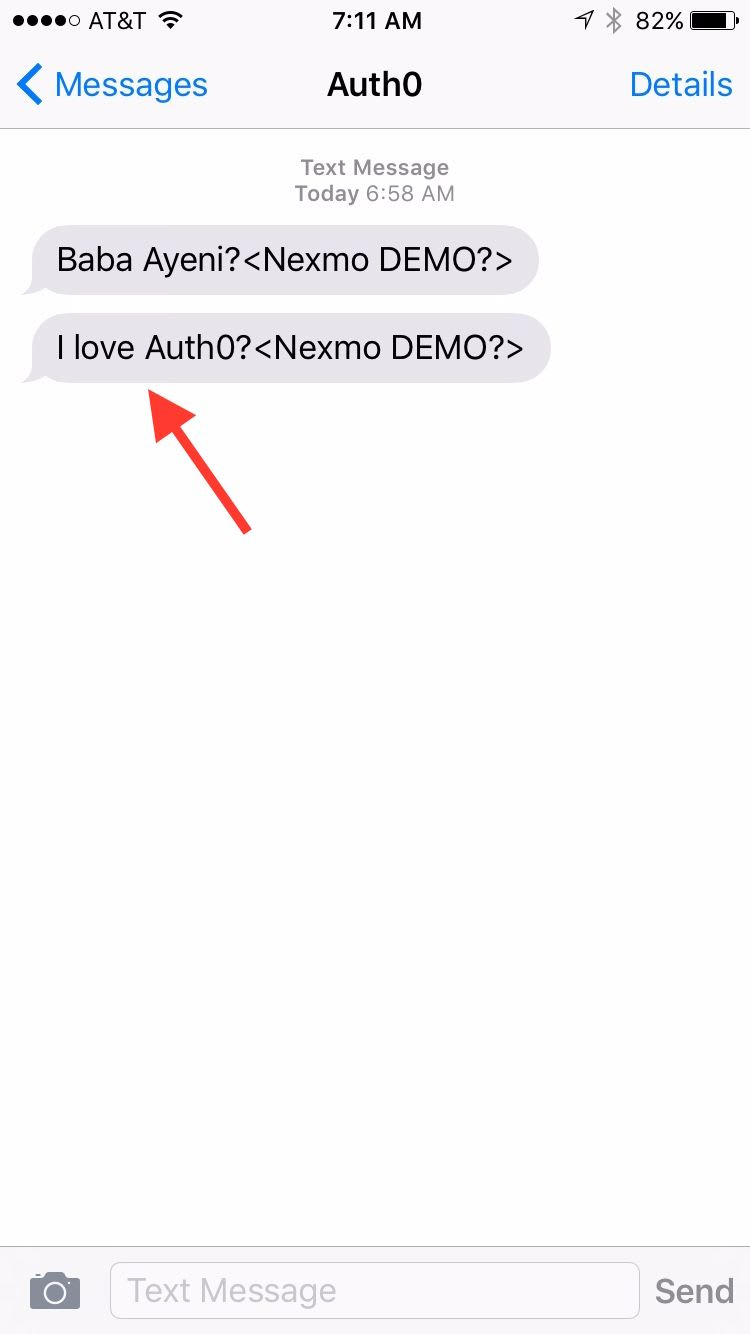
Text Message on User’s device
用户设备上的短信
Wait, was that even up to 5 minutes? You’ve built your boss a customer service messaging app. You can send the URL right now to anyone and they’ll be able to use!
等一下,甚至长达5分钟? 您已经为老板构建了一个客户服务消息传递应用程序。 您可以立即将URL发送给任何人,他们将可以使用该URL!
Let’s take it a step further. Right now there is room for errors, because you’ll have to type the phone number and message into the browser address bar. We’ll build a simple frontend interface for it.
让我们更进一步。 目前存在错误的空间,因为您必须在浏览器地址栏中键入电话号码和消息。 我们将为此构建一个简单的前端接口。
*Build the Frontend *
* 建立前端*
We’ll use AngularJS 1.5 to build out the front-end quickly. Create an** index.html** file in your service app directory and add the following code like so:
我们将使用AngularJS 1.5快速构建前端。 在服务应用程序目录中创建一个index.html **文件,并添加以下代码,如下所示:
*index.html *
* index.html *
<!doctype html>
<html lang="en" ng-app="csa">
<head>
  <meta charset="UTF-8">
  <meta http-equiv="X-UA-Compatible" content="IE=edge">
  <meta name="author" content="Prosper Otemuyiwa">
  <meta name="HandheldFriendly" content="true">
  <meta http-equiv="X-UA-Compatible" content="IE=edge,chrome=1">
  <meta name="fragment" content="!">
  <meta name="viewport" content="initial-scale=1, maximum-scale=1, user-scalable=no" />
  <base href="/">

  <title>Customer Service Bird App</title>
  <link href="//fonts.googleapis.com/css?family=Roboto|Montserrat:400,700|Open+Sans:400,300,600" rel="stylesheet">
  <link href="//maxcdn.bootstrapcdn.com/font-awesome/4.3.0/css/font-awesome.min.css" rel="stylesheet">
  <link href="//maxcdn.bootstrapcdn.com/bootstrap/3.3.0/css/bootstrap.min.css" rel="stylesheet">

  <!-- JS -->
  <script src="https://ajax.googleapis.com/ajax/libs/angularjs/1.5.8/angular.min.js"></script>
  <script src="app.js"></script>
</head>

<body ng-controller="MessageController">
  <header class="navbar navbar-default navbar-static-top">
    <div class="navbar-header">
      <a class="navbar-brand" href="/"> Customer Service Bird</a>
    </div>
  </header>

  <div class="container">
       <form name="messageForm" ng-submit="sendMessage()">
          <div class="col-md-12">

              <div class="form-group">
                  <label for="hire">Country</label>
                  <select class="form-control" id="hire" ng-model="countryCode" name="hire">
                    <option ng-repeat="country in countryList" value="{{ country.value }}">{{ country.name }}</option>
                  </select>
              </div>

              <div class="form-group">
                <label for="address">Mobile Number</label>
                <input class="form-control" name="mobile" type="text" ng-model="mobile" required>
              </div>

              <div class="form-group">
                <label for="bio">Message </label>
                <textarea class="form-control" name="bio" cols="50" rows="10" ng-model="message" id="bio" required>
                </textarea>
              </div>

               <!-- Save Changes Form Input -->
              <div class="form-group">
                <button class="form-control btn btn-block btn-info" ng-disabled="messageForm.$invalid" type="submit">Send Message</button>
              </div>
          </div>
        </form>

        <div class="col-md-12" ng-show="successMessage">
           <br/>
           <span class="alert alert-success"> Message sent successfully </span>
        </div>

        <div class="col-md-12" ng-show="errorMessage">
           <span class="alert alert-danger"> Server error...Please try again or contact the Engineer </span>
        </div>
  </div>
</body>
</html>
We gave our body a controller named MessageController, and also bootstrapped the angular app by assigning** csa** to the ng-app *attribute on the html tag at the very top. Next, create a javascript file: *app.js. This file will contain the MessageController that will be responsible for actually sending the message.
我们给我们的身体一个名为MessageController的控制器,并通过将** csa **分配给最顶部html标签上的 ng-app * 属性来引导有角度的应用程序。 接下来,创建一个javascript文件:* app.js。 该文件将包含MessageController ,它将负责实际发送消息。
App.js
App.js
var app = angular.module('csa', []);

app.controller('MessageController', ['$scope','$http', function($scope, $http) {

    $scope.countryList = [
        { name: 'Nigeria (+234)', value: '234' },
        { name: 'United Kingdom (+44)', value: '44' },
        { name: 'United States (+1)', value: '1' }
    ];

    $scope.sendMessage = function() {

        $scope.successMessage = false;
        $scope.errorMessage = false;

        var phoneNo = $scope.countryCode + $scope.mobile;
        var message = $scope.message;

        if ( $scope.mobile.charAt(0) === '0') {
            var phoneNo = $scope.countryCode + $scope.mobile.slice(1);
        }

        $http({
            method: 'GET',
            url: 'https://webtask.it.auth0.com/api/run/wt-prosperotemuyiwa-gmail_com-0/sms?phoneno=' + phoneNo + '&message=' + message
        }).then( function(response) {
            $scope.successMessage = true;
        }, function(err) {
            $scope.errorMessage = true;
        });
    };

}]);
Basically, we are using the $http angularJS service to make a get request to the webtask url and we are passing the required attributes from the user form input. Expected more? It’s really that simple!
基本上,我们使用$ http angularJS服务向Web任务url发出get请求,并从用户表单输入中传递所需的属性。 期望更多? 真的就是这么简单!
*Note: *In case you are wondering why Angular 2 wasn’t used here, it’s out of the scope of this tutorial because it will involve describing the setup and build process. If you want to use Angular 2, check out this and the angular 2 series covered here.
* 注意:*如果您想知道为什么这里不使用Angular 2,则超出了本教程的范围,因为它将涉及描述设置和构建过程。 如果要使用Angular 2,请查看此内容以及此处介绍的angular 2系列。
Now, run the app in your browser and try sending a message. You should see something like this:
现在,在浏览器中运行该应用程序,然后尝试发送消息。 您应该会看到以下内容:
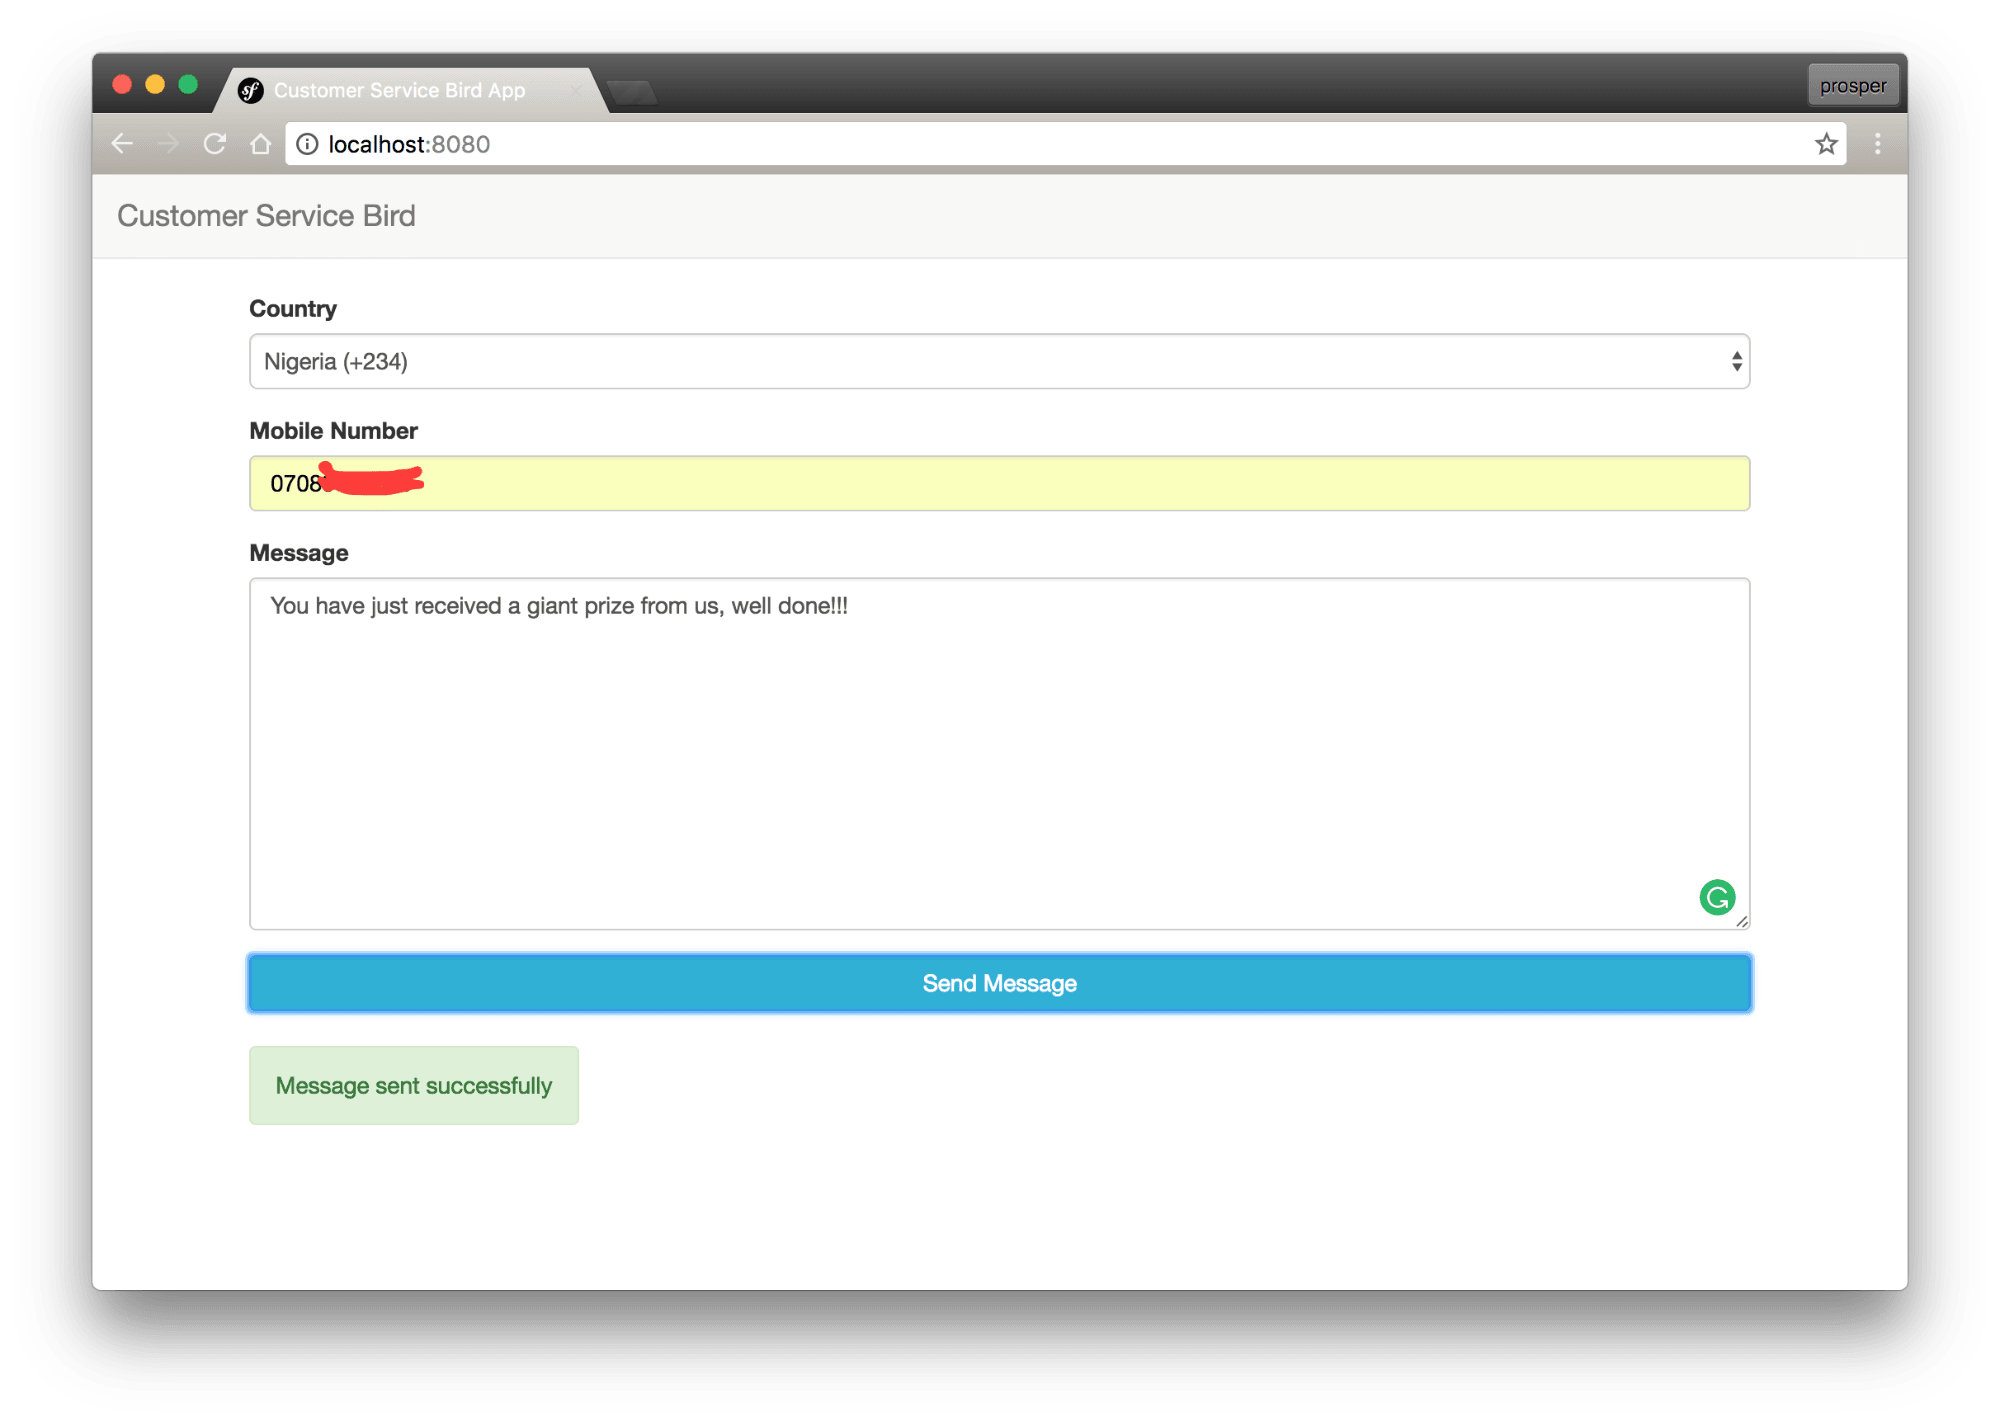
*Note: * I only used 3 countries for the drop down option, you can add as many as you want. You should also do more than I have done in this tutorial in terms of user input validation if you want to use this code in production. For the Nigerian folks, I know Jusibe is the most popular SMS service in the country, so I wrote an implementation for it here.
* 注意:*我只使用3个国家作为下拉选项,您可以添加任意多个。 如果要在生产中使用此代码,就用户输入验证而言,您还应该做得比本教程中我做的还要多。 对于尼日利亚人来说,我知道Jusibe是该国最受欢迎的SMS服务,因此我在这里编写了一个实现。
Conclusion
结论
With the help of Webtask & Nexmo, we have been able to spin up a functional customer service messaging app in less than 10 minutes. You can shrug your shoulders and say to your boss *“Not a big deal, kid stuff!” *
在Webtask&Nexmo的帮助下,我们能够在不到10分钟的时间内启动功能强大的客户服务消息传递应用程序。 您可以耸耸肩膀对老板说*“没什么大不了的,孩子们!” *
Hopefully this will inspire you to go serverless. Looking for more resources to get you hooked with building serverless apps? Check out Building Serverless apps with Webtask and Building Serverless apps with Lambda.
希望这会启发您去无服务器。 寻找更多资源让您着迷于构建无服务器应用程序吗? 查看使用Webtask 构建无服务器应用程序和使用Lambda构建无服务器应用程序。
You can find the source code for this tutorial on Github.
翻译自: https://scotch.io/tutorials/build-a-customer-service-messaging-app-in-5-minutes
构建meteor应用程序


 1562
1562

 被折叠的 条评论
为什么被折叠?


