


node mocha
介绍 ( Introduction )
I still remember the satisfaction of being finally able to write the backend part of a bigger app in node and I am sure many of you do it too.
我仍然记得能够最终在节点中编写更大的应用程序的后端部分感到满意,并且我相信你们中的许多人也可以这样做。
And then? We need to make sure our app behaves the way we expect and one of the strongly suggested methodologies is software testing. Software testing is crazily useful whenever a new feature is added to the system: Having the test environment already set up which can be run with a single command helps to figure out whether a new feature introduces new bugs.
然后? 我们需要确保我们的应用按照预期的方式运行,强烈建议的方法之一是软件测试。 每当将新功能添加到系统时,软件测试就非常有用:已经设置了可以通过单个命令运行的测试环境,有助于弄清新功能是否引入了新的错误。
In the past, we've worked on building a RESTful Node API and authenticating a Node API.
过去,我们一直在努力构建RESTful Node API和对Node API进行身份验证 。
In this tutorial we are going to write a simple RESTful API with Node.js and use Mocha and Chai to write tests against it. We will test CRUD operations on a bookstore.
在本教程中,我们将使用Node.js编写一个简单的RESTful API,并使用Mocha和Chai对其进行测试。 我们将在书店中测试CRUD操作。
As usual you can build the app step-by-step throughout the tutorial or directly get it on github.
像往常一样,您可以在整个教程中逐步构建应用程序,也可以直接在github上获取它。
摩卡:测试环境 ( Mocha: Testing Environment )
Mocha is a javascript framework for Node.js which allows Asynchronous testing. Let's say it provides the environment in which we can use our favorite assertion libraries to test the code.
Mocha是用于Node.jsJavaScript框架,该框架允许异步测试。 假设它提供了一个环境,我们可以在其中使用我们喜欢的断言库来测试代码。
 .
.
Mocha comes with tons of great features, the website shows a long list but here are the ones I like the most:
摩卡(Mocha)具有许多强大的功能,该网站显示了很长的列表,但以下是我最喜欢的列表:
- simple async support, including promises. 简单的异步支持,包括承诺。
- async test timeout support. 异步测试超时支持。
- before, after, before each, after each hooks (very useful to clean the environment where each test!). 在每个钩子之前,之后,之前,之后(对于清洁每个测试所在的环境非常有用!)。
- use any assertion library you want, Chai in our tutorial. 使用我们想要的任何断言库,Chai在我们的教程中。
柴:断言图书馆 ( Chai: Assertion Library )
So with Mocha we actually have the environment for making our tests but how do we do test HTTP calls for example? Moreover, How do we test whether a GET request is actually returning the JSON file we are expective, given a defined input? We need an assertion library, that's why mocha is not enough.
因此,实际上,有了Mocha,我们就有了进行测试的环境,但是例如,我们如何测试HTTP调用呢? 此外,在给定定义的输入的情况下,我们如何测试GET请求是否实际上返回了我们期望的JSON文件? 我们需要一个断言库,这就是为什么mocha不够用的原因。
So here it is Chai, the assertion library for the current tutorial:
因此,这里是Chai ,是本教程的断言库:

Chai shines on the freedom of choosing the interface we prefer: "should", "expect", "assert" they are all available. I personally use should but you are free to check it out the API and switch to the others two. Lastly Chai HTTP addon allows Chai library to easily use assertions on HTTP requests which suits our needs.
Chai赞扬选择我们喜欢的界面的自由:“应该”,“期望”,“声明”它们都可用。 我个人使用应该,但是您可以自由地检查它的API并切换到其他两个。 最后, Chai HTTP插件允许Chai库轻松使用适合我们需求的HTTP请求断言。
先决条件 (Prerequisites)
- Node.js: a basic understanding of node.js and is recommended as i wont go too much into detail on building a RESTful API. Node.js :对node.js的基本了解,因此建议您这样做,因为我不会在构建RESTful API时过分详细。
- POSTMAN for making fast HTTP requests to the API. POSTMAN,用于向API发出快速HTTP请求。
- ES6 syntax: I decided to use the latest version of Node (6.*.*) which has the highest integration of ES6 features for better code readibility. If you are not familiar with ES6 you can take a look at the great scotch articles (Pt.1 , Pt.2 and Pt.3) about it but do not worry I am going to spend a few words whenever we encount some "exotic" syntax or declaration. ES6语法 :我决定使用最新版本的Node(6。*。*),该版本具有ES6功能的最高集成度,以提高代码可读性。 如果您不熟悉ES6,则可以查看有关它的出色的苏格兰文章( Pt.1 , Pt.2和Pt.3 ),但是不用担心,每当我们遇到一些“异国情调”时,我都会花几句话语法或声明。
Time to setup our Bookstore!
是时候设置我们的书店了!
项目设置 ( Project setup )
目录结构 (Directory Structure)
Here is the project directory for our API, something you must have seen before:
这是我们API的项目目录,您之前必须已经看过它:
-- controllers
---- models
------ book.js
---- routes
------ book.js
-- config
---- default.json
---- dev.json
---- test.json
--test
---- book.js
package.json
server.json
Notice the /config folder containing 3 JSON files: As the name suggests, they contain particular configurations for a specific purpose.
请注意/config文件夹,其中包含3个JSON文件:顾名思义,它们包含用于特定目的的特定配置。
In this tutorial we are going to switch between two databases, one for development and one for testing purposes, thus the files contain the mongodb URI in JSON format:
在本教程中,我们将在两个数据库之间切换,一个用于开发,一个用于测试,因此文件包含JSON格式的mongodb URI:
dev.json and default.json:
dev.json和default.json :
test.json:
test.json :
NB: default.json is optional however let me highlight that files in the config directory are loaded starting from it. For more information about the configuration files (config directory, file order, file format etc.) check out this link.
注意 : default.json是可选的,但是让我强调一下config目录中的文件是从该目录开始加载的。 有关配置文件(配置目录,文件顺序,文件格式等)的更多信息,请查看此链接 。
Finally, notice /test/book.js, that's where we are going to write our tests!
最后,注意/test/book.js ,这就是我们要编写测试的地方!
Package.json (Package.json)
Create the package.json file and paste the following code:
创建package.json文件并粘贴以下代码:
{
  "name": "bookstore",
  "version": "1.0.0",
  "description": "A bookstore API",
  "main": "server.js",
  "author": "Sam",
  "license": "ISC",
  "dependencies": {
    "body-parser": "^1.15.1",
    "config": "^1.20.1",
    "express": "^4.13.4",
    "mongoose": "^4.4.15",
    "morgan": "^1.7.0"
  },
  "devDependencies": {
    "chai": "^3.5.0",
    "chai-http": "^2.0.1",
    "mocha": "^2.4.5"
  },
  "scripts": {
    "start": "SET NODE_ENV=dev && node server.js",
    "test": "mocha --timeout 10000"
  }
}
Again the configuration should not surprise anyone who wrote more than a server with node.js, the test-related packages mocha, chai, chai-http are saved in the dev-dependencies (flag --save-dev from command line) while the scripts property allows for two different ways of running the server.
同样,配置不应该让任何使用node.js编写服务器的人感到惊讶,与测试相关的软件包mocha , chai , chai-http被保存在dev-dependencies(命令行中的--save-dev标志)中,而scripts属性允许运行服务器的两种不同方式。
To run mocha I added the flag --timeout 10000 because I fetch data from a database hosted on mongolab so the default 2 seconds may not be enough.
为了运行mocha,我添加了--timeout 10000标志,因为我从mongolab上托管的数据库中获取数据,因此默认的2秒可能还不够。
Congrats! You made it through the boring part of the tutorial, now it is time to write the server and test it.
恭喜! 您已经完成了教程的无聊部分,现在该编写服务器并对其进行测试了。
服务器 ( The server )
主要 (Main)
Let's create the file server.js in the root of the project and paste the following code:
让我们在项目的根目录中创建文件server.js并粘贴以下代码:
let express = require('express');
let app = express();
let mongoose = require('mongoose');
let morgan = require('morgan');
let bodyParser = require('body-parser');
let port = 8080;
let book = require('./app/routes/book');
let config = require('config'); //we load the db location from the JSON files
//db options
let options = {
                server: { socketOptions: { keepAlive: 1, connectTimeoutMS: 30000 } },
                replset: { socketOptions: { keepAlive: 1, connectTimeoutMS : 30000 } }
              };

//db connection
mongoose.connect(config.DBHost, options);
let db = mongoose.connection;
db.on('error', console.error.bind(console, 'connection error:'));

//don't show the log when it is test
if(config.util.getEnv('NODE_ENV') !== 'test') {
    //use morgan to log at command line
    app.use(morgan('combined')); //'combined' outputs the Apache style LOGs
}

//parse application/json and look for raw text
app.use(bodyParser.json());
app.use(bodyParser.urlencoded({extended: true}));
app.use(bodyParser.text());
app.use(bodyParser.json({ type: 'application/json'}));

app.get("/", (req, res) => res.json({message: "Welcome to our Bookstore!"}));

app.route("/book")
    .get(book.getBooks)
    .post(book.postBook);
app.route("/book/:id")
    .get(book.getBook)
    .delete(book.deleteBook)
    .put(book.updateBook);


app.listen(port);
console.log("Listening on port " + port);

module.exports = app; // for testing
Here are the key concepts:
以下是关键概念:
- We require the module config to access the configuration file named as the NODE_ENV content to get the mongo db URI parameter for the db connection. This helps us to keep the "real" database clean by testing on another database hidden to our app future users. 我们要求模块config访问名为NODE_ENV内容的配置文件,以获取数据库连接的mongo db URI参数。 这有助于我们通过对应用程序未来用户隐藏的另一个数据库进行测试来保持“真实”数据库的清洁。
- The enviroment variable NODE_ENV is test against test to disable morgan log in the command line or it would interfere with the test output. 对环境变量NODE_ENV进行了针对测试的测试,以禁用命令行中的morgan日志,否则它将干扰测试输出。
- The last line of code exports the server for testing purposes. 最后一行代码导出服务器以进行测试。
- Notice the variables definition using let which makes the variable enclosed to the nearest enclosing block or global if outside any block. 注意使用let的变量定义,该变量使变量包含在最接近的封闭块中,或者如果在任何块外部,则为全局变量。
The remaining lines of codes are nothing new, we simply go through requiring all the necessary modules, define the header options for the communication with the server, craete the specific roots and eventually let the server listen on a defined port.
剩下的代码行并不是什么新鲜的事情,我们只需完成所有必需的模块,定义与服务器进行通信的标头选项,创建特定的根目录并最终让服务器在定义的端口上进行侦听就可以了。
模型和路线 (Model and Routes)
Time for our book model! Create a file in /app/model/ called book.js and paste the following code:
时间到了我们的图书模型! 在/app/model/创建一个名为book.js的文件,并粘贴以下代码:
let mongoose = require('mongoose');
let Schema = mongoose.Schema;

//book schema definition
let BookSchema = new Schema(
  {
    title: { type: String, required: true },
    author: { type: String, required: true },
    year: { type: Number, required: true },
    pages: { type: Number, required: true, min: 1 },
    createdAt: { type: Date, default: Date.now },
  },
  {
    versionKey: false
  }
);

// Sets the createdAt parameter equal to the current time
BookSchema.pre('save', next => {
  now = new Date();
  if(!this.createdAt) {
    this.createdAt = now;
  }
  next();
});

//Exports the BookSchema for use elsewhere.
module.exports = mongoose.model('book', BookSchema);
Our book schema has a title, author, the number of pages, the publication year and the date of creation in the db. I set the versionKey to false since it's useless for the purpose of the tutorial.
我们的图书模式在数据库中具有标题,作者,页数,出版年份和创建日期。 我将versionKey设置为false,因为对于本教程而言,它是无用的。
NB: the exotic callback syntax in the .pre() function is an arrow function, a function who has a shorter syntax which, according to the definiton on MDN , "lexically binds the this value (does not bind its own this, arguments, super, or new.target). Arrow functions are always anonymous".
注意 : .pre()函数中的奇异回调语法是一个箭头函数,该函数具有较短的语法,根据MDN的定义,该函数“按词法绑定此值(不绑定其自身的this,参数,超级或new.target)。箭头函数始终是匿名的” 。
Well, pretty much all we need to know about the model so let's move to the routes.
好吧,我们几乎需要了解有关该模型的所有知识,所以让我们开始研究路线。
in /app/routes/ create a file called book.js and paste the following code:
在/app/routes/创建一个名为book.js的文件,并粘贴以下代码:
let mongoose = require('mongoose');
let Book = require('../models/book');

/*
 * GET /book route to retrieve all the books.
 */
function getBooks(req, res) {
    //Query the DB and if no errors, send all the books
    let query = Book.find({});
    query.exec((err, books) => {
        if(err) res.send(err);
        //If no errors, send them back to the client
        res.json(books);
    });
}

/*
 * POST /book to save a new book.
 */
function postBook(req, res) {
    //Creates a new book
    var newBook = new Book(req.body);
    //Save it into the DB.
    newBook.save((err,book) => {
        if(err) {
            res.send(err);
        }
        else { //If no errors, send it back to the client
            res.json({message: "Book successfully added!", book });
        }
    });
}

/*
 * GET /book/:id route to retrieve a book given its id.
 */
function getBook(req, res) {
    Book.findById(req.params.id, (err, book) => {
        if(err) res.send(err);
        //If no errors, send it back to the client
        res.json(book);
    });
}

/*
 * DELETE /book/:id to delete a book given its id.
 */
function deleteBook(req, res) {
    Book.remove({_id : req.params.id}, (err, result) => {
        res.json({ message: "Book successfully deleted!", result });
    });
}

/*
 * PUT /book/:id to updatea a book given its id
 */
function updateBook(req, res) {
    Book.findById({_id: req.params.id}, (err, book) => {
        if(err) res.send(err);
        Object.assign(book, req.body).save((err, book) => {
            if(err) res.send(err);
            res.json({ message: 'Book updated!', book });
        });
    });
}

//export all the functions
module.exports = { getBooks, postBook, getBook, deleteBook, updateBook };
Here the key concepts:
这里的关键概念:
- The routes are no more than standard routes, GET, POST, DELETE, PUT to perform CRUD operations on our data. 这些路由只不过是用于对数据执行CRUD操作的标准路由,GET,POST,DELETE,PUT。
- In the function
updatedBook()we useObject.assign, a new function introduced in ES6 which, in this case, overrides the common properties of book withreq.bodywhile leaving untouched the others. 在功能updatedBook()我们使用Object.assign,在ES6推出了新的功能,在这种情况下,将覆盖本书的公共属性与req.body同时保持不变的人。 - At the end we export the object using a faster syntax which pairs key and value to avoid useless repetitions. 最后,我们使用更快的语法导出对象,该语法将键和值配对,以避免无用的重复。
We finished this section and actually we have a working app!
我们完成了本节,实际上我们有一个可以运行的应用程序!
天真测试 ( A Naive Test )
Now let's run the app and open POSTMAN to send HTTP request to the server and check if everything is working as expected.
现在,让我们运行该应用程序并打开POSTMAN以将HTTP请求发送到服务器,并检查一切是否按预期工作。
in the command line run
在命令行中运行
npm start获取/预订 (GET /book)
in POSTMAN run the GET request and, assuming the database contains books, here is the result:
在POSTMAN中运行GET请求,并假设数据库包含书籍,则结果如下:
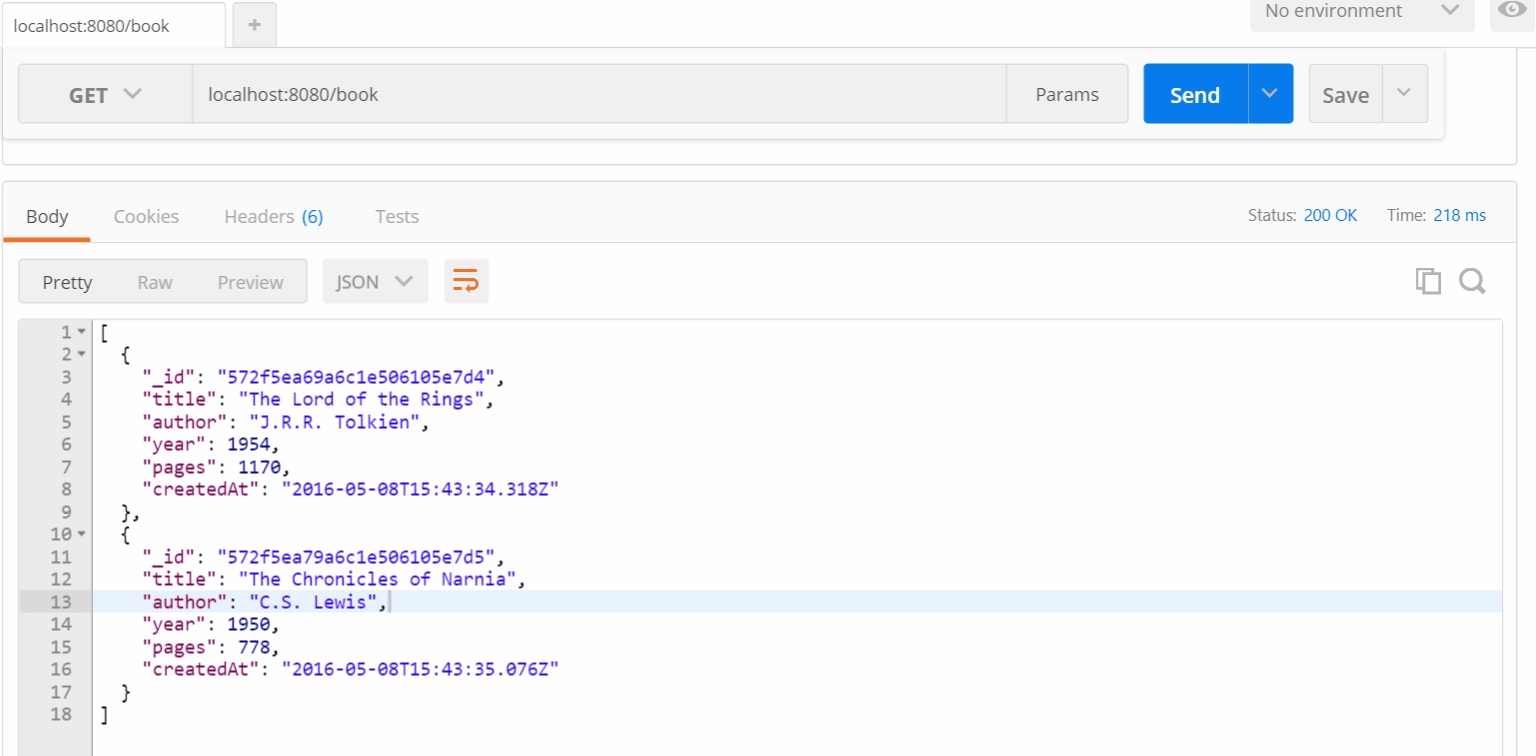
The server correctly returned the book list in my database.
服务器正确返回了我数据库中的书单。
开机自检/预订 (POST /book)
Let's add a book and POST to the server:
让我们向服务器添加一本书和POST:

It seems the book was perfectly added. The server returned the book and a message confirming it was added in our bookstore. Is it true? Let's send another GET request and here is the result:
看来这本书已完美地添加了。 服务器返回了该书,并显示一条消息,确认已将其添加到我们的书店中。 是真的吗 让我们发送另一个GET请求,结果如下:

Awesome it works!
太棒了!
放置/ book /:id (PUT /book/:id)
Let's update a book by changing the page and check the result:
让我们通过更改页面来更新一本书并检查结果:

Great! PUT also seems to be working so let's send another GET request to check all the list:
大! PUT似乎也可以正常工作,因此让我们发送另一个GET请求来检查所有列表:
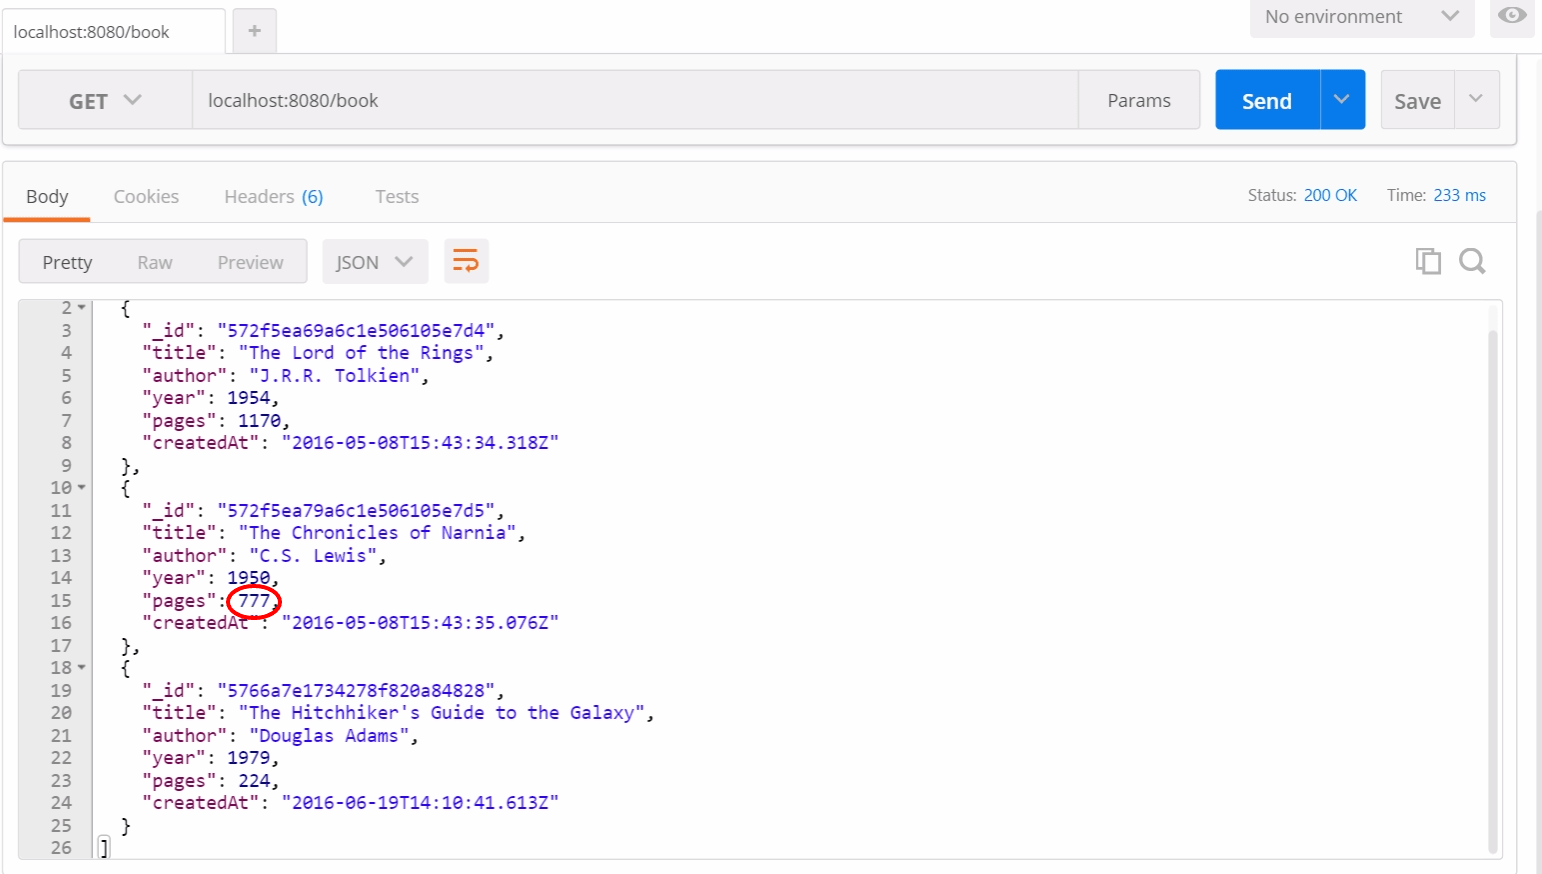
All is running smoothly...
一切运行顺利...
GET / book /:id (GET /book/:id)
Now let's get a single book by sending the id in the GET request and then delete it:
现在,通过发送GET请求中的ID,然后将其删除来获得一本书:
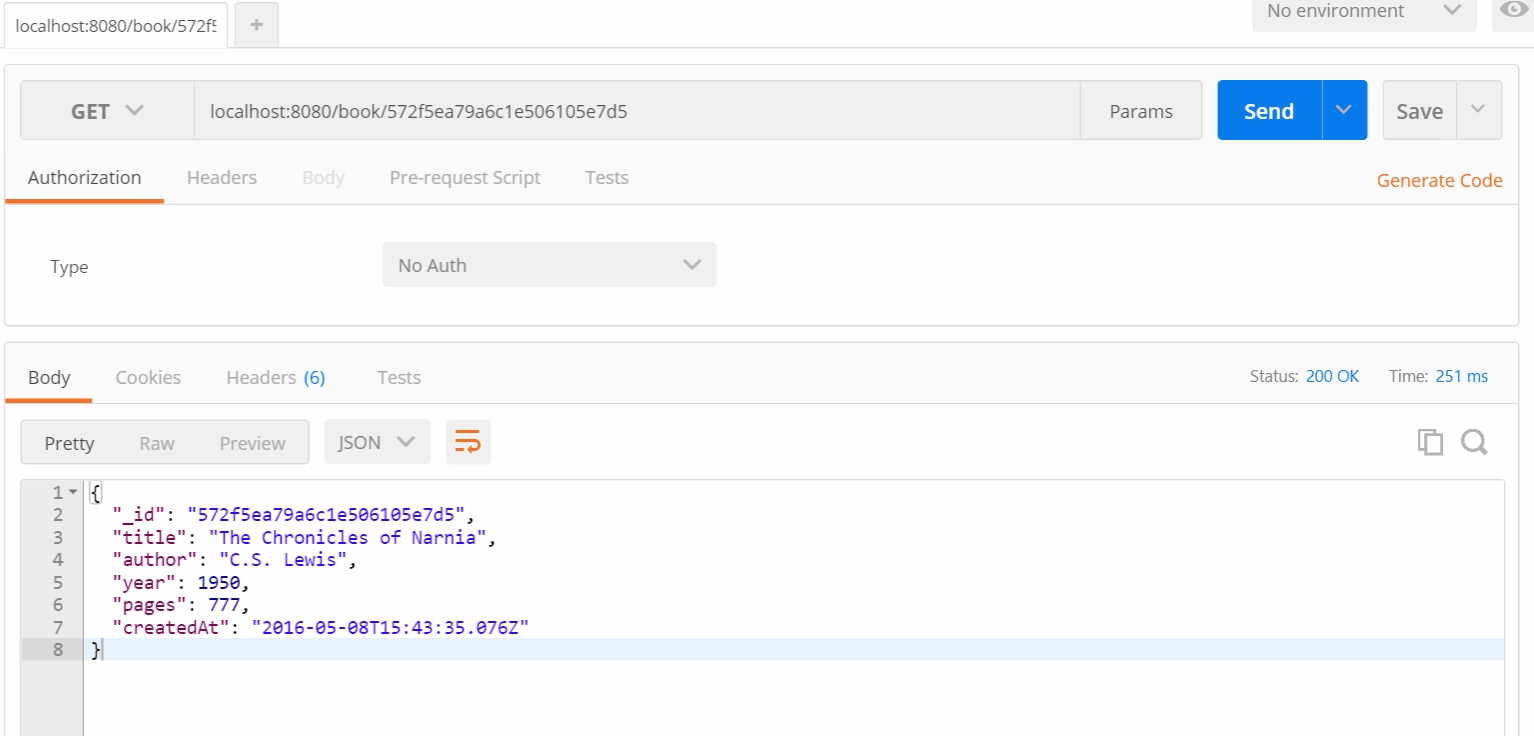
As it returns the correct book let's try now to delete it:
当它返回正确的书时,让我们现在尝试删除它:
删除/ book /:id (DELETE /book/:id )
Here is the result of the DELETE request to the server:
这是对服务器的DELETE请求的结果:

Even the last request works smoothly and we do not need to doublecheck with another GET request as we are sending the client some info from mongo (result property) which states the book was actually deleted.
即使最后一个请求也可以正常工作,并且我们不需要从另一个GET请求中仔细检查,因为我们正在从mongo(结果属性)向客户端发送一些信息,该信息指出该书实际上已被删除。
By doing some test with POSTMAN the app happened to behave as expected right? So, would you shoot it to your clients?
通过对POSTMAN进行测试,该应用程序的行为恰好符合预期,对吗? 那么,您会把它拍给客户吗?
Let me reply for you: NO!!
让我为您回复: 不!
Ours is what I called a naive test because we simply tried few operations without testing strange situations that may happen: A post request without some expected data, a DELETE with a wrong id as parameter or even without id to name few.
我们之所以称其为“天真测试”,是因为我们只是尝试了很少的操作而没有测试可能发生的奇怪情况:没有某些预期数据的发布请求,ID作为参数错误的DELETE或什至没有ID的例子。
This is obviously a simple app and if we were lucky enough, we coded it without introducing bugs of any sort, but what about a real-world app? Moreover, we spent time to run with POSTMAN some test HTTP requests so what would happen if one day we had to change the code of one of those? Test them all again with POSTMAN? Have you started to realize this is not an agile approach?
显然,这是一个简单的应用程序,如果幸运的话,我们在编写代码时不会引入任何类型的错误,但是真实世界中的应用程序呢? 此外,我们花了一些时间与POSTMAN一起运行一些测试HTTP请求,因此如果有一天我们不得不更改其中一个的代码,会发生什么? 用POSTMAN再次测试它们吗? 您是否已经开始意识到这不是敏捷方法?
This is nothing but few situations you may encounter and you already encountered in your journey as a developer, luckily we have tools to create tests which are always available and can be launched with a single comman line.
这不过是您可能遇到的少数情况,并且您在开发人员的旅途中已经遇到过这种情况,幸运的是,我们拥有创建测试的工具,这些工具始终可用,并且可以通过一条命令行启动。
Let's do something better to test our app!
让我们做点更好的测试我们的应用程序吧!
更好的测试 ( A Better Test )
First, let's create a file in /test called book.js and paste the following code:
首先,让我们在/test创建一个名为book.js的文件,并粘贴以下代码:
//During the test the env variable is set to test
process.env.NODE_ENV = 'test';

let mongoose = require("mongoose");
let Book = require('../app/models/book');

//Require the dev-dependencies
let chai = require('chai');
let chaiHttp = require('chai-http');
let server = require('../server');
let should = chai.should();


chai.use(chaiHttp);
//Our parent block
describe('Books', () => {
    beforeEach((done) => { //Before each test we empty the database
        Book.remove({}, (err) => {
           done();
        });
    });
/*
  * Test the /GET route
  */
  describe('/GET book', () => {
      it('it should GET all the books', (done) => {
        chai.request(server)
            .get('/book')
            .end((err, res) => {
                  res.should.have.status(200);
                  res.body.should.be.a('array');
                  res.body.length.should.be.eql(0);
              done();
            });
      });
  });

});
Wow that's a lot of new things, let's dig into it:
哇,这是很多新东西,让我们对其进行深入研究:
- You must have noticed the we set the NODE_ENV variable to test, by doing so we change the configuration file to be loaded so the server will connect to the test database and avoid morgan logs in the cmd. 您一定已经注意到我们将NODE_ENV变量设置为test,这样我们更改了要加载的配置文件,因此服务器将连接到测试数据库,并避免在cmd中登录morgan。
- We required the dev-dependencies modules and server itself (Do you remember we exported it by
module.exports?). 我们需要dev-dependencies模块和服务器本身(您还记得我们是通过module.exports导出的吗?)。 - We defined
shouldby runningchai.should()to style our tests on the HTTP requests result, then we told chai to use chai HTTP.should通过运行chai.should()的HTTP请求导致的款式我们的测试,然后我们告诉柴用柴HTTP。
So it starts with "describe" blocks of code for better organizing your assertions and this organization will reflect in the output at command line as we will see later.
因此,它从“描述”代码块开始,以更好地组织您的断言,并且该组织将反映在命令行的输出中,我们将在后面看到。
beforeEach is a block of code that is going to run before each the describe blocks on the same level. Why we did that? Well we are going to remove any book from the database to start with an empty bookstore whenever a test is run.
beforeEach是一个代码块,它将在同一级别的每个describe块之前运行。 我们为什么这样做? 好了,我们将在运行测试时从数据库中删除所有书籍,以一个空的书店开始。
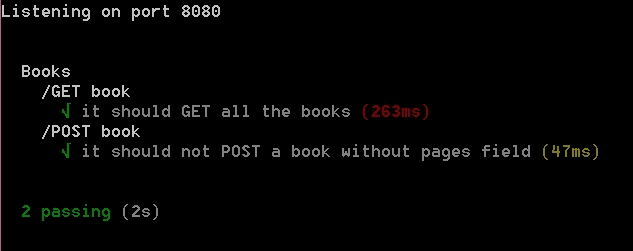
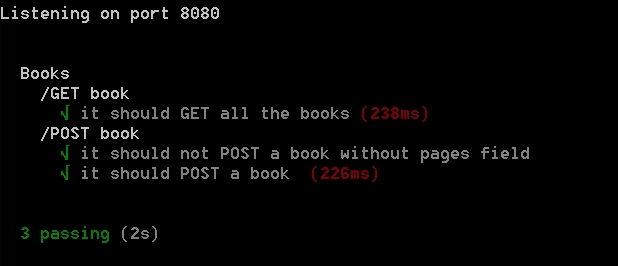
测试/ GET路线 (Test the /GET route)
And here it comes the first test, chai is going to perform a GET request to the server and the assertions on the res variable will satisfy or reject the first parameter of the the it block it should GET all the books. Precisely, given the empty bookstore the result of the request should be:
这是第一个测试,chai将向服务器执行GET请求,并且res变量上的断言将满足或拒绝it块的第一个参数,即它应该获取所有书籍 。 精确地,给定空的书店,请求的结果应为:
- Status 200. 状态200。
- The result should be an array. 结果应该是一个数组。
- Since the bookstore is empty, we presumed the length is equal to 0. 由于书店是空的,因此我们假设书的长度等于0。
Notice that the syntax of should assertions is very intituitive as it is similar as a natural language statement.
注意, should断言的语法非常直观,因为它类似于自然语言语句。
Now, in the command line run:
```javascript npm test ```现在,在命令行中运行:
JavaScript npm测试and here it is the output:
这是输出:

The test passed and the output reflects the way we organized our code with blocks of describe.
测试通过,输出结果反映了我们使用describe块组织代码的方式。
测试/ POST路由 (Test the /POST route)
Now let's check our robust is our API, suppose we are trying to add a book with missing pages field passed to the server: The server should not respond with a proper error message.
现在,让我们检查一下我们健壮的API,假设我们正在尝试添加一本书,并将其缺少的页面字段传递给服务器:服务器不应以正确的错误消息进行响应。
Copy and paste the following code in the test file:
将以下代码复制并粘贴到测试文件中:
process.env.NODE_ENV = 'test';

let mongoose = require("mongoose");
let Book = require('../app/models/book');

let chai = require('chai');
let chaiHttp = require('chai-http');
let server = require('../server');
let should = chai.should();


chai.use(chaiHttp);

describe('Books', () => {
    beforeEach((done) => {
        Book.remove({}, (err) => {
           done();
        });
    });
  describe('/GET book', () => {
      it('it should GET all the books', (done) => {
        chai.request(server)
            .get('/book')
            .end((err, res) => {
                  res.should.have.status(200);
                  res.body.should.be.a('array');
                  res.body.length.should.be.eql(0);
              done();
            });
      });
  });
  /*
  * Test the /POST route
  */
  describe('/POST book', () => {
      it('it should not POST a book without pages field', (done) => {
          let book = {
              title: "The Lord of the Rings",
              author: "J.R.R. Tolkien",
              year: 1954
          }
        chai.request(server)
            .post('/book')
            .send(book)
            .end((err, res) => {
                  res.should.have.status(200);
                  res.body.should.be.a('object');
                  res.body.should.have.property('errors');
                  res.body.errors.should.have.property('pages');
                  res.body.errors.pages.should.have.property('kind').eql('required');
              done();
            });
      });

  });
});
Here we added the test on an incomplete /POST request, let's analyze the assertions:
在这里,我们在不完整的/ POST请求上添加了测试,让我们分析断言:
- Status should be 200. 状态应为200。
- The response body should be an object. 响应主体应该是一个对象。
- One of the body properties should be
errors. 身体属性之一应该是errors。 Errorsshould have have the missing field pages as property.Errors应具有缺少的字段页作为属性。- Finally
pagesshould have the propertykindequal to required in order to highlight the reason why we got a negative answer from the server. 最后,pages应具有与所需属性相等的属性kind,以突出显示为什么我们从服务器获得否定答案的原因。
NB notice that we send the book along with the POST request by the .send() function.
请注意,我们通过.send()函数将书籍与POST请求一起发送。
Let's run the same command again and here is the output:
让我们再次运行相同的命令,这是输出:
Oh Yeah our test test is correct!
哦,是的,我们的测试测试是正确的!
Before writing a new test let me precise two things:
在编写新测试之前,让我先详细说明两点:
- First of all, why the server response structured that way? If you read the callback function for the /POST route, you will notice that in case of missing required fields, the server sends back the error message from mongoose. Try with POSTMAN and check the response. 首先,为什么服务器响应采用这种结构? 如果您阅读了/ POST路由的回调函数,则会注意到,如果缺少必填字段,服务器将从猫鼬发送回错误消息。 尝试使用POSTMAN并检查响应。
- In case of missing fields we still return a status of 200, this is for simplicity as we are just learning to test our routes. However I suggest to return a status of 206 Partial Content instead. 在缺少字段的情况下,我们仍然返回状态200,这是为了简单起见,因为我们只是在学习测试路线。 但是,我建议改为返回206部分内容的状态。
Let's send a book with all the required fields this time. Copy and paste the following code in the test file:
这次发送一本包含所有必填字段的书。 将以下代码复制并粘贴到测试文件中:
process.env.NODE_ENV = 'test';

let mongoose = require("mongoose");
let Book = require('../app/models/book');

let chai = require('chai');
let chaiHttp = require('chai-http');
let server = require('../server');
let should = chai.should();


chai.use(chaiHttp);

describe('Books', () => {
    beforeEach((done) => {
        Book.remove({}, (err) => {
           done();
        });
    });
  describe('/GET book', () => {
      it('it should GET all the books', (done) => {
        chai.request(server)
            .get('/book')
            .end((err, res) => {
                  res.should.have.status(200);
                  res.body.should.be.a('array');
                  res.body.length.should.be.eql(0);
              done();
            });
      });
  });
  /*
  * Test the /POST route
  */
  describe('/POST book', () => {
      it('it should not POST a book without pages field', (done) => {
          let book = {
              title: "The Lord of the Rings",
              author: "J.R.R. Tolkien",
              year: 1954
          }
        chai.request(server)
            .post('/book')
            .send(book)
            .end((err, res) => {
                  res.should.have.status(200);
                  res.body.should.be.a('object');
                  res.body.should.have.property('errors');
                  res.body.errors.should.have.property('pages');
                  res.body.errors.pages.should.have.property('kind').eql('required');
              done();
            });
      });
      it('it should POST a book ', (done) => {
          let book = {
              title: "The Lord of the Rings",
              author: "J.R.R. Tolkien",
              year: 1954,
              pages: 1170
          }
        chai.request(server)
            .post('/book')
            .send(book)
            .end((err, res) => {
                  res.should.have.status(200);
                  res.body.should.be.a('object');
                  res.body.should.have.property('message').eql('Book successfully added!');
                  res.body.book.should.have.property('title');
                  res.body.book.should.have.property('author');
                  res.body.book.should.have.property('pages');
                  res.body.book.should.have.property('year');
              done();
            });
      });
  });
});
This time we expect a returning object with a message saying we succesfully added the book and the book itself (remember with POSTMAN?). You should be now quite familiar with the assertions I made so there is no need for going into detail. Instead, run the command again and here is the output:
这次我们希望返回的对象带有一条消息,说我们成功添加了这本书和这本书本身(还记得POSTMAN吗?)。 您现在应该非常熟悉我所做的断言,因此无需赘述。 而是再次运行命令,这是输出:
Smooth~
顺利〜
测试/ GET /:id路线 (Test /GET/:id Route)
Now let's create a book, save it into the database and use the id to send a GET request to the server. Copy and paste the following code in the test file:
现在,让我们创建一本书,将其保存到数据库中,并使用ID将GET请求发送到服务器。 将以下代码复制并粘贴到测试文件中:
process.env.NODE_ENV = 'test';

let mongoose = require("mongoose");
let Book = require('../app/models/book');

let chai = require('chai');
let chaiHttp = require('chai-http');
let server = require('../server');
let should = chai.should();


chai.use(chaiHttp);

describe('Books', () => {
    beforeEach((done) => {
        Book.remove({}, (err) => {
           done();
        });
    });
  describe('/GET book', () => {
      it('it should GET all the books', (done) => {
            chai.request(server)
            .get('/book')
            .end((err, res) => {
                  res.should.have.status(200);
                  res.body.should.be.a('array');
                  res.body.length.should.be.eql(0);
              done();
            });
      });
  });
  describe('/POST book', () => {
      it('it should not POST a book without pages field', (done) => {
          let book = {
              title: "The Lord of the Rings",
              author: "J.R.R. Tolkien",
              year: 1954
          }
            chai.request(server)
            .post('/book')
            .send(book)
            .end((err, res) => {
                  res.should.have.status(200);
                  res.body.should.be.a('object');
                  res.body.should.have.property('errors');
                  res.body.errors.should.have.property('pages');
                  res.body.errors.pages.should.have.property('kind').eql('required');
              done();
            });
      });
      it('it should POST a book ', (done) => {
          let book = {
              title: "The Lord of the Rings",
              author: "J.R.R. Tolkien",
              year: 1954,
              pages: 1170
          }
            chai.request(server)
            .post('/book')
            .send(book)
            .end((err, res) => {
                  res.should.have.status(200);
                  res.body.should.be.a('object');
                  res.body.should.have.property('message').eql('Book successfully added!');
                  res.body.book.should.have.property('title');
                  res.body.book.should.have.property('author');
                  res.body.book.should.have.property('pages');
                  res.body.book.should.have.property('year');
              done();
            });
      });
  });
 /*
  * Test the /GET/:id route
  */
  describe('/GET/:id book', () => {
      it('it should GET a book by the given id', (done) => {
          let book = new Book({ title: "The Lord of the Rings", author: "J.R.R. Tolkien", year: 1954, pages: 1170 });
          book.save((err, book) => {
              chai.request(server)
            .get('/book/' + book.id)
            .send(book)
            .end((err, res) => {
                  res.should.have.status(200);
                  res.body.should.be.a('object');
                  res.body.should.have.property('title');
                  res.body.should.have.property('author');
                  res.body.should.have.property('pages');
                  res.body.should.have.property('year');
                  res.body.should.have.property('_id').eql(book.id);
              done();
            });
          });

      });
  });
});
Through the assertions we made sure the server returned all the fields and the right book testing the two ids together. Here is the output:
通过这些断言,我们确保服务器返回了所有字段,并且正确地测试了两个ID 。 这是输出:
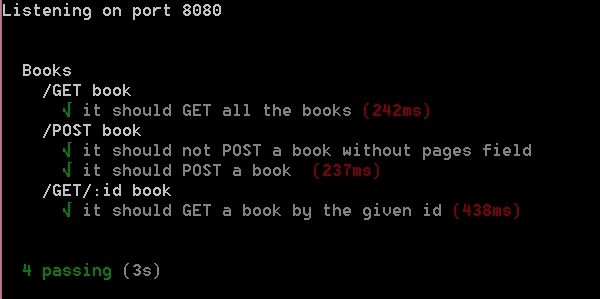
Have you noticed that by testing single routes within independent blocks we provide a very clear output? Also, isn't it so efficient? We wrote several tests that can be repeated with a single command line, once and for all.
您是否注意到通过测试独立块内的单个路径,我们提供了非常清晰的输出? 而且,这样有效吗? 我们编写了几个测试,这些测试可以用一个命令行一次又一次地重复进行。
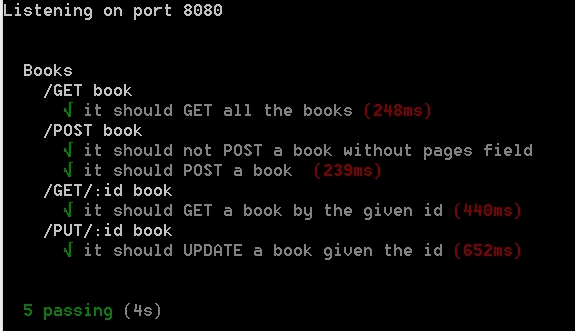
测试/ PUT /:id路由 (Test the /PUT/:id Route)
Time for testing an update on one of our books, we first save the book and then update the year it was published. So, copy and paste the following code:
是时候测试我们其中一本书的更新了,我们首先保存这本书,然后更新它的出版年份。 因此,复制并粘贴以下代码:
process.env.NODE_ENV = 'test';

let mongoose = require("mongoose");
let Book = require('../app/models/book');

let chai = require('chai');
let chaiHttp = require('chai-http');
let server = require('../server');
let should = chai.should();


chai.use(chaiHttp);

describe('Books', () => {
    beforeEach((done) => {
        Book.remove({}, (err) => {
           done();
        });
    });
  describe('/GET book', () => {
      it('it should GET all the books', (done) => {
            chai.request(server)
            .get('/book')
            .end((err, res) => {
                  res.should.have.status(200);
                  res.body.should.be.a('array');
                  res.body.length.should.be.eql(0);
              done();
            });
      });
  });
  describe('/POST book', () => {
      it('it should not POST a book without pages field', (done) => {
          let book = {
              title: "The Lord of the Rings",
              author: "J.R.R. Tolkien",
              year: 1954
          }
            chai.request(server)
            .post('/book')
            .send(book)
            .end((err, res) => {
                  res.should.have.status(200);
                  res.body.should.be.a('object');
                  res.body.should.have.property('errors');
                  res.body.errors.should.have.property('pages');
                  res.body.errors.pages.should.have.property('kind').eql('required');
              done();
            });
      });
      it('it should POST a book ', (done) => {
          let book = {
              title: "The Lord of the Rings",
              author: "J.R.R. Tolkien",
              year: 1954,
              pages: 1170
          }
            chai.request(server)
            .post('/book')
            .send(book)
            .end((err, res) => {
                  res.should.have.status(200);
                  res.body.should.be.a('object');
                  res.body.should.have.property('message').eql('Book successfully added!');
                  res.body.book.should.have.property('title');
                  res.body.book.should.have.property('author');
                  res.body.book.should.have.property('pages');
                  res.body.book.should.have.property('year');
              done();
            });
      });
  });
  describe('/GET/:id book', () => {
      it('it should GET a book by the given id', (done) => {
          let book = new Book({ title: "The Lord of the Rings", author: "J.R.R. Tolkien", year: 1954, pages: 1170 });
          book.save((err, book) => {
              chai.request(server)
            .get('/book/' + book.id)
            .send(book)
            .end((err, res) => {
                  res.should.have.status(200);
                  res.body.should.be.a('object');
                  res.body.should.have.property('title');
                  res.body.should.have.property('author');
                  res.body.should.have.property('pages');
                  res.body.should.have.property('year');
                  res.body.should.have.property('_id').eql(book.id);
              done();
            });
          });

      });
  });
 /*
  * Test the /PUT/:id route
  */
  describe('/PUT/:id book', () => {
      it('it should UPDATE a book given the id', (done) => {
          let book = new Book({title: "The Chronicles of Narnia", author: "C.S. Lewis", year: 1948, pages: 778})
          book.save((err, book) => {
                chai.request(server)
                .put('/book/' + book.id)
                .send({title: "The Chronicles of Narnia", author: "C.S. Lewis", year: 1950, pages: 778})
                .end((err, res) => {
                      res.should.have.status(200);
                      res.body.should.be.a('object');
                      res.body.should.have.property('message').eql('Book updated!');
                      res.body.book.should.have.property('year').eql(1950);
                  done();
                });
          });
      });
  });
});
We wanna make sure the message is the correct Book updated! one and that the year field was actually updated. Here is the output:
我们要确保邮件是正确的更新书! 一, year字段实际上已更新。 这是输出:
Good, we are close to the end, we still gotta test the DELETE route.
很好,我们快结束了,我们仍然要测试DELETE路线。
测试/ DELETE /:id路由 (Test the /DELETE/:id Route)
The pattern is similar to the previous tests, we first store a book, delete it and test against the response. Copy and paste the following code:
该模式类似于先前的测试,我们首先存储一本书,将其删除并根据响应进行测试。 复制并粘贴以下代码:
process.env.NODE_ENV = 'test';

let mongoose = require("mongoose");
let Book = require('../app/models/book');

let chai = require('chai');
let chaiHttp = require('chai-http');
let server = require('../server');
let should = chai.should();


chai.use(chaiHttp);

describe('Books', () => {
    beforeEach((done) => {
        Book.remove({}, (err) => {
           done();
        });
    });
  describe('/GET book', () => {
      it('it should GET all the books', (done) => {
            chai.request(server)
            .get('/book')
            .end((err, res) => {
                  res.should.have.status(200);
                  res.body.should.be.a('array');
                  res.body.length.should.be.eql(0);
              done();
            });
      });
  });
  describe('/POST book', () => {
      it('it should not POST a book without pages field', (done) => {
          let book = {
              title: "The Lord of the Rings",
              author: "J.R.R. Tolkien",
              year: 1954
          }
            chai.request(server)
            .post('/book')
            .send(book)
            .end((err, res) => {
                  res.should.have.status(200);
                  res.body.should.be.a('object');
                  res.body.should.have.property('errors');
                  res.body.errors.should.have.property('pages');
                  res.body.errors.pages.should.have.property('kind').eql('required');
              done();
            });
      });
      it('it should POST a book ', (done) => {
          let book = {
              title: "The Lord of the Rings",
              author: "J.R.R. Tolkien",
              year: 1954,
              pages: 1170
          }
            chai.request(server)
            .post('/book')
            .send(book)
            .end((err, res) => {
                  res.should.have.status(200);
                  res.body.should.be.a('object');
                  res.body.should.have.property('message').eql('Book successfully added!');
                  res.body.book.should.have.property('title');
                  res.body.book.should.have.property('author');
                  res.body.book.should.have.property('pages');
                  res.body.book.should.have.property('year');
              done();
            });
      });
  });
  describe('/GET/:id book', () => {
      it('it should GET a book by the given id', (done) => {
          let book = new Book({ title: "The Lord of the Rings", author: "J.R.R. Tolkien", year: 1954, pages: 1170 });
          book.save((err, book) => {
              chai.request(server)
            .get('/book/' + book.id)
            .send(book)
            .end((err, res) => {
                  res.should.have.status(200);
                  res.body.should.be.a('object');
                  res.body.should.have.property('title');
                  res.body.should.have.property('author');
                  res.body.should.have.property('pages');
                  res.body.should.have.property('year');
                  res.body.should.have.property('_id').eql(book.id);
              done();
            });
          });

      });
  });
  describe('/PUT/:id book', () => {
      it('it should UPDATE a book given the id', (done) => {
          let book = new Book({title: "The Chronicles of Narnia", author: "C.S. Lewis", year: 1948, pages: 778})
          book.save((err, book) => {
                chai.request(server)
                .put('/book/' + book.id)
                .send({title: "The Chronicles of Narnia", author: "C.S. Lewis", year: 1950, pages: 778})
                .end((err, res) => {
                      res.should.have.status(200);
                      res.body.should.be.a('object');
                      res.body.should.have.property('message').eql('Book updated!');
                      res.body.book.should.have.property('year').eql(1950);
                  done();
                });
          });
      });
  });
 /*
  * Test the /DELETE/:id route
  */
  describe('/DELETE/:id book', () => {
      it('it should DELETE a book given the id', (done) => {
          let book = new Book({title: "The Chronicles of Narnia", author: "C.S. Lewis", year: 1948, pages: 778})
          book.save((err, book) => {
                chai.request(server)
                .delete('/book/' + book.id)
                .end((err, res) => {
                      res.should.have.status(200);
                      res.body.should.be.a('object');
                      res.body.should.have.property('message').eql('Book successfully deleted!');
                      res.body.result.should.have.property('ok').eql(1);
                      res.body.result.should.have.property('n').eql(1);
                  done();
                });
          });
      });
  });
});
Again the server returns a message and properties from mongoose that we assert so let's check the output:
再次,服务器从猫鼬返回一条消息和我们声明的属性,因此让我们检查输出:

Great, our tests are all positive and we have a good basis to continue testing our routes with more sophisticated assertions.
太好了,我们的测试都是积极的,并且我们有很好的基础继续使用更复杂的断言来测试我们的路线。
Congratulation for completing the tutorial!
祝贺您完成本教程!
结论 ( Conclusion )
In this tutorial we faced the problem of testing our routes to provide our users a stable experience.
在本教程中,我们面临着测试路线以为用户提供稳定体验的问题。
We went through all the steps of creating a RESTful API, doing a naive test with POSTMAN and then propose a better way to test, in fact the main topic of the tutorial.
我们经历了创建RESTful API的所有步骤,使用POSTMAN进行了幼稚的测试,然后提出了一种更好的测试方法,实际上是本教程的主题。
It is good habit to always spend some time making tests to assure a server as reliable as possible but unfortunately it is often underestimated.
习惯上总是花一些时间进行测试以确保服务器尽可能可靠,但这是一个好习惯,但是不幸的是,它经常被低估。
During the tutorial we also discuss a few benefits of code testing and this will open doors to more advanced topics such as Test Driven Development (TDD).
在本教程中,我们还将讨论代码测试的一些好处,这将为诸如测试驱动开发(TDD)之类的更高级主题打开大门。
Good job!
做得好!
额外的ock子 ( Bonus Mockgoose )
One may argue that using two different databases is not the best situation and a second one is often not available. So what to do? Well, there is an alternative: Mockgoose.
一个人可能会争辩说使用两个不同的数据库并不是最好的情况,而第二个数据库通常不可用。 那么该怎么办? 好吧,还有另一种选择:Mockgoose。
Basically Mockgoose wraps your mongoose driver by intercepting the connection so your database will not be touched but instead use in memory store. Moreover it integrates well with Mocha.
基本上, Mockgoose通过拦截连接来包装您的Mongoose驱动程序,这样您的数据库就不会被触摸,而是在内存存储中使用。 此外,它与Mocha集成得很好。
NB: Apparently it requires mongodb to be installed on the running machine.
注意 :显然,它要求在运行的计算机上安装mongodb。
翻译自: https://scotch.io/tutorials/test-a-node-restful-api-with-mocha-and-chai
node mocha


 2354
2354

 被折叠的 条评论
为什么被折叠?
被折叠的 条评论
为什么被折叠?
 到【灌水乐园】发言


