


 这篇博客介绍了如何在Node.js环境中使用Mocha和Chai进行测试。内容涵盖了测试的基础知识和这两个库的安装配置,为开发者提供了在JavaScript项目中实施单元测试的指导。
node mocha
Node.js has a number of packages on npm that make the process of writing tests easier. In this tutorial, we using two of the most popular Node modules available for testing: Mocha and Chai.
Node.js在npm上具有许多软件包,这些软件包使编写测试的过程更加容易。 在本教程中,我们使用两个最受欢迎的Node模块进行测试: Mocha和Chai 。
Mocha is the main testing framework in this test suite. It provides functions to execute tests and handle logging test results to the terminal. Chai is an assertion library commonly used with Mocha. We use assertions to verify that the component that is being tested returns the value it’s expected to return for a particular test case.
Mocha是此测试套件中的主要测试框架。 它提供了执行测试和将测试结果记录到终端的功能。 Chai是Mocha常用的断言库。 我们使用断言来验证被测试的组件是否返回了特定测试用例所期望返回的值。
As you will see in the unit tests we write in this tutorial, functions like it and describe are a part of Mocha. Assertions we make inside these functions, like expect(isSuccess).to.be.true, come from the Chai library.
正如您将在本教程中编写的单元测试中看到的那样,类似的功能和describe是Mocha的一部分。 我们在这些函数中进行的断言,例如expect(isSuccess).to.be.true ,均来自Chai库。
设置测试环境 (Set Up the Testing Environment)
Before continuing, set up a new Node.js project if you don’t have one already. Then install Mocha and Chai libraries and save them as dev dependencies to the package.json file using this command:
在继续之前,如果您还没有一个新的Node.js项目,请先进行设置。 然后安装Mocha和Chai库,并使用以下命令将它们作为开发依赖项保存到package.json文件:
npm install mocha chai --save-devThen change the test script of the package.json file to this:
然后将package.json文件的测试脚本更改为此:
"scripts": {
    "test": "mocha"
 },
This allows us to run the tests using the npm test command on the command-line.
这使我们可以在命令行上使用npm test命令npm test 。
You should also create a new directory named test. This is where all our test files are going to be kept. Note that you have to use the exact name “test” for the directory since Mocha looks for a directory with this name to run the tests.
您还应该创建一个名为test的新目录。 这是我们所有测试文件都将保留的位置。 请注意,您必须对目录使用确切的名称“ test”,因为Mocha会使用该名称查找目录以运行测试。
At this point, our project directory has a folder structure like this:
至此,我们的项目目录具有如下文件夹结构:
|test
|src
|node_modules
package.json
摩卡咖啡基本测试格式 (Basic Test Format of Mocha)
A typical test file in Mocha takes the following form:
Mocha中的典型测试文件采用以下形式:
//a collection of test cases that test a specific component
describe("validator isValid()", () => {
	//test a function for a specific case
	it("should return true for a number in between 10 and 70", ()=> {
	})
	it("should return false when the number is less than or equal to 10", () => {
	})
	it("should return false when the number is greater than or equal to 70", () => {
	})
})
带有摩卡钩的测试格式 (Test Format With Mocha Hooks)
Mocha provides hooks that we can run before and after each test case or all the test cases. They are:
Mocha提供了可以在每个测试用例或所有测试用例之前和之后运行的挂钩。 他们是:
before(): Logic inside this hook is run before all the test cases in the collection of tests.before():此挂钩内部的逻辑在测试集合中的所有测试用例之前运行。after(): Logic inside this is run after all the test cases.after():在所有测试用例之后运行其中的逻辑。beforeEach(): Logic inside this is run before each test case in the collection.beforeEach():其中的逻辑在集合中的每个测试用例之前运行。afterEach(): Logic inside this is run after each test case.afterEach():其中的逻辑在每个测试用例之后运行。
describe("validator isValid()", () => {
	before(()=> {
	})
	after(()=> {
	})
	beforeEach(()=> {
	})
	afterEach(()=> {
	})
     it("should return true for a number in between 10 and 70", ()=>   {
	})
	it("should return false when the number is less than or equal to 10", () => {
	})
	it("should return false when the number is greater than or equal to 70", () => {
	})
})
编写您的第一个单元测试 (Writing Your First Unit Test)
To write the first unit test using Mocha and Chai, first let’s create a simple function named isNumValid which returns true for values between ten and 70, and returns false for values greater than or equal to 70 and less than or equal to ten.
要使用Mocha和Chai编写第一个单元测试,首先让我们创建一个名为isNumValid的简单函数,该函数对介于10到70之间的值返回true,对于大于或等于70且小于或等于10的值返回false。
exports.isNumValid = function(num) {
    if (num >= 70){
        return false
    } else if (num <= 10) {
        eturn false
    } else{
        return true
    }
}
Now we can write the tests to verify this function’s behavior. We create a new file inside the test directory, named validator.js, to write this test.
现在,我们可以编写测试来验证该功能的行为。 我们在测试目录中创建一个名为validator.js的新文件来编写此测试。
const chai = require('chai')
const expect = chai.expect
const validator = require('../src/validator')
describe("validator isNumValid()", () => {
	it("should return true for a number in between 10 and 70", ()=> {
		expect(validator.isNumValid(39)).to.be.true
	})
	it("should return false when the number is less than or equal to 10", () => {
		expect(validator.isNumValid(10)).to.be.false
	})
	it("should return false when the number is greater than or equal to 70", () => {
		expect(validator.isNumValid(79)).to.be.false
	})
})
You have to import the validator.js file to our test file in order to access the function being tested. In our case, the function is written in the validator.js file inside the src directory.
您必须将validator.js文件导入到我们的测试文件中才能访问被测试的功能。 在我们的例子中,函数写在validator.js内部文件src目录。
In addition to the assertion style expect we have used here, Chai provides two other assertion styles, should and assert. You can read more about the differences and use cases of these styles in the Chai assertion styles guide.
除了我们在这里使用的断言风格expect ,Chai还提供了另外两种断言风格, should和assert 。 您可以在Chai断言样式指南中了解有关这些样式的差异和用例的更多信息。
运行测试 (Run the test)
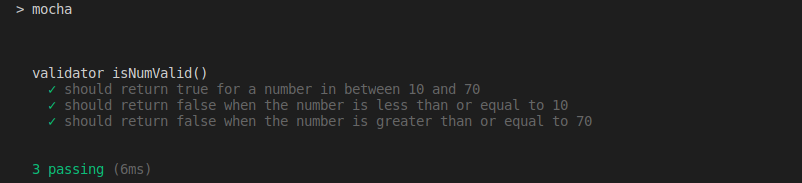
Use the command npm test to run these tests. Mocha outputs the results of the tests and shows them on the command-line.
使用命令npm test运行这些测试。 Mocha输出测试结果并将其显示在命令行上。
测试用例失败 (Failing Test Case)
Assume that we have made a mistake when writing the isNumValid function. We have forgotten to add the equal condition with the greater than (>) and less than (<) operators.
假设我们在编写isNumValid函数时犯了一个错误。 我们忘记了用大于(>)和小于(<)运算符来添加相等条件。
exports.isNumValid = function(num) {
    if (num > 70) {
        return false
    } else if (num < 10) {
        return false
    } else {
        return true
    }
}
When we run the tests again, one test case fails due to this mistake.
当我们再次运行测试时,一个测试用例由于该错误而失败。
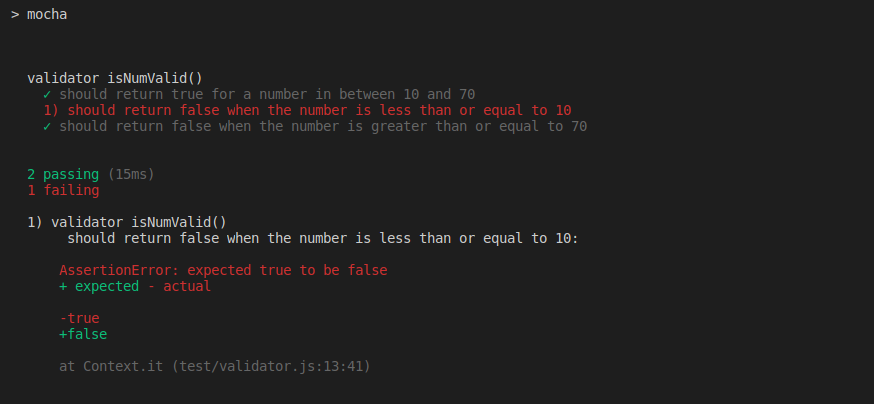
Because of unit testing, we are able to catch and correct mistakes like this easily without having to pour hours into finding where the bug is.
由于进行了单元测试,因此我们能够轻松地捕获并纠正此类错误,而无需花费大量时间来查找错误的位置。
However, in the above scenario, only one test case failed even though we had made the same mistake with both boolean operators. This is a problem. But is this a shortcoming of unit testing?
但是,在上述情况下,即使我们对两个布尔运算符都犯了相同的错误,也只有一个测试用例失败。 这是个问题。 但这是单元测试的缺点吗?
No, it’s a shortcoming in our test cases. We haven’t considered all the input scenarios and written separate test cases for each of them. We have combined the boundary conditions (when the number is between ten and 70) with other failing test conditions instead of writing a separate test case for each condition.
不,这是我们测试用例的一个缺点。 我们没有考虑所有的输入场景,而是为每个场景编写了单独的测试用例。 我们将边界条件(当数字在10到70之间)与其他失败的测试条件组合在一起,而不是为每个条件编写单独的测试用例。
Therefore, when following proper unit testing practices, our test suite should contain five test cases in total.
因此,按照正确的单元测试惯例,我们的测试套件应总共包含五个测试用例。
const chai = require('chai')
const expect = chai.expect
const validator = require('../src/validator')
describe("validator isNumValid()", () => {
	it("should return true for a number in between 10 and 70", ()=> {
		expect(validator.isNumValid(39)).to.be.true
	})
	it("should return false when the number is less 10", () => {
		expect(validator.isNumValid(9)).to.be.false
	})
	it("should return false when the number is equal to 10", () => {
		expect(validator.isNumValid(10)).to.be.false
	})
	it("should return false when the number is equal to 70", () => {
		expect(validator.isNumValid(70)).to.be.false
	})
	it("should return false when the number is greater than 70", () => {
		expect(validator.isNumValid(71)).to.be.false
	})
})
结论 (Conclusion)
In this article, we gave a quick and simplified introduction to testing, unit testing, and testing in Node.js. However, this tutorial contained only the basics concepts involved with testing. In the next article, we going further into the topic of testing in Node.js. We will discuss writing complex test cases, integration testing, and other testing practices, like using mocks and stubs.
在本文中,我们对测试,单元测试和Node.js中的测试进行了快速,简化的介绍。 但是,本教程仅包含测试所涉及的基本概念。 在下一篇文章中,我们将进一步探讨Node.js中的测试主题。 我们将讨论编写复杂的测试用例,集成测试和其他测试实践,例如使用模拟和存根。
Thanks for reading!
谢谢阅读!
翻译自: https://medium.com/better-programming/testing-in-node-js-using-mocha-and-chai-part-1-d5a9e91f4b06
node mocha


 326
326

 被折叠的 条评论
为什么被折叠?
被折叠的 条评论
为什么被折叠?
 到【灌水乐园】发言


