


微软预览word

When you create multiple columns in Word, they default to a set width. It’s easy to change that default width for each column. Let’s look at two ways you can do that.
在Word中创建多个列时,它们默认为设置的宽度。 更改每列的默认宽度很容易。 让我们看一下两种方法。
使用“列”对话框精确设置列宽 (Set Up Column Width Precisely with the Columns Dialog Box)
When you set a Word document to use multiple columns, Word assigns a default column width that depends on the number of columns you choose. Here are those default widths:
当您将Word文档设置为使用多列时,Word会根据您选择的列数分配默认的列宽。 这些是默认宽度:
One Column: 6.5″ width for the column. This is the standard setup you’re used to seeing when you start typing in a blank document with default page settings. Start with an 8.5″ width for the paper size, take away 1″ on either side for the default page margins, and you’re left with 6.5″ for the actual text.
一列:该列的宽度为6.5英寸。 当您开始使用默认页面设置键入空白文档时,这是您惯常使用的标准设置。 从纸张尺寸的8.5英寸宽度开始,在默认页边距的每一侧取1英寸,然后将6.5英寸保留为实际文本。
Two Columns: 3″ width for each column, with a 0.5″ space between columns.
两列:每列3英寸宽, 两列之间有0.5英寸的间距。
Three Columns: 1.83″ width for each column, with a 0.5″ space between columns.
三列:每列宽度为1.83英寸,两列之间有0.5英寸的间距。
And it goes on like that. Word lets you have up to 13 columns, and the more you add, the less space each column gets.
它就这样继续下去。 Word最多可以包含13列,添加的越多,每列获得的空间就越少。
If you’re happy with the defaults, you can just set the number of columns you want and go about your business. But, you can change things up if you want. Maybe you want smaller columns, with more space in between those columns. Or, maybe you two columns to be a similar size, and then have a smaller column off to the right.
如果您对默认设置感到满意,则只需设置所需的列数即可开展业务。 但是,您可以根据需要进行更改。 也许您想要较小的列,这些列之间有更多空间。 或者,也许您将两列设置为相似的大小,然后在右侧保留较小的列。
Let’s take a look at how to do all that using the “Columns” dialog box. This is the best way to set up columns if you don’t yet have any text in your document, or if you know the precise measurements you want to hit.
让我们看一下如何使用“列”对话框执行所有操作。 如果您的文档中还没有文本,或者您知道要打的精确尺寸,这是设置列的最佳方法。
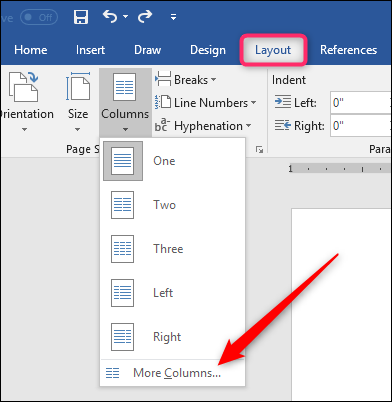
In Word, switch to the “Layout” tab on the Ribbon. That’s where the column magic happens. Click the “Columns” button and a dropdown menu opens with a number of options. Choose any of the numbers on the list to create that many columns with their default widths. Choose the “Left” or “Right” options to create a two-column layout where the column you chose (left or right) is smaller—about half the size of the other column. It’s the “More Columns” option we’re after here. Click that to set up your own custom column widths.
在Word中,切换到功能区上的“布局”选项卡。 那就是专栏魔术发生的地方。 单击“列”按钮,将打开一个包含多个选项的下拉菜单。 选择列表上的任何数字以创建具有默认宽度的许多列。 选择“左”或“右”选项可创建一个两列布局,其中您选择的列(左或右)较小,大约是另一列的一半。 这是我们在此使用的“更多列”选项。 单击以设置您自己的自定义列宽。
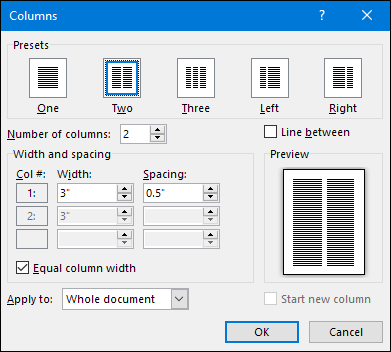
The “Columns” window that pops up lets you perform your customization. The “Presets” section contains the same options you saw on the “Columns” menu. You can also use the “Number Of Columns” box to set a specific number of columns from 1 to 13. So, start by choosing how many columns you want.
弹出的“列”窗口使您可以执行自定义。 “预设”部分包含在“列”菜单上看到的相同选项。 您还可以使用“列数”框来设置从1到13的特定列数。因此,首先选择所需的列数。
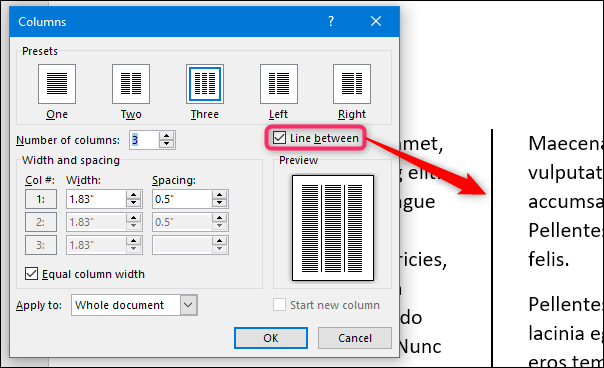
Select the “Line Between” option to have Word put a vertical line between columns.
选择“行之间”选项以使Word在列之间放置一条垂直线。
And now, on to actually adjusting the column width. If you want your columns to all stay the same width as one another, you can just adjust the number in the “Width” box for column #1. Changes you make there apply to all columns, no matter how many you have. Same goes for spacing. Adjust the number in the “Spacing” box for column#1 to change the spacing between all columns.
现在,开始实际调整列宽。 如果希望各列之间保持相同的宽度,则只需在第1列的“宽度”框中调整数字即可。 无论您有多少列,您在此处所做的更改都将应用于所有列。 间隔也一样。 调整第1列的“间距”框中的数字,以更改所有列之间的间距。
Note that as you change one value (width or spacing), the other value changes as well. Bump up the width, and the spacing goes down. Bump up the spacing, and the width goes down. You only have so much page width to work with, after all. Here, we set the width down to 1″ and the spacing went up to 1.75″ to compensate.
请注意,当您更改一个值(宽度或间距)时,另一个值也将更改。 增大宽度,间距减小。 增大间距,宽度减小。 毕竟,您只有这么多的页面宽度可以使用。 在这里,我们将宽度设置为1英寸,间距增加到1.75英寸以进行补偿。

If you want to control the width of each column individually (making some wider and some narrower), disable the “Equal Column Width” check box. When you do that, the width and spacing boxes for each column become available, and you can change them however you see fit. Keep in mind that you still have a fixed page width to work with, so adjust the width or spacing for one column will cause the others to change. You may have to work with it a bit to get things how you want them.
如果要单独控制每列的宽度(使列变宽或变窄),请禁用“相等列宽”复选框。 执行此操作后,每列的宽度和间距框将变为可用,并且可以根据需要更改它们。 请记住,您仍然可以使用固定的页面宽度,因此调整一列的宽度或间距将导致其他列发生变化。 您可能需要花点时间才能获得所需的东西。
Here, we’ve set up three columns. The first two are 2″ in width and the third is smaller at 1.5″. We left a .5″ spacing between all columns.
在这里,我们设置了三列。 前两个的宽度为2英寸,第三个的宽度为1.5英寸。 我们在所有列之间保留了0.5英寸的间距。

Note also that you don’t get to adjust spacing for your final column. This makes sense, because the spacing only happens between columns.
还要注意,您不必调整最后一列的间距。 这是有道理的,因为间距仅发生在列之间 。
使用Word的标尺即时更改列宽 (Change Column Width on the Fly with Word’s Rulers)
Now that you’ve seen how to set up column widths using the dialog box , let’s take a look at how you can change them on the fly with the Word ruler. This method is great if you already have columns in your document and you want to play around with widths to see what looks right to you.
现在,您已经了解了如何使用对话框设置列宽,让我们看一下如何使用Word标尺即时更改它们。 如果您的文档中已经有列,并且您想尝试各种宽度以查看适合您的内容,则此方法非常有用。
First, you need to make sure that your document rulers are visible. If you can’t see them, switch to the “View” tab on the Ribbon, and then select the “Ruler” option. Word’s rulers are great for lining things up, keeping tabs on measurements, and controlling indentation and margins. You should really leave them on all the time.
首先,您需要确保文档标尺可见 。 如果看不到它们,请切换到功能区上的“查看”选项卡,然后选择“标尺”选项。 Word的标尺非常适合于排列事物,密切关注度量值以及控制缩进和边距。 您应该一直不停地离开他们。
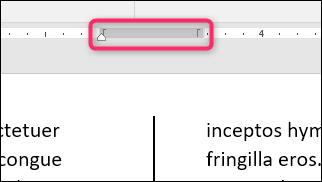
Assuming you’ve already got your document set up for two or more margins, look at the horizontal ruler at the top of the page. You can see that there’s a gray space in the middle of the ruler between the two columns.
假设您已经为两个或更多页边距设置了文档,请查看页面顶部的水平标尺。 您会看到两列之间的标尺中间有一个灰色空间。
That represents the spacing between columns that we talked about in the previous section, and it’s defined by two margin markers (the upside-down “L”).
这表示我们在上一节中讨论的列之间的间距,并且由两个边距标记(上下颠倒的“ L”)定义。
Dragging either one of the margin markers changes the size of the spacing, and the margins for the columns themselves. For example, if you slide the left margin marker to the left, the right maring marker automatically moves to the right, increasing the size of the spacing between those margins. The columns of text in your document change as you do this, too, giving you instant feedback on how the changes will look.
拖动任一空白标记会更改间距的大小以及列本身的空白。 例如,如果将左边界标记向左滑动,则右标记会自动向右移动,从而增加这些边界之间的间距。 这样做时,文档中的文本列也会更改,从而为您提供有关更改外观的即时反馈。
Here, we’ve dragged it it so the spacing is much greater than the default, leaving a wide space between columns.
在这里,我们将其拖动以使间距远大于默认间距,从而在列之间留出较大的空间。
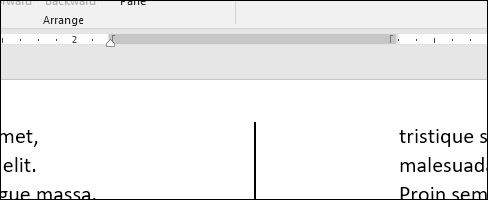
You probably noticed that the ruler also contains a small white triangle (although where it appears changes based on which column you’ve selected text in. That’s the indent marker, and it lets you control the interior indent on paragraphs in each column—the right indent for the left column and the left indent for the right column. If you’re interested in learning more about how to use indents, be sure to check out that guide to using rulers in Word we mentioned earlier. Indent control works the same whether you have multiple columns or just one.
您可能已经注意到,标尺还包含一个小的白色三角形(尽管它的出现位置会根据您选择的文本所在的列而变化。这是缩进标记,它使您可以控制每列各段落的内部缩进-右侧如果您想了解有关如何使用缩进的更多信息,请务必查看我们前面提到的在Word中使用标尺的指南 。您有多列或只有一列。
翻译自: https://www.howtogeek.com/344125/how-to-adjust-column-size-in-microsoft-word/
微软预览word


 6937
6937

 被折叠的 条评论
为什么被折叠?
被折叠的 条评论
为什么被折叠?
 到【灌水乐园】发言


