


 本文介绍了如何使用Macrium Reflect挂载磁盘映像以检索文件。通常,您会使用Macrium Reflect对整个驱动器进行备份,但有时需要单独挂载映像来获取特定文件。挂载映像可以让你在不完整还原的情况下访问所需文件。首先,找到磁盘映像文件,然后在Macrium Reflect中选择“还原”选项卡,挂载映像并选择一个未使用的驱动器字母。挂载后,可以在Windows资源管理器中浏览并提取所需文件,完成后记得卸载映像。

macrium 迁移
Generally speaking you image an entire drive to do a drive-at-a-time backup and restoration. Now and then you may find you need to mount a drive image you’ve created to retrieve a file or two. Read on as we show you how to mount a Macrium Reflect backup image as a Windows drive.
一般来说,您可以对整个驱动器进行映像以一次驱动器进行备份和还原。 有时您可能会发现需要挂载创建的驱动器映像以检索一个或两个文件。 请继续阅读,我们将向您展示如何将Macrium Reflect备份映像安装为Windows驱动器。
我为什么要这样做? (Why Do I Want To Do This?)
Ideally you have parallel backup practices: one backup workflow for things like /My Documents/ and your photos and a tandem backup process for your entire system drive so you can restore your computer in the event of a failure or serious problem. But best practice isn’t always the practice we follow and sometimes you need a file trapped inside a disk image.
理想情况下,您具有并行备份实践:一个用于/ My Documents /和照片的备份工作流程,以及用于整个系统驱动器的串联备份过程,以便在出现故障或严重问题时可以还原计算机。 但是最佳实践并不总是我们遵循的实践,有时您需要在磁盘映像中捕获文件。
Let’s say, for example, you followed one of our tutorials that uses Macrium Reflect, like How to Create an Image of Your PC Before Upgrading to Windows 10, and then some time later you realize there was a file in your /Downloads/ folder that you really needed.
例如,假设您遵循了使用Macrium Reflect的教程之一,例如如何在升级到Windows 10之前创建PC映像 ,然后过了一段时间,您意识到/ Downloads /文件夹中有一个文件您真的需要。
If that file isn’t co-located in your regular file backup system and exists only in your drive image then you need a way to get at that file without writing the entire image to a new drive. Fortunately for all of us Macrium includes a handy little way to mount your drive image as a virtual drive in Windows so you can browse /Downloads/ or any other folder in the disk image to your heart’s content.
如果该文件不是位于常规文件备份系统中,而是仅存在于驱动器映像中,则需要一种方法来获取该文件,而无需将整个映像写入新驱动器。 幸运的是,Macrium包含一种方便的小方法,可以将驱动器映像挂载为Windows中的虚拟驱动器,因此您可以浏览/ Downloads /或磁盘映像中的任何其他文件夹以适应您的需求。
挂载磁盘映像 (Mounting The Disk Image)
The first order of business is locate the disk image. For this tutorial we’re using a disk image located on a USB 3.0 backup drive attached to our main computer. Wherever your disk image is you want to locate it for ease of use before proceeding.
首先要做的是找到磁盘映像。 在本教程中,我们使用位于主机上的USB 3.0备份驱动器上的磁盘映像。 无论磁盘映像位于何处,都希望在继续操作之前找到它以便于使用。
There’s a big important point to make before we proceed: all the elements of the disk image need to be in one place for this mount-the-image trick to work. This means if you’ve been using the advanced features in Macrium Reflect like differential or incremental backup then all the pieces need to be in one place (the original plus all the increments) and not just the smaller and later incremental pieces. If you’ve followed along with this tutorial after using one of our whole-drive image tutorials, however, you don’t need to stress about that. The entirety of your disk image is contained in a single file.
在继续之前,有一个重要的要点:磁盘映像的所有元素都必须放在一个位置,此映像安装技巧才能起作用。 这意味着,如果您一直在使用Macrium Reflect中的高级功能(例如差异备份或增量备份),则所有部件都必须放在一个位置(原始部件加上所有增量),而不仅仅是较小的部件和后来的增量部件。 但是,如果您在使用我们的全驱动器映像教程之一之后继续阅读本教程,则无需特别强调。 整个磁盘映像都包含在一个文件中。
Backup image in hand it’s time to fire up Macrium Reflect. If you’re using the machine you originally created the image on it’s highly likely Macrium is still installed, if it isn’t installed you’ll want to grab a copy here and install it fresh. Note: you can skip the step in the installation process where it prompts you to download and create the recovery media (which will save you a bunch of time and around 500MB of bandwidth) as we’re just using the desktop application for this tutorial and not the recovery media.
现在准备备份图像,启动Macrium Reflect。 如果您使用的是最初在该计算机上创建映像的计算机,则很有可能仍安装Macrium,如果未安装,则需要在此处获取一个副本并重新安装 。 注意:您可以跳过安装过程中的提示,因为它只是提示您下载和创建恢复媒体(这将为您节省大量时间和大约500MB的带宽),因为本教程仅使用桌面应用程序,不是恢复媒体。
With Macrium Reflect launched, switch from the default “Disk Image” tab to the “Restore” tab as seen in the screenshot below.
启动Macrium Reflect后,从默认的“磁盘映像”选项卡切换到“还原”选项卡,如下面的屏幕快照所示。
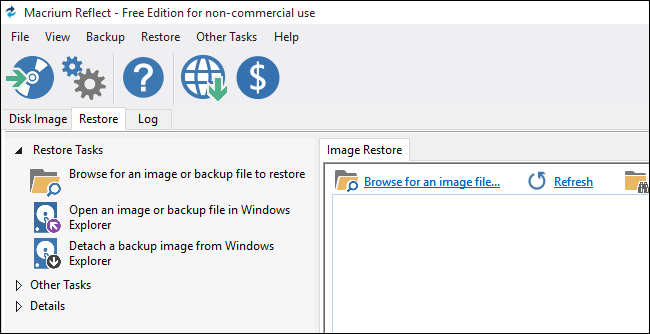
Click on the link, in the left hand navigation panel, labeled “Open an image or backup file in Windows Explorer.
单击左侧导航面板中标记为“在Windows资源管理器中打开图像或备份文件”的链接。
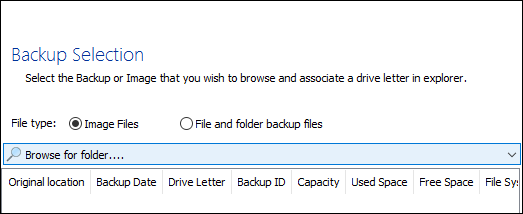
In the subsequent menu, select “Image Files” and then click “Browse for folder ….”. Navigate to the location of your disk image and select the drive or folder it is located in. When you’ve selected a drive or folder that contains a proper Macrium disk image it will popular the list below the browse menu.
在随后的菜单中,选择“图像文件”,然后单击“浏览文件夹...。”。 导航至磁盘映像的位置,然后选择其所在的驱动器或文件夹。选择包含正确Macrium磁盘映像的驱动器或文件夹后,它将在浏览菜单下方的列表中流行。
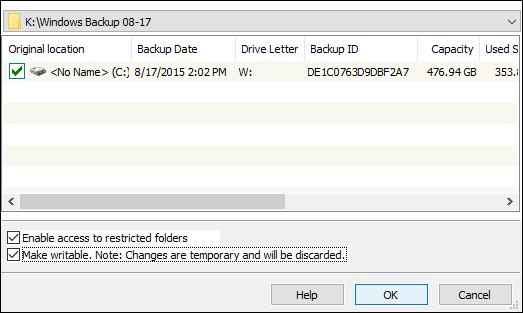
Once the list is populated you can select the image you wish to mount (simple enough in our case because there is only a single disk image in that directory). Check the image you wish to mount and then select an unused drive letter; we selected “W:”.
填充列表后,您可以选择要挂载的映像(在我们的情况下非常简单,因为该目录中只有一个磁盘映像)。 检查要装载的映像,然后选择未使用的驱动器号; 我们选择了“ W:”。
Below the list there are two options: “Enable access to restricted folders” and “Make writable”. We suggest you check them both, but first a word on their function. The first option, “Enable access to restricted folders”, mounts the drive image with full NTFS rights to override permissions that were set on another computer (or an old operating installation on the same computer you’re currently using). This is enormously convenient as old NTFS permissions present quite a hassle when browsing old operating system disks on a new operating system. (Seriously Macrium, we love you for including this feature and saving us from having to manually wrestle with old file permissions).
列表下方有两个选项:“启用对受限文件夹的访问”和“使可写”。 我们建议您同时检查它们两个,但首先要对它们的功能有所说明。 第一个选项“启用对受限文件夹的访问”,将使用具有完整NTFS权限的驱动器映像挂载,以覆盖在另一台计算机(或当前使用的同一台计算机上的旧操作安装)中设置的权限。 这非常方便,因为在新的操作系统上浏览旧的操作系统磁盘时,旧的NTFS权限非常麻烦。 (严重地说,Macrium,我们非常感谢您提供此功能,并使我们免于必须手动使用旧文件权限的麻烦)。
The second option “Make writable” sounds like a horrible idea but is actually harmless and very useful. There are many applications wherein you need to write and/or execute something in order to extract the data you need from them. Let’s say, for example, your old computer had a virtual hard drive on it and you need to open that up to get some old tax forms. By checking “Make writable” you can mount that virtual drive file (even though the virtual drive is actually inside the mounted backup disk image). The changes are temporary and the drive image will revert to the pristine state it was in when you’re done working with it.
第二个选项“使可写”听起来像一个可怕的想法,但实际上是无害的,非常有用。 在许多应用程序中,您需要编写和/或执行某些操作才能从其中提取所需的数据。 例如,假设您的旧计算机上有一个虚拟硬盘驱动器,那么您需要打开它以获取一些旧的税单。 通过选中“可写”,您可以挂载该虚拟驱动器文件(即使该虚拟驱动器实际上位于已挂载的备份磁盘映像中)。 所做的更改是临时的,并且驱动器映像将恢复为使用完后的原始状态。
Once you’ve made your selections, click OK to mount and open the disk image.
做出选择后,单击“确定”挂载并打开磁盘映像。
浏览磁盘映像 (Browsing the Disk Image)
When you finish with your selection in the previous step your the virtual drive should open automatically in Windows Explorer (if not you can open My Computer and browse to it like you would any other drive).
在上一步中完成选择后,虚拟驱动器应在Windows资源管理器中自动打开(如果没有,您可以像打开其他驱动器一样打开“我的电脑”并浏览到该计算机)。
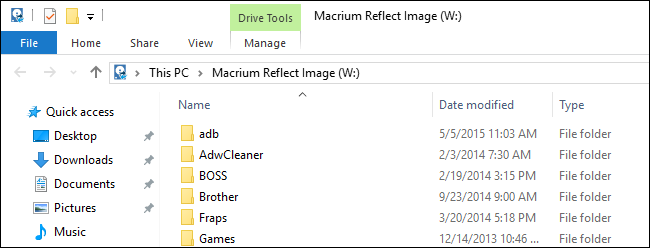
The disk image will appear like a regular drive with folders, files, and, importantly, the ability to copy files out. You can even use disk search tools to drill down through your files in search of the missing item you need.
磁盘映像看起来像是带有文件夹,文件的常规驱动器,并且重要的是,它具有复制文件的功能。 您甚至可以使用磁盘搜索工具向下钻取文件,以查找所需的丢失项。
Remember the step in the last section “Enable access to restricted folders”? This is exactly why we checked that item.
还记得上一节“启用对受限文件夹的访问”中的步骤吗? 这正是我们检查该项目的原因。
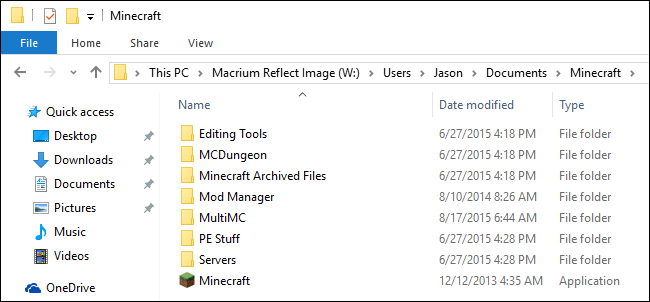
Note the drive structure: we’re currently in the /Users/Username/ folder of our old Windows installation. Traditionally this would pose a problem and we’d have to wrestle with NTFS file permissions but thanks to the simple toggle we’re able to easily do so. Also, it’s time to confess the real reason we’re diving into the old disk image. It’s not for tax returns or mission critical files, it’s for Minecraft. We needed those old world files and mods!
请注意驱动器结构:我们当前在旧Windows安装的/ Users / Username /文件夹中。 传统上,这会带来问题,我们必须与NTFS文件权限进行斗争,但是由于简单的切换,我们可以轻松地做到这一点。 而且,该承认我们深入研究旧磁盘映像的真正原因了。 它不是用于纳税申报表或关键任务文件,而是用于Minecraft。 我们需要那些旧世界的文件和mod!
At this point retrieving the files is a simple drag and drop operation.
此时,检索文件是一个简单的拖放操作。
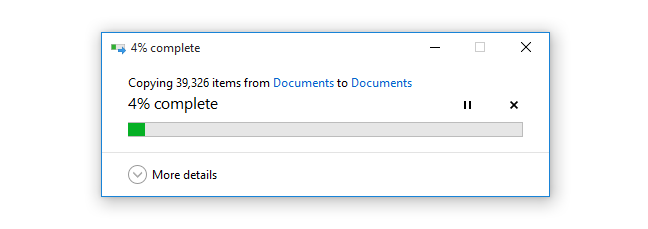
We, perhaps, underestimated exactly how many Minecraft files we had stashed in the old drive image. None the less over a USB 3.0 connection the transfer was surprisingly zippy and over in a matter of minutes.
也许我们完全低估了旧驱动器映像中保存的Minecraft文件数量。 即便如此,通过USB 3.0连接,传输过程却令人惊讶地Swift完成,并在几分钟之内完成。
Browse freely and find all the files you need to pull from the image. Once you’re done it’s time to move onto the next step, unmounting the image.
自由浏览并找到您需要从映像中提取的所有文件。 完成后,就该进行下一步了,卸载映像。
卸载磁盘映像 (Unmounting the Disk Image)
Your final step, once all the missing tax files and Minecraft maps alike are located and extracted, is to unmount the disk image. While you could certainly leave the image mounted for a period of time (and may need to depending on how large the files you need to retrieve are) it’s bad data hygiene and backup practice to leave the image unnecessarily mounted, so back into storage it must go.
找到并提取所有丢失的税收文件和Minecraft地图后,最后一步是卸载磁盘映像。 尽管您当然可以将映像挂载一段时间(并可能需要根据需要检索的文件大小而定),但是由于数据卫生和备份习惯很差,因此不必要地挂载映像,因此必须将其重新存储到存储中走。

To unmount the disk image you can either right click on the drive in Windows Explorer and select “Unmount Macrium Image” or you can unmount it, as seen above, in the Macrium Reflect application by selecting Restore -> Detach Image.
要卸载磁盘映像,可以右键单击Windows资源管理器中的驱动器,然后选择“卸载Macrium映像”,也可以在Macrium Reflect应用程序中通过选择“还原”->“分离映像”来卸载它,如上所示。
Once you’ve unmounted the disk image we strongly suggest returning the storage medium that contains the backup image to its prior location for safe keeping.
强烈建议您卸载磁盘映像后,将包含备份映像的存储介质返回到其先前位置以安全保存。
That’s all there is to it! Locate the disk image, mount it as a virtual drive, and all your old files are at your finger tips again. Have a question about backing up, restoring, or otherwise securing your files? Shoot us an email at ask@howtogeek.com and we’ll do our best to answer it.
这里的所有都是它的! 找到磁盘映像,将其挂载为虚拟驱动器,所有旧文件再次在您的指尖。 对备份,还原或保护文件有疑问吗? 向我们发送电子邮件至ask@howtogeek.com,我们将尽力答复。
翻译自: https://www.howtogeek.com/226436/how-to-mount-a-macrium-reflect-backup-image-to-retrieve-files/
macrium 迁移


 1952
1952

 被折叠的 条评论
为什么被折叠?
被折叠的 条评论
为什么被折叠?
 到【灌水乐园】发言


