


 本文提供了解决从Ubuntu9.04升级到9.10后出现的多种音频问题的操作指南,包括无音频、Flash视频音频故障等。介绍了ALSA与PulseAudio的作用及配置方法。
Many users have had problems with audio upon upgrading from Ubuntu 9.04 to 9.10. This How-To will show you how to fix some of those audio issues, including:
从Ubuntu 9.04升级到9.10时,许多用户在音频方面遇到问题。 本操作方法将向您展示如何解决某些音频问题,包括:
- No audio in Flash videos. Flash视频中没有音频。
- Audio stops entirely after opening a Flash video. 打开Flash视频后,音频完全停止。
- No audio at all. 完全没有音频。
- Audio plays out of speakers but not headphones plugged into the front of the computer (go to step 5). 音频从扬声器中播放,但没有将耳机插入计算机正面(请转到步骤5)。
快速Ubuntu音频入门 (Quick Ubuntu Audio Primer)
By default, Ubuntu 9.10 uses two complementary programs to pump sound through your speakers or headphones.
默认情况下,Ubuntu 9.10使用两个互补程序通过扬声器或耳机泵送声音。
ALSA
阿尔萨
The Advanced Linux Sound Architecture (ALSA) provides direct access to your sound card.
高级Linux声音体系结构(ALSA)可直接访问您的声卡。
One issue with ALSA is that only one program can output sound to ALSA at one time. Because of this, Ubuntu includes a second program called…
ALSA的一个问题是一次只能有一个程序将声音输出到ALSA。 因此,Ubuntu包含了另一个名为……的程序。
PulseAudio
脉冲音频
PulseAudio is a sound server that takes audio data from all of your applications and passes it onto ALSA.
PulseAudio是一种声音服务器,可从您所有应用程序中获取音频数据并将其传递到ALSA。
PulseAudio lets you do some cool things like control the volume level of each application separately, and stream audio to another computer over a network.
PulseAudio使您可以做一些很酷的事情,例如分别控制每个应用程序的音量级别,以及通过网络将音频流传输到另一台计算机。
A common problem in Ubuntu 9.10 occurs when an application attempts to use ALSA directly, instead of going through PulseAudio as it should. The following steps will solve that problem.
当应用程序尝试直接使用ALSA而不是按需通过PulseAudio时,会在Ubuntu 9.10中发生一个常见问题。 以下步骤将解决该问题。
步骤1:安装一些实用程序 (Step 1: Install some utilities)
In this step, we will install the Gnome ALSA Mixer and the Default Sound Chooser.
在此步骤中,我们将安装Gnome ALSA混音器和默认声音选择器。
To install the Gnome ALSA Mixer, open a terminal and type in:
要安装Gnome ALSA Mixer,请打开一个终端并输入:
sudo apt-get install gnome-alsamixer
须藤apt-get install gnome-alsamixer
Installing the Default Sound Chooser is a bit more complicated. It used to be in the alsa-utils package, but it was removed in Ubuntu 9.10. Luckily, a helpful Ubuntu forum user has provided directions to install this utility.
安装默认声音选择器要复杂一些。 它曾经在alsa-utils软件包中,但是在Ubuntu 9.10中已被删除。 幸运的是,一位有用的Ubuntu论坛用户提供了安装此实用程序的指导。
Download an old version of alsa-utils (make sure you choose the correct architecture: i386 for a 32-bit system and amd64 for a 64-bit system).
下载alsa-utils的旧版本 (请确保选择正确的体系结构:32位系统为i386,64位系统为amd64)。
- Open a terminal window. 打开一个终端窗口。
- Navigate to the directory that you saved the .deb file in. 导航到保存.deb文件的目录。
- Perform the following commands: 执行以下命令:
# Install the .deb
sudo dpkg -i alsa-utils_1.0.18-1ubuntu11*.deb
# Copy asoundconf
sudo cp /usr/bin/asoundconf /usr/
# Install the graphical front-end to the Default Sound Card chooser
sudo apt-get install asoundconf-gtk
# Update alsa-utils now that you have asoundconf copied
sudo apt-get upgrade alsa-utils
# Move asoundconf to the right place
sudo mv /usr/asoundconf /usr/bin/#安装.deb
须藤dpkg -i alsa-utils_1.0.18-1ubuntu11 * .deb
#复制asoundconf
须藤cp / usr / bin / asoundconf / usr /
#将图形前端安装到默认声卡选择器
须藤apt-get install asoundconf-gtk
#立即复制asoundconf,更新alsa-utils
sudo apt-get升级alsa-utils
#将asoundconf移到正确的位置
须藤MV / usr / asoundconf / usr / bin /
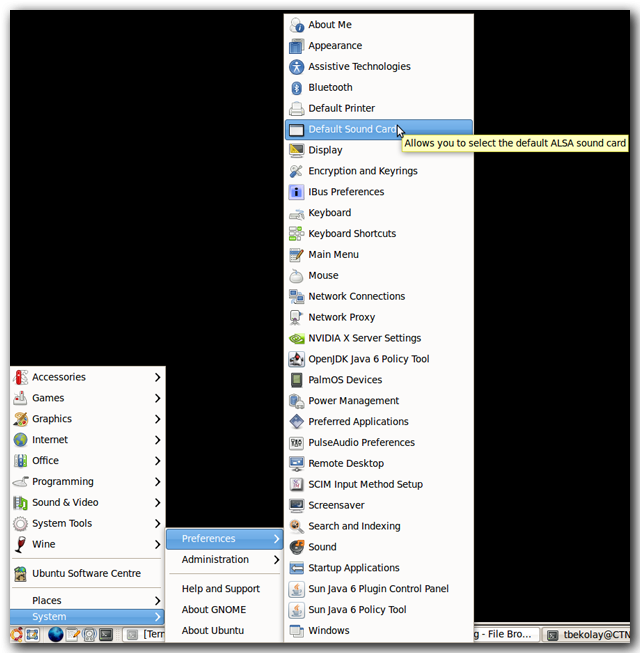
At this point you should now have a utility called Default Sound Card in System > Preferences.
此时,您现在应该在系统>首选项中有一个名为“默认声卡”的实用程序。
步骤2:更新PulseAudio和ALSA (Step 2: Update PulseAudio and ALSA)
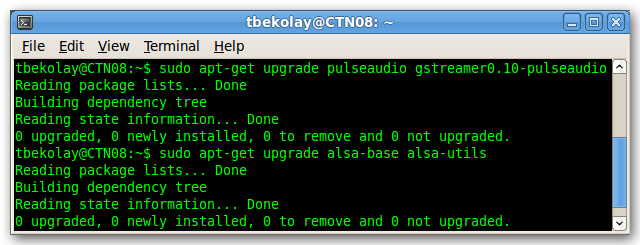
To ensure that you have the latest versions of PulseAudio and ALSA, open a terminal and perform the following commands.
为确保您具有最新版本的PulseAudio和ALSA,请打开终端并执行以下命令。
sudo apt-get upgrade pulseaudio gstreamer0.10-pulseaudio
sudo apt-get upgrade alsa-base alsa-utilssudo apt-get升级pulseaudio gstreamer0.10-pulseaudio
sudo apt-get升级alsa-base alsa-utils
If these packages are not yet installed, then replace “upgrade” in the above commands with “install” and run them again.
如果尚未安装这些软件包,则将以上命令中的“ upgrade”替换为“ install”,然后再次运行它们。
If your packages are already updated, you will see something like this.
如果您的软件包已经更新,您将看到类似这样的内容。
步骤3:选择PulseAudio作为您的默认声卡 (Step 3: Choose PulseAudio as your default sound card)
Open up the Default Sound Card utility you installed in Step 1. It will be in System > Preferences.
打开在步骤1中安装的默认声卡实用程序。它将在“系统”>“首选项”中。
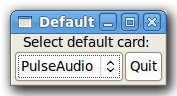
Choose PulseAudio. Click Quit.
选择PulseAudio。 单击退出。
步骤4:重新启动 (Step 4: Reboot)
Save anything you have open and reboot your computer.
保存所有打开的内容,然后重新启动计算机。
步骤5:设定音量 (Step 5: Set the volume)
Open the Gnome ALSA Mixer, which is in Applications > Sound & Video.
打开“应用程序”>“声音和视频”中的Gnome ALSA混合器。
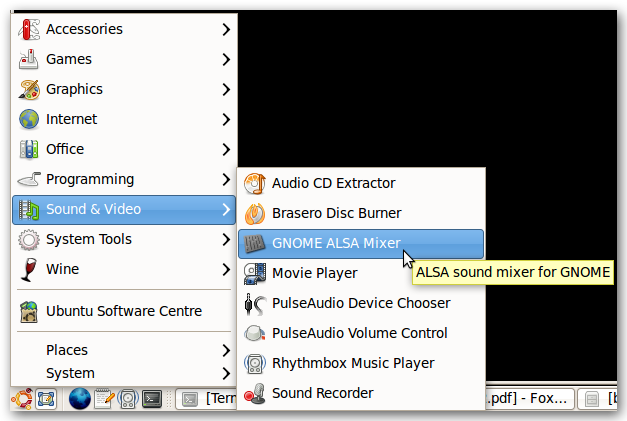
Ensure that nothing is muted and set the volume at a comfortable level. In most cases, you can put it at the maximum, as most applications that play audio have their own volume controls. In particular, ensure that the Master and PCM volumes are not muted.
确保没有任何声音被静音,并将音量设置在舒适的水平。 在大多数情况下,您可以将其发挥到最大,因为大多数播放音频的应用程序都有自己的音量控件。 特别是,请确保主音量和PCM音量没有被静音。
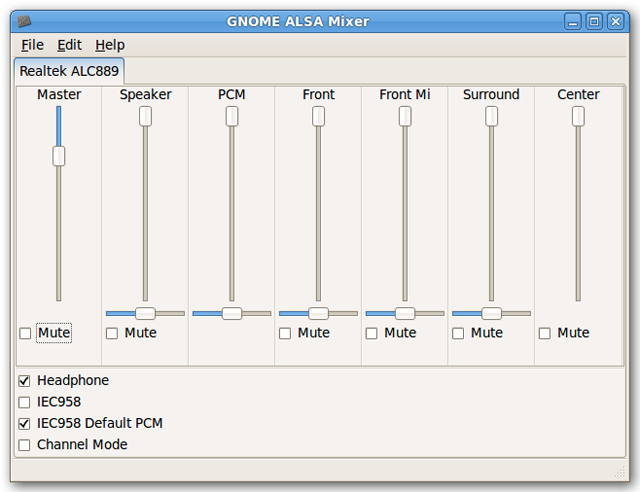
Note that there are separate volume controls for the audio plugs in the back and front of your computer, if your motherboard has both. Having one muted but not the other may be why audio will play out of the speakers, but not out of headphones plugged into the front of the computer.
请注意,如果主板同时具有音频和音频,则在计算机的背面和正面都有单独的音量控件。 将一个静音而不将另一个静音可能是为什么音频会从扬声器中播放出来,而不是从插入计算机正面的耳机中播放出来的原因。
步骤6:测试音频 (Step 6: Test the audio)
Open up your favorite music playing application (we’re partial to RhythmBox). Make sure the volume control is at a reasonable level. Play a song. Do you hear it? If not, proceed to step 7.
打开您喜欢的音乐播放应用程序(我们属于RhythmBox)。 确保音量控制在合理的水平。 播放歌曲。 你听到了吗 如果不是,请继续执行步骤7。
Open up your favorite web browser. Open up a Youtube video. Do you hear both the Youtube video and your music? If so, then audio is working properly!
打开您喜欢的Web浏览器。 打开YouTube视频。 您同时听到YouTube视频和音乐吗? 如果是这样,则音频工作正常!
If not, proceed to step 7.
如果不是,请继续执行步骤7。
步骤7:获取最新版本的ALSA (Step 7: Get the latest version of ALSA)
If audio is still not working, or not working for multiple applications, then you may need to update to the latest version of ALSA.
如果音频仍然无法正常工作,或者不能用于多个应用程序,则可能需要更新到最新版本的ALSA。
Again, a helpful Ubuntu forum user provides an easy method to do this.
再次,有用的Ubuntu论坛用户提供了一种简便的方法。
Download the ALSA upgrade script (requires forum registration).
下载ALSA升级脚本 (需要论坛注册)。
- Open a terminal. 打开一个终端。
- Navigate to the directory that you saved the .tar file in. 导航到保存.tar文件的目录。
- Perform the following commands: 执行以下命令:
tar xvf AlsaUpgrade-1.0.22.1-2.tar
sudo ./AlsaUpgrade-1.0.22.1-2.sh –d
sudo ./AlsaUpgrade-1.0.22.1-2.sh –c
sudo ./AlsaUpgrade-1.0.22.1-2.sh -itar xvf AlsaUpgrade-1.0.22.1-2.tar
sudo ./AlsaUpgrade-1.0.22.1-2.sh –d
sudo ./AlsaUpgrade-1.0.22.1-2.sh –c
须藤./AlsaUpgrade-1.0.22.1-2.sh -i
步骤8:重新启动并测试 (Step 8: Reboot and test)
Save anything you have open and reboot your computer.
保存所有打开的内容,然后重新启动计算机。
Once you’re back into Ubuntu, test out your audio as described in step 6. If your audio still doesn’t work, there’s still one last resort…
回到Ubuntu后,按照步骤6中所述测试音频。如果您的音频仍然不起作用,那么还有最后的选择...
第9步:切换到开放声音系统 (Step 9: Switch to the Open Sound System)
ALSA was designed as a replacement to a similar program called the Open Sound System (OSS). Even though many distributions adopted ALSA, development of OSS continued, and current versions are perfectly capable of delivering high-quality sound in Ubuntu.
ALSA被设计为替代类似程序,称为开放声音系统(OSS)。 即使许多发行版都采用ALSA,OSS的开发仍在继续,并且当前版本完全能够在Ubuntu中提供高质量的声音。
Switching to OSS is an article in itself. Fortunately, the Ubuntu community maintains just such an article.
切换到OSS本身就是一篇文章。 幸运的是,Ubuntu社区维护着这样的文章 。
结论 (Conclusion)
Hopefully by following these steps you’ve been able to get sound working properly in Ubuntu 9.10. Let us know if these steps worked for you in the comments!
希望通过执行以下步骤,您可以在Ubuntu 9.10中使声音正常工作。 让我们知道这些步骤是否对您有用!
翻译自: https://www.howtogeek.com/howto/10964/how-to-fix-sound-issues-in-ubuntu-9.10/


 1162
1162

 被折叠的 条评论
为什么被折叠?
被折叠的 条评论
为什么被折叠?
 到【灌水乐园】发言


