


junos pulse

Have you ever faced the problem where you only want to have one DHCP server on the network for central management of your scopes, but you have multiple Vlans? HTG explains how to use a DHCP relay agent.
您是否曾经遇到过这样的问题,即您只想在网络上只有一个DHCP服务器来进行范围的集中管理,却有多个VLAN? HTG解释了如何使用DHCP中继代理。
总览 (Overview)
The DHCP protocol was created so that clients could obtain their IP address automatically and without human intervention (yes that used to be an actual part of IT-ing, back in the day). The way this works is that when a client connects to the network, it sends out a “broadcast” packet asking to find the DHCP server. That used to be “ok” until Vlans came along. Vlans create boundaries and segment your physical network into several virtually isolated ones (hence the name V-LAN). One of the downsides to Vlans is that now the DHCP server and the clients can’t directly communicate, because “brodcast” packets cannot “jump” networks. So, how do you avoid having a DHCP server per-Vlan, and deliver the DHCP requests from the clients in a Vlan, back to the central server?
创建DHCP协议是为了使客户端可以自动获取其IP地址,而无需人工干预(是的,过去曾经是IT的实际组成部分)。 这种工作方式是,当客户端连接到网络时,它会发出一个“广播”数据包,要求查找DHCP服务器。 在Vlans出现之前,这一直是“好的”。 VLAN创建边界并将您的物理网络划分为几个虚拟的隔离网络(因此称为V-LAN)。 Vlans的缺点之一是现在DHCP服务器和客户端无法直接通信,因为“广播”数据包无法“跳跃”网络。 因此,如何避免每个Vlan拥有DHCP服务器,并将来自Vlan中的客户端的DHCP请求传递回中央服务器?
DHCP relays were invented to over come this exact problem by essentially “routing” or “proxy-ing” the client’s requests. The requests are broadcasted by the clients on their local network, the relay-agent catches them and forwards them to the DHCP server using unicast. The returned DHCP answer gets to the relay agent using unicast as well, and the relay agent sends the answer on the client’s network.
发明了DHCP中继可以通过“路由”或“代理”客户端的请求来解决此确切的问题。 这些请求由客户端在其本地网络上广播,中继代理将其捕获,然后使用单播将其转发到DHCP服务器。 返回的DHCP应答也使用单播到达中继代理,中继代理在客户端网络上发送应答。
DHCP relays can come in many shapes and forms: there is the Microsoft’s “relay-agent”, Cisco’s “IP helper” and Juniper’s “helpers bootp” to mention a few. They all do the same thing, and in this guide we will go over how to configure it on a JunOS device.
DHCP中继可以有多种形式和形式:Microsoft的“中继代理”,Cisco的“ IP帮助器”和Juniper的“帮助器”仅举几例。 它们都执行相同的操作,在本指南中,我们将介绍如何在JunOS设备上对其进行配置。
Image by Thomas Thomas
图片由托马斯·托马斯 ( Thomas Thomas)
GUI方式 (The GUI way)
It is my firm belief, that there shouldn’t be a need to go under the hood for simple configurations such as this, so I’ve worked with Juniper’s support to find the GUI way to this configuration.
我坚信,不需要像这样的简单配置进行深入研究,因此我一直在瞻博网络的支持下找到用于此配置的GUI方式。
You will need to have:
您将需要具备:
- From the layer3 switch, the “l3-interface” notation for the Vlan you want to enable the forwarding for. 从第3层交换机,要为其启用转发的VLAN的“ l3-interface”符号。
- The IP of the DHCP server that will serve the requests. 将为请求提供服务的DHCP服务器的IP。
Obtain the Vlan-ID
获取VLAN ID
To obtain the “interface” notation of the Vlan, open the device’s WebGUI, and go to “Configure”.
要获取Vlan的“接口”符号,请打开设备的WebGUI,然后转到“配置”。
Under “Switching”, click on “VLAN” and select the Vlan you need from the list.
在“交换”下,单击“ VLAN”,然后从列表中选择所需的VLAN。
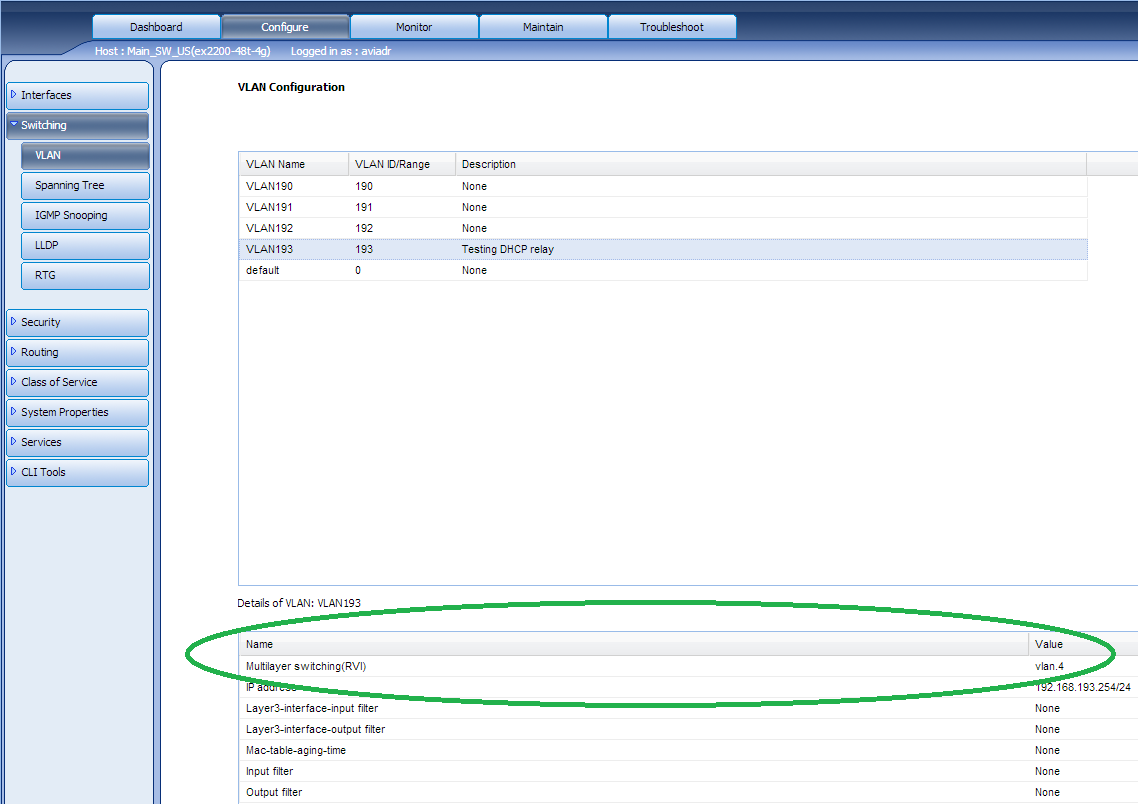
In the details pane, the value of “Multilayer switching(RVI)” is the required “interface” name. Make a note of the value.
在详细信息窗格中,“多层交换(RVI)”的值是必需的“接口”名称。 记下该值。
Configure forwarding
配置转发
In the device’s WebGUI, go to “Configure” -> “CLI Tools” -> “Point and Click CLI”.
在设备的WebGUI中,转到“配置”->“ CLI工具”->“指向并单击CLI”。
Click on “Forwarding options” -> “Configure”.
单击“转发选项”->“配置”。
Note: If you already have a configuration in any of the below categories, you will have an “Edit” button instead.
注意:如果您已经具有以下任一类别的配置,则将具有“编辑”按钮。

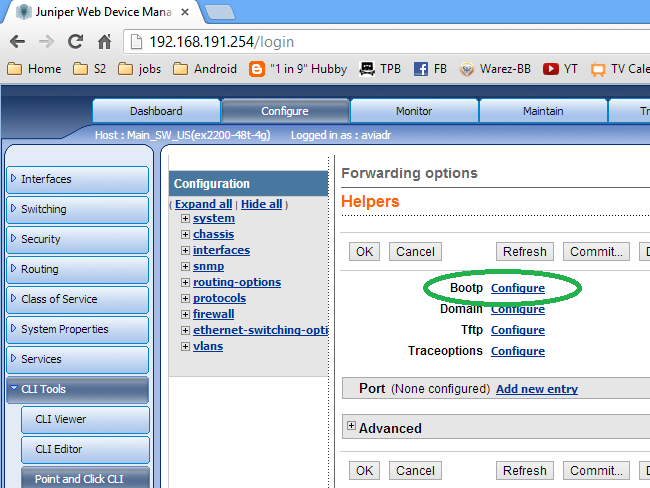
Click on “Helpers” -> “Configure”.
点击“助手”->“配置”。

Click on “Bootp” -> “Configure”.
单击“启动”->“配置”。
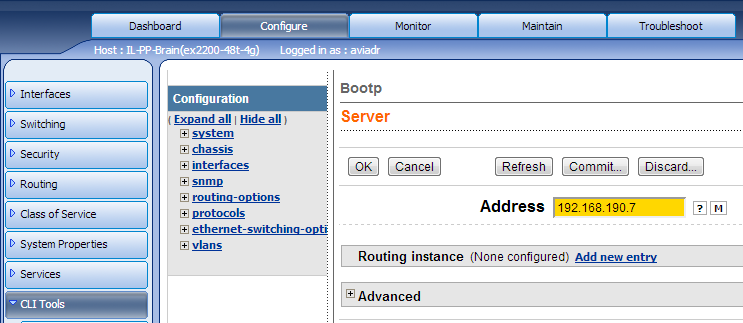
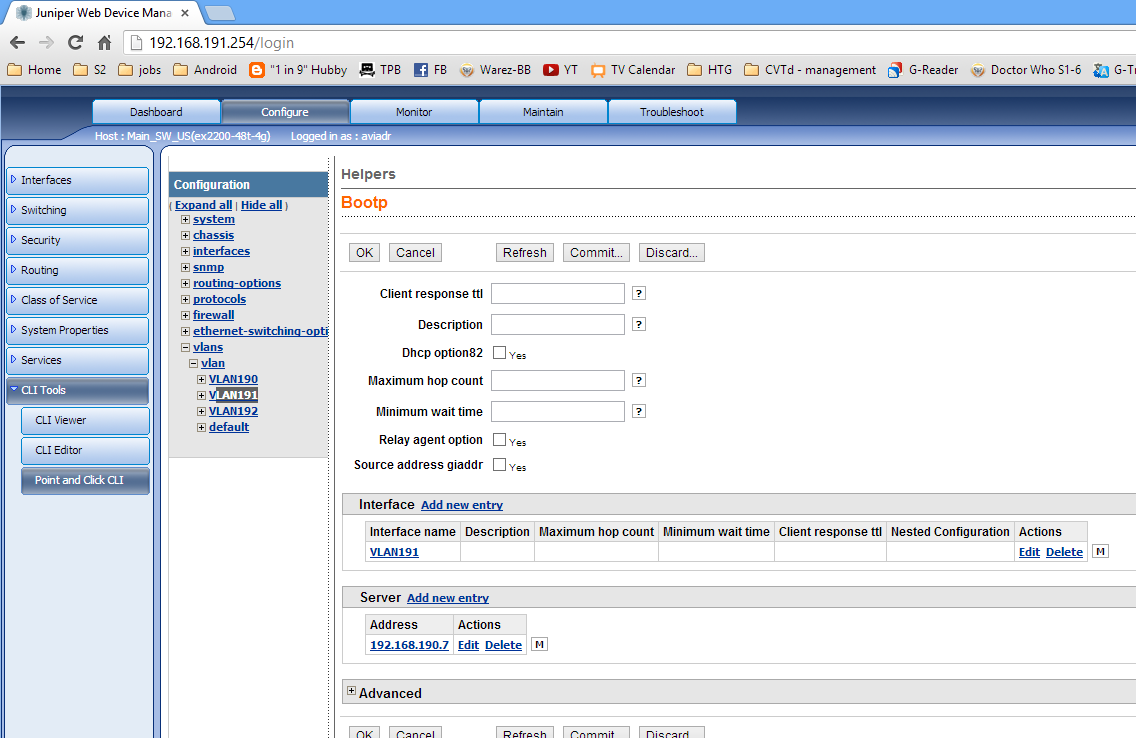
Click on “Server” -> “Add new entry”.
单击“服务器”->“添加新条目”。

Put in the IP of the DHCP server and click OK.
放入DHCP服务器的IP,然后单击“确定”。
Click on “Interface” -> “Add new entry”.
单击“接口”->“添加新条目”。
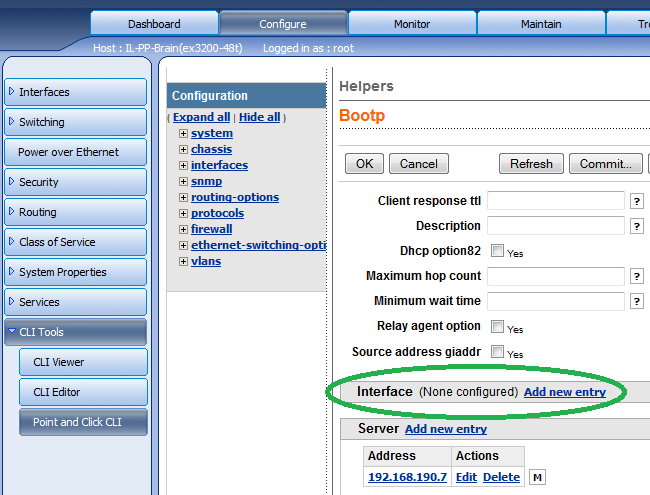
Enter the name of the “interface” or “Multilayer switching(RVI)” value of the Vlan you want to forward for as noted from the segment above.
输入您要转发的VLAN的“接口”或“多层交换(RVI)”值的名称,如上节所述。
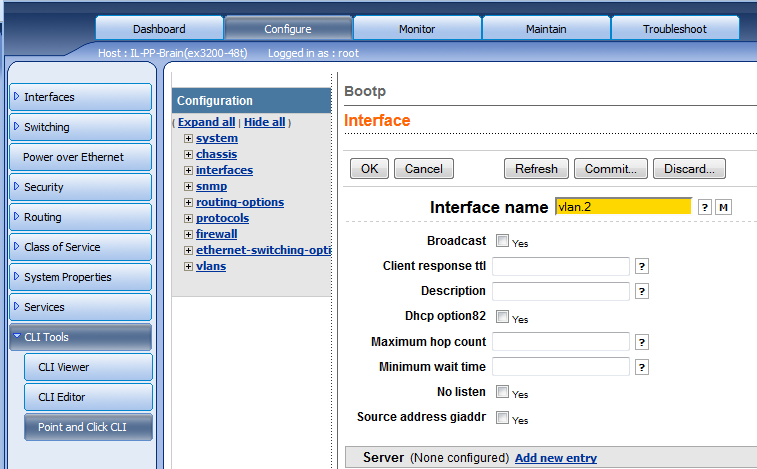
When you’re done, your configuration should look something like the below picture.
完成后,您的配置应如下图所示。
Commit your changes.
提交您的更改。
CLI方式 (The CLI way)
As stated above, I am not a fan of the CLI way. With that said, you may not have a choice in the matter, or you may need this procedure to be scriptable. What ever the case may be, the documentation explains that these two lines do the trick (assuming you have everything else set up):
如上所述,我不喜欢CLI方式。 话虽如此,您可能对此没有选择,或者您可能需要此过程可编写脚本。 无论情况如何, 文档都说明这两行可以解决问题(假设您已经设置了其他所有内容):
set forwarding-options helpers bootp server 192.168.190.7
 set forwarding-options helpers bootp interface vlan.2
set forwarding-options helpers bootp server 192.168.190.7
 set forwarding-options helpers bootp interface vlan.2
Where the above IP and Vlan name should be changed to reflect your setup.
应更改上述IP和VLAN名称的位置以反映您的设置。
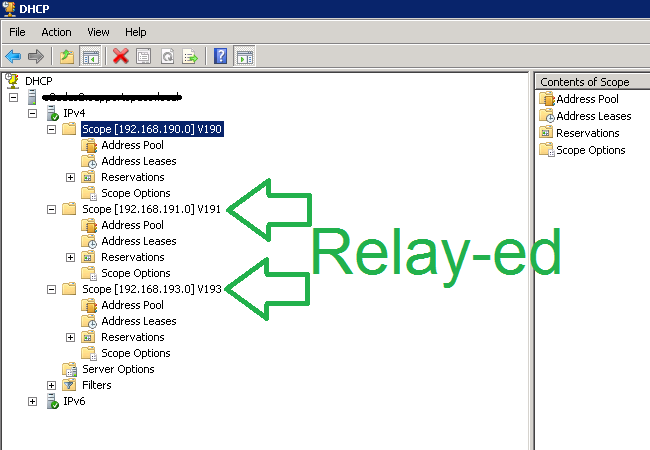
在DHCP服务器端 (On the DHCP server’s side)
I’ve done this configuration numerous times and have always connected back to Microsoft’s DHCP server. At least in Microsoft’s implementation there is no need for any additional configuration on the server’s side, other than to create the appropriate scope. That is, you need to have a scope that corresponds with the Vlan interface the request is coming from. In our example, the L3 switch’s IP was 192.168.191.254 with a netmask of 255.255.255.0 (class C). The DHCP configuration to handle the relayed scope/s of our example looks like:
我已经完成了多次配置,并且始终连接回Microsoft的DHCP服务器。 至少在Microsoft的实现中,除了创建适当的作用域之外,不需要在服务器端进行任何其他配置。 也就是说,您需要具有与请求来自的Vlan接口相对应的作用域。 在我们的示例中,L3交换机的IP为192.168.191.254,网络掩码为255.255.255.0(C类)。 用于处理示例中中继范围的DHCP配置如下所示:
That is it. You should be all set.
这就对了。 你应该准备好了。
-I’ve just figured out where this part can do the most… -damage??
翻译自: https://www.howtogeek.com/137784/it-geek-how-to-use-a-dhcp-relay-junos/
junos pulse


 911
911

 被折叠的 条评论
为什么被折叠?
被折叠的 条评论
为什么被折叠?
 到【灌水乐园】发言


