


联想台式机usb控制器驱动
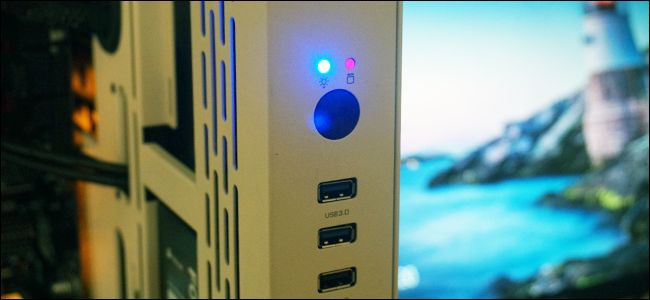
Desktop computers make a certain amount of noise and light during operation. Unless you’ve custom-built a monster gaming machine with awesome obnoxious lighting effects, these are probably limited to a power indicator and a drive light. You can turn your computer off, of course, but if you’d prefer to let it run without the lights (like if you’re using your PC in a dorm room or studio apartment), it’s easy to turn those lights off for good.
台式计算机在运行期间会产生一定量的噪音和光。 除非你定制一个怪物游戏机与真棒讨厌的灯光效果,这些都可能限于电源指示灯和一个驱动器指示灯。 当然,您可以关闭计算机,但是如果您希望计算机在没有灯光的情况下运行(例如,如果您在宿舍或一室公寓中使用PC),那么很容易就可以将这些灯光永久关闭。
首先,轻松丑陋的方式:遮盖灯光 (First, the Easy Ugly Way: Cover the Lights)
Before getting into the actual instructions, we’d be remiss not to mention the quick, easy method of avoiding these lights: just cover them up. A bit of electrical tape will do the job in a snap, though it’s definitely a little janky looking. You could also use specific stickers meant to dim LEDs, which we’ve compared here. But if you want a solution that looks a bit nicer, then read on.
在开始实际使用说明之前,我们会不愿提及避免这些光的快速,简便方法:将它们掩盖起来。 一点电气胶带将很快完成这项工作,尽管看上去确实有点不干净。 您还可以使用特定的贴纸来使LED变暗, 我们在这里进行了比较 。 但是,如果您想要一个看起来更好的解决方案,请继续阅读。
第一步:如果可能,找到您的电脑或主板手册 (Step One: Find Your PC or Motherboard Manual, if Possible)
What we’re going to be doing is disconnecting the LED connection wires from the system panel connector, also known as the front panel header. These things are tiny and often unlabeled on the motherboard, so it’s best to have some kind of a guide.
我们要做的是从系统面板连接器(也称为前面板接头连接器)上断开LED连接线的连接。 这些东西很小,通常在主板上没有标签,因此最好有某种指导。
If you’ve built the computer yourself, you probably remember inserting these wires during the initial build process. Just find the original manual, or do an online search for your motherboard model to get a PDF version. It will include a diagram of the system panel, including which specific cables are for the power and drive LEDs.
如果您自己构建了计算机,则可能记得在最初的构建过程中插入了这些电线。 只需查找原始手册,或在线搜索您的主板型号即可获取PDF版本 。 它将包括系统面板的示意图,其中包括用于电源和驱动器LED的特定电缆。
If you purchased your PC already assembled, this might be a bit tougher—the manual may not make any reference to the motherboard at all. If that’s the case, you can determine the part number of the motherboard and search for a manual separate from the computer itself, or simply do a bit of searching for the system panel diagram for that specific board.
如果您购买的PC已经组装好了,则可能会有点困难-手册可能根本没有提及主板。 在这种情况下,您可以确定主板的部件号并搜索与计算机本身不同的手册,或者只是搜索该特定主板的系统面板图。
第二步:打开电脑 (Step Two: Open Your PC)
Remove all power and data cables from your computer. Remove the screws for the side access panel—these might be thumb screws on a normal full-sized desktop, or it might be much more involved for a compact model. Move your computer somewhere that has plenty of light and easy access to the motherboard.
从计算机上拔下所有电源电缆和数据电缆。 卸下侧面检修面板的螺钉-可能是普通全尺寸台式机上的翼形螺钉,或者对于紧凑型机型可能涉及更多。 将计算机移动到光线充足且易于访问主板的地方。
If you don’t know how to open your computer case, again, consult its manual. You want to access the side that will let you see the top of the motherboard and its connections.
如果您不知道如何打开计算机机箱,请再次查阅其手册。 您要访问侧面,以便查看主板顶部及其连接。
第三步:拔下电源和驱动器LED (Step Three: Unplug the Power and Drive LEDs)
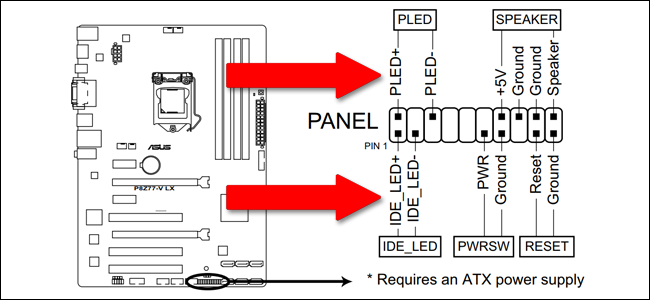
Here’s the important part. Refer to your manual or guide for a layout of the system panel connector. This part is usually on the bottom or right edge of your motherboard, on the opposite corner of the processor area.
这是重要的部分。 有关系统面板连接器的布局,请参阅您的手册或指南。 该部分通常位于主板的底部或右边缘,位于处理器区域的对角。
You want to remove the positive (+) and negative (+) cables for both the power indicator LED and the drive indicator LED. Usually these are labelled “PLED” and “IDE_LED” or “HD LED” on the diagram, and if you’re lucky, in tiny lettering on the cables and the motherboard, too. Some motherboards support multiple power LEDs for different sleep or hibernation states.
您要卸下电源指示灯LED和驱动器指示灯LED的正极(+)和负极(+)电缆。 通常,它们在图表上分别标记为“ PLED”和“ IDE_LED”或“ HD LED”,如果幸运的话,电缆和主板上的字体也要很小。 一些主板支持用于不同睡眠或Hibernate状态的多个电源LED。
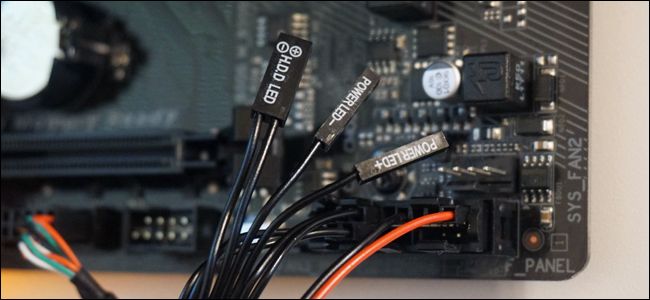
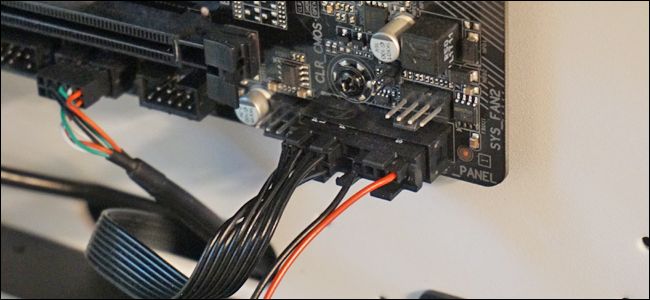
Unplug only the positive and negative cables for the power and hard drive LEDs. Do not touch the other cables: the other pins on the system panel are for the physical on/off switch, the reset switch, and sometimes extras like the front headphone jack and motherboard alert speaker.
仅拔下电源和硬盘驱动器LED的正极和负极电缆。 请勿触摸其他电缆:系统面板上的其他针脚用于物理打开/关闭开关,重置开关,有时还用于前置耳机插Kong和主板警报扬声器等其他附件。
第四步:测试结果 (Step Four: Test the Results)
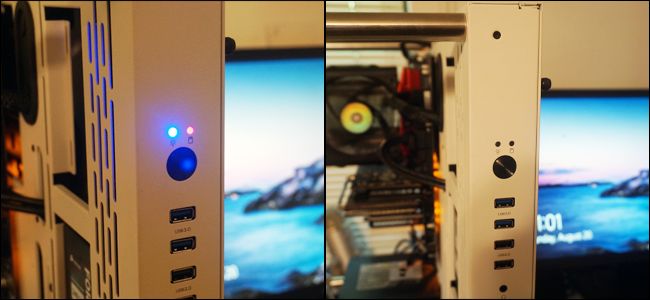
Now without completely re-assembling your computer, carefully plug it in and turn it on. You should see the processor fans and case fans start to spin up, but the LEDs on the front of the case won’t light up. Test the power and reset switches to make sure they’re still operating—they should work fine without the LEDs activating.
现在,无需完全重新组装计算机,请小心地将其插入并打开电源。 您应该看到处理器风扇和机箱风扇开始旋转,但是机箱前面的LED不会点亮。 测试电源和重置开关,以确保它们仍在运行-在LED指示灯未激活的情况下,它们应该可以正常工作。
If your computer doesn’t turn on, or the reset switch isn’t working, go back to step three, re-insert all the cables, and try again, making sure to carefully follow your manual or guide. If all else fails, you can try a process of elimination to see which cables going from the front of the case to the system panel are for which function.
如果您的计算机无法打开,或者重置开关不起作用,请返回至第三步,重新插入所有电缆,然后重试,确保认真遵循手册或指南。 如果其他所有方法均失败,则可以尝试排除方法,以查看从机箱正面到系统面板的电缆适用于哪些功能。
联想台式机usb控制器驱动


 677
677

 被折叠的 条评论
为什么被折叠?
被折叠的 条评论
为什么被折叠?
 到【灌水乐园】发言


