


rsync 同步数据记录

The rsync protocol can be pretty simple to use for ordinary backup/synchronization jobs, but some of its more advanced features may surprise you. In this article, we’re going to show how even the biggest data hoarders and backup enthusiasts can wield rsync as a single solution for all of their data redundancy needs.
rsync协议对于普通的备份/同步作业可以非常简单地使用,但是它的一些更高级的功能可能会让您感到惊讶。 在本文中,我们将展示即使最大的数据仓库和备份爱好者也可以将rsync作为单个解决方案来满足其所有数据冗余需求。
警告:仅适用于高级怪胎 (Warning: Advanced Geeks Only)
If you’re sitting there thinking “What the heck is rsync?” or “I only use rsync for really simple tasks,” you may want to check out our previous article on how to use rsync to backup your data on Linux, which gives an introduction to rsync, guides you through installation, and showcases its more basic functions. Once you have a firm grasp of how to use rsync (honestly, it isn’t that complex) and are comfortable with a Linux terminal, you’re ready to move on to this advanced guide.
如果您坐在那里,想着“ rsync到底是什么?” 或“我仅将rsync用于完成非常简单的任务”,您可能想查看我们之前的文章, 该文章介绍了如何使用rsync在Linux上备份数据 ,其中介绍了rsync,指导您进行安装并展示了其更基本的知识功能。 一旦您掌握了如何使用rsync(老实说,它并不那么复杂)并且对Linux终端感到满意之后,就可以继续学习此高级指南了。
在Windows上运行rsync (Running rsync on Windows)
First, let’s get our Windows readers on the same page as our Linux gurus. Although rsync is built to run on Unix-like systems, there’s no reason that you shouldn’t be able to use it just as easily on Windows. Cygwin produces a wonderful Linux API that we can use to run rsync, so head over to their website and download the 32-bit or 64-bit version, depending on your computer.
首先,让我们的Windows阅读器与Linux专家在同一页面上。 尽管rsync是为在类似Unix的系统上运行而构建的,但没有理由不使您不能在Windows上如此轻松地使用它。 Cygwin产生了一个很棒Linux API,我们可以使用它运行rsync,因此请转到他们的网站并下载32位或64位版本,具体取决于您的计算机。
Installation is straightforward; you can keep all options at their default values until you get to the “Select Packages” screen.
安装非常简单; 您可以将所有选项保持其默认值,直到进入“选择软件包”屏幕。
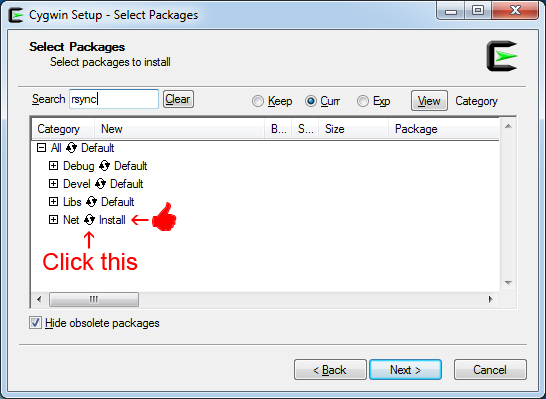
Now you need to do the same steps for Vim and SSH, but the packages are going to look a bit different when you go to select them, so here are some screenshots:
现在,您需要对Vim和SSH执行相同的步骤,但是在选择它们时,这些包看起来会有些不同,因此,下面是一些屏幕截图:
Installing Vim:
安装Vim:

Installing SSH:
安装SSH:

After you’ve selected those three packages, keep clicking next until you finish the installation. Then you can open Cygwin by clicking on the icon that the installer placed on your desktop.
选择了这三个软件包之后,请继续单击“下一步”,直到完成安装。 然后,您可以通过单击安装程序在桌面上放置的图标来打开Cygwin。
rsync命令:从简单到高级 (rsync Commands: Simple to Advanced)
Now that the Windows users are on the same page, let’s take a look at a simple rsync command, and show how the use of some advanced switches can quickly make it complex.
现在,Windows用户位于同一页面上,让我们看一个简单的rsync命令,并展示如何使用某些高级开关快速使它变得复杂。
Let’s say you have a bunch of files that need backed up – who doesn’t these days? You plug in your portable hard drive so you can backup your computers files, and issue the following command:
假设您有一堆需要备份的文件–这些天谁不备份? 您插入便携式硬盘驱动器,以便可以备份计算机文件,然后发出以下命令:
rsync -a /home/geek/files/ /mnt/usb/files/
rsync -a /home/geek/files/ /mnt/usb/files/
Or, the way it would look on a Windows computer with Cygwin:
或者,在使用Cygwin的Windows计算机上的外观:
rsync -a /cygdrive/c/files/ /cygdrive/e/files/
rsync -a /cygdrive/c/files/ /cygdrive/e/files/
Pretty simple, and at that point there’s really no need to use rsync, since you could just drag and drop the files. However, if your other hard drive already has some of the files and just needs the updated versions plus the files that have been created since the last sync, this command is handy because it only sends the new data over to the hard drive. With big files, and especially transferring files over the internet, that is a big deal.
非常简单,到那时,实际上不需要使用rsync,因为您可以拖放文件。 但是,如果您的其他硬盘驱动器已经有一些文件,并且只需要更新的版本以及自上次同步以来创建的文件,则此命令非常方便,因为它仅将新数据发送到硬盘驱动器。 对于大文件,尤其是通过Internet传输文件,这很重要。
Backing up your files to an external hard drive and then keeping the hard drive in the same location as your computer is a very bad idea, so let’s take a look at what it would require to start sending your files over the internet to another computer (one you’ve rented, a family member’s, etc).
将文件备份到外部硬盘驱动器,然后将硬盘驱动器与计算机保持在同一位置是一个非常糟糕的主意,因此,让我们看一下开始通过Internet将文件发送到另一台计算机所需的操作(您租用的房子,家庭成员的房子等)。
rsync -av --delete -e 'ssh -p 12345’ /home/geek/files/ geek2@10.1.1.1:/home/geek2/files/
rsync -av --delete -e 'ssh -p 12345' /home/geek/files/ geek2@10.1.1.1:/home/geek2/files/
The above command would send your files to another computer with an IP address of 10.1.1.1. It would delete extraneous files from the destination that no longer exist in the source directory, output the filenames being transferred so you have an idea of what’s going on, and tunnel rsync through SSH on port 12345.
上面的命令会将您的文件发送到IP地址为10.1.1.1的另一台计算机。 它将从目标中删除源目录中不再存在的无关文件,输出正在传输的文件名,这样您就可以知道发生了什么,并通过端口12345上的SSH隧道传输rsync。
The -a -v -e --delete switches are some of the most basic and commonly used; you should already know a good deal about them if you’re reading this tutorial. Let’s go over some other switches that are sometimes ignored but incredibly useful:
-a -v -e --delete开关是一些最基本和最常用的开关。 如果您正在阅读本教程,那么您应该已经对它们有很多了解。 让我们看一下其他一些有时会被忽略但非常有用的开关:
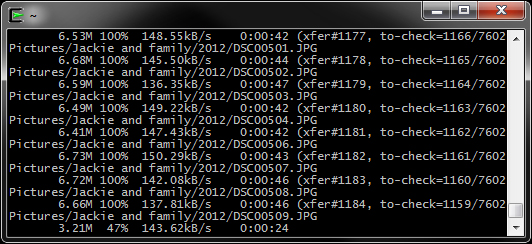
--progress – This switch allows us to see the transfer progress of each file. It’s particularly useful when transferring large files over the internet, but can output a senseless amount of information when just transferring small files across a fast network.
--progress –此开关使我们可以查看每个文件的传输进度。 它在通过Internet传输大文件时特别有用,但是当仅通过快速网络传输小文件时,可能会输出大量信息。
An rsync command with the --progress switch as a backup is in progress:
带有--progress开关作为备份的rsync命令正在进行中:
--partial – This is another switch that is particularly useful when transferring large files over the internet. If rsync gets interrupted for any reason in the middle of a file transfer, the partially transferred file is kept in the destination directory and the transfer is resumed where it left off once the rsync command is executed again. When transferring large files over the internet (say, a couple of gigabytes), there’s nothing worse than having a few second internet outage, blue screen, or human error trip up your file transfer and having to start all over again.
--partial –这是另一个开关,在通过Internet传输大文件时特别有用。 如果rsync在文件传输过程中由于某种原因而被中断,则部分传输的文件将保留在目标目录中,并且一旦再次执行rsync命令,传输将从中断的位置继续进行。 当通过Internet传输大型文件(例如,几GB)时,没有比第二次Internet中断,蓝屏或人为错误导致文件传输中断并不得不重新开始的情况更糟糕的了。
-P – this switch combines --progress and --partial, so use it instead and it will make your rsync command a little neater.
-P –此开关结合了--progress和--partial ,因此请改用它,它会使rsync命令更加整洁。
-z or --compress – This switch will make rsync compress file data as it’s being transferred, reducing the amount of data that has to be sent to the destination. It’s actually a fairly common switch but is far from essential, only really benefiting you on transfers between slow connections, and it does nothing for the following types of files: 7z, avi, bz2, deb, g,z iso, jpeg, jpg, mov, mp3, mp4, ogg, rpm, tbz, tgz, z, zip.
-z或--compress –此开关将使rsync在传输文件时对其进行压缩,从而减少了必须发送到目标的数据量。 实际上,这是一个相当普通的开关,但并不是必需的,它只会使您在慢速连接之间的传输上真正受益,并且对以下类型的文件不起作用:7z,avi,bz2,deb,g,z iso,jpeg,jpg, mov,mp3,mp4,ogg,rpm,tbz,tgz,z,zip。
-h or --human-readable – If you’re using the --progress switch, you’ll definitely want to use this one as well. That is, unless you like to convert bytes to megabytes on the fly. The -h switch converts all outputted numbers to human-readable format, so you can actually make sense of the amount of data being transferred.
-h或--human-readable –如果您正在使用--progress开关,则肯定也要使用此开关。 也就是说,除非您想即时将字节转换为兆字节。 -h开关将所有输出的数字转换为人类可读的格式,因此您实际上可以了解正在传输的数据量。
-n or --dry-run – This switch is essential to know when you’re first writing your rsync script and testing it out. It performs a trial run but doesn’t actually make any changes – the would-be changes are still outputted as normal, so you can read over everything and make sure it looks okay before rolling your script into production.
-n或--dry-run –此开关对于知道何时首次编写rsync脚本并进行测试非常重要。 它执行一次试运行,但实际上并未进行任何更改-可能的更改仍会正常输出,因此您可以阅读所有内容,并确保在将脚本投入生产之前一切正常。
-R or --relative – This switch must be used if the destination directory doesn’t already exist. We will use this option later in this guide so that we can make directories on the target machine with timestamps in the folder names.
-R或--relative –如果目标目录不存在,则必须使用此开关。 我们将在本指南的后面部分中使用此选项,以便我们可以在目标计算机上建立目录,并在文件夹名称中带有时间戳。
--exclude-from – This switch is used to link to an exclude list that contains directory paths that you don’t want backed up. It just needs a plain text file with a directory or file path on each line.
--exclude-from –此开关用于链接到包含您不希望备份的目录路径的排除列表。 它只需要一个纯文本文件,每行上都有一个目录或文件路径。
--include-from – Similar to --exclude-from, but it links to a file that contains directories and file paths of data you want backed up.
--include-from –与--exclude-from相似,但是它链接到一个文件,该文件包含要备份的数据的目录和文件路径。
--stats – Not really an important switch by any means, but if you are a sysadmin, it can be handy to know the detailed stats of each backup, just so you can monitor the amount of traffic being sent over your network and such.
--stats – --stats ,这并不是真正重要的开关,但是,如果您是sysadmin,则可以方便地了解每个备份的详细统计信息,这样您就可以监视通过网络等发送的流量。
--log-file – This lets you send the rsync output to a log file. We definitely recommend this for automated backups in which you aren’t there to read through the output yourself. Always give log files a once over in your spare time to make sure everything is working properly. Also, it’s a crucial switch for a sysadmin to use, so you’re not left wondering how your backups failed while you left the intern in charge.
--log-file –这使您可以将rsync输出发送到日志文件。 对于自动备份,我们绝对建议您这样做,因为您无需亲自阅读输出。 总是在业余时间给日志文件一次一次,以确保一切正常。 另外,这是系统管理员要使用的关键开关,因此您不必怀疑在离开实习生时备份如何失败。
Let’s take a look at our rsync command now that we have a few more switches added:
现在,让我们看一下rsync命令,因为我们添加了更多的开关:
rsync -avzhP --delete --stats --log-file=/home/geek/rsynclogs/backup.log --exclude-from '/home/geek/exclude.txt' -e 'ssh -p 12345' /home/geek/files/ geek2@10.1.1.1:/home/geek2/files/
rsync -avzhP --delete --stats --log-file=/home/geek/rsynclogs/backup.log --exclude-from '/home/geek/exclude.txt' -e 'ssh -p 12345' /home/geek/files/ geek2@10.1.1.1:/home/geek2/files/
The command is still pretty simple, but we still haven’t created a decent backup solution. Even though our files are now in two different physical locations, this backup does nothing to protect us from one of the main causes of data loss: human error.
该命令仍然非常简单,但是我们还没有创建一个不错的备份解决方案。 即使我们的文件现在位于两个不同的物理位置,此备份也无法保护我们免受数据丢失的主要原因之一的影响:人为错误。
快照备份 (Snapshot Backups)
If you accidentally delete a file, a virus corrupts any of your files, or something else happens whereby your files are undesirably altered, and then you run your rsync backup script, your backed up data is overwritten with the undesirable changes. When such a thing occurs (not if, but when), your backup solution did nothing to protect you from your data loss.
如果您不小心删除了文件,病毒破坏了您的任何文件,或者发生了其他不受欢迎的更改您的文件的事情,然后您运行rsync备份脚本,则备份的数据将被不希望的更改所覆盖。 当发生这种情况时(不是,而是在什么时候),您的备份解决方案不会采取任何措施来保护您免受数据丢失的影响。
The creator of rsync realized this, and added the --backup and --backup-dir arguments so users could run differential backups. The very first example on rsync’s website shows a script where a full backup is run every seven days, and then the changes to those files are backed up in separate directories daily. The problem with this method is that to recover your files, you have to effectively recover them seven different times. Moreover, most geeks run their backups several times a day, so you could easily have 20+ different backup directories at any given time. Not only is recovering your files now a pain, but even just looking through your backed up data can be extremely time consuming – you’d have to know the last time a file was changed in order to find its most recent backed up copy. On top of all that, it’s inefficient to run only weekly (or even less often in some cases) incremental backups.
rsync的创建者意识到了这一点,并添加了--backup和--backup-dir参数,以便用户可以运行差异备份。 rsync网站上的第一个示例显示了一个脚本,其中每7天运行一次完整备份,然后每天将这些文件的更改备份到单独的目录中。 这种方法的问题在于,要恢复文件,您必须有效地七个不同的时间来恢复它们。 而且,大多数怪胎每天都运行几次备份,因此您可以轻松地在任何给定时间拥有20多个不同的备份目录。 现在恢复文件不仅很麻烦,而且即使只是浏览备份的数据也会非常耗时–您必须知道上次更改文件才能找到其最新的备份副本。 最重要的是,仅每周(或者在某些情况下甚至更少)运行增量备份效率低下。
Snapshot backups to the rescue! Snapshot backups are nothing more than incremental backups, but they utilize hardlinks to retain the file structure of the original source. That may be hard to wrap your head around at first, so let’s take a look at an example.
快照备份可助您一臂之力! 快照备份只不过是增量备份,但是它们利用硬链接来保留原始源的文件结构。 刚开始时可能很难缠住头,所以让我们看一个例子。
Pretend we have a backup script running that automatically backs up our data every two hours. Whenever rsync does this, it names each backup in the format of: Backup-month-day-year-time.
假设我们有一个正在运行的备份脚本,该脚本每两个小时自动备份一次数据。 每当rsync执行此操作时,它将以以下格式命名每个备份:Backup-month-day-year-time。
So, at the end a typical day, we’d have a list of folders in our destination directory like this:
因此,在通常的一天结束时,我们将在目标目录中有一个文件夹列表,如下所示:

When traversing any of those directories, you’d see every file from the source directory exactly as it was at that time. Yet, there would be no duplicates across any two directories. rsync accomplishes this with the use of hardlinking through the --link-dest=DIR argument.
遍历这些目录中的任何一个时,您会看到源目录中的每个文件与当时的情况完全相同。 但是,任何两个目录之间都不会有重复项。 rsync通过--link-dest=DIR参数使用硬链接来实现此目的。
Of course, in order to have these nicely- and neatly-dated directory names, we’re going to have to beef up our rsync script a bit. Let’s take a look at what it would take to accomplish a backup solution like this, and then we’ll explain the script in greater detail:
当然,为了拥有这些精美而整洁的目录名,我们将不得不加强rsync脚本。 让我们看一下完成这样的备份解决方案将需要什么,然后我们将更详细地解释该脚本:
#!/bin/bash
#!/bin/bash
#copy old time.txt to time2.txt
#copy old time.txt to time2.txt
yes | cp ~/backup/time.txt ~/backup/time2.txt
yes | cp ~/backup/time.txt ~/backup/time2.txt
#overwrite old time.txt file with new time
#overwrite old time.txt file with new time
echo `date +”%F-%I%p”` > ~/backup/time.txt
echo `date +”%F-%I%p”` > ~/backup/time.txt
#make the log file
#make the log file
echo “” > ~/backup/rsync-`date +”%F-%I%p”`.log
echo “” > ~/backup/rsync-`date +”%F-%I%p”`.log
#rsync command
#rsync command
rsync -avzhPR --chmod=Du=rwx,Dgo=rx,Fu=rw,Fgo=r --delete --stats --log-file=~/backup/rsync-`date +”%F-%I%p”`.log --exclude-from '~/exclude.txt' --link-dest=/home/geek2/files/`cat ~/backup/time2.txt` -e 'ssh -p 12345' /home/geek/files/ geek2@10.1.1.1:/home/geek2/files/`date +”%F-%I%p”`/
rsync -avzhPR --chmod=Du=rwx,Dgo=rx,Fu=rw,Fgo=r --delete --stats --log-file=~/backup/rsync-`date +”%F-%I%p”`.log --exclude-from '~/exclude.txt' --link-dest=/home/geek2/files/`cat ~/backup/time2.txt` -e 'ssh -p 12345' /home/geek/files/ geek2@10.1.1.1:/home/geek2/files/`date +”%F-%I%p”`/
#don’t forget to scp the log file and put it with the backup
#don't forget to scp the log file and put it with the backup
scp -P 12345 ~/backup/rsync-`cat ~/backup/time.txt`.log geek2@10.1.1.1:/home/geek2/files/`cat ~/backup/time.txt`/rsync-`cat ~/backup/time.txt`.log
scp -P 12345 ~/backup/rsync-`cat ~/backup/time.txt`.log geek2@10.1.1.1:/home/geek2/files/`cat ~/backup/time.txt`/rsync-`cat ~/backup/time.txt`.log
That would be a typical snapshot rsync script. In case we lost you somewhere, let’s dissect it piece by piece:
那将是典型的快照rsync脚本。 万一我们在某个地方迷路了,让我们对其进行剖析:
The first line of our script copies the contents of time.txt to time2.txt. The yes pipe is to confirm that we want to overwrite the file. Next, we take the current time and put it into time.txt. These files will come in handy later.
脚本的第一行将time.txt的内容复制到time2.txt。 yes管道用于确认我们要覆盖该文件。 接下来,我们将当前时间放入time.txt中。 这些文件将在以后派上用场。
The next line makes the rsync log file, naming it rsync-date.log (where date is the actual date and time).
下一行是rsync日志文件,将其命名为rsync-date.log(其中date是实际日期和时间)。
Now, the complex rsync command that we’ve been warning you about:
现在,我们一直在警告您的复杂rsync命令:
-avzhPR, -e, --delete, --stats, --log-file, --exclude-from, --link-dest – Just the switches we talked about earlier; scroll up if you need a refresher.
-avzhPR, -e, --delete, --stats, --log-file, --exclude-from, --link-dest –只是我们前面提到的开关; 如果需要复习,请向上滚动。
--chmod=Du=rwx,Dgo=rx,Fu=rw,Fgo=r – These are the permissions for the destination directory. Since we are making this directory in the middle of our rsync script, we need to specify the permissions so that our user can write files to it.
--chmod=Du=rwx,Dgo=rx,Fu=rw,Fgo=r –这些是目标目录的权限。 由于我们在rsync脚本的中间创建该目录,因此我们需要指定权限,以便我们的用户可以向其中写入文件。
The use of date and cat commands
日期和猫命令的使用
We’re going to go over each use of the date and cat commands inside the rsync command, in the order that they occur. Note: we’re aware that there are other ways to accomplish this functionality, especially with the use of declaring variables, but for the purpose of this guide, we’ve decided to use this method.
我们将按顺序查看rsync命令中date和cat命令的每种用法。 注意:我们知道还有其他方法可以实现此功能,尤其是使用声明变量,但是出于本指南的目的,我们决定使用此方法。
The log file is specified as:
日志文件指定为:
~/backup/rsync-`date +”%F-%I%p”`.log
~/backup/rsync-`date +”%F-%I%p”`.log
Alternatively, we could have specified it as:
或者,我们可以将其指定为:
~/backup/rsync-`cat ~/backup/time.txt`.log
~/backup/rsync-`cat ~/backup/time.txt`.log
Either way, the --log-file command should be able to find the previously created dated log file and write to it.
无论哪种方式,-- --log-file命令都应该能够找到先前创建的带日期的日志文件并将其写入。
The link destination file is specified as:
链接目标文件指定为:
--link-dest=/home/geek2/files/`cat ~/backup/time2.txt`
--link-dest=/home/geek2/files/`cat ~/backup/time2.txt`
This means that the --link-dest command is given the directory of the previous backup. If we are running backups every two hours, and it’s 4:00PM at the time we ran this script, then the --link-dest command looks for the directory created at 2:00PM and only transfers the data that has changed since then (if any).
这意味着--link-dest命令被赋予了上一个备份的目录。 如果我们每两个小时运行一次备份,并且在运行此脚本的时间是4:00 PM,则--link-dest命令将查找在2:00 PM创建的目录,并且仅传输此后已更改的数据(如果有的话)。
To reiterate, that is why time.txt is copied to time2.txt at the beginning of the script, so the --link-dest command can reference that time later.
重申一下,这就是为什么在脚本开头将time.txt复制到time2.txt的原因,因此--link-dest命令可以在以后引用该时间。
The destination directory is specified as:
目标目录指定为:
geek2@10.1.1.1:/home/geek2/files/`date +”%F-%I%p”`
geek2@10.1.1.1:/home/geek2/files/`date +”%F-%I%p”`
This command simply puts the source files into a directory that has a title of the current date and time.
此命令只是将源文件放入具有当前日期和时间标题的目录中。
Finally, we make sure that a copy of the log file is placed inside the backup.
最后,我们确保将日志文件的副本放置在备份中。
scp -P 12345 ~/backup/rsync-`cat ~/backup/time.txt`.log geek2@10.1.1.1:/home/geek2/files/`cat ~/backup/time.txt`/rsync-`cat ~/backup/time.txt`.log
scp -P 12345 ~/backup/rsync-`cat ~/backup/time.txt`.log geek2@10.1.1.1:/home/geek2/files/`cat ~/backup/time.txt`/rsync-`cat ~/backup/time.txt`.log
We use secure copy on port 12345 to take the rsync log and place it in the proper directory. To select the correct log file and make sure it ends up in the right spot, the time.txt file must be referenced via the cat command. If you’re wondering why we decided to cat time.txt instead of just using the date command, it’s because a lot of time could have transpired while the rsync command was running, so to make sure we have the right time, we just cat the text document we created earlier.
我们在端口12345上使用安全复制来获取rsync日志并将其放置在正确的目录中。 要选择正确的日志文件并确保它以正确的位置结尾,必须通过cat命令引用time.txt文件。 如果您想知道为什么我们决定使用time.txt而不是只使用date命令,那是因为在运行rsync命令时可能已经发生了很多时间,因此为了确保我们有正确的时间,我们只需要我们之前创建的文本文档。
自动化 (Automation)
Use Cron on Linux or Task Scheduler on Windows to automate your rsync script. One thing you have to be careful of is making sure that you end any currently running rsync processes before continuing a new one. Task Scheduler seems to close any already running instances automatically, but for Linux you’ll need to be a little more creative.
在Linux上使用Cron或在Windows 上使用Task Scheduler来自动执行rsync脚本。 您必须要注意的一件事是,在继续新的rsync进程之前,请确保已结束所有当前正在运行的rsync进程。 Task Scheduler似乎会自动关闭任何已在运行的实例,但是对于Linux,您将需要更具创造力。
Most Linux distributions can use the pkill command, so just be sure to add the following to the beginning of your rsync script:
大多数Linux发行版都可以使用pkill命令,因此请确保将以下内容添加到rsync脚本的开头:
pkill -9 rsync
pkill -9 rsync
加密 (Encryption)
Nope, we’re not done yet. We finally have a fantastic (and free!) backup solution in place, but all of our files are still susceptible to theft. Hopefully, you’re backing up your files to some place hundreds of miles away. No matter how secure that faraway place is, theft and hacking can always be problems.
不,我们还没有完成。 我们终于有了一个不错的(免费的!)备份解决方案,但是我们所有的文件仍然容易被盗。 希望您将文件备份到数百英里之外的某个地方。 不管那个遥远的地方有多安全,盗窃和黑客入侵始终都是问题。
In our examples, we have tunneled all of our rsync traffic through SSH, so that means all of our files are encrypted while in transit to their destination. However, we need to make sure the destination is just as secure. Keep in mind that rsync only encrypts your data as it is being transferred, but the files are wide open once they reach their destination.
在我们的示例中,我们已通过SSH隧道传输了所有rsync流量,因此这意味着我们在将所有文件传输到目的地时都对其进行了加密。 但是,我们需要确保目的地同样安全。 请记住,rsync仅在传输数据时对您的数据进行加密,但是一旦文件到达目的地,它们便会打开。
One of rsync’s best features is that it only transfers the changes in each file. If you have all of your files encrypted and make one minor change, the entire file will have to be retransmitted as a result of the encryption completely randomizing all of the data after any change.
rsync的最佳功能之一是它仅传输每个文件中的更改。 如果您对所有文件进行了加密并进行了较小的更改,则由于更改后加密将所有数据完全随机化,因此必须重新传输整个文件。
For this reason, it’s best/easiest to use some type of disk encryption, such as BitLocker for Windows or dm-crypt for Linux. That way, your data is protected in the event of theft, but files can be transferred with rsync and your encryption won’t hinder its performance. There are other options available that work similarly to rsync or even implement some form of it, such as Duplicity, but they lack some of the features that rsync has to offer.
因此,最好/最简单的方法是使用某些类型的磁盘加密,例如Windows的BitLocker或Linux的dm-crypt 。 这样,您的数据就可以在被盗的情况下得到保护,但是可以通过rsync传输文件,并且加密不会影响其性能。 还有其他选项可以类似于rsync甚至实现某种形式的工作,例如Duplicity,但是它们缺少rsync必须提供的某些功能。
After you’ve setup your snapshot backups at an offsite location and encrypted your source and destination hard drives, give yourself a pat on the back for mastering rsync and implementing the most foolproof data backup solution possible.
在异地安装快照备份并加密源硬盘驱动器和目标硬盘驱动器后,请拍一下背面以掌握rsync并实施最简单的数据备份解决方案。
翻译自: https://www.howtogeek.com/175008/the-non-beginners-guide-to-syncing-data-with-rsync/
rsync 同步数据记录


 3820
3820


 被折叠的 条评论
为什么被折叠?
被折叠的 条评论
为什么被折叠?
 到【灌水乐园】发言


