


SQL Server Management Studio (SSMS) is getting better and better with each new release but Microsoft seems to ignore one big issue affecting a group of users that grows rapidly as the technology moves forward and we move on to modern workstations and laptops.
随着每个新版本的发布,SQL Server Management Studio(SSMS)越来越好,但是Microsoft似乎忽略了一个重大问题,该问题影响了随着技术的发展以及我们转向现代工作站和便携式计算机而Swift增长的一组用户。
I recently switched my old Dell XPS laptop which served me very well the last 5 years. To meet my work needs, I moved on to a modern Inspiron 15 Gaming machine with a 15.6-inch UHD (3840 x 2160) display. It came with a Windows 10 operating system and its doing a decent job of managing the size of text, icons and other items on a majority of programs. However, one thing that was bugging me from the very beginning was the visual appearance of SSMS.
我最近更换了旧的戴尔XPS笔记本电脑,在过去的5年中为我提供了很好的服务。 为了满足我的工作需求,我转而使用配备了15.6英寸UHD(3840 x 2160)显示屏的现代Inspiron 15游戏机。 它带有Windows 10操作系统,在管理大多数程序中的文本,图标和其他项目的大小方面做得不错。 但是,从一开始就困扰我的一件事是SSMS的外观。
So, the first thing I did was checking out SSMS changelog and previous releases to find any information regarding 4K resolution and high DPI support. The 16.3 (Version number: 13.0.15700.28) update for SSMS includes initial beta support to allow high-DPI in SSMS to display appropriately on high-resolution monitors. Furthermore, it’s stated that this functionality is disabled by default because of continuous development and testing to make high-DPI in SSMS support better.
因此,我要做的第一件事是查看SSMS变更日志和以前的版本,以查找有关4K分辨率和高DPI支持的任何信息。 SSMS的16.3(版本号:13.0.15700.28)更新包括初始beta支持,以使SSMS中的高DPI可以在高分辨率监视器上正确显示。 此外,据指出,由于不断开发和测试以更好地支持SSMS中的高DPI,默认情况下禁用此功能。
This initial beta support for high-resolution displays is linked to 17 customer bug requests on Microsoft Connect which has been retired after nearly 10 years. However, this is less important and the purpose of this write-up is to show how to make SSMS on 4K resolution and high DPI pretty again. So, let’s check how SSMS looks on UHD display with all, both Windows and SSMS, default settings.
最初的对高分辨率显示器的beta支持与Microsoft Connect上的17个客户错误请求相关,这些请求在将近10年后已经停用。 但是,这并不重要,本文的目的是展示如何使SSMS再次达到4K分辨率和高DPI。 因此,让我们检查Windows和SSMS的所有默认设置下,SSMS在UHD显示屏上的外观如何。
SSMS 16.5.3 (SSMS 16.5.3)
To enable high-DPI in SSMS, follow the instructions below:
要在SSMS中启用高DPI,请按照以下说明进行操作:
Key: HKEY_LOCAL_MACHINE\SOFTWARE\Microsoft\Windows\CurrentVersion\SideBySide
Name: PreferExternalManifest
Entry type: DWORD
Data: 00000001密钥:HKEY_LOCAL_MACHINE \ SOFTWARE \ Microsoft \ Windows \ CurrentVersion \ SideBySide
名称:PreferExternalManifest
条目类型:DWORD
数据:00000001Start by opening Registry Editor in Windows. One way to do it in Windows 10 is the following:
首先在Windows中打开注册表编辑器。 在Windows 10中执行此操作的一种方法如下:
- regedit. regedit 。
- regedit by clicking “运行命令”选择Run command. regedit 。
Depending on computer’s User Account Control (UAC) settings, you may be prompted to confirm that you want to start the Registry Editor:
根据计算机的用户帐户控制(UAC)设置,可能会提示您确认要启动注册表编辑器:
In Registry Editor, paste (only available in Windows 10) the key path and hit Enter to jump directly to the folder rather than navigating through the registry explorer and because it’s much faster. Right-click in the window’s right pane and choose the New > DWORD (32-bit) Value command:
在注册表编辑器中,粘贴(仅在Windows 10中可用)密钥路径,然后按Enter键直接跳转到该文件夹,而不是浏览注册表浏览器,因为它速度更快。 右键单击窗口的右窗格,然后选择“ 新建” >“ DWORD(32位)值”命令:
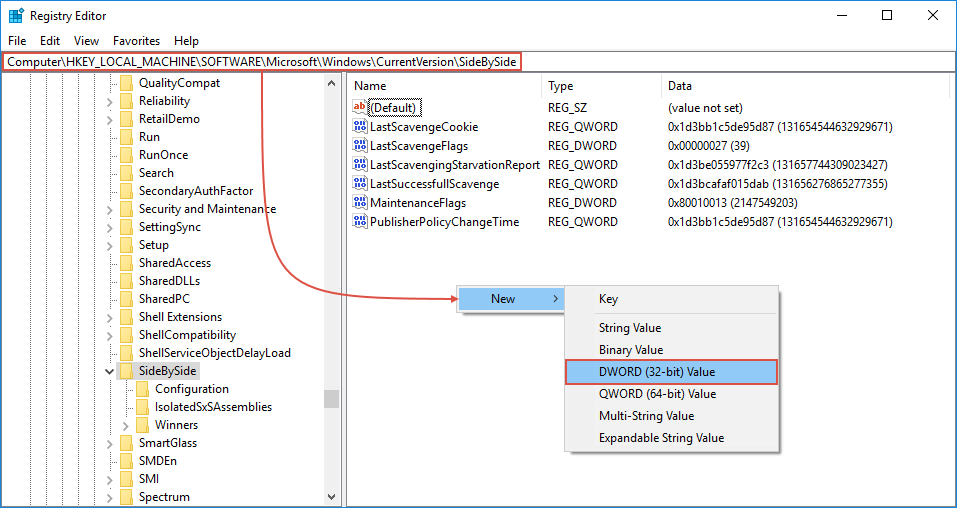
Give value the name “PreferExternalManifest” and hit Enter to save it:
将值命名为“ PreferExternalManifest”,然后按Enter进行保存:
Right-click the newly created value and choose the Modify… command. Then change the Value data to “00000001” and click the OK button to save the changes:
右键单击新创建的值,然后选择“ 修改...”命令。 然后将数值数据更改为“ 00000001”,然后单击确定按钮以保存更改:
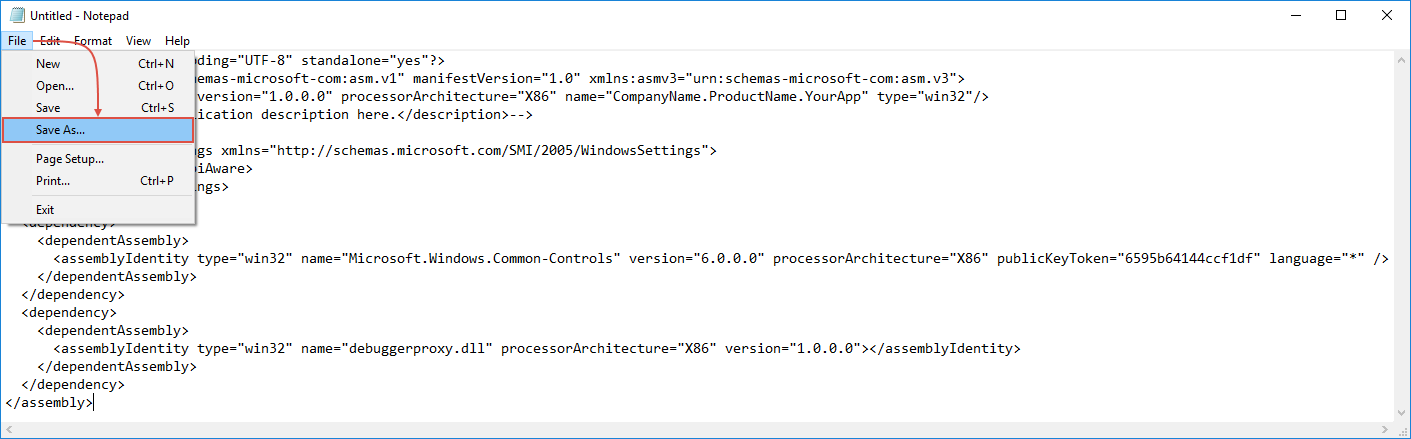
Copy the XML code from below to the clipboard:
从下面将XML代码复制到剪贴板:
<?xml version="1.0" encoding="UTF-8" standalone="yes"?>
<assembly xmlns="urn:schemas-microsoft-com:asm.v1" manifestVersion="1.0" xmlns:asmv3="urn:schemas-microsoft-com:asm.v3">
  <!--<assemblyIdentity version="1.0.0.0" processorArchitecture="X86" name="CompanyName.ProductName.YourApp" type="win32"/>
  <description>Your application description here.</description>-->
  <asmv3:application>
    <asmv3:windowsSettings xmlns="http://schemas.microsoft.com/SMI/2005/WindowsSettings">
      <dpiAware>True</dpiAware>
    </asmv3:windowsSettings>
  </asmv3:application>
  <dependency>
    <dependentAssembly>
      <assemblyIdentity type="win32" name="Microsoft.Windows.Common-Controls" version="6.0.0.0" processorArchitecture="X86" publicKeyToken="6595b64144ccf1df" language="*" />
    </dependentAssembly>
  </dependency>
  <dependency>
    <dependentAssembly>
      <assemblyIdentity type="win32" name="debuggerproxy.dll" processorArchitecture="X86" version="1.0.0.0"></assemblyIdentity>
    </dependentAssembly>
  </dependency>
</assembly>
Any text editor will do the job though make sure to run it as an administrator:
尽管要确保以管理员身份运行它,但任何文本编辑器都可以完成此工作:
Otherwise, you might get a warning that you don’t have permission to save the file at the specified location:
否则,您可能会收到警告,表明您无权将文件保存在指定位置:
Again, based on computer’s UAC settings, you may be prompted to confirm that you want to start the text editor:
再次,根据计算机的UAC设置,可能会提示您确认要启动文本编辑器:
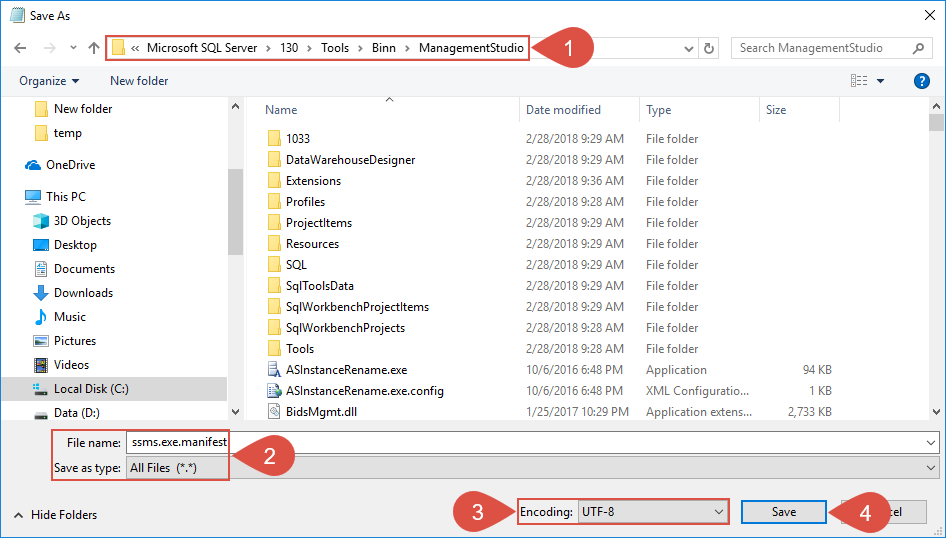
Paste the code into the text editor and save the file in the installation folder where ssms.exe is located:
将代码粘贴到文本编辑器中,然后将文件保存在ssms.exe所在的安装文件夹中:
- The default location is “%SystemDrive%\Program Files (x86)\Microsoft SQL Server\130\Tools\Binn\ManagementStudio” 默认位置为“%SystemDrive%\ Program Files(x86)\ Microsoft SQL Server \ 130 \ Tools \ Binn \ ManagementStudio”
- ssms.exe.manifest and set the ssms.exe.manifest并将“ Save as type option to “All files (*.*)” 另存为类型”选项设置为“所有文件(*。*)”
- UTF-8 UTF-8
- Save button to exit text editor and save the file 保存按钮退出文本编辑器并保存文件
Restart the machine for these changes to take effect.
重新启动计算机,以使这些更改生效。
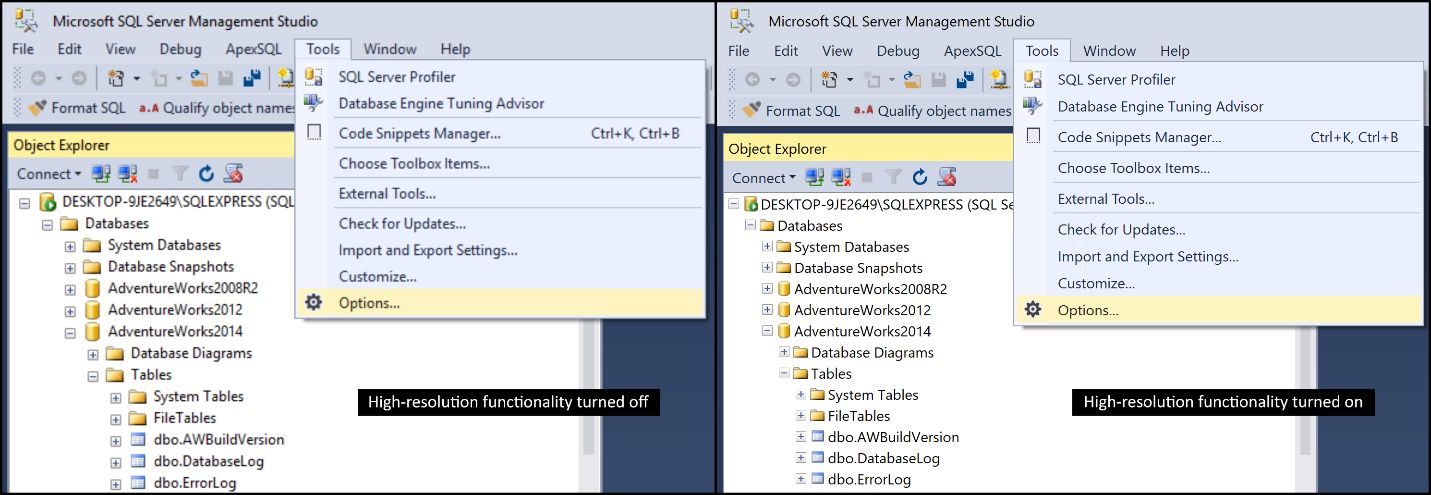
Before this “fix”, the text, icons, and other items in SSMS looked fuzzy and blurry but after the machine restart, there’s a noticeable change in almost everything (see the screenshot below before/after):
在执行此“修复”之前,SSMS中的文本,图标和其他项目看起来模糊不清,但是在机器重启后,几乎所有内容都有明显的变化(请参见下面的屏幕截图)。
The only other high-resolution display enhancement since the SSMS 16.3 (August 2016) version came out was the icons update to be consistent with VS Shell provided icons and support High DPI resolutions which was added in the initial release of SSMS 17. What this basically means is that the whole support for high-resolution displays is still just in beta testing. I’m not even sure that it will ever be official. Microsoft had brought into question are they fully committed to improving the SSMS experience or not.
自SSMS 16.3(2016年8月)版发布以来,唯一的其他高分辨率显示增强功能是图标更新,以与VS Shell提供的图标一致,并支持在SSMS 17的初始版本中添加的高DPI分辨率。这意味着对高分辨率显示器的全部支持仍处于beta测试中。 我什至不确定它是否会正式发布。 微软已经质疑他们是否完全致力于改善SSMS体验。
SSMS 17.6 (SSMS 17.6 )
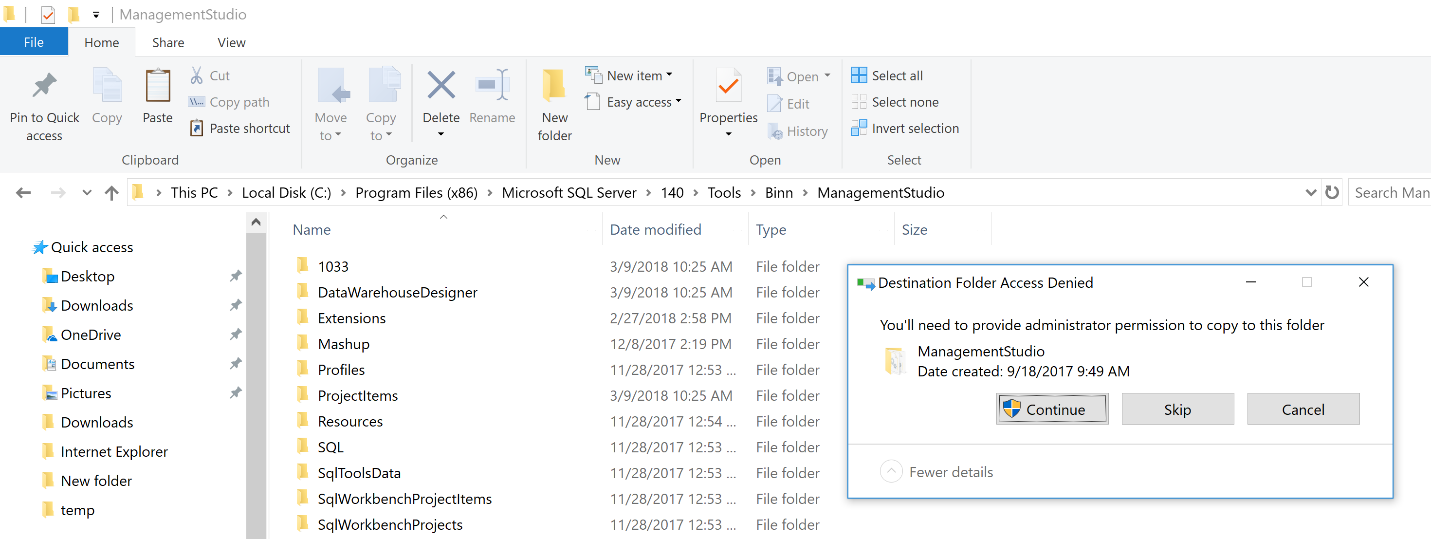
The same fix can be applied to the latest version of SSMS as well. Now that we already did step 1 and 2, there is no need to repeat that. We just need to copy the manifest file that we previously created to the installation directory of SSMS 17 which is “%SystemDrive%\Program Files (x86)\Microsoft SQL Server\140\Tools\Binn\ManagementStudio”. When copying the manifest file to this location, the folder access will be denied and you’ll have to provide administrator permission to proceed. If your account has administrator privileges, just click the Continue button:
同样的修复程序也可以应用于最新版本的SSMS。 既然我们已经执行了步骤1和2,则无需重复该步骤。 我们只需要将先前创建的清单文件复制到SSMS 17的安装目录,即“%SystemDrive%\ Program Files(x86)\ Microsoft SQL Server \ 140 \ Tools \ Binn \ ManagementStudio”。 将清单文件复制到此位置时,文件夹访问将被拒绝,您必须提供管理员权限才能继续。 如果您的帐户具有管理员权限,只需单击“ 继续”按钮:
The before/after example is shown below:
之前/之后的示例如下所示:

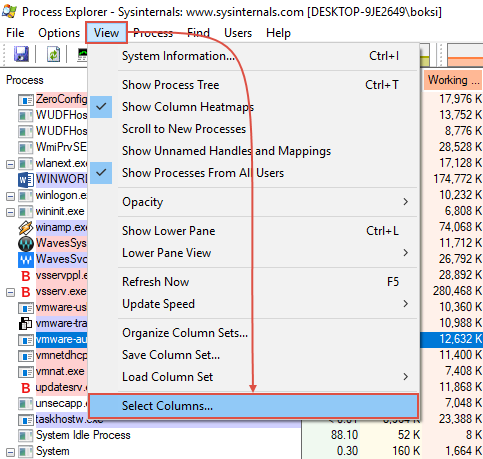
This issue can also be resolved another way. There’s a neat tool to check whether applications are DPI-aware or not called Sysinternals Process Explorer:
此问题也可以通过其他方式解决。 有一个简单的工具可以检查应用程序是否支持DPI,称为Sysinternals。 流程浏览器:
- ProcessExplorer.zip archive from the URL above. ProcessExplorer.zip档案。
- procexp.exe or procexp.exe或procexp64.exe application. procexp64.exe应用程序。
- View menu, click the 视图菜单上,单击Select columns command: 选择列命令:
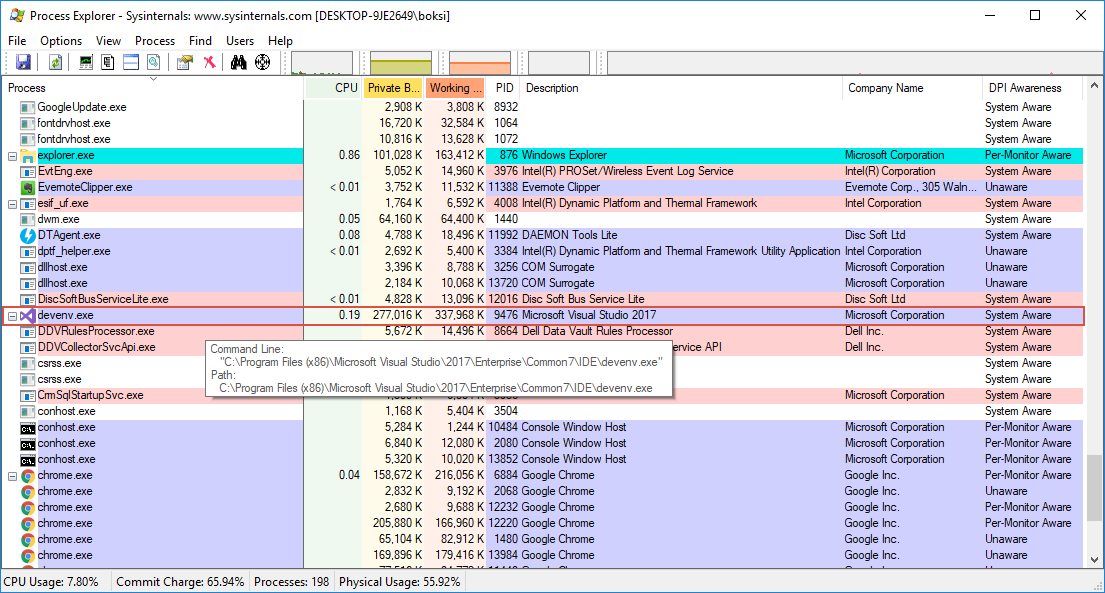
- DPI Awareness column to the view of Process Explorer: DPI Awareness列添加到Process Explorer的视图中:
- Start the application that you want to check (in this case Visual Studio 2017). 启动要检查的应用程序(在本例中为Visual Studio 2017)。
- DPI Awareness column. DPI Awareness”列。
Microsoft Visual Studio 2017 process is devenv.exe (find more information about a process from the Description column) and under the DPI Awareness column we can see that this application is System Aware:
Microsoft Visual Studio 2017进程是devenv.exe (从`` 描述''列中找到有关进程的更多信息),在DPI意识列下,我们可以看到此应用程序是系统感知 :
System Aware: These applications do not scale for DPI changes. They query for the DPI one time, and then use that value for the lifetime of the application. If the DPI changes, the application does not adjust to the new DPI value. It will be automatically scaled up or down by the system when the DPI changes from the system value.
系统感知 :这些应用程序无法扩展DPI更改。 他们一次查询DPI,然后在该应用程序的生存期内使用该值。 如果DPI更改,则应用程序不会调整为新的DPI值。 当DPI从系统值更改时,系统会自动按比例将其放大或缩小。
What this means for Visual Studio 2017 is that it supports 4K and high DPI right out the box. If we do the same for SSMS 17 it will also indicate that it’s System Aware, but this is only because of the registry key and manifest file that we created in the installation directory:
这对于Visual Studio 2017意味着意味着它立即支持4K和高DPI。 如果我们对SSMS 17进行相同的操作,它还将表明它是系统感知的,但这仅是由于我们在安装目录中创建的注册表项和清单文件所致:

If we go back to SSMS 17 installation folder and delete the manifest file, the application will no longer be DPI-aware, and the “DPI Awareness” column will change its value to Unaware:
如果返回SSMS 17安装文件夹并删除清单文件,则该应用程序将不再支持DPI,并且“ DPI Awareness”列将其值更改为Unaware :

Unaware: These applications do not scale for DPI changes. They are always assumed to have a scale factor of 100 percent (96 DPI). These applications are automatically scaled by the system at any other DPI settings.
不知道 :这些应用程序无法扩展DPI更改。 始终假定它们的比例因子为100%(96 DPI)。 这些应用程序会在其他任何DPI设置下由系统自动缩放。
Whenever the Unaware value is present, that means that the application does not support 4K and high DPI and elements such as the taskbar, icons, toolbars, text, and dialog boxes appear to be fuzzy. As you can imagine, once we delete the manifest file from SSMS 2016 installation folder it also becomes Unaware.
只要出现Unaware值,就表示该应用程序不支持4K和高DPI,并且任务栏,图标,工具栏,文本和对话框等元素看起来很模糊。 可以想象,一旦我们从SSMS 2016安装文件夹中删除了清单文件,它也将变为Unaware。
SSMS 2012/2014 (SSMS 2012/2014)
These two versions of SSMS does not include initial beta support, so the above “fix” will not work for them. If we examine the DPI Awareness for both SSMS 2012 and 2014, it will indicate that they are Per-Monitor Aware:
这两个版本的SSMS不包括最初的beta支持,因此上述“修复”不适用于它们。 如果我们同时检查SSMS 2012和2014的DPI意识,则表明它们是每个监视器的意识 :

Per-Monitor Aware: These applications check for the DPI when they are started, and adjusts the scale factor whenever the DPI value changes. These applications are not automatically scaled by the system.
What this means in our case, is that the application does not handle 4K resolution and high DPI very well and you can expect similar visual appearance as for the Unaware applications.
每监视器感知 :这些应用程序在启动时会检查DPI,并在DPI值更改时调整比例因子。 系统不会自动缩放这些应用程序。
在我们的案例中,这意味着该应用程序不能很好地处理4K分辨率和高DPI,并且您可以期望获得与Unaware应用程序相似的视觉外观。
DPI-scaling overrides
DPI缩放覆盖
An easier way to stop the madness is to tweak Windows compatibility settings for applications that do not appear correctly. At least for SSMS 2016 and 17 on Windows 10 operating system.
阻止这种疯狂的一种更简单的方法是,针对未正确显示的应用程序调整Windows兼容性设置。 至少对于Windows 10操作系统上的SSMS 2016和17。
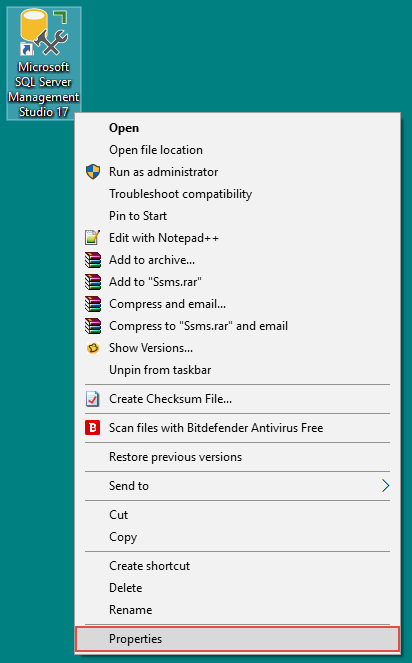
Instead of creating the new registry value and the manifest file, locate SSMS shortcut on the desktop (this functionality can be enabled in the .exe properties) and do the following:
而不是创建新的注册表值和清单文件,而是在桌面上找到SSMS快捷方式(可以在.exe属性中启用此功能),然后执行以下操作:
- Properties. 属性 。
- Go over to the Compatibility tab, enable Override High DPI scaling behavior. Scaling performed by and set the Scaling Behavior to Application:
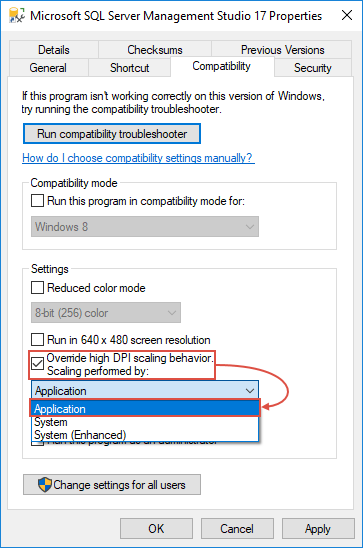
- 转到“兼容性”选项卡,启用“ 替代高DPI缩放行为”。 进行缩放,并将缩放行为设置为Application :
- Apply and then 应用” ,然后OK to close the window and save the changes. 单击“确定”关闭窗口并保存更改。
Application: This forces SSMS to run in per-monitor DPI awareness mode. This setting effectively tells Windows not to bitmap stretch UI from the .exe in question when the DPI changes.
应用程序 :这将强制SSMS在每个监视器的DPI感知模式下运行。 当DPI更改时,此设置有效地告诉Windows不要对有问题的.exe进行位图拉伸UI。
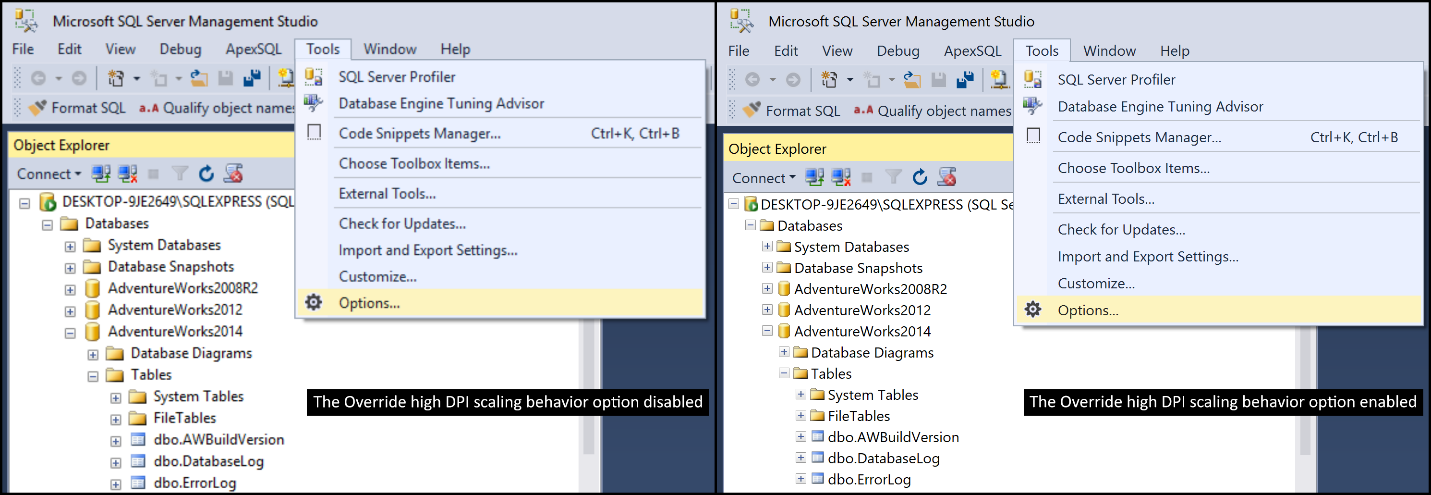
Now, Per-Monitor applications usually do not handle 4K resolution and high DPI very well but not always. In this case, enabling this option fixed the fuzziness and blurriness perfectly without enabling the beta support at all:
现在,Per-Monitor应用程序通常不能很好地处理4K分辨率和高DPI,但并非总是如此。 在这种情况下,启用此选项可以完全消除模糊性和模糊性,而无需完全启用beta支持:
Display scaling and high-DPI in SSMS is, in general, a complex problem. There is no magic bullet or single fix to resolve all DPI Scaling problems but considering the fact that we’re talking about Microsoft’s applications here and not third parties we’re really missing continuous improvements from Microsoft in this field.
通常,SSMS中的显示缩放和高DPI是一个复杂的问题。 没有解决所有DPI Scaling问题的灵丹妙药,也没有单一解决方案,但是考虑到我们在这里谈论的是Microsoft的应用程序,而不是第三方,这一事实确实使我们错失了Microsoft在该领域的持续改进。
Disclaimer: All tests were performed on a 15.6-inch display with the resolution set to 3840 x 2160 pixels and scaling option set to 250% (Windows default values) but due to the complexity of the problem the results shown in this article might vary on other environments.
免责声明 :所有测试均在15.6英寸显示器上进行,分辨率设置为3840 x 2160像素,缩放选项设置为250%(Windows默认值),但是由于问题的复杂性,本文显示的结果可能会有所不同。其他环境。
I hope this article has been informative for you and I thank you for reading.
希望本文对您有所帮助,也感谢您的阅读。


 6506
6506

 被折叠的 条评论
为什么被折叠?
被折叠的 条评论
为什么被折叠?
 到【灌水乐园】发言


