


azure3.0
In this article, we are going to understand what Azure CLI is and how to work with it. For the purpose of this article, we will take the version 2.0 to demonstrate the features and functionalities. The Azure CLI, as the name suggests is a cross- platform and open-source command-line tool that we can use to create or manage resources in the Azure Portal. This tool gives us the ability to issue commands right from the windows command prompt and deal with the Azure resources. Since this tool is a cross-platform, that means the users can easily install the utility on Windows, Linux or Mac OS and still work with the same set of commands without making any changes.
在本文中,我们将了解什么是Azure CLI以及如何使用它。 出于本文的目的,我们将使用2.0版来演示其功能。 顾名思义,Azure CLI是一个跨平台的开源命令行工具,可用于在Azure Portal中创建或管理资源。 此工具使我们能够直接从Windows命令提示符下发出命令并处理Azure资源。 由于该工具是跨平台的,因此,用户可以轻松地在Windows,Linux或Mac OS上安装该实用程序,并且仍然可以使用同一组命令进行任何更改。
Using the Azure CLI, users can automate a great extent of tasks in the Azure portal like creating or deleting Azure resources like a Virtual Machine or backing up an SQL Database. The Azure CLI is also available to use within the web browser which is also known as the cloud shell. The cloud shell is available once the user has logged into the Azure portal from any browser. The set of commands for both the CLI and cloud shell is the same. Initially, the CLI version 1.0 was released, which was written in NodeJS. However, now it has become obsolete and version 2.0 has been completely rewritten using python.
使用Azure CLI,用户可以在Azure门户中自动化大量任务,例如创建或删除虚拟机之类的Azure资源或备份SQL数据库。 还可以在Web浏览器(也称为云外壳)中使用Azure CLI。 一旦用户从任何浏览器登录到Azure门户,云外壳便可用。 CLI和云外壳程序的命令集是相同的。 最初,发布了使用NodeJS编写的CLI版本1.0。 但是,现在它已经过时了,版本2.0已使用python完全重写。
我们可以使用Azure CLI做什么? (What can we do with Azure CLI?)
With the help of Azure CLI, you can easily perform the following tasks.
借助Azure CLI,您可以轻松地执行以下任务。
- Creating new resources – With the help of the CLI tool, you can spin up new resources like a virtual machine or an SQL database directly with commands issued from the windows command line or the cloud shell 创建新资源 –借助CLI工具,您可以直接使用Windows命令行或云Shell发出的命令来启动虚拟机或SQL数据库等新资源
- Querying existing resources – We can also query results for the existing resources in the Azure portal. For example, what is the value of the secret from the Azure Key Vault, etc.
- 查询现有资源 –我们还可以在Azure门户中查询现有资源的结果。 例如,Azure Key Vault等中的秘密的价值是什么。
- Updating existing resources – Maybe we need to update the configuration setting for a web application, we can leverage the CLI and perform the update operation 更新现有资源 –也许我们需要更新Web应用程序的配置设置,我们可以利用CLI并执行更新操作
- Deleting existing resources – We can also delete resources from the Azure portal that we no longer need so that we could save some bucks all by using the CLI tool 删除现有资源 –我们还可以从Azure门户中删除不再需要的资源,以便可以使用CLI工具节省一些钱
安装Azure CLI (Installing the Azure CLI )
For the sake of this article, I’m going to install the CLI on my windows machine. However, if you would like to install the CLI on an OS of your choice other than windows, please refer to the official documentation from Microsoft regarding the installation of the tool.
为了本文的目的,我将在Windows计算机上安装CLI。 但是,如果要在Windows以外的其他所选操作系统上安装CLI,请参阅Microsoft的官方文档中有关该工具的安装信息。
In order to install the CLI on a Windows machine, navigate to this link and click on Download the MSI Installer. If there’s already an existing version of the CLI installed, it will automatically be updated. So, you do not need to uninstall the previous versions.
为了在Windows计算机上安装CLI,请导航至此链接 ,然后单击“ 下载MSI安装程序” 。 如果已经安装了CLI的现有版本,它将自动更新。 因此,您无需卸载以前的版本。
Figure 1 – Download the CLI
图1 –下载CLI
Once the MSI package is downloaded in your local, follow the necessary steps and install it.
将MSI软件包下载到本地后,请按照必要的步骤进行安装。
Figure 2 – Installing the CLI
图2 –安装CLI
Once the CLI is installed, you can check if the utility has been correctly installed by running the command “az –version“. This command will show the current version of the tool and the other modules that are available to be used by the CLI tool. Note that in the figure below, the installed version of the tool is 2.5.1 which is the latest version at the time of writing this article. The versions are updated quite frequently, so your version might differ from this. Also, notice that there are four sub-modules already available to be used with the CLI tool along with the versions of each of the sub-modules. These sub-modules actually allows us to monitor or play with the various resources in Azure.
一旦安装了CLI,您可以通过运行命令“ az –version ”来检查实用程序是否已正确安装。 该命令将显示该工具的当前版本以及CLI工具可以使用的其他模块。 请注意,在下图中,该工具的安装版本为2.5.1,这是撰写本文时的最新版本。 这些版本经常更新,因此您的版本可能与此不同。 另外,请注意,已经有四个子模块可与CLI工具一起使用,以及每个子模块的版本。 这些子模块实际上允许我们监视或使用Azure中的各种资源。
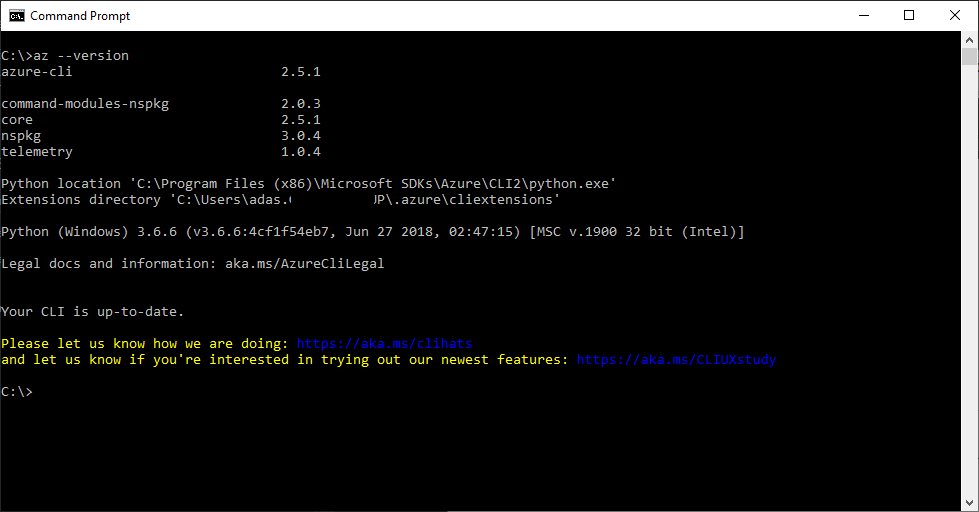
Figure 3 – Checking the CLI version
图3 –检查CLI版本
使用CLI登录到Azure (Login to Azure using the CLI)
Once you have successfully installed the CLI, there’s not much to do until you have logged in and started issuing the commands to the resources. In order to login to your Azure portal, run the command “az login“. You will automatically be redirected to the login page for the Azure portal where you need to provide credentials and Sign In. Once logged in, the browser will notify with the message as shown below.
成功安装CLI后,无需执行任何操作,直到登录并开始向资源发布命令。 为了登录到您的Azure门户,运行命令“ az login ”。 您将自动重定向到Azure门户的登录页面,您需要在其中提供凭据和登录。 登录后,浏览器将显示如下消息。
Figure 4 – Azure Login Successful
图4 – Azure登录成功
You can also verify your logic by returning to the CLI and the Azure login details will be displayed.
您还可以通过返回CLI来验证逻辑,然后将显示Azure登录详细信息。
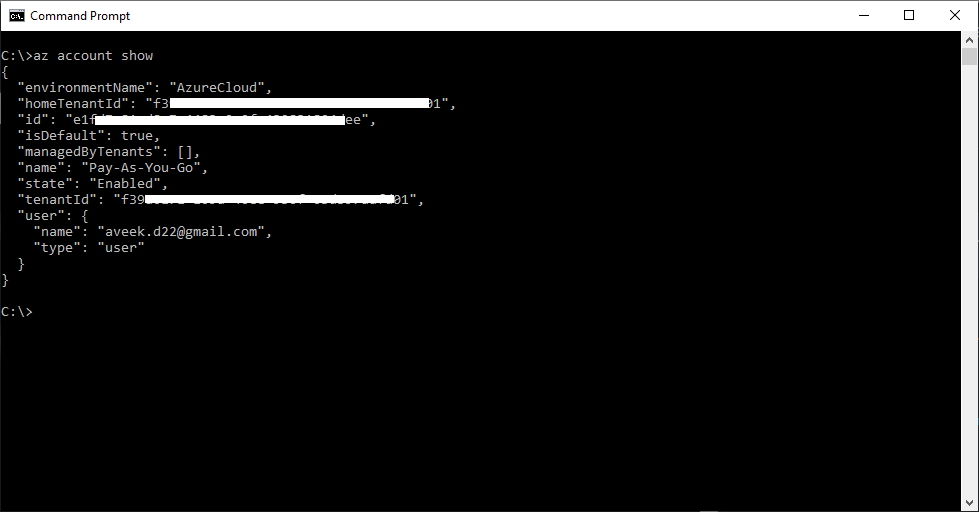
Figure 5 – Azure Login Details
图5 – Azure登录详细信息
As you can see in the figure above, the default subscription with the name “Pay-As-You-Go” is selected and we can access all the resources available within this subscription. Your login can be associated with multiple subscriptions or accounts in Azure. To get details about the selected subscription, run the command “az account show“. This will give you information about the subscription that you are currently logged in to.
如上图所示,已选择名称为“ Pay-As-You-Go ”的默认订阅,我们可以访问该订阅中的所有可用资源。 您的登录名可以与Azure中的多个订阅或帐户关联。 要获取有关所选订阅的详细信息,请运行命令“ az account show ”。 这将为您提供有关当前登录的订阅的信息。
In order to view other subscriptions linked to your login, simply run the command “az account list“. This will show you a list of all the subscriptions linked to your login.
为了查看链接到您的登录名的其他订阅,只需运行命令“ az account list ”。 这将为您显示链接到您的登录名的所有订阅的列表。
And if you want to change the current subscription to another, run the command like this “az account set -s “<SUBSCRIPTION_NAME>““. This will change the selected subscription to the specified in the command. For example, in my case, I can use the command “az account set -s “Pay-As-You-Go”” to set my default subscription.
并且,如果要将当前订阅更改为其他订阅,请运行如下命令:“ az account set -s <SUBSCRIPTION_NAME> ”。 这会将选定的预订更改为命令中指定的预订。 例如,对于我来说,我可以使用命令“ az account set -s“ Pay-As-You-Go” ”来设置默认订阅。
在订阅中获取资源组 (Fetch Resource Groups within the subscription)
Now that we have set our subscription, we can issue commands to view the available resource groups within the subscription. In order to view all the available resource groups, you can run the command “az group list“. This will display a list of all the available resource groups as follows.
现在我们已经设置了订阅,我们可以发出命令以查看订阅中的可用资源组。 为了查看所有可用资源组,您可以运行命令“ az group list ”。 这将显示所有可用资源组的列表,如下所示。
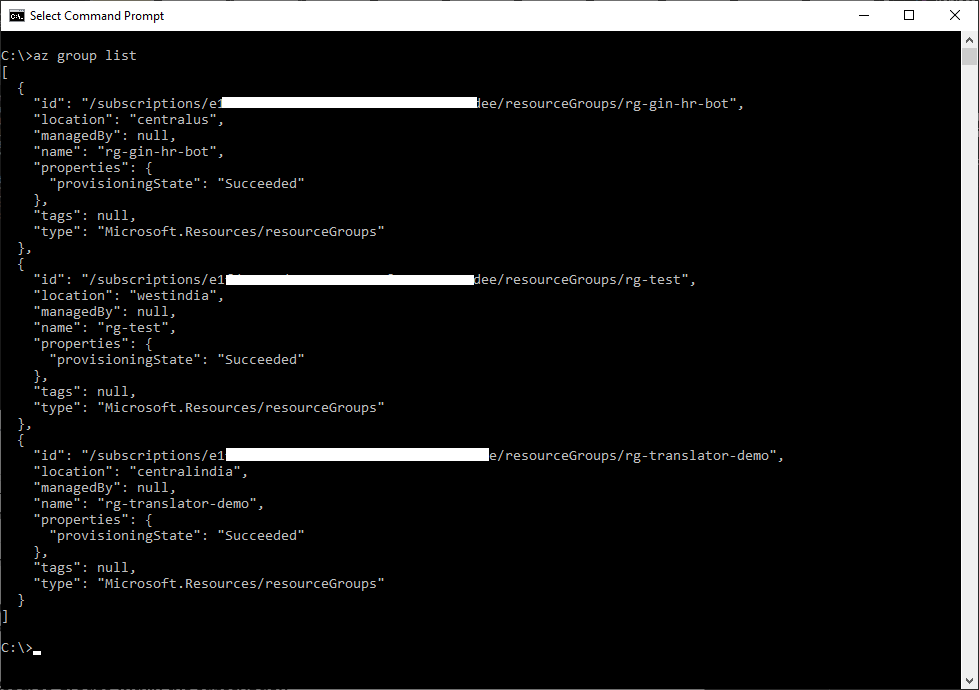
Figure 6 – Azure Resource Groups
图6 – Azure资源组
As you can see in the figure above, all the resource groups are visible. By default, the result is always displayed in the JSON format. However, if you want you can also fetch the result in a tabular format by adding the parameters “-o table“. The complete command will be “az group list -o table“.
如您在上图中所看到的,所有资源组都是可见的。 默认情况下,结果始终以JSON格式显示。 但是,如果您愿意,也可以通过添加参数“ -o table ”以表格格式获取结果。 完整的命令将是“ az group list -o table ”。
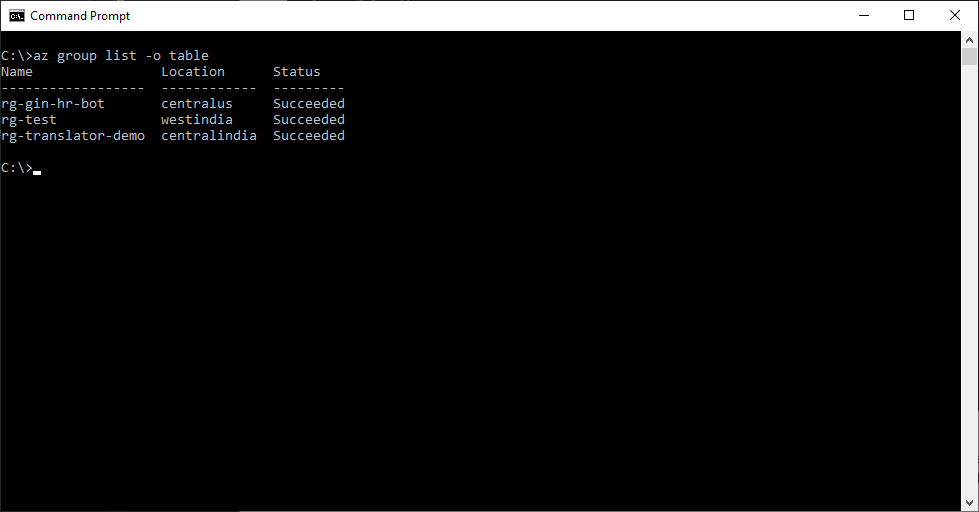
Figure 7 – Azure Resource Groups in Tabular Format
图7 –表格格式的Azure资源组
使用Azure Cloud Shell (Using the Azure Cloud Shell)
Another method of using the Azure CLI is by using the cloud shell component which can be accessed after logging in to the Azure portal. Once you are logged in to Azure, click on the command button available on the top of the portal.
使用Azure CLI的另一种方法是使用云外壳组件,该组件可在登录Azure门户后访问。 登录到Azure后,单击门户顶部的命令按钮。
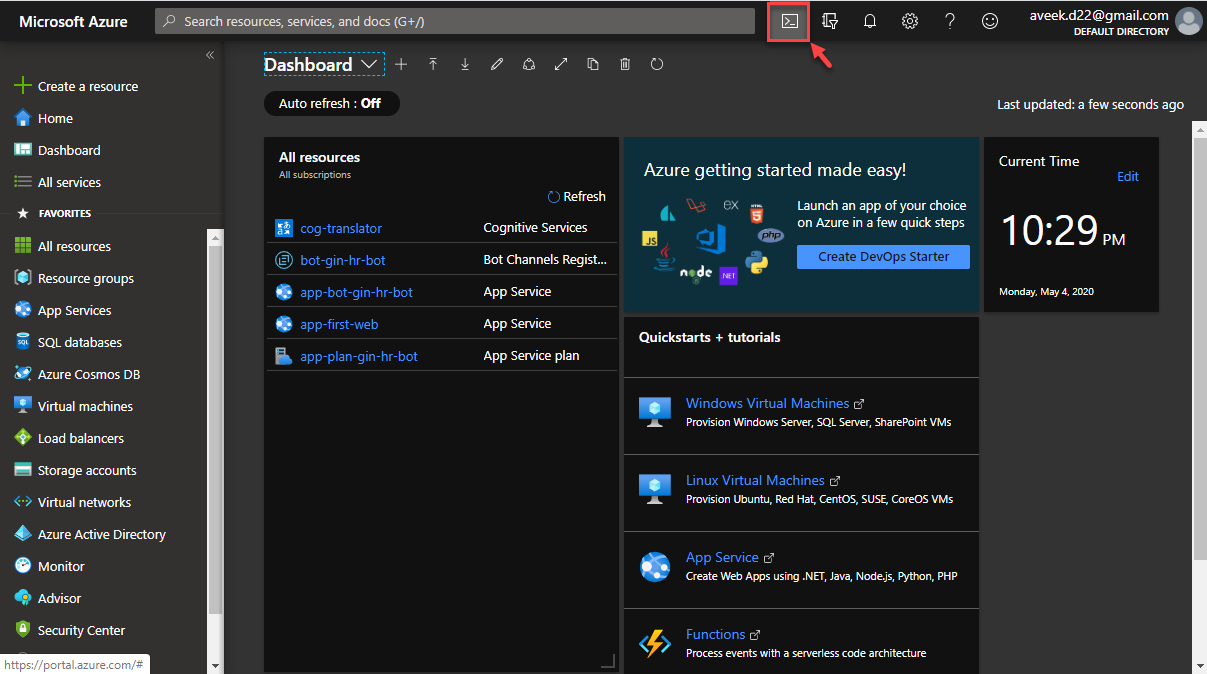
Figure 8 – Azure Cloud Shell
图8 – Azure云外壳
A new popup window appears at the bottom of the portal where you will be provided with two options to start with the cloud shell – Bash and PowerShell. For the sake of this article, I’m going ahead with the PowerShell. You can also choose to continue with the Bash option.
一个新的弹出窗口将出现在门户的底部,您将在其中获得两个从云外壳开始的选项-Bash和PowerShell 。 就本文而言,我将继续使用PowerShell 。 您也可以选择继续使用Bash选项。
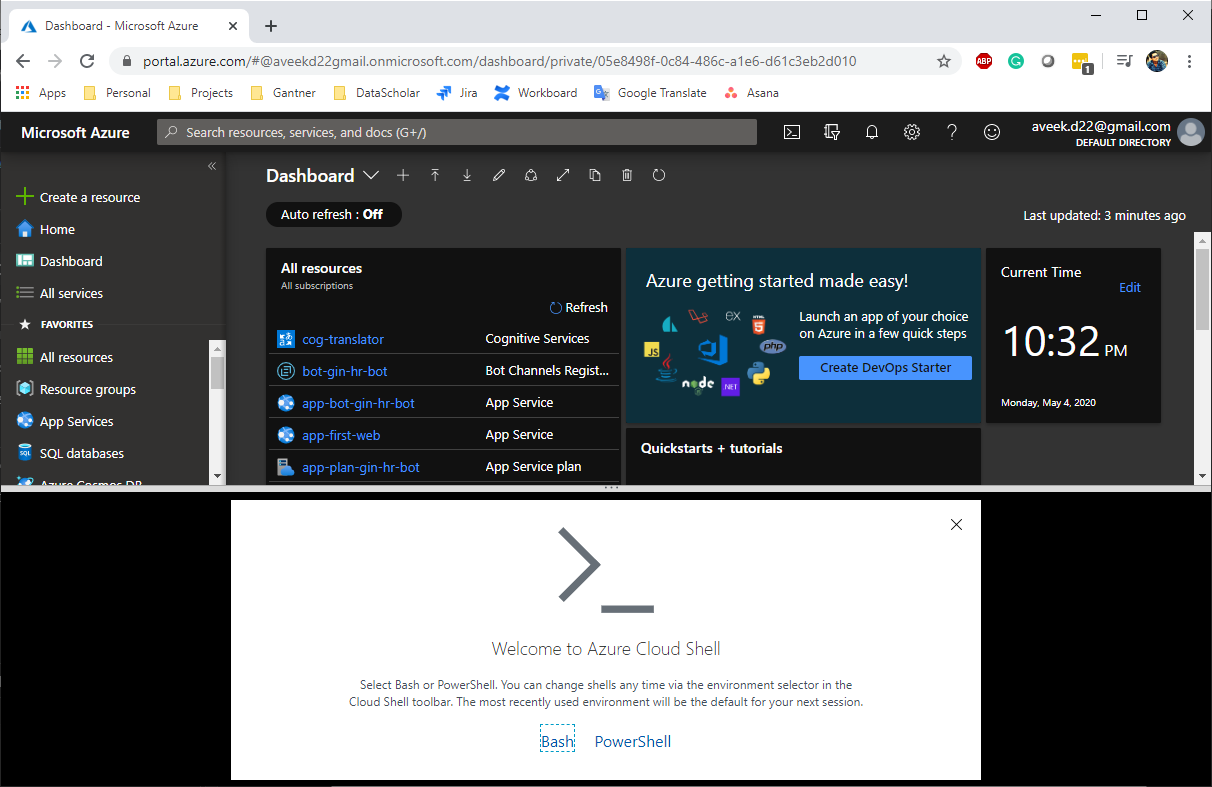
Figure 9 – Select PowerShell
图9 –选择PowerShell
Once you click on the PowerShell, the next step will be to select the Subscription to proceed ahead. We need to create a simple Storage Account here in order to store the cloud shell scripts to be stored and executed. Go ahead and click on Create Storage. It might take some time to create the necessary storage requirements.
单击PowerShell后,下一步将是选择Subscription以继续进行。 我们需要在此处创建一个简单的存储帐户,以便存储要存储和执行的云外壳脚本。 继续并单击“ 创建存储” 。 创建必要的存储要求可能需要一些时间。
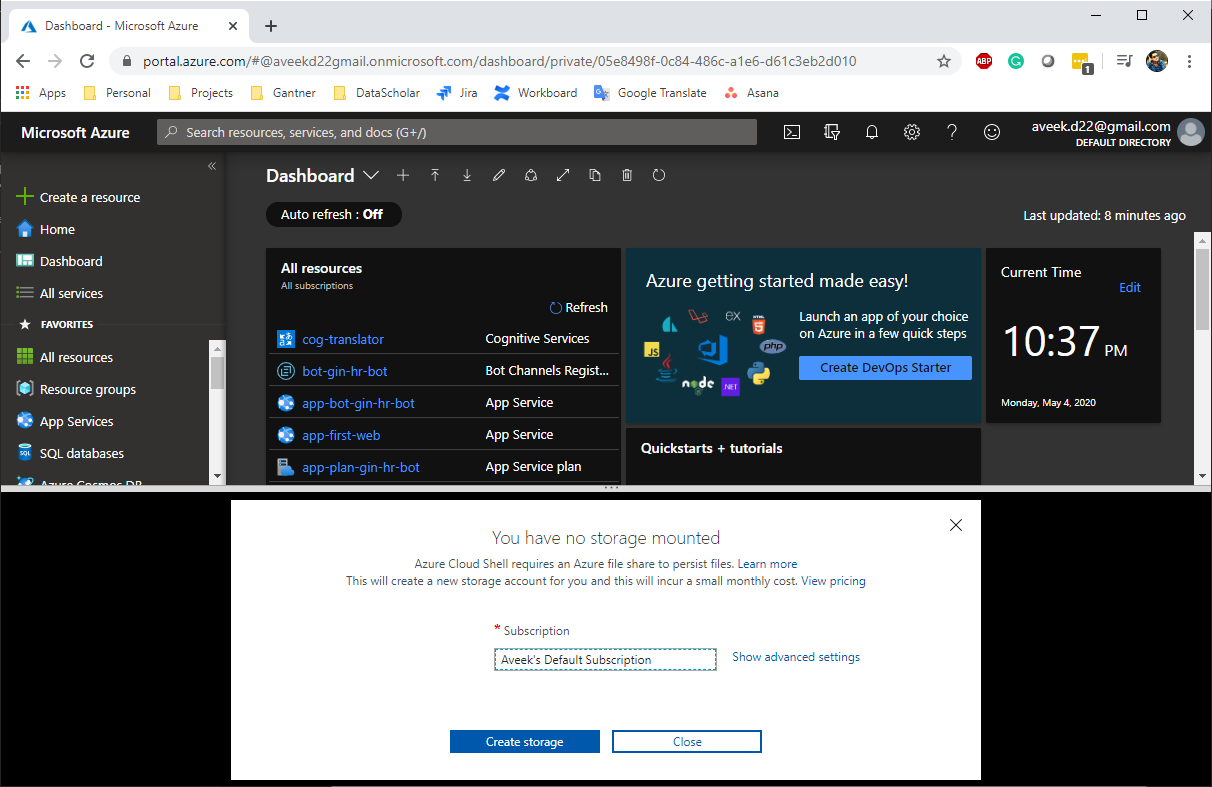
Figure 10 – Create Storage Account
图10 –创建存储帐户
Once the Storage Account is created, the shell will start automatically, and you can run the Azure CLI commands as usual.
创建存储帐户后,外壳程序将自动启动,您可以照常运行Azure CLI命令。
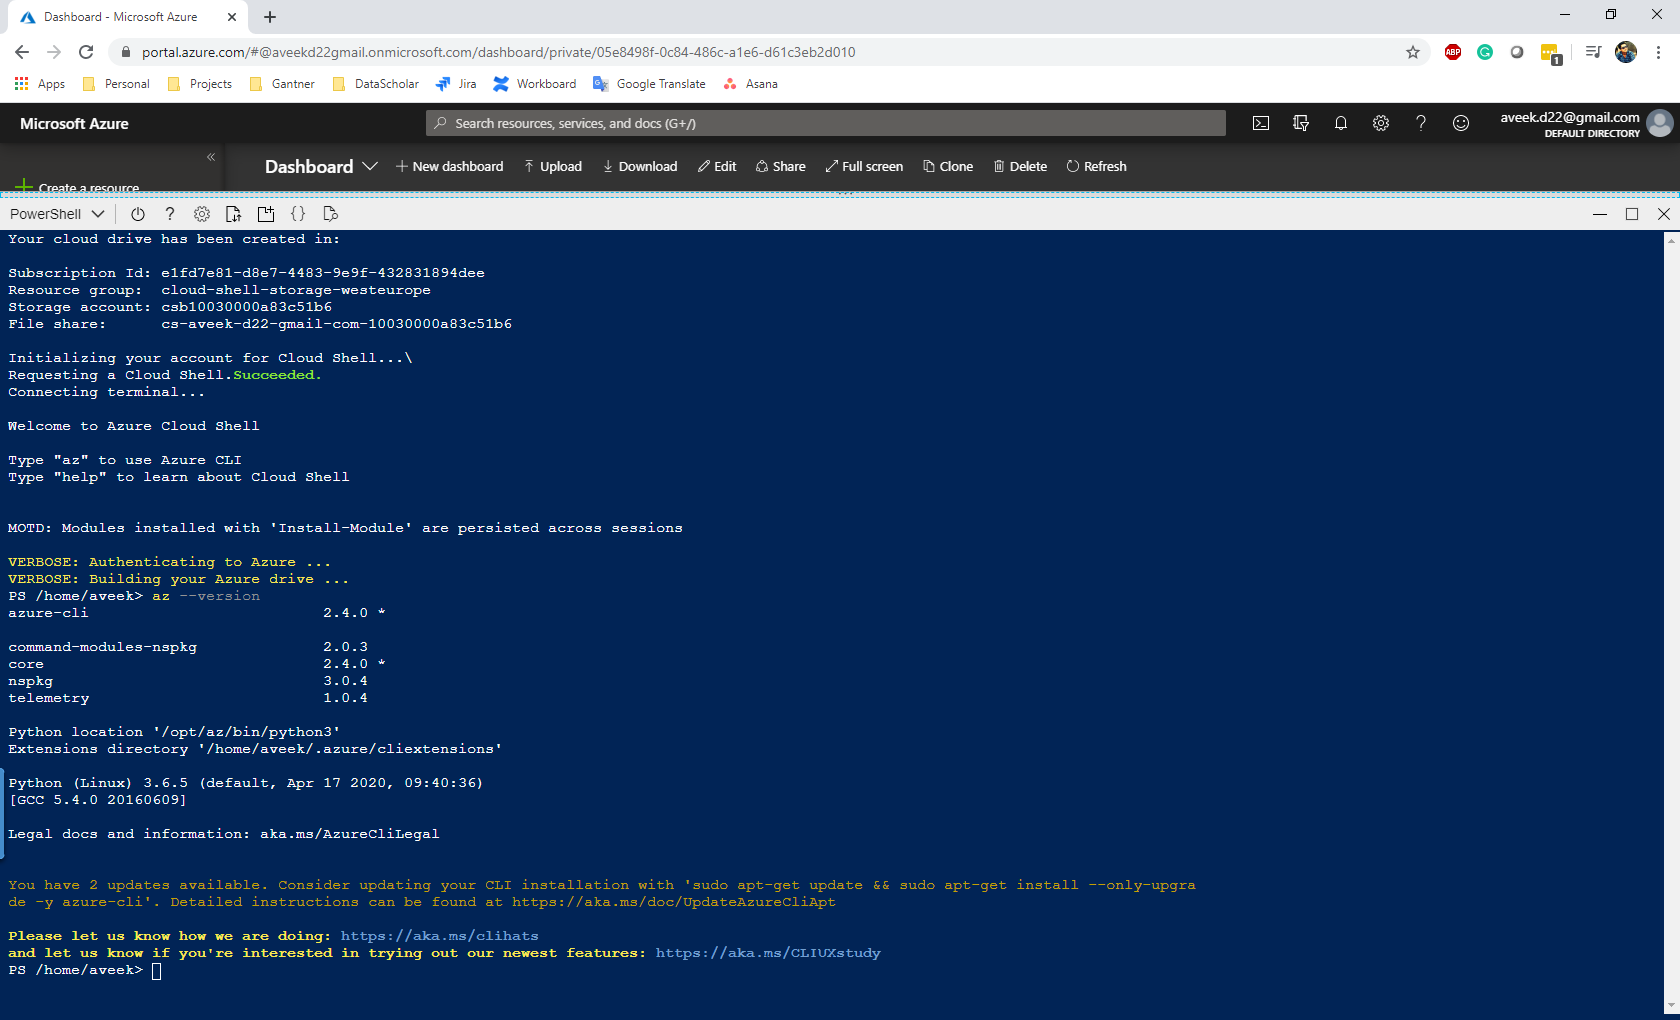
Figure 11 – Azure CLI in Cloud Shell
图11 – Cloud Shell中的Azure CLI
结论 (Conclusion)
In this article, we have discussed in detail what Azure CLI is and how to install the CLI in the local environment. We can also use Azure CLI from the Azure web portal directly, but the former is helpful while communicating with the Azure portal via the windows command line while the latter can be used to experience the same in the browser. In my next articles, I am going to explain more on how to create and manage resources in the Azure portal using the CLI.
在本文中,我们详细讨论了什么是Azure CLI以及如何在本地环境中安装CLI。 我们也可以直接从Azure Web门户使用Azure CLI,但是前者在通过Windows命令行与Azure门户进行通信时非常有用,而后者可用于在浏览器中体验相同的体验。 在我的下一篇文章中,我将进一步解释如何使用CLI在Azure门户中创建和管理资源。
翻译自: https://www.sqlshack.com/getting-started-with-azure-cli-2-0/
azure3.0


 6728
6728


 被折叠的 条评论
为什么被折叠?
被折叠的 条评论
为什么被折叠?
 到【灌水乐园】发言


