


多实例kerberos
介绍 (Introduction)
Intended audience
目标听众
This document is intended for application developers, database administrators and system administrator who plan to create linked servers between instances of Microsoft SQL Server using Windows Authentication.
本文档适用于计划使用Windows身份验证在Microsoft SQL Server实例之间创建链接服务器的应用程序开发人员,数据库管理员和系统管理员。
Context
语境
Let’s say we have two separate SQL Server boxes and their service account are Active Directory accounts. We will refer to one of these boxes as instance A and instance B. Assuming we are willing to be able to be connected on instance A and run a T-SQL query which uses data from instance B without explicitly opening two connections in an application.
假设我们有两个单独SQL Server框,它们的服务帐户是Active Directory帐户。 我们将这些框之一称为实例A和实例B。假设我们愿意能够连接到实例A并运行T-SQL查询,该查询使用实例B中的数据,而无需在应用程序中显式打开两个连接。
This is exactly the purpose of Linked Server objects! Most of the time, such an object is created using credentials, but it’s not the only way to do it. As we will discuss in one of following sections, there are four authentication options when we create a Linked Server object. One of them is the “identity forwarding”, which means that the identity of an authenticated user U1 connected to an instance A is used by this instance A in order to connect to an instance B and create a link between instances A and B as U1.
这正是链接服务器对象的目的! 大多数情况下,使用凭据创建此类对象,但这并不是唯一的方式。 正如我们将在以下部分之一中讨论的那样,当我们创建链接服务器对象时,有四个身份验证选项。 其中之一是“身份转发”,这意味着该实例A使用了连接到实例A的经过身份验证的用户U1的身份,以便连接到实例B并在实例A和实例B之间创建一个链接(作为U1) 。
The explanation above is summarized below:
上面的解释总结如下:
If SQL Server authentication is used for U1 on instance A, it means that a SQL Login U1 must be created on Instance B, with the exact same password.
如果将SQL Server身份验证用于实例A上的U1,则意味着必须使用完全相同的密码在实例B上创建SQL登录U1。
If Windows authentication is used, it’s not so straight forward: there are a few configuration tasks to be performed and we will discuss them in following sections.
如果使用Windows身份验证,则不是那么简单:有一些配置任务要执行,我们将在以下各节中讨论它们。
In this article, we will first review the different steps to follow in order to create a linked server to another SQL Server instance using SQL Server Management Studio. We will then test the linked server connection using the “identity forwarding” settings and see the error message that should come up. After that, we will use a tool that will help us in the configuration of such a linked server object.
在本文中,我们将首先回顾要执行的不同步骤,以便使用SQL Server Management Studio创建到另一个SQL Server实例的链接服务器。 然后,我们将使用“身份转发”设置测试链接服务器的连接,并查看错误消息。 之后,我们将使用一个工具来帮助我们配置这样的链接服务器对象。
使用SSMS创建链接服务器 (Creating a linked server using SSMS)
First, open SQL Server Management Studio and connect to the instance of your choice. Then, go down to “Server Objects” and right-click on “Linked Server” node.
首先,打开SQL Server Management Studio并连接到您选择的实例。 然后,转到“服务器对象”,然后右键单击“链接服务器”节点。
A contextual menu should appear. Click on “New Linked Server…”.
将会出现一个上下文菜单。 单击“新链接的服务器…”。
This will open the Linked Server Creation Dialog:
这将打开“链接服务器创建”对话框:
Here you have two options:
在这里,您有两个选择:
- Select “SQL Server” as Server Type and provide a network name for the target SQL Server instance 选择“ SQL Server”作为服务器类型,并为目标SQL Server实例提供一个网络名称
- Provide the name you want for the Linked Server object and specify a network name for target SQL Server instance in Data source text box. 提供所需的链接服务器对象名称,并在“数据源”文本框中为目标SQL Server实例指定网络名称。
No matter the option you chose, go to the Security Page of the dialog.
无论您选择哪种选项,都请转到对话框的“安全性”页面。
This dialog is divided into two parts. The first one is a list of local to remote logins mapping. The second part tells to SQL Server how to use the first part:
此对话框分为两个部分。 第一个是本地到远程登录映射的列表。 第二部分告诉SQL Server如何使用第一部分:
- The first option can be summarized as: if a local login attempts to use the linked server and it’s not kind of whitelisted in the first part, then this local login cannot use the linked server. 第一个选项可以总结为:如果本地登录尝试使用链接服务器,并且在第一部分中没有将其列入白名单,则此本地登录无法使用链接服务器。
- The second option tells SQL Server to connect anonymously to target SQL Server instance for logins that are not listed in first part of the dialog. 第二个选项告诉SQL Server匿名连接到目标SQL Server实例,以进行对话框第一部分中未列出的登录。
- The third option tells SQL Server to use the security context of the authenticated login to contact remote instance. It’s the one we will use for the aim of this article. 第三个选项告诉SQL Server使用经过身份验证的登录名的安全上下文来联系远程实例。 这是我们将用于本文目的的一种。
- The last (and less secure) option is to define credentials for any login that is not listed in the local to remote mapping list. 最后一个(安全性较低)选项是为未在本地到远程映射列表中列出的任何登录定义凭据。
So, for next step, we will let the first part of the dialog empty and select the third option.
因此,对于下一步,我们将对话框的第一部分留空,然后选择第三个选项。
If we hit the “OK” button, we may get following error message:
如果我们点击“确定”按钮,我们可能会收到以下错误消息:
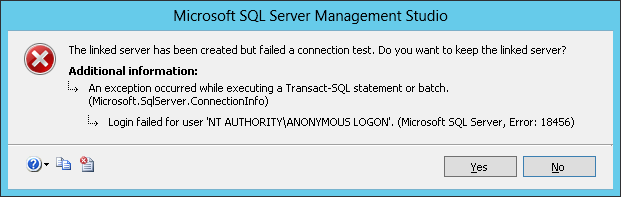
The “Login failed for user NT AUTHORITY\ANONYMOUS LOGON” is a pretty common error message and you can find a lot of requests for help on the internet. Unfortunately, during my researches, I did not find a single thread with the whole solution to my problem. That’s also the reason why I wrote this article.
“ 用户NT AUTHORITY \ ANONYMOUS LOGON的登录失败 ”是一个非常常见的错误消息,您可以在Internet上找到很多帮助请求。 不幸的是,在研究期间,我没有找到解决问题的整体方法的单个线程。 这也是我写这篇文章的原因。
Now, let’s try to get it working!
现在,让我们尝试使其正常运行!
There are mainly two configuration issues: the first one is the Server Principal Name and the second one is the Identity Delegation permission. There is a tool that will check these two aspects and it’s the subject of next section.
主要有两个配置问题:第一个是服务器主体名称,第二个是身份委托权限。 有一个工具可以检查这两个方面,这是下一部分的主题。
有用的工具:SQL Server的Kerberos配置管理器(KCM) (Useful tool: Kerberos Configuration Manager for SQL Server (KCM))
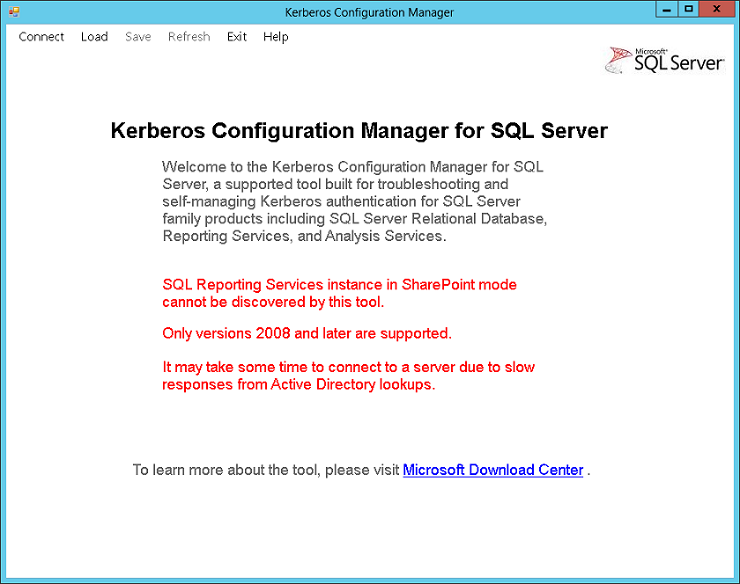
Kerberos Configuration Manager for SQL Server is a tool designed by Microsoft and available under the following link.
用于SQL Server的Kerberos配置管理器是由Microsoft设计的工具,可通过以下链接获得 。
Installation
安装
Once you downloaded tool installer, run it and you will get following dialog:
下载工具安装程序后,运行它,您将获得以下对话框:
Click on “Next” button.
点击“下一步”按钮。
Set the installation location, if you want one that is different from default. Then, click on “Next” button.
如果您想要的安装位置与默认设置不同,请设置安装位置。 然后,单击“下一步”按钮。

You’ll get on a confirmation panel. Click on “Next” button.
您将进入确认面板。 点击“下一步”按钮。
Then, a license agreement appears. Accept it and click on “Next” button.
然后,出现许可协议。 接受它,然后单击“下一步”按钮。
And the installer begins and completes very fastly. The only step that remains is to click on “Close” button.
然后安装程序开始并非常快速地完成。 剩下的唯一步骤是单击“关闭”按钮。
使用KCM解决链接服务器的连接问题 (Solving linked server connectivity issue with KCM)
By default, the KCM tool is located in the folder:
默认情况下,KCM工具位于以下文件夹中:
C:\Program Files\Microsoft\Kerberos Configuration Manager for SQL Server
C:\ Program Files \ Microsoft \ Kerberos配置管理器SQL Server
There are three files in this folder:
此文件夹中有三个文件:
Double-click on KerberosConfigMgr.exe.
双击KerberosConfigMgr.exe。
Here is the default view for Kerberos Configuration Manager tool:
这是Kerberos Configuration Manager工具的默认视图:
Click on “Connect” menu. It will open following dialog:
点击“连接”菜单。 它将打开以下对话框:
Specify the information required to connect and click on “Connect” button.
指定连接所需的信息,然后单击“连接”按钮。
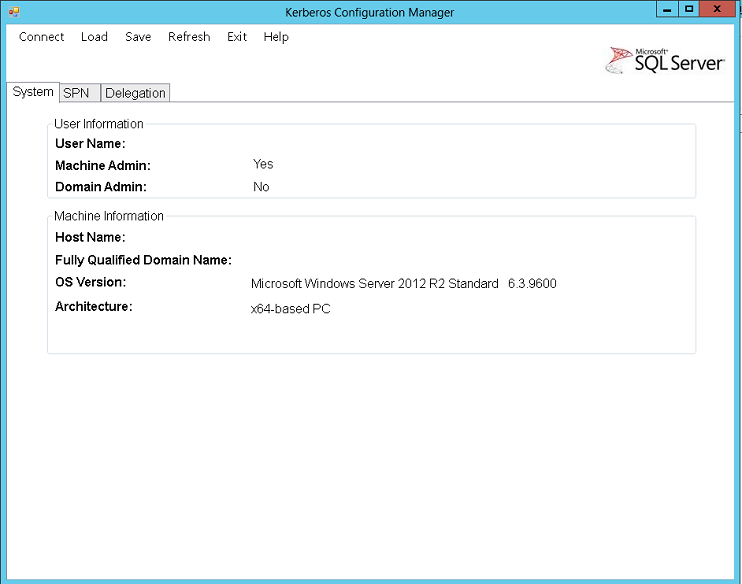
As soon as we click on the “Connect” button, the tool will start collecting data using WMI providers and when its collection completes, we get a summary view, which starts by a server and user summary:
一旦单击“连接”按钮,该工具将开始使用WMI提供程序收集数据,并且在其收集完成后,我们将获得摘要视图,该视图由服务器和用户摘要开始:
Then, there are the two tabs of interest for our problem: SPN (for Server Principal Name) and delegation. Let’s first have a look at SPN tab.
然后,对于我们的问题,有两个有趣的选项卡:SPN(用于服务器主体名称)和委托。 首先让我们看一下SPN标签。

As you can see in the image above, I can see directly that the required Server Principal Names are missing. But you can also see that there are two possibilities for us: either generate the script for fixing the problem or actually fix it.
如上图所示,我可以直接看到缺少所需的服务器主体名称。 但是您也可以看到我们有两种可能性:生成用于解决问题的脚本或实际解决问题。
Here is the content of a generated script:
这是生成的脚本的内容:
 @echo off
/* Some comments */
echo Changing SPN configuration may affect other services running on the same machine. By selecting to continue, the following action(s) will be performed:
echo.
echo 	Add SPN "MSSQLSvc/TestServer" to account "AD\SQL_SVC_ACCOUNT"


echo.
echo It may take several minutes for the updated SPN information to be visible to all servers in the domain. For more information, go to http://go.microsoft.com/fwlink/?LinkID=316972 .
echo.

:Prompt
set /p answer=Are you sure you want to continue? (Y/N):

if %answer% == Y goto Yes
if %answer% == y goto Yes
if %answer% == N goto No
if %answer% == n goto No

cls
echo Unknown input
goto Prompt

:No
exit

:Yes

SetSPN -s "MSSQLSvc/TestServer" "AD\SQL_SVC_ACCOUNT"

set /p answer=Press any key to continue...
@echo on
It’s very handy in big organizations because you can provide those scripts to your system/domain administrators and ask him to run it.
在大型组织中,这非常方便,因为您可以将这些脚本提供给系统/域管理员,并请他来运行它。
The last tab in the tab pane is “Delegation”. In short, for Kerberos authentication and some other authentication protocols, the SQL Server service account should be trusted and allowed to act on behalf of another user (which is the already authenticated user in our case).
选项卡窗格中的最后一个选项卡是“委派”。 简而言之,对于Kerberos身份验证和某些其他身份验证协议,应该信任SQL Server服务帐户,并允许该帐户代表另一个用户(在我们的情况下为已身份验证的用户)操作。
Personally and as an example, I got following results, saying that no delegation is not configured.
就个人而言,作为一个例子,我得到以下结果,说没有配置任何委托。

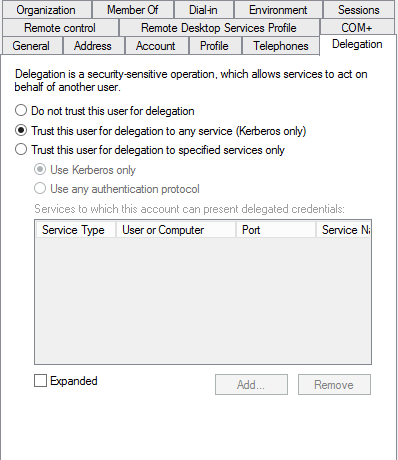
To resolve this, we will need to connect to the Active Directory management console, find the AD user corresponding to the SQL Server service account for the instance from which connection will be established. Once you got it, open its properties.
若要解决此问题,我们将需要连接到Active Directory管理控制台,为要从中建立连接的实例找到与SQL Server服务帐户相对应的AD用户。 一旦获得它,请打开它的属性。
There is a “Delegation tab” and you can either choose to trust the account no matter the service or to trust the user for a list of specified services, as you can see below:
有一个“委派”选项卡,您可以选择信任该帐户而不管该服务是什么,也可以选择信任用户以获得指定服务的列表,如下所示:
Note
注意
- Always prefer security by default, so you should select “Trust this user for delegation to specified services only” and add the SQL Server service account. 默认情况下,始终首选安全性,因此您应选择“信任此用户仅委派给指定的服务”,然后添加SQL Server服务帐户。
- This part could be done by a system/domain administrator instead of a DBA. 这部分可以由系统/域管理员而不是DBA完成。
If your Active Directory is composed of multiple nodes, it will take a while to replicate this setting. The easier way to check is to restart SQL Server.
如果您的Active Directory由多个节点组成,则将花费一些时间来复制此设置。 更简单的检查方法是重新启动SQL Server。
As soon as our settings are done for delegation and for SPN, we should rerun KCM tool and find this as a result for SPN:
在完成委派和SPN的设置后,我们应该重新运行KCM工具并找到SPN的结果:
And delegation tab should be showing something else than “None”.
并且“委派”选项卡应该显示“ None”以外的其他内容。
If everything has been done correctly, we should now be able to right-click on the linked server we created and test connection:
如果一切都正确完成,我们现在应该能够右键单击我们创建的链接服务器并测试连接:
And we should get:
我们应该得到:
参考资料 (References)
- Social Technet – Linked Server: The old “Login failed for users “NT Authority\Anonymous Logon” issue 社交Technet –链接服务器:旧的“用户登录失败” NT Authority \ Anonymous Logon”问题
- How to easily Check your SPN and Delegation settings for SQL Server in an Active Directory environment 如何在Active Directory环境中轻松检查SQL Server的SPN和委派设置
- Using Kerberos Configuration Manager to resolve Microsoft SQL Server SPN issues 使用Kerberos配置管理器解决Microsoft SQL Server SPN问题
- Demystify Kerberos usage: How-to for SQL Server 揭秘Kerberos用法:SQL Server的方法
- Understanding Kerberos Double Hop 了解Kerberos Double Hop
- Register a Service Principal Name for Kerberos Connections 注册Kerberos连接的服务主体名称
- New tool: “Microsoft Kerberos Configuration Manager for SQL Server” is ready to resolve your Kerberos/Connectivity issues 新工具:“用于SQL Server的Microsoft Kerberos配置管理器”可以解决您的Kerberos /连接问题
- SQLServerCentral: Create linked Server using the login current security context (Active Directory) SQLServerCentral:使用登录当前的安全上下文(Active Directory)创建链接的服务器
翻译自: https://www.sqlshack.com/how-to-link-two-sql-server-instances-with-kerberos/
多实例kerberos


 2355
2355

 被折叠的 条评论
为什么被折叠?
被折叠的 条评论
为什么被折叠?
 到【灌水乐园】发言


