


初始配置 (Initial configuration)
We have been exploring the SQL Server FILESTREAM feature in this ongoing series of articles. In this previous article, Managing data with SQL Server FILESTREAM tables, we wrote about inserting FILESTREAM data into a FILESTREAM table and performing DML activities on it. Suppose we have created the FILESTREAM database in our instance and now we want to insert a large number of files into a FILESTREAM container. It is easy to write out the insert queries for a small number of files, but if the numbers of files were in huge quantity, it would be difficult to write out the code and insert data into it. It is difficult to manage such kind of requests regularly in the environment.
在此系列文章中,我们一直在探索SQL Server FILESTREAM功能。 在上一篇文章“ 使用SQL Server FILESTREAM表管理数据”中 ,我们写了关于将FILESTREAM数据插入FILESTREAM表并在其上执行DML活动的文章。 假设我们在实例中创建了FILESTREAM数据库,现在我们想在FILESTREAM容器中插入大量文件。 写出少量文件的插入查询很容易,但是如果文件数量很多,则很难写出代码并将数据插入其中。 很难在环境中定期管理此类请求。
Therefore, in this article, we are going to explore how to insert into FILESTREAM table if there are N number of files to be inserted. We do not want manual efforts here, therefore; we will complete the task using an SSIS package.
因此,在本文中,我们将探讨如果要插入N个文件,则如何插入FILESTREAM表。 因此,我们不想在这里进行人工操作; 我们将使用SSIS包完成任务。
Before we start this article, below are the pre-requisites.
在开始本文之前,下面是先决条件。
- FILESTREAM in SQL Server SQL Server中的FILESTREAM
- Managing data with SQL Server FILESTREAM tables to enable FILESTREAM feature, configure access level and create FIELSTREAM database along with the dedicated filegroup FILESTREAM 使用SQL Server FILESTREAM表管理数据来启用FILESTREAM功能,配置访问级别并创建FIELSTREAM数据库以及专用文件组FILESTREAM
You can download the set up from the Download and install SQL Server Data Tools (SSDT) for Visual Studio. You need to have an active internet connection to download and install it. You can do offline installations as well, however; it would be easy to install with the active internet connections. During the installation, select the option ‘SQL Server Integration Services’ which we will use for the SSIS package.
您可以从“ 下载并安装Visual StudioSQL Server数据工具(SSDT) ”中 下载 设置 。 您需要具有活动的Internet连接才能下载并安装它。 但是,您也可以进行脱机安装。 使用活动的Internet连接将很容易安装。 在安装过程中,选择选项“ SQL Server Integration Services”,该选项将用于SSIS包。
Now let us assume we want to insert the objects present in our folder ‘C:\Chesington’. As shown below we have 324 files in this folder having total size 1.15 GB. We do not want to spend time on writing the t-SQL for these 324 files individually. We can use SSDT Integration service package to do this work for us.
现在让我们假设我们要插入文件夹“ C:\ Chesington”中存在的对象。 如下所示,我们在此文件夹中有324个文件,总大小为1.15 GB。 我们不想花时间在为这324个文件分别编写t-SQL上。 我们可以使用SSDT Integration服务包为我们完成这项工作。
First, create the FILESTREAM table in our SQL Server FILESTREAM enabled instance and database.
首先,在启用了SQL Server FILESTREAM的实例和数据库中创建FILESTREAM表。
Create Table Tbl_Insert_Bulk_Objects
(
    Object_ID UNIQUEIDENTIFIER ROWGUIDCOL NOT NULL UNIQUE,
    ObjName varchar(1000),
     [Object] varbinary (max) FILESTREAM ,
)
Go
If we want to insert the records into this FILESTREAM table, we need the complete file name(path\file.extn) of the object. For example, in the article Managing data with SQL Server FILESTREAM tables, we used the below query to insert the record into this FILESTREAM table.
如果要将记录插入此FILESTREAM表,则需要该对象的完整文件名(path \ file.extn)。 例如,在文章“ 使用SQL Server FILESTREAM表管理数据”中 ,我们使用以下查询将记录插入到此FILESTREAM表中。
DECLARE @File varbinary(MAX);
SELECT
@File = CAST(
bulkcolumn as varbinary(max)
)
FROM
OPENROWSET(BULK 'C:\sqlshack\akshita.png', SINGLE_BLOB) as MyData;

INSERT INTO DemoFileStreamTable_1
VALUES
(
NEWID(),
'Sample Picture',
@File
)
In this query, you can see the highlighted portion as complete path of the file. In the current scenario, we want to insert 324 objects, we need to have the complete path of each object. We will use SSIS to capture these file names and insert into ‘TBL_FileList’ table.
在此查询中,您可以看到突出显示的部分是文件的完整路径。 在当前情况下,我们要插入324个对象,我们需要具有每个对象的完整路径。 我们将使用SSIS捕获这些文件名并将其插入“ TBL_FileList”表中。
Create Table Tbl_Filelist
(
    Object_ID UNIQUEIDENTIFIER ROWGUIDCOL NOT NULL UNIQUE,
    ObjName varchar(1000),
 )
Go
Let us create the SSIS package now to perform this bulk insert on SQL Server FILESTREAM table. Launch the Visual Studio 2017 (SSDT) from the start menu.
现在让我们创建SSIS包以对SQL Server FILESTREAM表执行此批量插入。 从开始菜单启动Visual Studio 2017(SSDT)。
In the start page, click on File -> New -> Project
在开始页面中,单击文件->新建->项目
If you run the Visual Studio 2017 (SSDT) for the first time, make sure you select the layout Business intelligence. In the Business Intelligence, click on the Integration Service Project and provide the project name, location for this project.
如果您是第一次运行Visual Studio 2017(SSDT),请确保选择布局Business Intelligence。 在商业智能中,单击Integration Service项目,然后提供项目名称,该项目的位置。
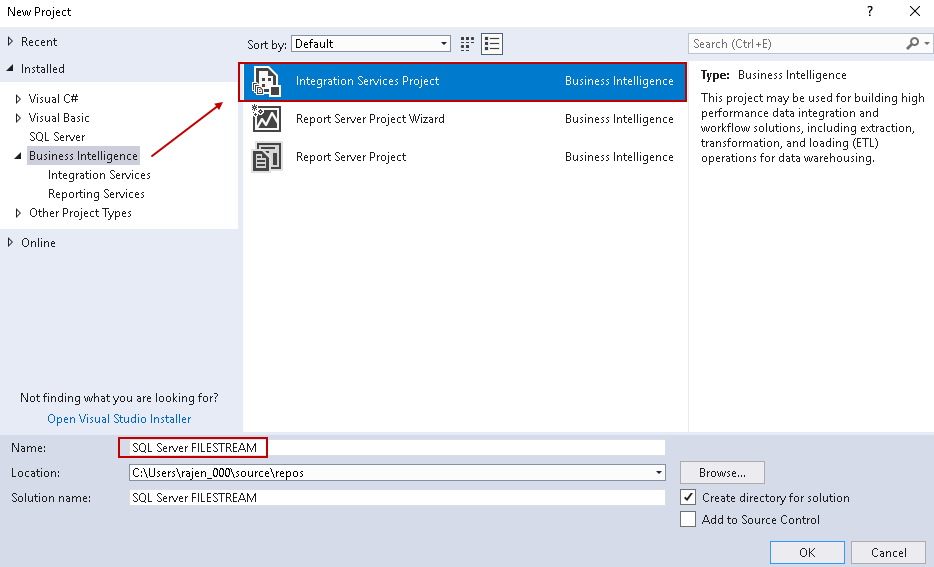
SSDT will create a directory for this solution inside the location. In the Solution Explorer, Right-click on the package and rename it as per your choice.
SSDT将在该位置内部为此解决方案创建一个目录。 在解决方案资源管理器中,右键单击该程序包,然后根据您的选择将其重命名。
I renamed this to ‘FILESTREAM.dtsx.’
我将其重命名为“ FILESTREAM.dtsx”。
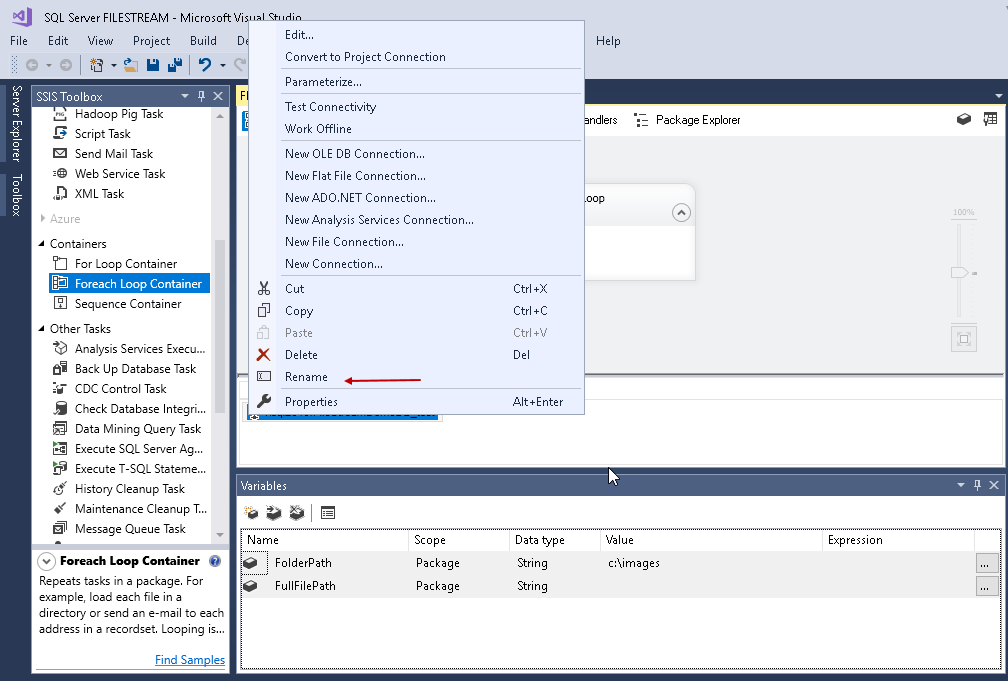
- For Each Loop container to capture the file names: We can use the ForEach Loop container to repeat the control flow task ‘N’ number of times. It is similar to a for loop we have used in the programming languages. We are going to use this container to loop through the source files and retrieve the file names. Drag the ‘Foreach loop Container’ i the Control flow area. 对于每个循环容器以捕获文件名:我们可以使用ForEach循环容器重复执行控制流任务“ N”次。 它类似于我们在编程语言中使用过的for循环。 我们将使用此容器遍历源文件并检索文件名。 将“ Foreach循环容器”拖到“控制”流区域中。
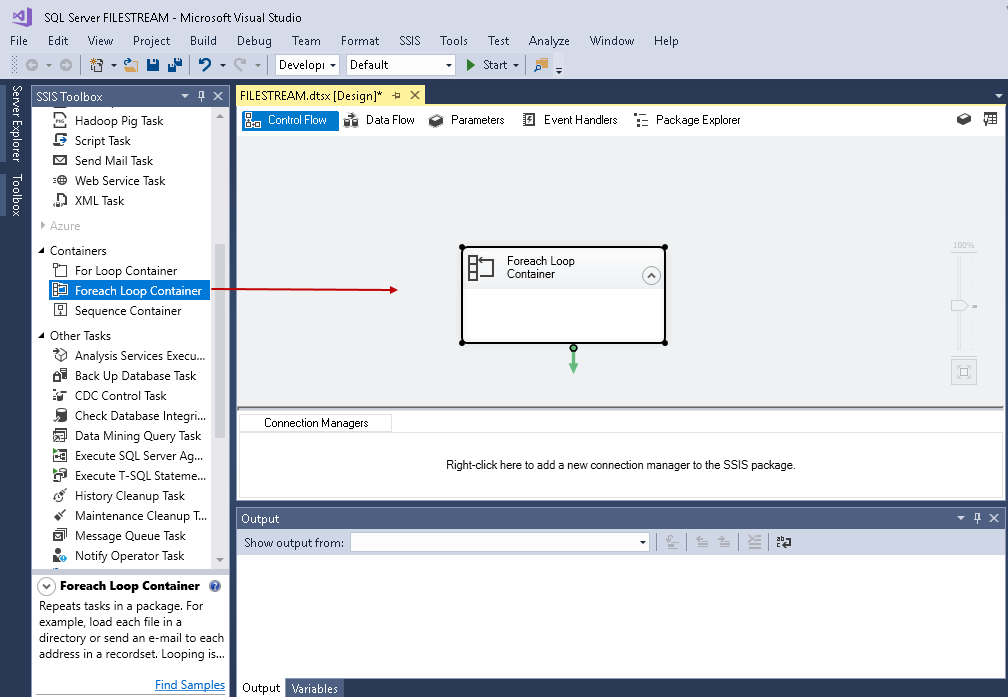
Right click on the blank area in the control flow and click on Variables. It opens the ‘Variables’ window as shown here.
右键单击控制流中的空白区域,然后单击变量。 它将打开“变量”窗口,如下所示。
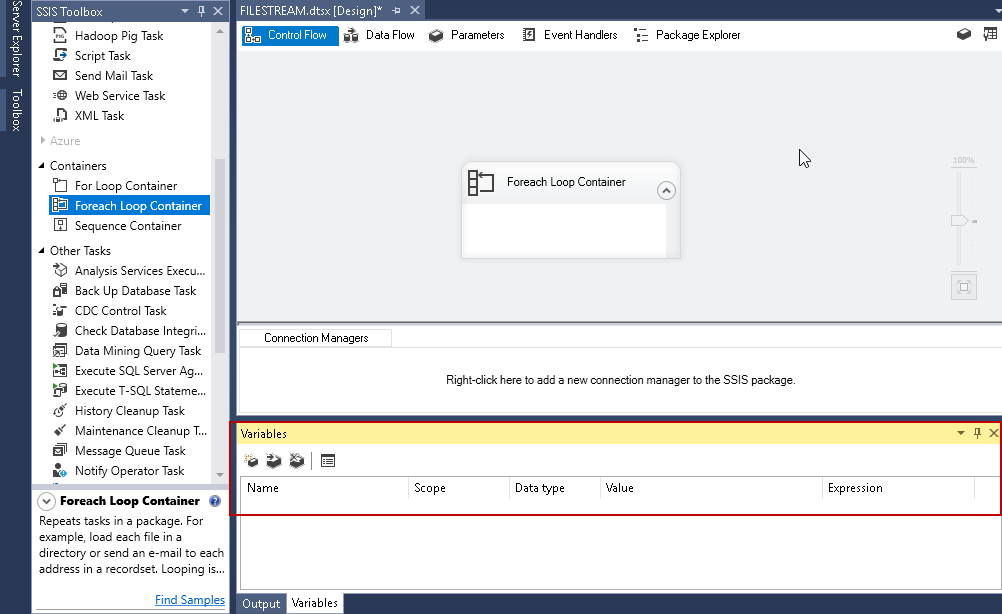
Click on ‘Add Variable’ to add the variable to this SSIS package.
单击“添加变量”以将变量添加到此SSIS包中。
We are going to define two variables here.
我们将在这里定义两个变量。
- FolderPath: In this variable, we will pass the folder path where we have the files to import into SQL Server FILESTREAM table FolderPath:在此变量中,我们将传递文件导入到SQL Server FILESTREAM表中的文件夹路径
- FullFilePath: This variable will capture the full object path FullFilePath:此变量将捕获完整的对象路径
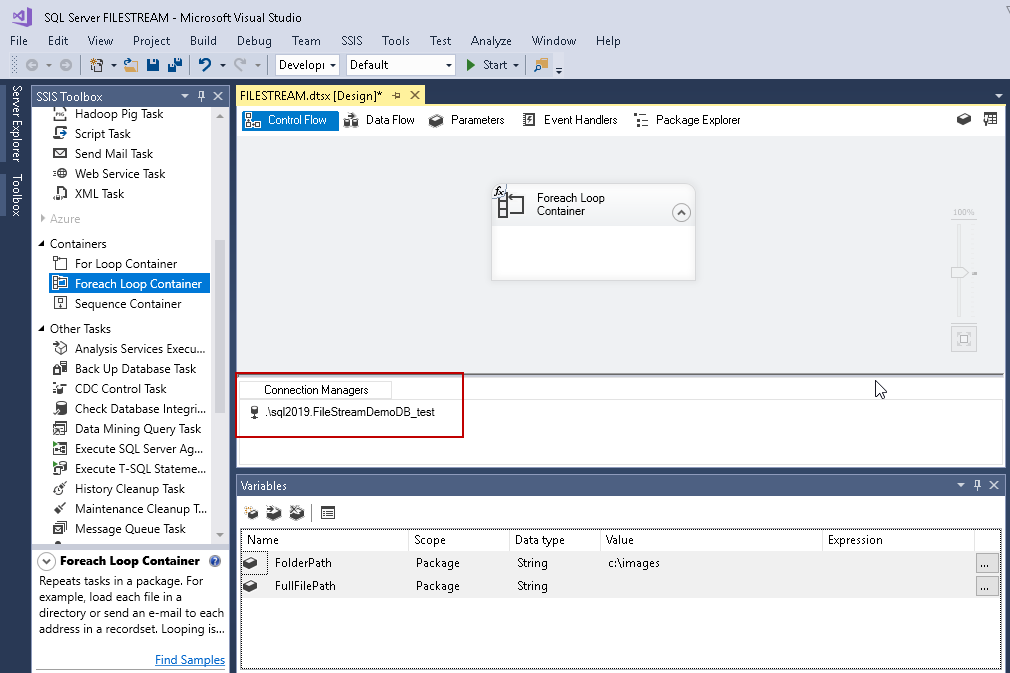
Define the variables as shown in the below screenshot. In the ‘FolderPath’ variable, you can notice the value ‘C:\Images’. It is the folder in which we have all the files placed as of now.
定义变量,如下面的屏幕快照所示。 在“ FolderPath”变量中,您会注意到值“ C:\ Images”。 到此为止,我们已将所有文件放置在该文件夹中。
Now double click on the ‘Foreach loop container’, and it opens the pop-up window to do furthe Configuration.
现在,双击“ Foreach循环容器”,它会打开弹出窗口进行进一步的配置。
Click on the ‘Collection’. By default, it shows the Enumerator ‘Foreach Item Enumerator’
点击“收藏”。 默认情况下,它显示Enumerator'Foreach Item Enumerator'
We need to select the enumerator ‘Foreach File Enumerator’ from the drop-down menu.
我们需要从下拉菜单中选择枚举器“ Foreach File Enumerator”。
It shows the below window once we select the ‘Forach file enumerator’.
选择“ Forach文件枚举器”后,它将显示以下窗口。
Click on ‘Expressions’ and browse it. You get the property expression editor window.
单击“表达式”并浏览。 您将获得属性表达式编辑器窗口。
In this property expression editor, select the ‘Directory’ from drop-down values.
在此属性表达式编辑器中,从下拉值中选择“目录”。
Once we select the ‘Directory’ option, we get the three dot icons to give the expression input.
选择“目录”选项后,我们将获得三个点图标以提供表达式输入。
Click on the three dots icon (…), and you get the expression editor.
单击三个点图标(…),您将获得表达式编辑器。
Expand the ‘Variables and Parameters’, and you can see the variables we created in the above step.
展开“变量和参数”,您将看到我们在以上步骤中创建的变量。
Drag the variable ‘User: FolderPath’ to the ‘Expression’ window and click on ‘Evaluate Expression’. You can see the source folder name in the ‘Evaluated value’.
将变量“ User:FolderPath”拖到“ Expression”窗口中,然后单击“ Evaluate Expression”。 您可以在“评估值”中查看源文件夹名称。
Click on ‘Ok’, and you can see the below ‘Foreach loop editor’ window.
单击“确定”,您将看到下面的“ Foreach循环编辑器”窗口。
In the retrieve file name, you get the below options.
在检索文件名中,您将获得以下选项。
- Name and Extension: We can get the file name along with the extension using this 名称和扩展名:使用此文件,我们可以获取文件名以及扩展名
- Full Qualified: We get the fully-qualified name for the file. The full qualified name denotes the file name along with the extension and the source path 全限定:我们获得文件的全限定名称。 完整的合格名称表示文件名以及扩展名和源路径
- Name Only: We get only file name if we select this option
- 仅名称:如果选择此选项,则仅获得文件名
In this article, we want to get the fully qualified name for all the files placed in the source folder. Therefore, we will select ‘Full Qualified’ option here.
在本文中,我们想要获取放置在源文件夹中的所有文件的全限定名称。 因此,我们将在此处选择“完全合格”选项。
Now we need to map the variable to hold this fully qualified name, therefore, click on the ‘Variable Mapping’ from the left menu bar.
现在,我们需要映射变量以保留此完全限定的名称,因此,单击左侧菜单栏中的“变量映射”。
In the variable Mapping, select the variable ‘User: FullFilePath’ which we created earlier and give the value 0 in the Index column.
在变量Mapping中,选择我们之前创建的变量'User:FullFilePath',并在Index列中将值设置为0。
Click on ‘OK’ and return to the ‘Foreach loop Container.’
单击“确定”,然后返回“ Foreach循环容器”。
进阶设定 (Advanced configuration)
In the first part of this article on FILESTREAM and SSIS configuration, we wrote about exploring SSIS packages for the SQL Server FILESTREAM import objects. In this part, we will take over from there and do multiple configurations to load objects into FILESTREAM tables at once.
在有关FILESTREAM和SSIS配置的本文的第一部分中,我们写过有关探索SQL Server FILESTREAM导入对象的SSIS包的信息。 在这一部分中,我们将从那里接管并进行多种配置,以一次将对象加载到FILESTREAM表中。
We configured the ‘Foreach loop Container’ to loop through the source folder and put the result (fully qualified name) into a variable.
我们将“ Foreach循环容器”配置为遍历源文件夹,并将结果(完全限定名称)放入变量中。
Now, we need to create the connection to our SQL database table in which we want to store the fully-qualified name of the objects.
现在,我们需要创建到SQL数据库表的连接,我们要在其中存储对象的标准名称。
In the Connection Managers, right click and select ‘New OLE database Connection’
在连接管理器中,右键单击并选择“新建OLE数据库连接”
If there are any existing connections, you can see in the ‘Data Connections’ window. Let us create new OLE database connections to show the required steps.
如果存在任何现有连接,则可以在“数据连接”窗口中看到。 让我们创建新的OLE数据库连接以显示所需的步骤。
In the new connection window, enter the following details.
在新的连接窗口中,输入以下详细信息。
- Server name: Enter the SQL Server instance name along with the port number (if we are using non-default port) 服务器名称:输入SQL Server实例名称以及端口号(如果我们使用的是非默认端口)
- Authentication method: Select the Windows or SQL authentication. If we are using SQL authentication, enter the user name and password 身份验证方法:选择Windows或SQL身份验证。 如果我们使用的是SQL身份验证,请输入用户名和密码
- Database name: Select the database name in which table exists to hold the fully qualified file names 数据库名称:选择存在该表的数据库名称以保存标准文件名
Click on the ‘Test connection’ to check the successful connection.
单击“测试连接”以检查连接是否成功。
You can see the connections in the ‘Connection Manager’ window.
您可以在“连接管理器”窗口中查看连接。
Right click on the connection and rename the connection to ‘FILESTREAMDB’.
右键单击连接,然后将连接重命名为“ FILESTREAMDB”。
- Execute SQL Task: In this step, drag the ‘Execute SQL Task’ from the SSIS toolbox in the ‘Foreach loop container’. You can see a red colour cross icon in the execute SQL task. It is because we have not specified any connection in this task 执行SQL任务:在此步骤中,从“ Foreach循环容器”中的SSIS工具箱中拖动“执行SQL任务”。 您可以在执行SQL任务中看到一个红色的十字图标。 这是因为我们在此任务中未指定任何连接
Double click on the ‘Execute SQL Task’ to open the execute SQL task editor window.
双击“执行SQL任务”以打开执行SQL任务编辑器窗口。
In the Execute SQL Task do the following configurations.
在执行SQL任务中,执行以下配置。
- Name: Change the name of this task to a meaningful name. We can give it a name like an extract source file names 名称:将此任务的名称更改为有意义的名称。 我们可以给它起一个类似于提取源文件名的名称
- Connection Type: OLE database 连接类型:OLE数据库
- Connection: Select the connection we created earlier from the drop down value. We can create a new connection as well here. To create a new connection select <create connection..) From the drop-down 连接:从下拉值中选择我们之前创建的连接。 我们也可以在这里创建一个新的连接。 要创建新连接,请选择<创建连接。。)从下拉列表中
- SQLSource type: Direct input SQLSource类型:直接输入
- SQL Statement: Enter the below query to insert the FILE full qualified names and unique ID in the table we created earlier, in the ObjName you can see value as ‘?’, it will be replaced by the result set variable in the run time SQL语句:输入以下查询以在我们之前创建的表中插入FILE全限定名和唯一ID,在ObjName中,您可以看到值为“?”,它将在运行时替换为结果集变量
Insert into Tbl_Filelist (Object_ID,ObjName) values (NEWID(),?)
插入到Tbl_Filelist(Object_ID,ObjName)值(NEWID(),?)
Now we need to define this parameter from the ‘Parameter Mapping’ page list. It opens the below page.
现在,我们需要从“参数映射”页面列表中定义此参数。 打开下面的页面。
Click on ‘Add’, and it shows the below mapping, by default.
单击“添加”,默认情况下显示以下映射。
Change these parameter mapping as per below list.
根据下面的列表更改这些参数映射。
- Variable Name: user:FullFilePath 变量名称:user:FullFilePath
- Data Type VARCHAR 数据类型VARCHAR
- Parameter Name: 0 参数名称:0
- Parameter Value:-1 参数值:-1
You can see that the red icon is not present now in front of ‘Extract Source File format.’
您可以看到“提取源文件格式”前面没有红色图标。
We have extracted the fully qualified file names from the source path till now using the Foreach Loop Container.
到目前为止,我们已经使用Foreach循环容器从源路径中提取了标准文件名。
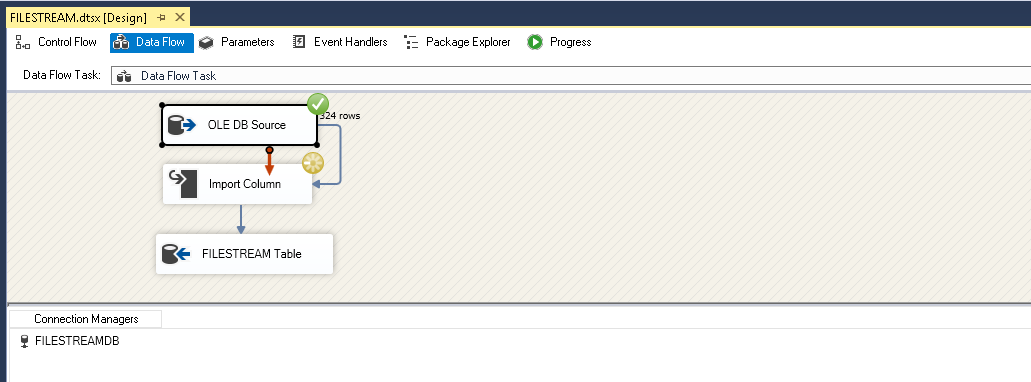
In the next step, we need to prepare a dynamic query to insert the records into the SQL Server FILESTREAM table. Add a ‘Data Flow Task’ outside the container as shown here.
在下一步中,我们需要准备一个动态查询以将记录插入到SQL Server FILESTREAM表中。 如下所示,在容器外部添加一个“数据流任务”。
Connect the precedence constraint to the data flow task as shown here.
如下所示,将优先约束连接到数据流任务。
Double click on the ‘Data Flow task’ and it moves you to ‘Data Flow page’. In this page, we are going to define the source and the destination to insert the records.
双击“数据流任务”,它会带您进入“数据流页面”。 在此页面中,我们将定义插入记录的源和目标。
Drag the ‘OLE DB Source’ in the Data Flow page.
在“数据流”页面中拖动“ OLE DB源”。
Double click on the OLE DB source, and it opens the OLE DB Source Editor. In the editor, specify the OLE DB connection Manager (you can also create a new connection from here also) and select the table contains the file list from the drop-down list.
双击OLE DB源,它将打开OLE DB源编辑器。 在编辑器中,指定OLE DB连接管理器(您也可以从此处创建新连接),然后从下拉列表中选择包含文件列表的表。
In the next step, add an ‘Import Column’ transformation. It is used to import the data and perform manipulations before sending the data over to the destination path. We are going to use to create a BLOB for the SQL Server FILESTREAM table.
在下一步中,添加“导入列”转换。 它用于导入数据并在将数据发送到目标路径之前执行操作。 我们将用于为SQL Server FILESTREAM表创建BLOB。
Double click on the Import columns transformation.
双击导入列转换。
In this advanced editor for import columns, go to the Input Properties tab. Select the column field contains the file path.
在此用于导入列的高级编辑器中,转到“输入属性”选项卡。 选择包含文件路径的列字段。
Now, go to the Input and Output Properties tab.
现在,转到“输入和输出属性”选项卡。
Expand the Import Columns Output and Click on the Add Column to do the transformation. In the Import Column Output, add a new column and select datatype DT_IMAGE. This data type is useful for FILESTREAM objects.
展开“导入列”输出,然后单击“添加列”以进行转换。 在“导入列输出”中,添加一个新列并选择数据类型DT_IMAGE。 此数据类型对于FILESTREAM对象很有用。
You need to note down this LineageID, and we will specify it to connect the input and the output. Now, will link both the Import column output and Import Column input using the LeneageID.
您需要记下这个LineageID,我们将指定它来连接输入和输出。 现在,将使用LeneageID链接“导入列”输出和“导入列”输入。
Expand the ‘Import Columns Input’ and click on the input column name. In the ‘FileDataColumnID’ enter the lineage ID as shown below.
展开“导入列输入”,然后单击输入列名称。 在“ FileDataColumnID”中,输入沿袭ID,如下所示。
Click ‘OK’ and add an ‘OLE DB destination’ in the package. This OLE destination will point to the FILESTREAM table.
单击“确定”,然后在包中添加“ OLE DB目标”。 该OLE目标将指向FILESTREAM表。
We are using the same connection for the FILESTREAM table as well, therefore, select the destination SQL Server FILESTREAM table from the drop-down.
我们也为FILESTREAM表使用了相同的连接,因此,从下拉列表中选择目标SQL Server FILESTREAM表。
Click on the ‘Mapping’. In the mapping, select the input and the output columns. In this case, we will select new column ‘ImageData’ for the Object destination which is a FILESTREAM column.
点击“映射”。 在映射中,选择输入和输出列。 在这种情况下,我们将为对象目的地选择一个新列“ ImageData”,这是一个FILESTREAM列。
Rename the OLE DB destination to understand the package quickly.
重命名OLE DB目标以快速了解程序包。
Now we have configured the SSIS package to do the following tasks
现在,我们已经配置了SSIS包以执行以下任务
- Import the fully-qualified file names into the table 将标准文件名导入表中
- Insert the data into the FILESTREAM table 将数据插入FILESTREAM表
Before we execute the package, verify that we have an empty FILESTREAM table.
在执行包之前,请验证我们是否有一个空的FILESTREAM表。
select * from Tbl_Insert_Bulk_Objects
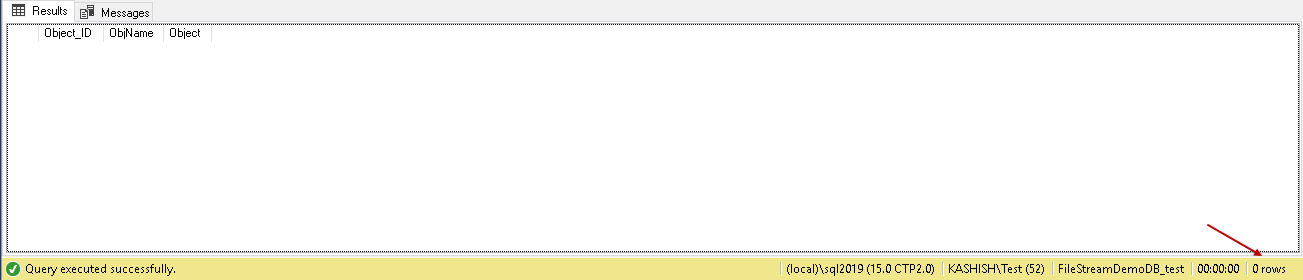
We can also verify that we do not have any file name stored in the table.
我们还可以验证表中没有存储任何文件名。
SELECT * FROM [FileStreamDemodatabase_test].[dbo].[Tbl_Filelist]
Let us execute the package now. Click on the ‘Start’ button.
现在让我们执行包。 点击“开始”按钮。
It might take time depending upon the number of files and their sizes for the package to execute. While the package is running, you can graphically see the status.
可能需要一些时间,具体取决于文件的数量及其执行包的大小。 程序包运行时,您可以以图形方式查看状态。
If you want detailed information about the execution, click on the ‘Progress’. It shows the complete information about each operator, statement, warning, errors in this page.
如果您需要有关执行的详细信息,请单击“进度”。 它在此页面中显示有关每个操作员,语句,警告和错误的完整信息。
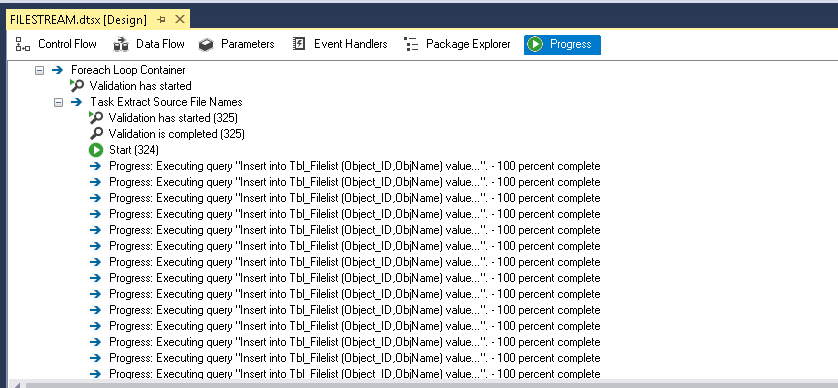
Once the package is executed successfully, you can see the Green tick against each operator. You also get a message ‘Package execution completed with Success.’
成功执行程序包后,您会看到每个操作员的绿色对勾。 您还会收到一条消息“成功完成包执行”。
Now it turns to verify the things.
现在轮到验证事情了。
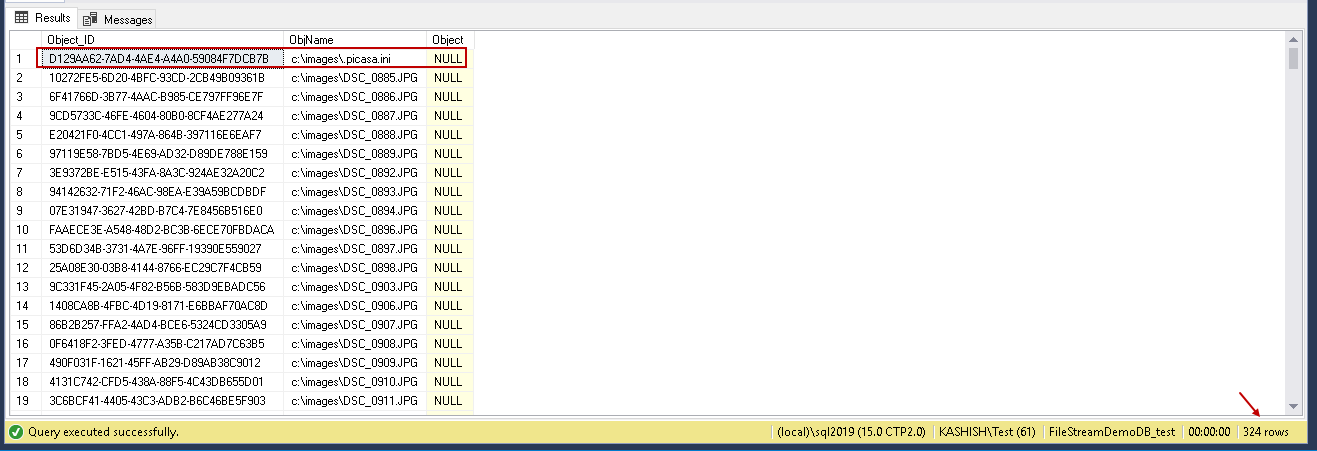
- Verify the file names in the [Tbl_Filelist] table: in the below screenshot, you can see the full-qualified name for each file in ObjName column along with the unique ID in Object_ID column. We have 324 files in the source folder 验证[Tbl_Filelist]表中的文件名:在下面的屏幕快照中,您可以在ObjName列中看到每个文件的全名,并在Object_ID列中看到唯一的ID。 源文件夹中有324个文件
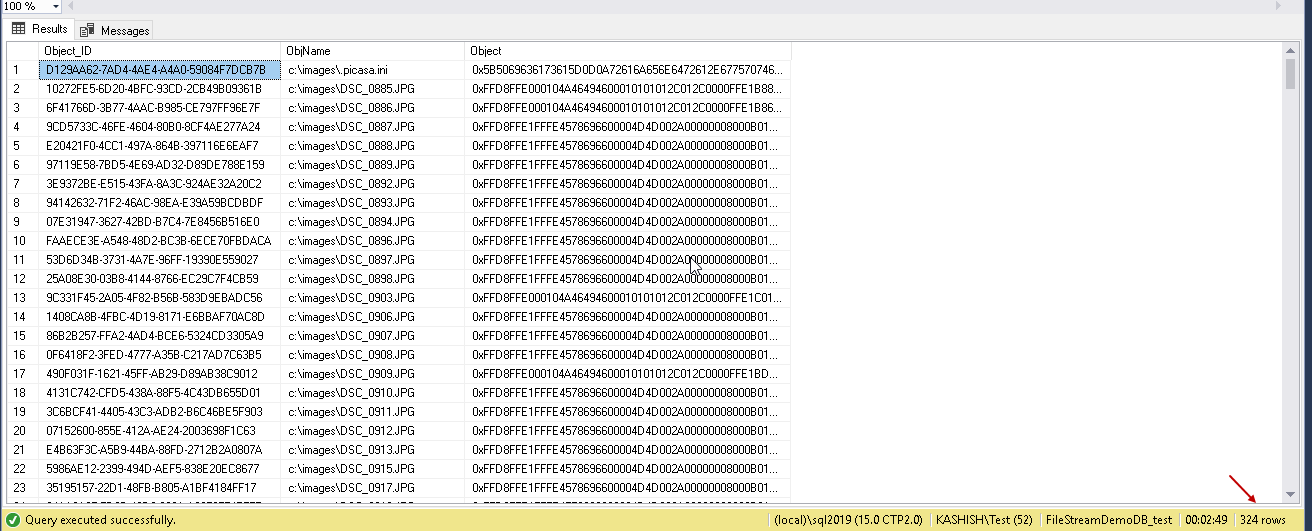
- Verify the SQL Server FILESTREAM table: In the below screenshot, we have 324 records in the FILESTREAM table as well. It shows that we have successfully inserted all records into this table 验证SQL Server FILESTREAM表:在下面的屏幕快照中,FILESTREAM表中也有324条记录。 它表明我们已成功将所有记录插入到该表中
- Verify the files in the FILESTREAM Container: let us go to the FILESTREAM container and check the count of files and their total size. We have 324 files in this FILESTREAM container as well, and total size matches with the source folder size. 验证FILESTREAM容器中的文件:让我们转到FILESTREAM容器并检查文件数及其总大小。 这个FILESTREAM容器中也有324个文件,总大小与源文件夹的大小匹配。
结论: ( Conclusion: )
We have explored to the benefits of using SSIS packages to import objects into a SQL Server FILESTREAM table without writing T-SQL for each file insert. Feel free to provide any feedback in the comments below.
我们已经探索了使用SSIS包将对象导入到SQL Server FILESTREAM表中而无需为每个文件插入编写T-SQL的好处。 请随时在下面的评论中提供任何反馈。
目录 (Table of contents)
翻译自: https://www.sqlshack.com/importing-sql-server-filestream-data-with-ssis-packages/


 1232
1232

 被折叠的 条评论
为什么被折叠?
被折叠的 条评论
为什么被折叠?
 到【灌水乐园】发言


