


sql azure 语法
This article explores the Python SQL scripts in SQL Notebook of Azure Data Studio.
本文探讨了Azure Data StudioSQL Notebook中的Python SQL脚本。
介绍 (Introduction)
SQL Notebook is an exciting feature of Azure Data Studio. It is gaining popularity among database administrators and developers. You should explore the following articles before going through this article:
SQL Notebook是Azure Data Studio的一项令人兴奋的功能。 它在数据库管理员和开发人员中越来越受欢迎。 在阅读本文之前,您应该浏览以下文章:
- SQL Notebook in SQL Notebooks introduction and overview SQL Notebook中SQL Notebook简介和概述
- A handy SQL Notebook for the purposes of troubleshooting in Azure Data Studio 方便SQL笔记本,用于在Azure Data Studio中进行故障排除
Let’s create a new notebook for this article. Connect to a SQL instance in Azure Data Studio.
让我们为本文创建一个新的笔记本。 连接到Azure Data Studio中SQL实例。
Right-click on a SQL instance and from the context menu choose New Notebook:
右键单击SQL实例,然后从上下文菜单中选择“ 新建笔记本” :
It launches SQL Notebook, as shown below. By default, it launches SQL kernel for executing T-SQL queries for SQL Server.
它将启动SQL Notebook,如下所示。 默认情况下,它将启动SQL内核以执行SQL Server的T-SQL查询。
In the kernel list, we see following kernels apart from SQL:
在内核列表中,除了SQL以外,我们还看到以下内核:
- PySpark: We can use this for writing Python code using spark compute from a cluster PySpark :我们可以使用它来通过集群中的spark计算编写Python代码
- Spark Scala and Spark R: We can use scala code using spark compute from a cluster
- Spark Scala和Spark R:我们可以通过集群中的Spark计算使用Scala代码
- Python 3: We can use Python code for connecting with SQL Server and execute queries Python 3:我们可以使用Python代码与SQL Server连接并执行查询
- PowerShell: We can write PowerShell code using PowerShell kernel PowerShell :我们可以使用PowerShell内核编写PowerShell代码
You might think – Why should we worry about the Python programming language? If yes, go through this article: Why would a SQL Server DBA be interested in Python?
您可能会想–为什么我们要担心Python编程语言? 如果是,请阅读以下文章: 为什么SQL Server DBA对Python感兴趣?
You should also explore the Python articles and be familiar with the Python queries.
您还应该浏览Python文章并熟悉Python查询。
Let’s change the kernel from SQL to Python 3 in SQL Notebook. Once we change the selection to Python 3, it gives the following option for configuring Python for Notebooks:
让我们在SQL Notebook中将内核从SQL更改为Python 3。 将选择更改为Python 3后,它将为配置笔记本电脑的Python提供以下选项:
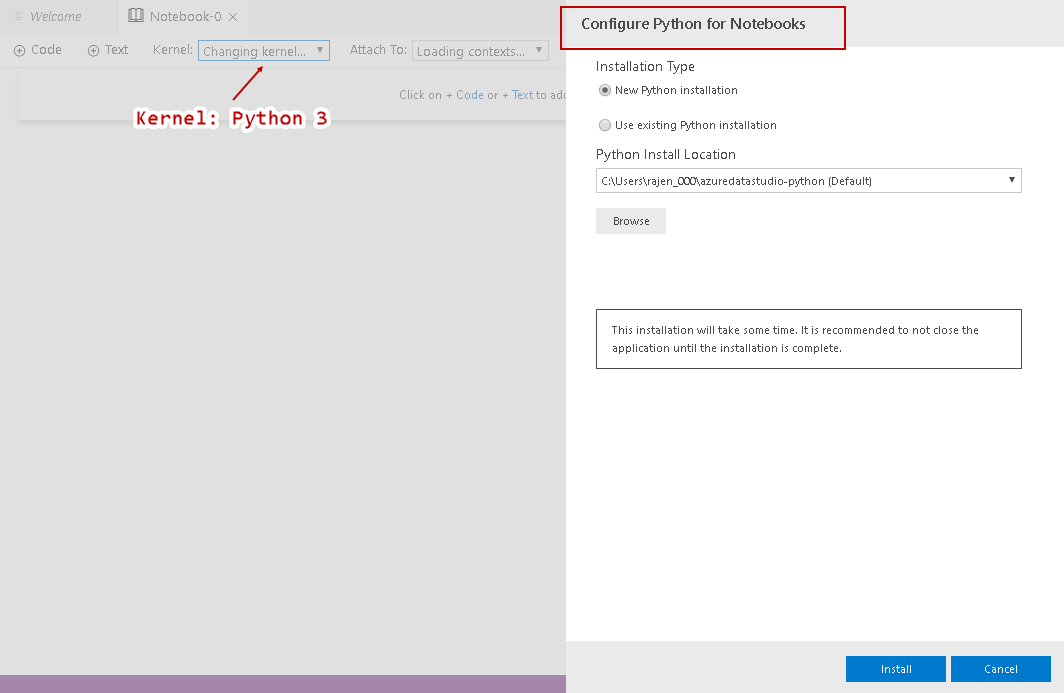
We get two options for Python installation:
对于Python安装,我们有两种选择:
- New Python installation: If we do not have an existing Python installation, we can choose this option, and Azure Data Studio does Python installation for us. It takes some time for downloading and installs Python. You can see an information message as well in the middle of the Python configuration page 新的Python安装:如果没有现有的Python安装,则可以选择此选项,Azure Data Studio可以为我们安装Python。 下载并安装Python需要花费一些时间。 您还可以在Python配置页面的中间看到一条信息消息
- Use existing Python installation: If we have an existing Python on the server, we can browse to Python directory and use existing installation 使用现有的Python安装:如果服务器上有现有的Python,我们可以浏览到Python目录并使用现有的安装
Let’s choose the default option New Python installation and click on the Install button at the bottom. It logs the installation in the task window on Azure Data Studio. We can see that the Python installer size is 144.21 MB. You should have an active internet connection for downloading the software:
让我们选择默认选项“ 新建Python安装” ,然后单击底部的“ 安装”按钮。 它将安装记录在Azure Data Studio的任务窗口中。 我们可以看到Python安装程序的大小为144.21 MB。 您应具有活动的Internet连接以下载软件:
It downloads the required package and starts the installation for Notebooks. It also shows the commands for installation of Python kernel:
它会下载所需的程序包并开始安装Notebook。 它还显示了安装Python内核的命令:
It installs the Python and starts notebook Python kernel:
它安装Python并启动笔记本Python内核:
You can see kernel: Python 3 in SQL Notebook after installation:
安装后,您可以在SQL Notebook中看到内核:Python 3:
We can also see Attach to is localhost for the Python3 kernel. We use this for local Python development:
我们还可以看到Python3内核的Attach to是localhost 。 我们将其用于本地Python开发:
Click on Manage Packages, and you can see a list of installed Pip packages:
单击“ 管理软件包”,您可以看到已安装的Pip软件包的列表:
We can search for any specific Pip package as well. Click on Add new and search for specific Pip module:
我们也可以搜索任何特定的Pip包。 单击添加新并搜索特定的Pip模块:
In the following screenshot, we search for “idna” Pip package. In the result, it gives the package summary and version information:
在以下屏幕截图中,我们搜索“ idna” Pip软件包。 结果是,它给出了软件包的摘要和版本信息:
Let’s search for Python SQL driver (pyodbc) module and install it for the Notebook:
让我们搜索Python SQL驱动程序(pyodbc)模块并为Notebook安装它:
Now, we will use Python ODBC for connecting to SQL Server and query tables.
现在,我们将使用Python ODBC连接到SQL Server和查询表。
在SQL Notebook中使用Python执行SQL查询 (Execute SQL query using Python in SQL Notebook)
First, click on Text and write a heading for the query:
首先,单击文本并为查询写一个标题:
SQL Notebook uses Markdown language formatting. You also get a preview of the text, as shown below.
SQL Notebook使用Markdown语言格式。 您还可以预览文本,如下所示。
We can format the text in an h2 heading by adding the ## symbol in front of the text:
我们可以通过在文本前面添加##符号来在h2标题中设置文本格式:
Now we will add Python code in this notebook. We require the following information to write the query:
现在,我们将在此笔记本中添加Python代码。 我们需要以下信息来编写查询:
- SQL instance details SQL实例详细信息
- Database name 数据库名称
- T-SQL for retrieving records from a table T-SQL,用于从表中检索记录
- ODBC driver information ODBC驱动程序信息
Click on Windows Start and type “odbc”. Open ODBC data sources (64-bit):
单击Windows“开始”,然后键入“ odbc”。 打开ODBC数据源(64位):
It opens the following ODBC Data Source Administrator (64-bit):
它将打开以下ODBC数据源管理器(64位):
Under the System DSN tab, click on Add. It opens the available ODBC drivers. Note down the name of latest ODBC driver – ODBC Driver 17 for SQL Server:
在“ 系统 DSN”选项卡下,单击“ 添加” 。 它将打开可用的ODBC驱动程序。 记下最新的ODBC驱动程序的名称– SQL Server的ODBC Driver 17 :
Cancel it, and it closes the ODBC data source window.
取消它,并关闭ODBC数据源窗口。
步骤1:导入pyodbc Python模块 (Step 1: Import pyodbc Python module)
import pyodbc
步骤2:使用Windows身份验证建立数据库连接 (Step 2: Establish a database connection using windows authentication )
cstring = 'DRIVER=ODBC Driver 17 For SQL Server;Server=Kashish\SQL2019GA;DATABASE=AdventureWorks;Trusted_Connection=yes'
步骤3:建立T-SQL字串 (Step 3: Create a T-SQL string )
tsql ='SELECT top 10 [PersonType],[Title],[FirstName],[MiddleName],[LastName],[Suffix] from Person.person'
步骤4:使用步骤1中的字符串与Pyodbc建立连接 (Step 4: Make a connection using the string from step 1 with Pyodbc)
conn = pyodbc.connect(cstring)
步骤5:打开游标并执行SQL脚本 (Step 5: Open cursor and execute SQL script)
cursor = conn.cursor()
cursor.execute(tsql)
步骤6:以逗号分隔格式打印结果 (Step 6: Print results in comma-separated format)
rows = cursor.fetchall()
for row in rows:
print(row, end='\n')
Let’s combine all pieces together and paste into SQL Notebook. To add the code, after the text, click on Add code:
让我们将所有片段组合在一起并粘贴到SQL Notebook中。 要添加代码,请在文本后单击添加代码 :
In the code area, paste the following Python SQL script:
在代码区域中,粘贴以下Python SQL脚本:
import pyodbc
cstring = 'DRIVER=ODBC Driver 17 For SQL Server;Server=Kashish\SQL2019GA;DATABASE=AdventureWorks;Trusted_Connection=yes'
tsql ='SELECT top 10 [PersonType],[Title],[FirstName],[MiddleName],[LastName],[Suffix] from Person.person'
conn = pyodbc.connect(cstring)
cursor = conn.cursor()
cursor.execute(tsql)
rows = cursor.fetchall()
for row in rows:
 print(row, end='\n')
Click on the play icon for executing this Python code and view the results:
单击播放图标以执行此Python代码并查看结果:
在Azure Data Studio中使用Python SQL脚本执行长查询(多行) (Executing a long query (multiline) using Python SQL script in Azure Data Studio)
In the previous section, we used a single line query in a single quote. We cannot execute the long query in the single quotes.
在上一节中,我们在单引号中使用了单行查询。 我们无法在单引号中执行长查询。
We get the following error message if we use a long query in a single quote:
如果我们在单引号中使用长查询,则会收到以下错误消息:
We can use the long SQL statement using the triple-quote string format. We require textwrap module for using triple-quote. SQL Server ignores all-white spaces along with tab and newlines:
我们可以使用使用三引号字符串格式的长SQL语句。 我们需要使用textwrap模块来使用三引号。 SQL Server将忽略全空格以及制表符和换行符:
import pyodbc
import textwrap
cstring = 'DRIVER=ODBC Driver 17 For SQL Server;Server=Kashish\SQL2019GA;DATABASE=AdventureWorks;Trusted_Connection=yes'
tsql =textwrap.dedent("""
SELECT top 2
    e.[BusinessEntityID]    ,p.[Title]    ,p.[FirstName]    ,p.[MiddleName]    ,p.[LastName]
    ,p.[Suffix]    ,e.[JobTitle]      ,pp.[PhoneNumber]
    ,pnt.[Name] AS [PhoneNumberType]
    ,ea.[EmailAddress]
    FROM [HumanResources].[Employee] e
    INNER JOIN [Person].[Person] p
    ON p.[BusinessEntityID] = e.[BusinessEntityID]
    INNER JOIN [Person].[BusinessEntityAddress] bea
    ON bea.[BusinessEntityID] = e.[BusinessEntityID]
    INNER JOIN [Person].[Address] a
    ON a.[AddressID] = bea.[AddressID]
    INNER JOIN [Person].[StateProvince] sp
    ON sp.[StateProvinceID] = a.[StateProvinceID]
    INNER JOIN [Person].[CountryRegion] cr
    ON cr.[CountryRegionCode] = sp.[CountryRegionCode]
    LEFT OUTER JOIN [Person].[PersonPhone] pp
    ON pp.BusinessEntityID = p.[BusinessEntityID]
    LEFT OUTER JOIN [Person].[PhoneNumberType] pnt
    ON pp.[PhoneNumberTypeID] = pnt.[PhoneNumberTypeID]
    LEFT OUTER JOIN [Person].[EmailAddress] ea
    ON p.[BusinessEntityID] = ea.[BusinessEntityID]
    """)
conn = pyodbc.connect(cstring)
cursor = conn.cursor()
cursor.execute(tsql)
rows = cursor.fetchall()
for row in rows:
 print(row, end='\n')
使用适用于SQL Notebook的Python SQL脚本将数据插入SQL表 (Insert data into SQL tables with Python SQL script for SQL Notebook)
Suppose we have the following test table and we want to insert data using Python SQL:
假设我们有以下测试表,并且想使用Python SQL插入数据:
Create table Tempdata
(
    ID int,
    Name varchar(50)
)
Let’s copy and paste the following code in the Notebook for inserting one record:
让我们将以下代码复制并粘贴到Notebook中,以插入一条记录:
import pyodbc
import textwrap
cstring = 'DRIVER=ODBC Driver 17 For SQL Server;Server=Kashish\SQL2019GA;DATABASE=AdventureWorks;Trusted_Connection=yes'
conn = pyodbc.connect(cstring)
cursor = conn.cursor()
qry = '''Insert into SQLShack.dbo.Tempdata
        (ID, Name)
        VALUES(?, ?)
        '''
param_values = ['1', 'SQL']
cursor.execute(qry, param_values)
print('{0} row inserted successfully.'.format(cursor.rowcount))
cursor.commit()
cursor.close()
Execute this code, and it returns the number of rows inserted into the table:
执行以下代码,它返回插入表中的行数:
In this query, we followed the below steps:
在此查询中,我们遵循以下步骤:
步骤1:导入pyodbc Python模块 (Step 1: Import pyodbc Python module)
import pyodbc
步骤2:使用Windows身份验证建立数据库连接 (Step 2: Establish a database connection using windows authentication )
cstring = 'DRIVER=ODBC Driver 17 For SQL Server;Server=Kashish\SQL2019GA;DATABASE=AdventureWorks;Trusted_Connection=yes'
步骤3:开启游标 (Step 3: Open the cursor )
cursor = conn.cursor()
步骤4:使用通配符运算符指定插入语句,并使用param_values指定值。 (Step 4: Specify the insert statement with wildcard operators and specified values using param_values.)
qry = '''Insert into SQLShack.dbo.Tempdata
        (ID, Name)
        VALUES(?, ?)
        '''
param_values = ['1', 'SQL']
步骤5:使用指定的参数执行insert语句 (Step 5: Execute the insert statement with parameters specified)
cursor.execute(qry, param_values)
第6步:使用cursor.rowcount和打印功能为插入的行数打印一条消息。 (Step 6: Print a message for the number of rows inserted using cursor.rowcount and print function.)
print('{0} row inserted successfully.'.format(cursor.rowcount))
步骤6:提交insert语句并关闭游标 (Step 6: Commit the insert statement and close the cursor)
We need to commit the record that we inserted in an earlier step. We should not skip this step else, SQL Server will block the other sessions trying to retrieve records from this table. It is similar to a commit transaction statement in SQL Server.
我们需要提交在先前步骤中插入的记录。 我们不应该跳过此步骤,否则SQL Server将阻止其他试图从该表中检索记录的会话。 它类似于SQL Server中的提交事务语句。
cursor.commit()
cursor.close()
We inserted single records in the above query. We might want to insert multiple records at a time. We can use the above query with some changes. Previously we use cursor.execute the function for data insertion. We use a cursor.executemany function for inserting multiple records.
我们在上面的查询中插入了一条记录。 我们可能想一次插入多个记录。 我们可以对上面的查询进行一些更改。 以前我们使用cursor.execute函数插入数据。 我们使用cursor.executemany函数插入多个记录。
In the below query, we insert three records in the tempdata table:
在下面的查询中,我们在tempdata表中插入三个记录:
import pyodbc
import textwrap
cstring = 'DRIVER=ODBC Driver 17 For SQL Server;Server=Kashish\SQL2019GA;DATABASE=AdventureWorks;Trusted_Connection=yes'
conn = pyodbc.connect(cstring)
cursor = conn.cursor()
qry = '''Insert into SQLShack.dbo.Tempdata
        (ID, Name)
        VALUES(?, ?)
        '''
param_values = [('1', 'SQL'),
                 ('2','MSSQL'),
                 ('3','DBA')
               ]
cursor.executemany(qry, param_values)
cursor.commit()
cursor.close()
We can see the data in the tempdata table, as shown below:
我们可以在tempdata表中看到数据,如下所示:
在SQL表中使用Python SQL脚本更新记录 (Update records using Python SQL script in SQL table )
In this section, we will use an update statement in the Azure Data Studio Notebook using the Python SQL.
在本节中,我们将使用Python SQL在Azure Data Studio Notebook中使用更新语句。
We can specify an update statement similar to an insert statement:
我们可以指定类似于插入语句的更新语句:
import pyodbc
import textwrap
cstring = 'DRIVER=ODBC Driver 17 For SQL Server;Server=Kashish\SQL2019GA;DATABASE=AdventureWorks;Trusted_Connection=yes'
conn = pyodbc.connect(cstring)
cursor = conn.cursor()
qry = '''Update SQLShack.dbo.Tempdata
        Set name=?
        where ID=?
        '''
param_values = ['Raj', '1' ]
cursor.execute(qry, param_values)
cursor.commit()
cursor.close()
Let me highlight the changes in the following query compared to an insert query.
让我重点介绍与插入查询相比,以下查询中的更改。
Specify the update statement with requirement parameters using a wildcard operator (?):
使用通配符(?)指定带有需求参数的更新语句:
qry = '''Update SQLShack.dbo.Tempdata
        Set name=?
        where ID=?
        '''
In the param_value, we must specify the values for the wildcard operator(?) in the correct order:
在param_value中,我们必须以正确的顺序指定通配符operator(?)的值:
param_values = ['Raj', '1' ]
Execute the Python SQL script in Notebook and verify the changes:
在Notebook中执行Python SQL脚本并验证更改:
在SQL表中使用Python SQL脚本删除记录 (Delete records using Python SQL script in SQL table )
Let’s delete a record from the SQL table in the Notebook of Azure Data Studio. You can easily understand the following code as it looks similar to an update statement. We replaced the update with a delete statement. We use the wildcard operator in the where condition:
让我们从Azure Data Studio笔记本中SQL表中删除一条记录。 您可以轻松理解以下代码,因为它看起来类似于更新语句。 我们用delete语句替换了更新。 我们在where条件中使用通配符:
import pyodbc
import textwrap
cstring = 'DRIVER=ODBC Driver 17 For SQL Server;Server=Kashish\SQL2019GA;DATABASE=AdventureWorks;Trusted_Connection=yes'
conn = pyodbc.connect(cstring)
cursor = conn.cursor()
qry = '''Delete from SQLShack.dbo.Tempdata
         where ID=?
        '''
param_values = ['1']
cursor.execute(qry, param_values)
cursor.commit()
cursor.close()
Verify that record with ID=1 does not exist in the tempdata table:
验证ID = 1的记录在tempdata表中不存在:
结论 (Conclusion)
In this article, we explored Python SQL script in SQL Notebook of Azure Data Studio. We can use Python for Select, Insert, Update and Delete statements as well. You should explore Python language for SQL Server using the SQLShack articles.
在本文中,我们探索了Azure Data StudioSQL Notebook中的Python SQL脚本。 我们也可以将Python用于Select,Insert,Update和Delete语句。 您应该使用SQLShack文章探索SQL Server的Python语言。
翻译自: https://www.sqlshack.com/use-python-sql-scripts-in-sql-notebooks-of-azure-data-studio/
sql azure 语法


 445
445

 被折叠的 条评论
为什么被折叠?
被折叠的 条评论
为什么被折叠?
 到【灌水乐园】发言


