


 本文介绍了在SQL Server中复制表数据和架构的几种方法,包括使用SELECT INTO查询、SQL Server导出/导入向导、生成脚本以及ApexSQL工具。这些方法各有优缺点,适用于不同的场景,如快速复制、维护数据关系和处理Identity列等。
In some cases, as a DBA, you are requested to copy the schema and the content of specific tables from a database to another one in the same instance or in a different SQL instance, such as copying specific tables from a production database to a DEV one for testing or troubleshooting purposes.
在某些情况下,作为DBA,要求您将模式和特定表的内容从数据库复制到同一实例或不同SQL实例中的另一数据库,例如将特定表从生产数据库复制到DEV。一种用于测试或故障排除的目的。
SQL Server offers a lot of methods that can be used to perform table’s data and schema copy process. In order to go through each one of these methods, we will consider the below scenario:
SQL Server提供了许多可用于执行表的数据和架构复制过程的方法。 为了遍历这些方法中的每一种,我们将考虑以下情形:
- The hosting SQL Server: localhost. 托管SQL Server:本地主机。
- Both databases hosted in the same SQL Server 2017 instance 两个数据库托管在同一SQL Server 2017实例中
- AdventureWorks2018 AdventureWorks2018
- SQLShackDemo SQLShackDemo
The tables that will be copied from the source database to the destination one are: Department, Employee, EmployeeDepartmentHistory and EmployeePayHistory under the HumanResources schema.
将要从源数据库复制到目标数据库的表是在HumanResources模式下的Department , Employee , EmployeeDepartmentHistory和EmployeePayHistory 。
Tables Copying Methods:
表格复制方法:
Using SELECT INTO Query
使用SELECT INTO查询
In order to copy our tables from the AdventureWorks2018 database to the SQLShackDemo one, we can use the Select into SQL statement. This statement will create the tables in the destination database first, then it will copy the data to these tables. If you manage to copy the database objects such as the indexes and constraints, you need to generate script for it individually, after that you need to apply the scripts to the destination database.
为了将表从AdventureWorks2018数据库复制到SQLShackDemo之一,我们可以使用Select into SQL语句。 该语句将首先在目标数据库中创建表,然后将数据复制到这些表中。 如果您设法复制数据库对象(例如索引和约束),则需要为其单独生成脚本,然后再将脚本应用于目标数据库。
In our example, to copy the Department, Employee, EmployeeDepartmentHistory and EmployeePayHistory tables under the HumanResources schema from the AdventureWorks2018 database to the SQLShackDemo database, we will run the below script:
在我们的示例中,要将HumanResources模式下的Department , Employee , EmployeeDepartmentHistory和EmployeePayHistory表从AdventureWorks2018数据库复制到SQLShackDemo数据库,我们将运行以下脚本:
Create schema HumanResources
Go

Select * into SQLShackDemo.HumanResources.Department from
AdventureWorks2018.HumanResources.Department
Select * into SQLShackDemo.HumanResources.Employee from
AdventureWorks2018.HumanResources.Employee
Select * into SQLShackDemo.HumanResources.EmployeeDepartmentHistory from
AdventureWorks2018.HumanResources.EmployeeDepartmentHistory
Select * into SQLShackDemo.HumanResources.EmployeePayHistory from
AdventureWorks2018.HumanResources.EmployeePayHistory
The columns in destination tables are created in the order specified in the select statement. All these columns have the exact name, data type, nullability property, and column value as in the source table.
目标表中的列是按select语句中指定的顺序创建的。 所有这些列都具有与源表中相同的确切名称,数据类型,可空性属性和列值。
If any of the tables contains an Identity column, the new column in the destination table will inherit the Identity property without the need to turn on the Identity_Insert.
如果任何表包含Identity列,则目标表中的新列将继承Identity属性,而无需打开Identity_Insert。
This is valid in most cases unless the Select statement contains Join, you are using Union to join multiple Select statements, the Identity column is mentioned many times in your select statement or the source of this Identity column is a remote data source.
在大多数情况下,这是有效的,除非Select语句包含Join,您正在使用Union来联接多个Select语句,在select语句中多次提到了Identity列,或者此Identity列的源是远程数据源。
If any one of these conditions mentioned is true, the column will be created with Not null property instead of inheriting the required Identity property.
如果上述任一条件为true,则将使用Not null属性创建该列,而不是继承所需的Identity属性。
To overcome this Identity issue, you can use the Identity SQL function in the select statement to create the Identity column.
要解决此Identity问题,可以在select语句中使用Identity SQL函数来创建Identity列。
Using SQL Server Export/Import wizard
使用SQL Server导出/导入向导
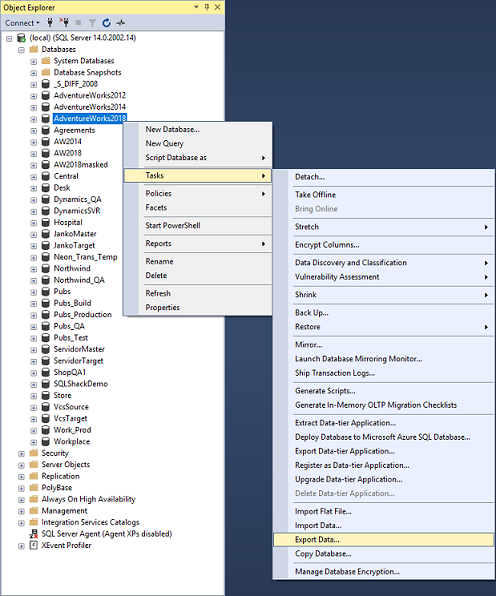
Another method that can be used to copy tables from the source database to the destination one is the SQL Server Export and Import wizard, which is available in SQL Server Management Studio. You have the choice to export from the source database or import from the destination one in order to transfer the data:
可用于将表从源数据库复制到目标数据库的另一种方法是SQL Server导出和导入向导,该向导可在SQL Server Management Studio中使用。 您可以选择从源数据库导出或从目标数据库导入,以便传输数据:
- AdventureWorks2018 database in the Object Explorer中的Object Explorer, then from AdventureWorks2018数据库,然后从Tasks choose the Tasks中选择Export Data command: Export Data命令:
- In the Choose a Data Source step of the SQL Server Import and Export Wizard, specify the source Server name, the Authentication method that will be used to connect to the source server, and the source Database name, then click the Next button:
- 在“ SQL Server 导入和导出向导”的“选择数据源”步骤中,指定源服务器名称,将用于连接到源服务器的身份验证方法以及源数据库名称,然后单击“ 下一步”按钮:
- In the Choose a Destination step of the SQL Server Import and Export Wizard, specify the destination Server name, the Authentication method that will be used to connect to the destination server and the destination Database name, then click the Next button:
- 在“ SQL Server导入和导出向导”的“选择目标”步骤中,指定目标服务器名称,将用于连接到目标服务器的身份验证方法和目标数据库名称,然后单击“ 下一步”按钮:
- Specify Table Copy or Query step of the SQL Server导入和导出向导”的“ SQL Server Import and Export Wizard, choose the 指定表复制或查询”步骤中,选择“ Copy data from one or more tables or views option and click the 从一个或多个表或视图复制数据”选项,然后单击“ Next button: 下一步”按钮:
- Select Source Tables and Views step of the SQL Server导入和导出向导”的“ SQL Server Import and Export Wizard, choose the tables that will be copied from the chosen source database to the destination one: 选择源表和视图”步骤中,选择将要从所选源数据库复制到目标数据库的表:
- the 单击“ Edit Mappings button and make sure that the 编辑映射”按钮,并确保选中“ Create destination table option is ticked, and if any of your tables contain Identity column, make sure to tick the 创建目标表”选项,如果任何表包含“标识”列,请确保选中“ Enable identity insert option, then click the 启用标识插入”选项,然后单击“ OK button. If you have more than one table to be exported to the destination database, you need to go through the 确定”按钮。 如果要导出到目标数据库的表不止一个,则需要逐表检查“ Edit Mappings check table by table: 编辑映射”检查表:
- Select Source Tables and Views step, click the 编辑映射”检查所有表后,在“ Next button, once all tables are checked via the 选择源表和视图”步骤中,单击“ Edit Mappings 下一步”按钮。
- Save and Run Package step, click the 保存并运行程序包”步骤中,单击“ Next button: 下一步”按钮:
- Complete the Wizard step, click the 完成向导”步骤中,单击“ Finish button: 完成”按钮:
- Close button: 关闭”按钮:
This method is a quick way to copy tables from the source database to the destination one if you arrange to copy the tables with no concern with the tables’ relationships and orders.
如果您安排复制表而不关心表的关系和顺序,则此方法是一种将表从源数据库复制到目标数据库的快速方法。
Using this method, the tables’ Indexes and keys will not be transferred. If you are interested in copying it, you need to generate scripts for these database objects.
使用此方法,将不会传输表的索引和键。 如果您有兴趣复制它,则需要为这些数据库对象生成脚本。
If these are Foreign keys connecting these tables together, you need to export the data in the correct order, otherwise the export wizard will fail.
如果这些是将这些表连接在一起的外键,则需要以正确的顺序导出数据,否则导出向导将失败。
Using Generate Scripts
使用生成脚本
SQL Server provides another way to generate script for the SQL Server databases with its objects and data. This script can be used to copy the tables’ schema and data from the source database to the destination one in our case.
SQL Server提供了另一种为SQL Server数据库及其对象和数据生成脚本的方法。 在本例中,此脚本可用于将表的架构和数据从源数据库复制到目标数据库。
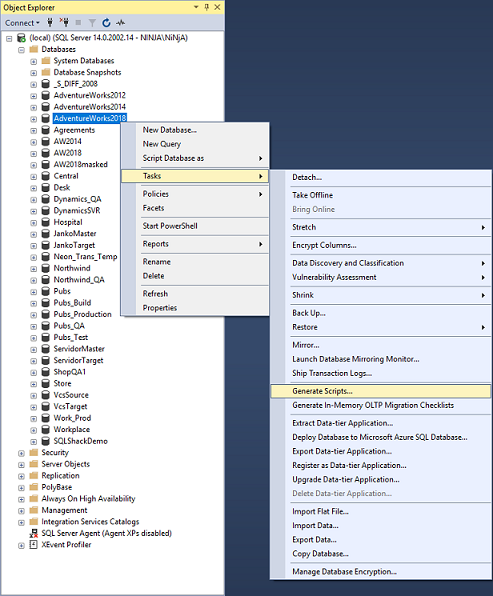
- Object Explorer, then from 对象资源管理器”中右键单击源数据库,然后从“ Tasks choose the 任务”中选择“ Generate Scripts command: 生成脚本”命令:
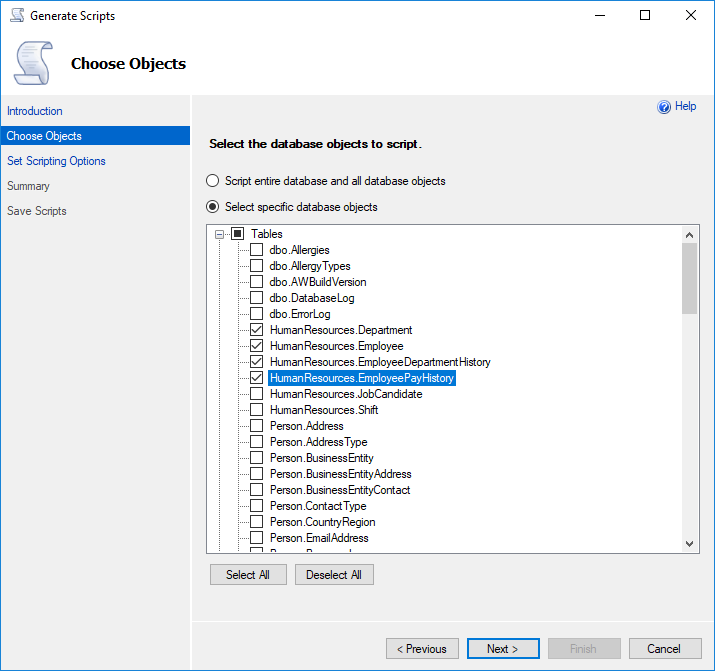
- Choose Objects step, choose the 选择对象”步骤中,选择“ Select specific database objects option to specify the tables that you will generate script for, then choose the tables by ticking beside each one of it and click the 选择特定数据库对象”选项以指定要为其生成脚本的表,然后通过在每个表旁边打勾并单击“ Next button: 下一步”按钮来选择表:
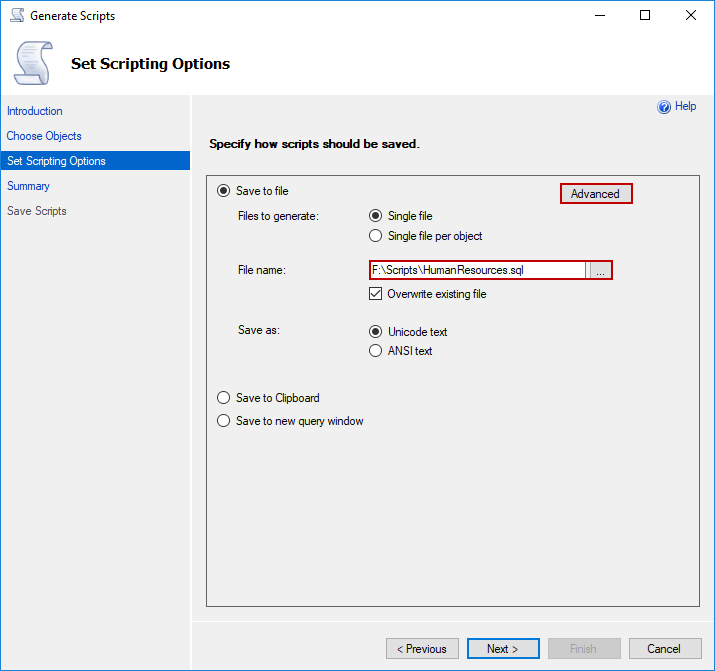
- Set Scripting Options step, specify the path where you will save the generated script file, and click the 设置脚本选项”步骤中,指定保存生成的脚本文件的路径,然后单击“ Advanced button: 高级”按钮:
- Advanced Scripting Options window, specify 高级脚本选项”窗口中,将“ Schema and data as 架构和数据”指定为Types of data to script: 要编写脚本的数据类型:
You can decide from here if you want to script the indexes and keys in your tables.
您可以从此处决定是否要编写表中的索引和键的脚本。
- OK button and after getting back to the 确定按钮,然后返回到“ Advanced Scripting Options step, click the 高级脚本选项”步骤,然后单击Next button 下一步按钮。
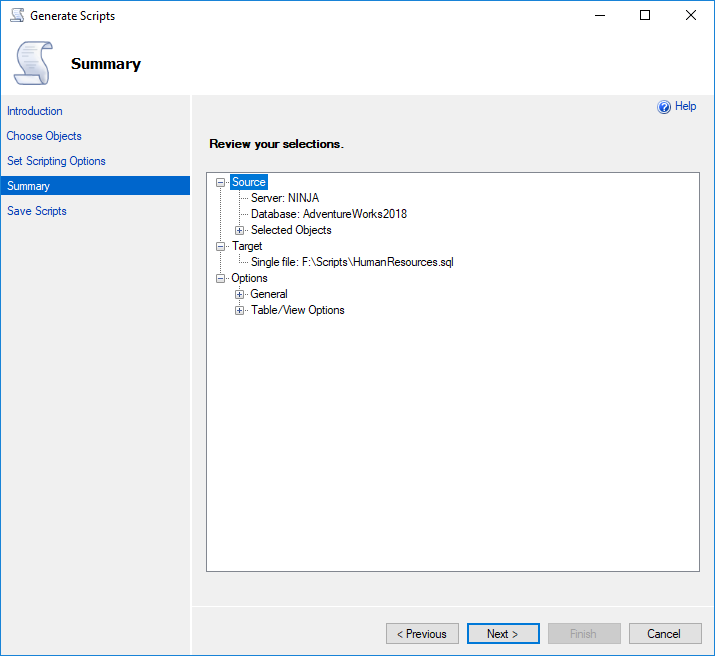
- Summary step and click the 摘要”步骤,然后单击“ Next button: 下一步”按钮:
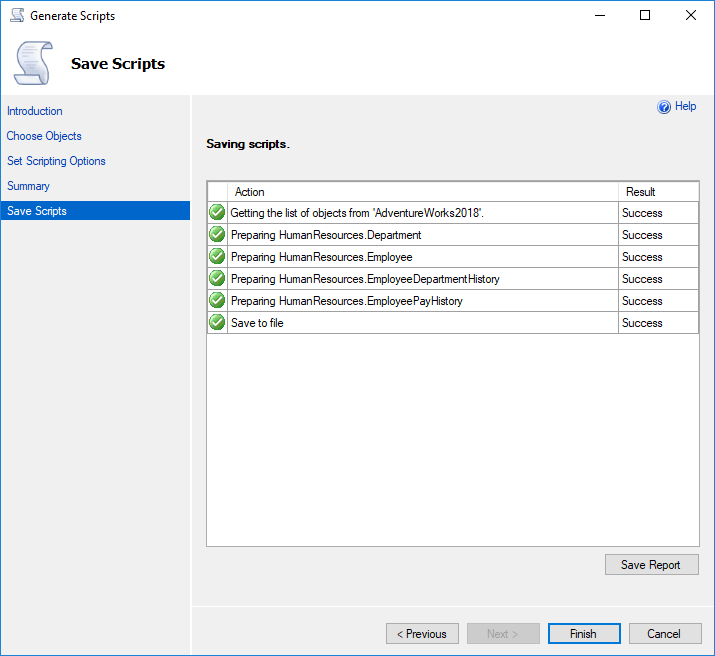
- Save Scripts step. If there are no errors click the 保存脚本”步骤监视进度。 如果没有错误,请单击“ Finish button and you will find the script file in the specified path: 完成”按钮,您将在指定的路径中找到脚本文件:
SQL Scripting method is useful to generate one single script for the tables’ schema and data, including the indexes and keys. But again, this method doesn’t generate the tables’ creation script in the correct order if there are relations between the tables.
SQL脚本方法可用于为表的架构和数据(包括索引和键)生成一个脚本。 但是同样,如果表之间存在关系,则此方法不会以正确的顺序生成表的创建脚本。
Using the ApexSQL Diff and ApexSQL Data Diff combination
使用ApexSQL Diff和ApexSQL Data Diff组合
ApexSQL Diff is a useful SQL tool that can be used to find the differences between the databases from schema side and generate synchronization script to create these tables in the destination database in the correct order.
ApexSQL Diff是有用SQL工具,可用于从架构端查找数据库之间的差异,并生成同步脚本以按正确的顺序在目标数据库中创建这些表。
ApexSQL Data Diff also is another SQL tool that can be used to find the differences between the databases from data side and generate synchronization script to insert the data in the destination database tables, taking into consideration the Identity columns.
ApexSQL Data Diff还是另一个SQL工具,可用于从数据侧查找数据库之间的差异并生成同步脚本以将数据插入目标数据库表中,同时考虑了Identity列。
We can take benefits of these two tools together to generate the required scripts to create the tables to be copied with its objects, and copy the data from the source tables to the destination ones by following these steps:
我们可以利用这两个工具的优势来生成所需的脚本,以创建要与其对象一起复制的表,并按照以下步骤将数据从源表复制到目标表:
- ApexSQL Diff tool ApexSQL Diff工具
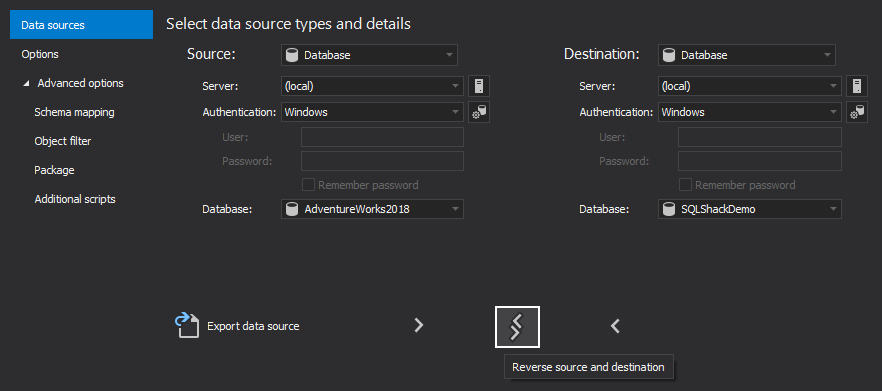
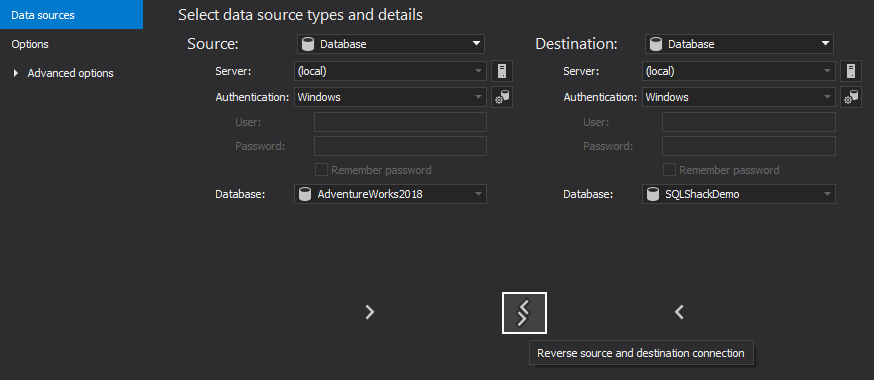
From the Data sources tab of the New project window, specify the source server name, the source database name and the Authentication method used to connect to the source server. You need to specify a valid user name and password if you choose SQL Server authentication.
在“ 新建项目”窗口的“ 数据源”选项卡中,指定源服务器名称,源数据库名称和用于连接到源服务器的身份验证方法。 如果选择SQL Server身份验证,则需要指定有效的用户名和密码。
Also specify the destination server name, the destination database name and the Authentication method used to connect to the destination server. You need to specify a valid user name and password if you choose SQL Server authentication.
还指定目标服务器名称,目标数据库名称和用于连接到目标服务器的身份验证方法。 如果选择SQL Server身份验证,则需要指定有效的用户名和密码。
You can change the role of each server specified as the source or destination one with a click on the Reverse button below data sources:
- Compare button 比较”按钮
The main application window will be shown, that contains the
将显示主应用程序窗口,其中包含“ Results grid with objects that are common between the two databases and the objects exist in one of the databases but not existed in the second one: 结果”网格 ,其中包含两个数据库之间共有的对象,并且该对象存在于一个数据库中,但不存在于第二个数据库中:
In our example, we are interested in the objects that exist in the AdventureWorks2018 database and not exist in the SQLShackDemo database, where we can find the tables to be copied.
在我们的示例中,我们对AdventureWorks2018数据库中存在的对象和SQLShackDemo数据库中不存在的对象感兴趣,在该数据库中可以找到要复制的表。
- AdventureWorks2018AdventureWorks2018
- Synchronize button from the 主页”选项卡上的“ Home tab: 同步”按钮:
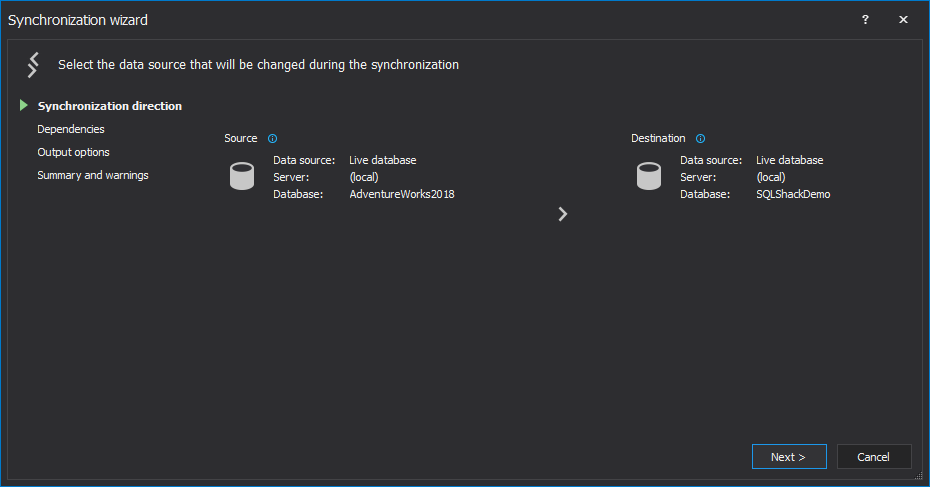
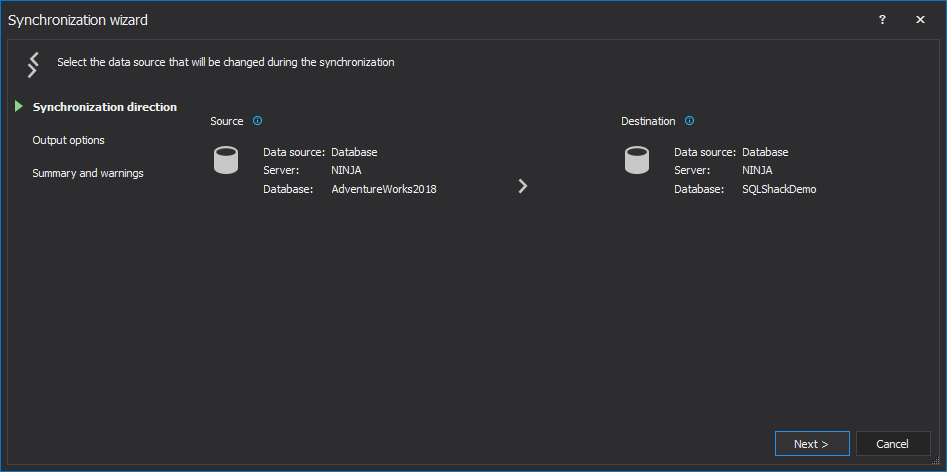
- In the Synchronization direction step of the Synchronization wizard, click the Next button, if you don’t want to change the synchronization direction:
- 如果您不想更改同步方向,请在“ 同步向导”的“ 同步方向”步骤中,单击“ 下一步”按钮:
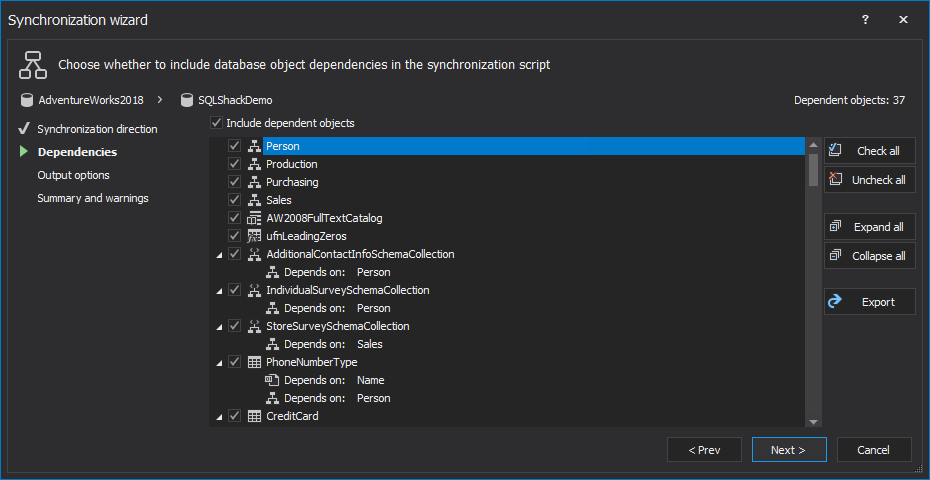
- In the Dependencies step of the Synchronization wizard, uncheck the Include dependent database objects option, if you don’t want to script the related tables and click the Next button:
- 如果不想编写相关表的脚本,请在“ 同步”向导的“ 依赖关系”步骤中,取消选中“ 包括依赖数据库对象”选项,然后单击“ 下一步” :
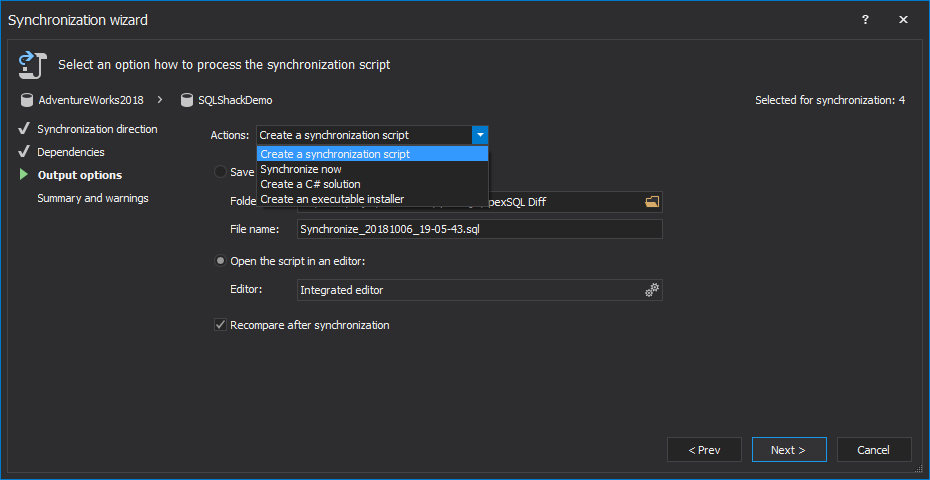
- In the Output options step of the Synchronization wizard, choose the Create a synchronization script action if you want to generate script and run it manually or the Synchronize now action to let the tool to run the script on the destination server directly and click the Next button:
- 在“ 同步”向导的“ 输出选项”步骤中,如果要生成脚本并手动运行,请选择“ 创建同步脚本”操作,或者选择“立即同步”操作以使该工具直接在目标服务器上运行脚本,然后单击“ 下一步”按钮。 :
- In the Summary and warning step of the Synchronization wizard, review the Actions and click the Create script button:
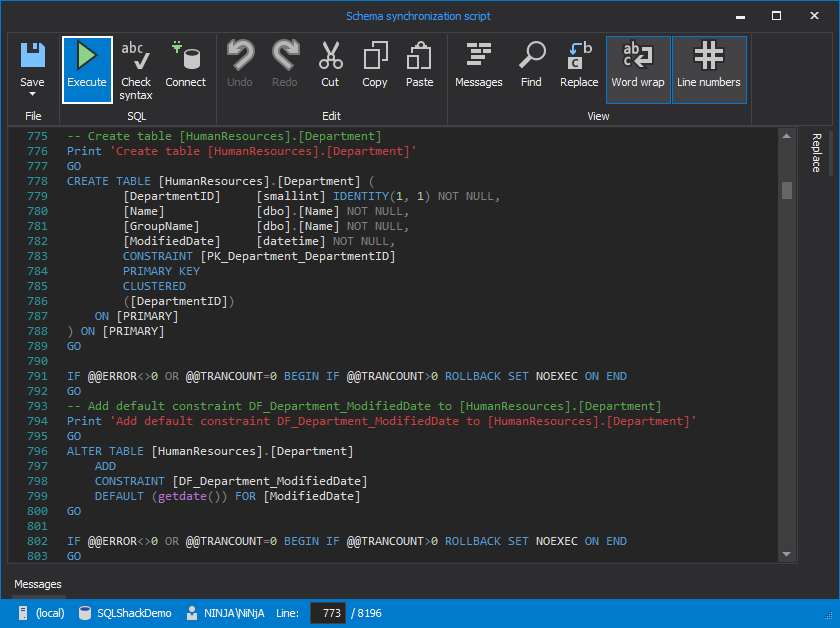
Now the script for creating the database tables with its objects are generated and in the correct order. You can simply run this script on the destination database to create the tables with a click on the Execute button:
- 在“ 同步”向导的“ 摘要和警告”步骤中,查看“ 操作” ,然后单击“ 创建脚本”按钮:
现在,将以正确的顺序生成用于创建具有其对象的数据库表的脚本。 您只需在“ 执行”按钮上单击即可在目标数据库上运行此脚本以创建表:
- ApexSQL Data Diff tool ApexSQL数据差异工具
From the Data sources tab of the New project window, specify the source server name, the source database name and the Authentication method used to connect to the source server. You need to specify a valid user name and password if you choose SQL Server authentication.
在“ 新建项目”窗口的“ 数据源”选项卡中,指定源服务器名称,源数据库名称和用于连接到源服务器的身份验证方法。 如果选择SQL Server身份验证,则需要指定有效的用户名和密码。
Also specify the destination server name, the destination database name and the Authentication method used to connect to the destination server. You need to specify a valid user name and password if you choose SQL Server authentication.
还指定目标服务器名称,目标数据库名称和用于连接到目标服务器的身份验证方法。 如果选择SQL Server身份验证,则需要指定有效的用户名和密码。
You can change the role of each server specified as the source or destination one with a click on the Reverse button:
- Compare button 比较”按钮
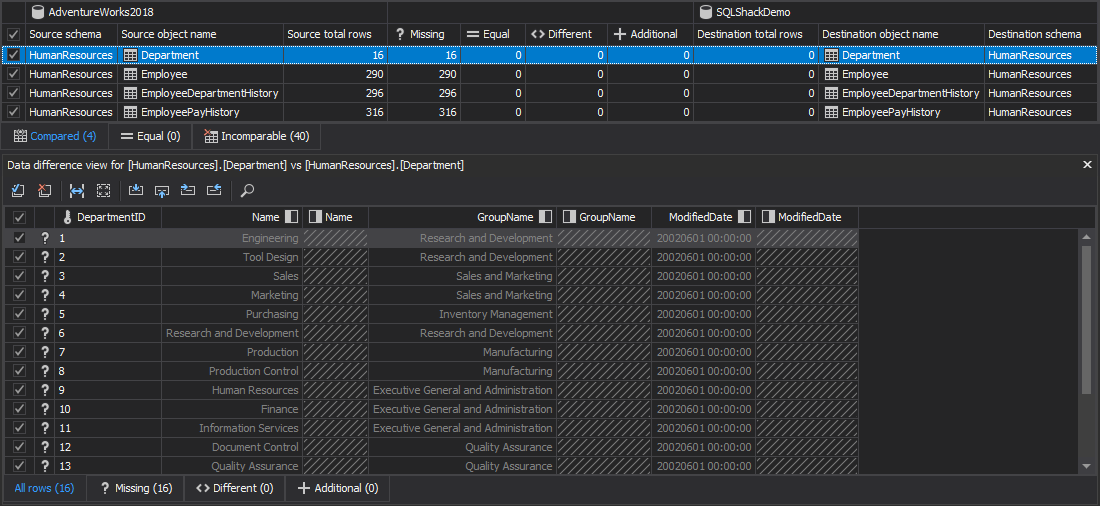
The main application window will be shown, that contains the data differences between the tables in the source and destination databases in addition to the identical and incomparable data.
将显示主应用程序窗口,其中包含相同和不可比较的数据以及源数据库和目标数据库中表之间的数据差异。
Here we are interested in the data differences between the tables in the source and destination databases, as in the previous steps we created these tables schema, but they are still empty.
在这里,我们对源数据库和目标数据库中的表之间的数据差异感兴趣,就像在前面的步骤中创建这些表模式一样,但它们仍然为空。
- Synchronize button from the 主页”选项卡上的“ Home tab: 同步”按钮:
- In the Synchronization direction step of the Synchronization wizard, click the Next button, if you don’t want to change the synchronization direction:
- 如果您不想更改同步方向,请在“ 同步向导”的“ 同步方向”步骤中,单击“ 下一步”按钮:
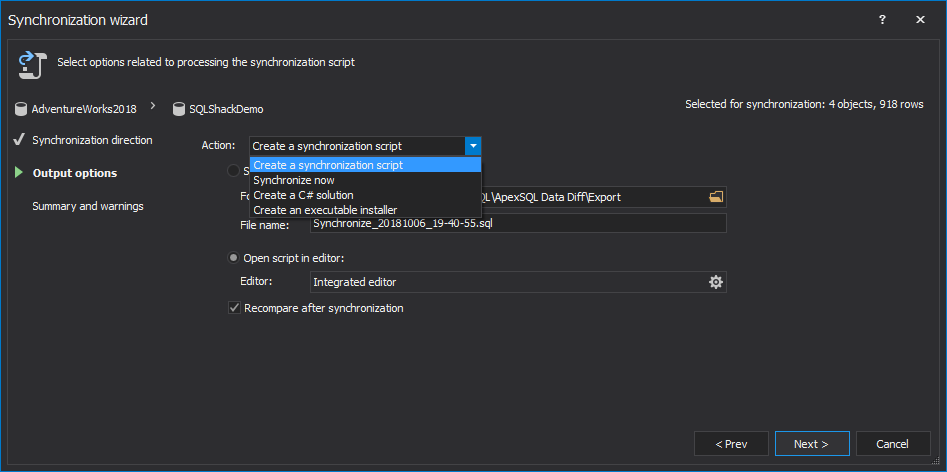
- In the Output options step of the Synchronization wizard, choose the Create a synchronization script action, if you want to generate script and run it manually or the Synchronize now action to let the tool to run the script on the destination server and click the Next button:
- 在“ 同步”向导的“ 输出选项”步骤中,如果要生成脚本并手动运行,请选择“ 创建同步脚本”操作,或者选择“立即同步”操作以使该工具在目标服务器上运行脚本,然后单击“ 下一步”按钮。 :
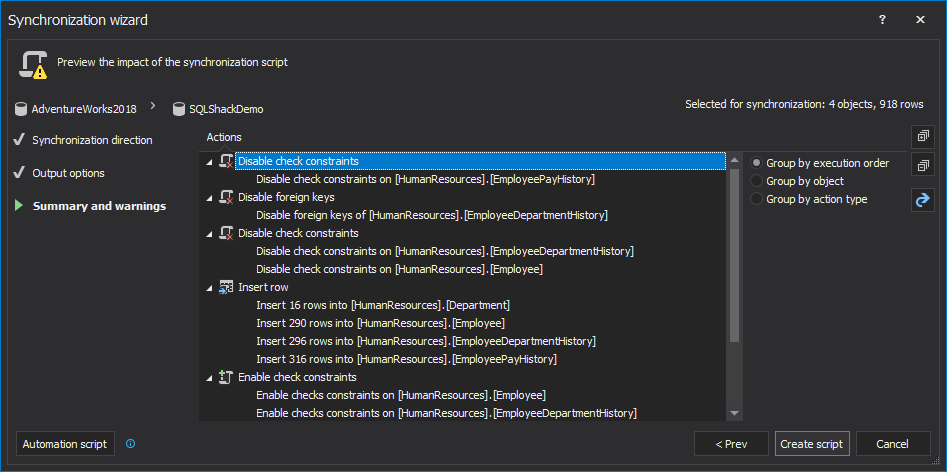
- Summary and warnings step of the 同步”向导的“ Synchronization wizard, review the actions and click the 摘要和警告”步骤中,查看操作并单击“ Create script button: 创建脚本”按钮:
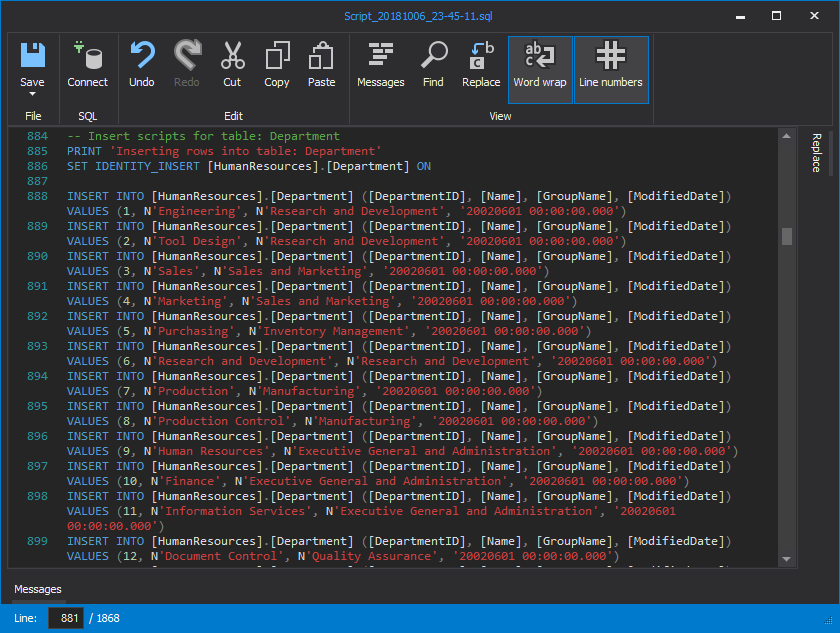
Now the script to insert the database tables, handling the Identity insert, are generated. You can simply run this script on the destination database with a click on the Execute button to insert the tables’ data:
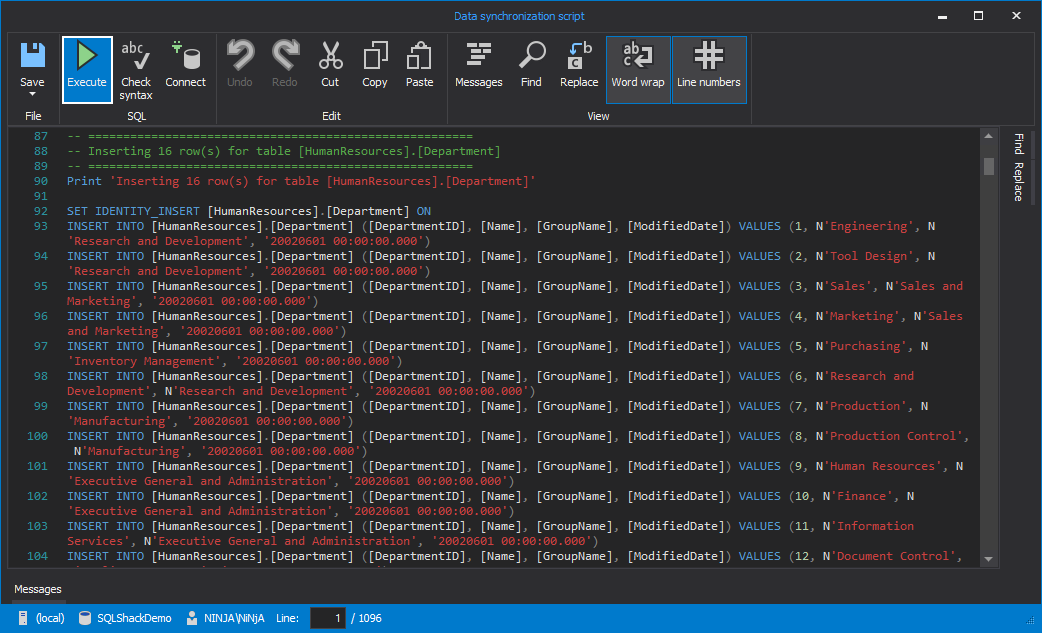
现在,将生成用于处理身份标识插入的用于插入数据库表的脚本。 您只需单击“ 执行”按钮即可在目标数据库上运行此脚本,以插入表数据:

The combination of the ApexSQL Diff and ApexSQL Data Diff tools are useful to copy SQL database tables by generating complete scripts for these tables’ schema with indexes and keys and in the correct order, and the tables’ data handling the Identity column insert.
ApexSQL Diff和ApexSQL Data Diff工具的组合可用于复制SQL数据库表,方法是为这些表的模式生成带有索引和键的正确脚本,并按正确的顺序生成它们,并处理ID列插入的表数据。
Using ApexSQL Script
使用ApexSQL脚本
Another useful tool provided by ApexSQL that can be used to copy SQL Server tables data and schema from the source database to the destination one is the ApexSQL Script tool. This nice tool will create script for the database tables schema and data with the indexes and keys of these tables handling the Identity column insert.
ApexSQL提供的另一种有用的工具是ApexSQL脚本工具,可用于将SQL Server表数据和架构从源数据库复制到目标数据库。 这个好工具将为数据库表模式和数据创建脚本,并使用这些表的索引和键来处理Identity列插入。
- ApexSQL Script tool ApexSQL脚本工具
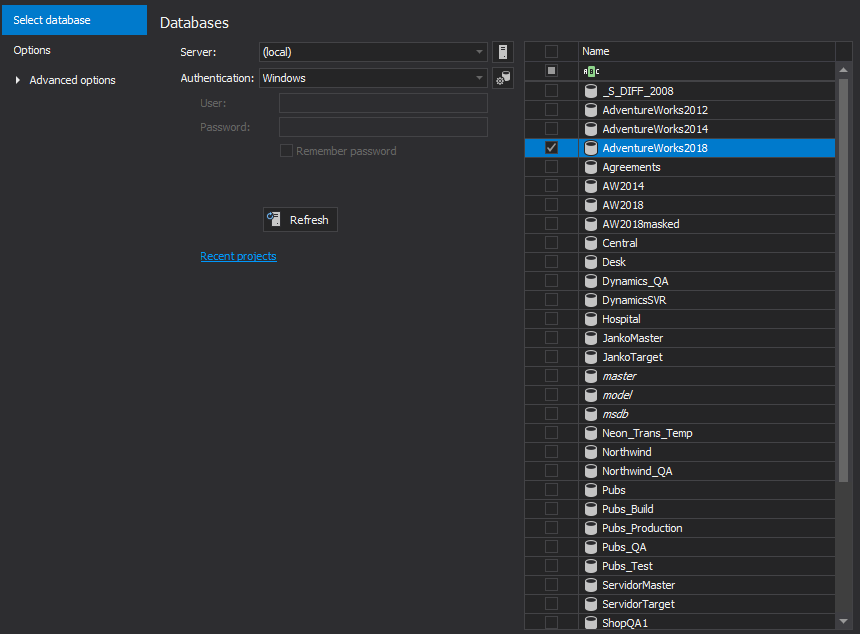
- Select databases tab of the 新建项目”窗口的“ New project window, specify the source server name and the Authentication method used to connect to the source server and click the 选择数据库”选项卡中,指定源服务器名称和用于连接到源服务器的身份验证方法,然后单击“ Connect button: 连接”按钮:
You need to specify a valid user name and password if you choose SQL Server authentication.
如果选择SQL Server身份验证,则需要指定有效的用户名和密码。
- AdventureWorks2018AdventureWorks2018
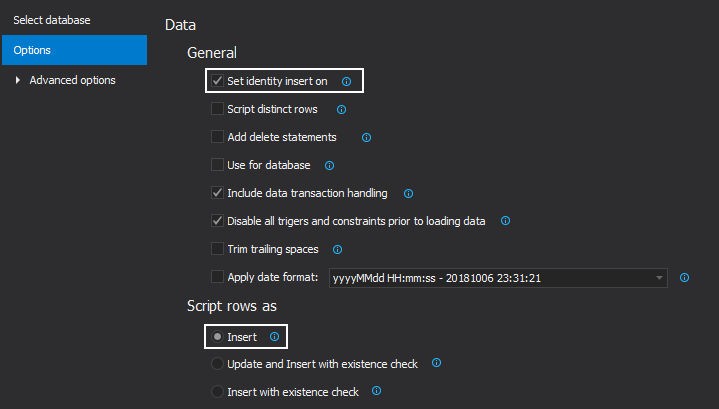
- From the Options tab, under the Data section, select the Set identity insert on option from the General sub-section and Insert from the Script row as sub-section and click the Load button:
- 从选项选项卡,在数据部分中, 选择从脚本行作为子段总小节和插入选项设置标识插入 ,然后单击Load按钮:
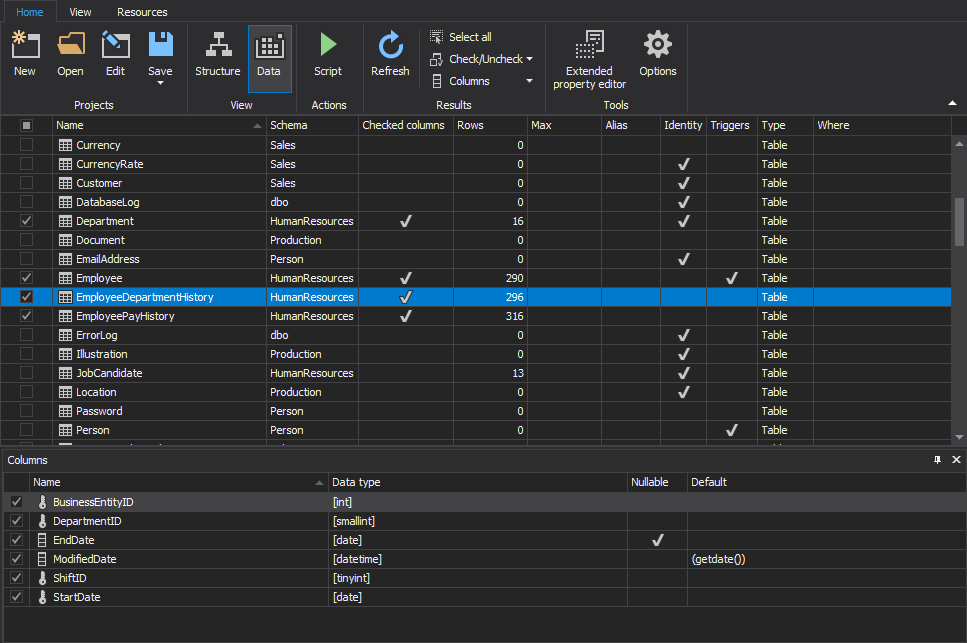
- Structure view is shown. Choose the tables that you will copy to the destination database and click the 结构”视图。 选择要复制到目标数据库的表,然后在“ Data button from the 视图”部分下的“ Home tab under the 主页”选项卡中单击“ View section: 数据”按钮:
- Data view, choose the same tables as in the 数据”视图下,选择与“ Structure view, so that data from those tables is included as well: 结构”视图中的表相同的表,以便也包括这些表中的数据:
- Script button from the 主页”选项卡中单击“ Home tab: 脚本”按钮:
- Structure and data as the 脚本”向导的第一步中,选择“ Scripting mode in the first step of the 结构和数据”作为“ Script wizard and click the 脚本”模式 ,然后单击“ Next button: 下一步”按钮:
- SQL script as the 脚本向导中选择Output type, from the SQL脚本作为Script wizard and click the 输出类型,然后单击Next button: 下一步按钮:
- Dependencies window, uncheck any dependent objects or leave all checked and click the 依赖关系”窗口中,取消选中任何依赖对象或将所有选中的对象保留为选中状态,然后单击“ Next button: 下一步”按钮:
- SQL script options step, choose the SQL脚本选项”步骤中,选择“ Open script in editor option and then click the 在编辑器中打开脚本”选项,然后单击“ Create button: 创建”按钮:
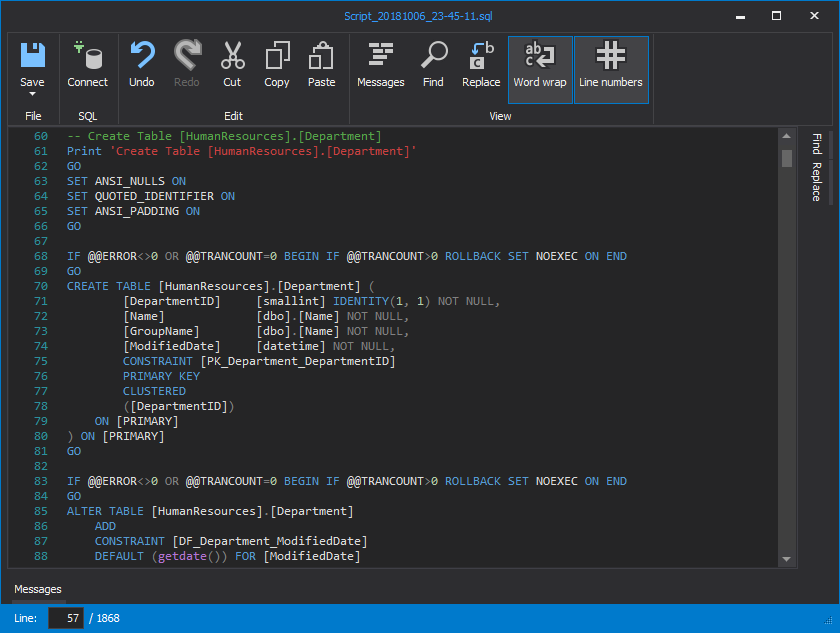
Now a completed single script is generated. Just run it on the destination database and the tables will be copied completely. You can go through the script to check the tables’ creation scripts in the correct order as below:
现在,将生成完整的单个脚本。 只需在目标数据库上运行它,表将被完全复制。 您可以按照以下正确顺序浏览脚本以检查表的创建脚本:
Also, you can find the Insert statements for the tables’ data as follows:
ApexSQL Script is a very useful tool that can be used to copy SQL Server database tables from the source database to the destination one without any effort from your side to handle the tables’ creation order. Also, no action required from your side to handle the Identity insert.
ApexSQL Script是一种非常有用的工具,可用于将SQL Server数据库表从源数据库复制到目标数据库,而无需您方面的任何努力来处理表的创建顺序。 另外,您无需采取任何措施来处理身份证明插入。
Conclusion:
结论:
As you can see, multiple methods can be used to copy tables from the source database to the destination one, including schema and data. Most of these tools require a big effort from your side to copy the tables’ objects such as indexes and keys. Also, these tools will not handle the creation order for these tables if there are relations between it. From the data side, most of these tools need extra steps from your side to handle the Identity insert. Using the combination of the ApexSQL Diff and ApexSQL Data Diff or using ApexSQL Script, by a few numbers of simple steps, you will have a complete script for the database tables’ schema and data with no extra effort from your side to handle anything. Just run these scripts on the destination database and enjoy the result.
如您所见,可以使用多种方法将表从源数据库复制到目标数据库,包括模式和数据。 这些工具大多数都需要您付出很大的努力才能复制表的对象,例如索引和键。 此外,如果它们之间存在关系,这些工具将不处理这些表的创建顺序。 从数据方面来看,这些工具中的大多数都需要您采取额外的步骤来处理标识插入。 通过几个简单的步骤,使用ApexSQL Diff和ApexSQL Data Diff的组合,或者使用ApexSQL Script ,您将拥有数据库表的模式和数据的完整脚本,而无需您费力地处理任何事情。 只需在目标数据库上运行这些脚本即可享受结果。
翻译自: https://www.sqlshack.com/how-to-copy-tables-from-one-database-to-another-in-sql-server/


 2万+
2万+

 被折叠的 条评论
为什么被折叠?
被折叠的 条评论
为什么被折叠?
 到【灌水乐园】发言


