


SQL Server Data Tools – a free standalone download or and add-in to visual studio comes in different flavors and versions. Although this blog post uses Visual Studio 2012 and SSDT stand-alone the principles are example are also valid on Visual Studio 2013.
SQL Server数据工具– Visual Studio的免费独立下载或加载项具有不同的风格和版本。 尽管此博客文章使用Visual Studio 2012和SSDT独立版本,但这些示例示例在Visual Studio 2013上也有效。
As you know SSDT is Microsoft developer tools for working with SQL Server databases on premises and in the cloud. It supersedes Management Studio in development functionality adding the powerful Visual Studio IDE to the rescue of developers that – for too many years – were stuck with SQL Server Management Studio.
如您所知,SSDT是Microsoft开发人员工具,用于在内部和云中使用SQL Server数据库。 它取代了Management Studio的开发功能,从而添加了功能强大的Visual Studio IDE,以挽救被SQL Server Management Studio困扰了很多年的开发人员。
When SQL Server 2012 was released, SSDT was also released and since then many versions have been released, not necessary following the release pattern of SQL Server.
在发布SQL Server 2012时,还发布了SSDT,从那时起,已经发布了许多版本,而不必遵循SQL Server的发布模式。
For each release, some new features are added. Some are still missing but they are probably coming in an upcoming release.
对于每个版本,都添加了一些新功能。 有些仍然缺失,但可能会在即将发布的版本中推出。
Team Foundation Server on the other hand has been around for quite a while. Team Foundation Server is the collaboration platform at the core of Microsoft’s application lifecycle management (ALM) solution. TFS supports agile development practices, multiple IDEs and platforms locally or in the cloud and gives you the tools you need to effectively manage software development projects throughout the IT lifecycle.
另一方面,Team Foundation Server已经存在了一段时间。 Team Foundation Server是Microsoft应用程序生命周期管理(ALM)解决方案核心的协作平台。 TFS支持本地或云中的敏捷开发实践,多个IDE和平台,并为您提供在整个IT生命周期中有效管理软件开发项目所需的工具。
Remember : For SSDT in Visual Studio 2012 you will need TFS Express 2012. If you have SSDT 2013 you will need TFS Express 2013. You can’t mix versions!
切记:对于Visual Studio 2012中的SSDT,您将需要TFS Express2012。如果您具有SSDT 2013,则将需要TFS Express2013。您不能混合使用版本!
In this post, we are going to focus on the interaction between SSDT and TFS. Developing locally and publishing the changes to an on-premises instance of SQL Server. We will look at how we can do continuous integration between development and other environments pushing the schema changes and upgrading the version numbers in a seamless manner upon successful build of the solution.
在本文中,我们将重点介绍SSDT和TFS之间的交互。 在本地开发并将更改发布到SQL Server的本地实例。 我们将研究如何在开发和其他环境之间进行持续集成,以在成功构建解决方案后以无缝方式推动模式更改和版本号升级。
For more info about TFS, please read following: TFS overview
有关TFS的更多信息,请阅读以下内容: TFS概述
I am using the free version of TFS called TFS Express that can be installed locally. It is suitable for small projects only and is limited to five concurrent users. Download it here.
我使用的是TFS的免费版本,称为TFS Express ,可以在本地安装。 它仅适用于小型项目,并且仅限五个并发用户。 在这里下载。
For creating a Visual Studio Online solution and more info about Visual Studio Online click here
有关创建Visual Studio Online解决方案以及有关Visual Studio Online的更多信息,请单击此处。
内部和外部 (On and Off-premises)
At the time of writing, it is not possible to have Visual Studio Online (VSO) deploying to a local instance of SQL Server as VSO cannot “see” your on-premises SQL Servers. Even with a Hosted Build Controller.
在撰写本文时,由于VSO无法“看到”本地SQL Server,因此无法将Visual Studio Online(VSO)部署到SQL Server的本地实例。 即使使用托管构建控制器。
场景 (The scenario)
I am a database developer and I am working on an existing Azure SQL database that need some changes. I have some simple tables and I need to add a stored procedure to create customers ranking and a table to get hold of the customer ranking. The ranking should be calculated according to how much the customer has bought.
我是数据库开发人员,并且正在研究需要一些更改的现有Azure SQL数据库。 我有一些简单的表,我需要添加一个存储过程来创建客户排名,并添加一个表来掌握客户排名。 排名应根据客户购买的数量来计算。
| Rank Name | Description |
| Inactive | No orders |
| Bronze | Orders under $100 |
| Silver | Orders $100 to $999 |
| Gold | Orders $1,000 to $9,999 |
| Platinum | Orders $10,000 and more |
| 等级名称 | 描述 |
| 不活跃 | 没有订单 |
| 青铜 | 100美元以下的订单 |
| 银 | 订单$ 100至$ 999 |
| 金 | 订单$ 1,000至$ 9,999 |
| 铂 | 订单$ 10,000以上 |
Stored Procedure:
存储过程:
CREATE PROCEDURE [dbo].[uspRankCustomers]
AS
DECLARE @CustomerId int
DECLARE @OrderTotal money
DECLARE @RankingId int

DECLARE curCustomer CURSOR FOR
SELECT c.CustomerID, ISNULL(SUM(oh.OrderTotal), 0) AS OrderTotal
FROM dbo.Customer AS c
LEFT OUTER JOIN dbo.OrderHeader AS oh ON c.CustomerID = oh.CustomerID
Group BY c.CustomerId

OPEN curCustomer
FETCH NEXT FROM curCustomer INTO @CustomerId, @OrderTotal

WHILE @@FETCH_STATUS = 0
BEGIN
IF @OrderTotal = 0 SET @RankingId = 1
ELSE IF @OrderTotal < 100 SET @RankingId = 2
ELSE IF @OrderTotal < 1000 SET @RankingId = 3
ELSE IF @OrderTotal < 10000 SET @RankingId = 4
ELSE SET @RankingId = 5

UPDATE Customer
SET RankingId = @RankingId
WHERE CustomerId = @CustomerId

FETCH NEXT FROM curCustomer INTO @CustomerId, @OrderTotal
END

CLOSE curCustomer
DEALLOCATE curCustomer
GO
创建项目 (Creating the project)
Creating a project from an existing database in SSDT is straightforward.
从SSDT中的现有数据库创建项目非常简单。
In another blog post I will have a detailed look at the different ways to work with new and existing databases but for now let’s import an existing database in our project.
在另一篇博客文章中,我将详细介绍使用新数据库和现有数据库的不同方法,但现在让我们在项目中导入现有数据库。
- Create a new SQL Server Database project 创建一个新SQL Server数据库项目
- Right click on the project name -> Import -> Import database 右键单击项目名称->导入->导入数据库
- Create a new connection to the server (or use an existing one, if one exists) 创建与服务器的新连接(或使用现有的连接,如果存在)
- Choose the database to import 选择要导入的数据库
- Leave the other settings as they are. 保持其他设置不变。
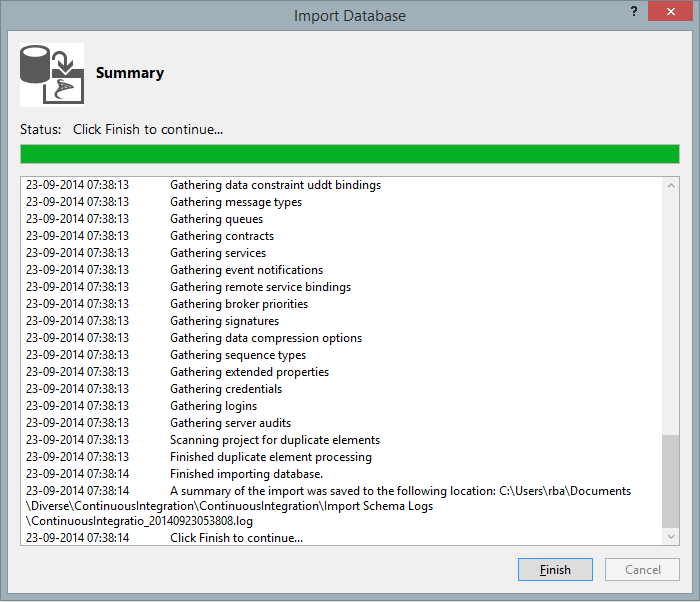
After a few seconds the import should be complete
几秒钟后,导入应完成
Figure 2: Database import complete
The first thing I always do when working on an existing database is taking a baseline for the solution. So I have an initial state of the database I eventually can return to when working on it. This is done by right-clicking on the database and choosing snapshot project. It will generate a dacpac file holding the database schema of the newly imported database. I usually name the file “baseline” and leave the timestamp so I now when it was created.
在处理现有数据库时,我始终要做的第一件事就是为解决方案建立基准。 因此,我具有数据库的初始状态,最终可以在使用该数据库时返回该状态。 可以通过右键单击数据库并选择快照项目来完成。 它将生成一个dacpac文件,其中包含新导入的数据库的数据库模式。 我通常将文件命名为“基准”,并留下时间戳,因此现在是它的创建时间。
将解决方案添加到Visual Studio Online (Adding the solution to Visual Studio Online)
Now I need to add the database to the Source Control provider, in this case Visual Studio Online.
现在,我需要将数据库添加到Source Control提供程序中,在本例中为Visual Studio Online。
- Choose Team -> Connect to Team foundation Server and connect to my Visual Studio online project folder 选择团队->连接到Team Foundation Server并连接到我的Visual Studio联机项目文件夹
- Now I can Choose File -> Source Control -> Add to source control 现在,我可以选择“文件”->“源代码管理”->“添加到源代码管理”
- And all my items should be added (but not checked-in) 并且我的所有物品都应添加(但不能签入)
- Check in now to save all items in the source control repository. 立即签入以将所有项目保存在源代码控制存储库中。
实施变更 (Implementing the changes)
Now that I am done I can implement the changes necessary to database, adding the ranking table, the stored procedure and making changes to the customer table so it references the ranking table.
现在,我已经完成了对数据库的必要更改,添加了排名表,存储过程并对客户表进行了更改,以便它引用排名表。
CONSTRAINT [FK_Customer_customerRanking] FOREIGN KEY (RankingID) REFERENCES [customerRanking]([Id])
Listing 2: adding Foreign Key to Customer table
清单2:向客户表添加外键
I also add data to the CustomerRanking table as described in the scenario above
我还按照上述情况将数据添加到CustomerRanking表中
There is also another table that I think it is important to add: Deployment. The idea behind this table is to keep track of all the deployments I’ve made, using a post deployment script that is always executed each I perform my continuous integration
我认为还需要添加另一个表格: Deployment 。 该表背后的想法是,使用部署后脚本跟踪我所做的所有部署,该脚本在每次执行持续集成时始终执行
CREATE TABLE [dbo].[Deployment]
(
[Id] INT NOT NULL IDENTITY(1,1),
[DeploymentDate] DATETIME NOT NULL,
CONSTRAINT [PK_Deployment] PRIMARY KEY ([Id])
)
Listing 3: Adding Deployment table
清单3:添加部署表
Now that I’ve done my changes I can build my project (necessary before taking a snapshot), take a snapshot project of my database, call it “change_complete”, and leave the timestamp as is.
现在,我已经完成了更改,可以构建我的项目(在拍摄快照之前是必需的),拍摄数据库的快照项目,将其称为“ change_complete”,并保留时间戳。
创建部署配置文件 (Create a deployment profile)
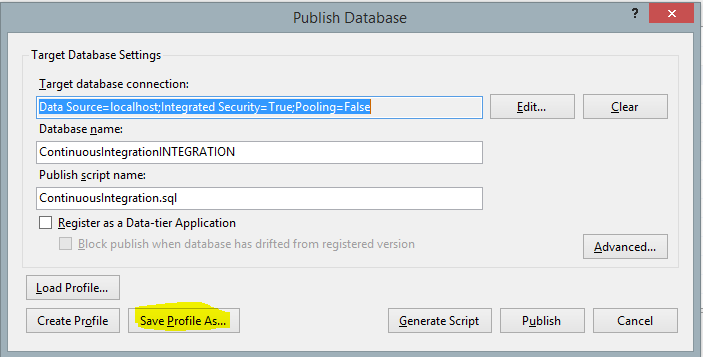
Before I can deploy I need to create a profile telling Visual Studio where to deploy upon successful build
在部署之前,我需要创建一个配置文件,以告诉Visual Studio成功构建后在哪里部署
- Right click the project and choose Publish 右键单击该项目,然后选择发布
- Write the server name and the name of the database where it should be deployed to (in my example ContinuousIntegrationINT), but it can also be on Azure or other places 编写服务器名称和应将其部署到的数据库的名称(在我的示例中为ContinuousIntegrationINT),但也可以位于Azure或其他位置
- Don’t publish but save the profile and give it a meaningful name 不发布,但保存配置文件并为其赋予有意义的名称
- Close the dialog without publishing 关闭对话框而不发布
If you are connecting using a user name and password you need to manually edit the publish profile file afterwards as the password is not saved.
如果使用用户名和密码进行连接,则由于未保存密码,因此之后需要手动编辑发布配置文件。
Figure 3: Create a deployment profile
实施持续整合 (Implementing the continuous integration)
The idea is to have the database deployed each time I check the source code in. At the same time I want the deployment table to keep track of the deployments.
想法是每次我检入源代码时都要部署数据库。与此同时,我希望部署表可以跟踪部署。
To achieve that I start by creating a post-deployment script:
为此,我首先创建一个部署后脚本:
- Right click on the project -> Add -> New item -> Post-deployment script (in the User script category) 右键单击项目->添加->新建项目->部署后脚本(在用户脚本类别中)
Add some SQL to increment the deployment version and also to populate the CustomerRanking table and every other table that needs data.
添加一些SQL以增加部署版本,并填充CustomerRanking表和其他需要数据的表。
insert into Deployment (DeploymentDate) values (getdate())

if(select count(*) from CustomerRanking) = 0
begin
INSERT INTO [dbo].[CustomerRanking] ([Id], [Name], [Description]) VALUES (1, N'Inactive ', N'No orders ')
INSERT INTO [dbo].[CustomerRanking] ([Id], [Name], [Description]) VALUES (2, N'Bronze ', N'Orders under $100 ')
INSERT INTO [dbo].[CustomerRanking] ([Id], [Name], [Description]) VALUES (3, N'Silver ', N'Orders $100 to $999 ')
INSERT INTO [dbo].[CustomerRanking] ([Id], [Name], [Description]) VALUES (4, N'Gold ', N'Orders $1,000 to $9,999 ')
INSERT INTO [dbo].[CustomerRanking] ([Id], [Name], [Description]) VALUES (5, N'Platinum ', N'Orders $10,000 and more ')
End
Listing 4: Post deployment script
清单4:部署后脚本
For modifying the deployment options go to the Source Control explorer tab and add a new build definition.
要修改部署选项,请转到“源代码管理”浏览器选项卡,然后添加新的构建定义。
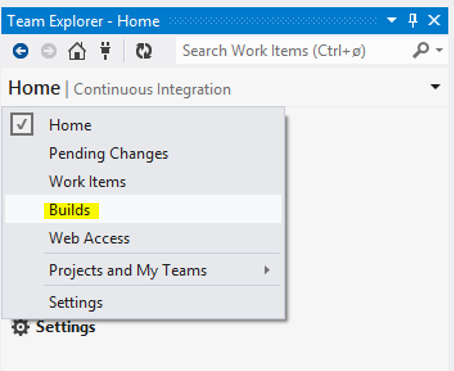
Figure 4: Adding a build definition
This is the page where you can control what happens during a build.
在此页面中,您可以控制构建期间发生的情况。
What we want here is to tell Visual Studio to use msbuild to deploy the database on any successful builds. This is done by:
我们想要的是告诉Visual Studio使用msbuild在任何成功的构建上部署数据库。 这是通过以下方式完成的:
On the Trigger page, choose Continuous Integration
在“触发器”页面上,选择“连续积分”
Figure 5: Continuous integration option- On the process page make sure that the project is listed on the item to build property 在过程页面上,确保要在项目上列出项目以建立属性
On the process page I add the necessary build arguments
在过程页面上,我添加必要的构建参数
Figure 6: Process page

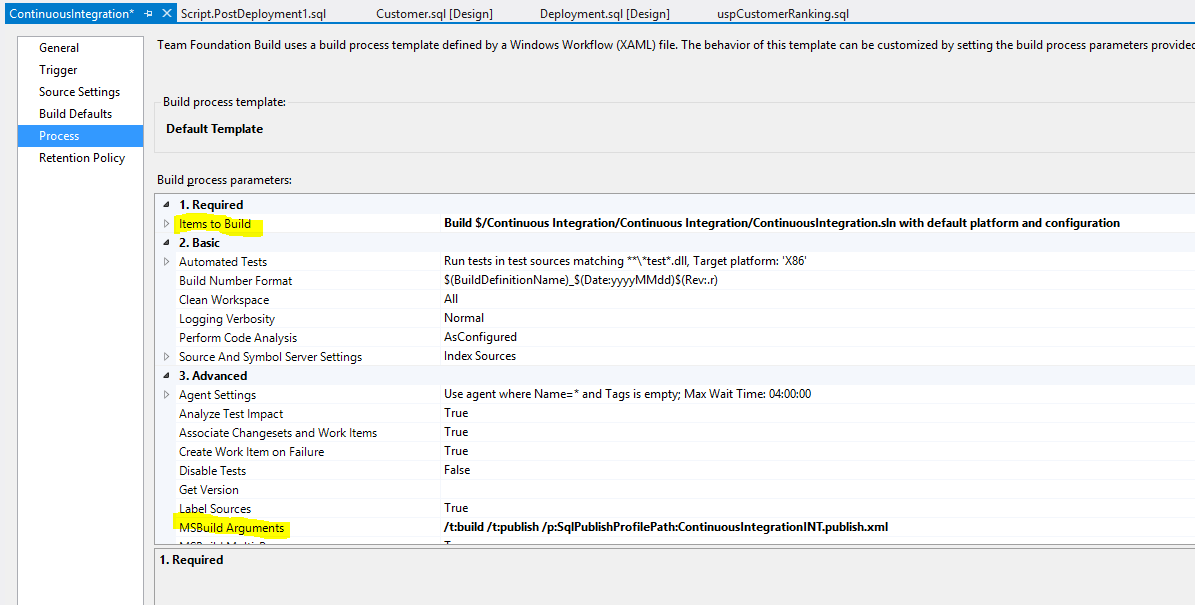
The arguments necessary for the example are:
该示例所需的参数为:
- /t:build (builds the source code) / t:build(生成源代码)
- /t:publish (published the code using the publish file) / t:发布(使用发布文件发布代码)
- /p:SqlPublishProfilePath (the path of the publish file – relative to the project) / p:SqlPublishProfilePath(发布文件的路径–相对于项目)
So in my case the arguments (separated by space) would be:
因此,在我的情况下,参数(以空格分隔)为:
/t:build /t:publish /p:SqlPublishProfilePath=ContinuousIntegrationINT.publish.xml
/ t:构建/ t:发布/p:SqlPublishProfilePath=ContinuousIntegrationINT.publish.xml
你完成了! (You’re done!)
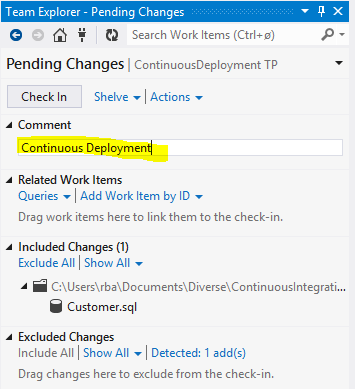
Save the New build configuration. Every future check in should trigger a build and a publish to the database specified in the publish file.
保存新的构建配置。 以后进行的每一次签入都应触发构建并将其发布到发布文件中指定的数据库中。
Next time you check in it, your build definition should kick in and build the project:
下次您检入它时,您的构建定义将启动并构建项目:
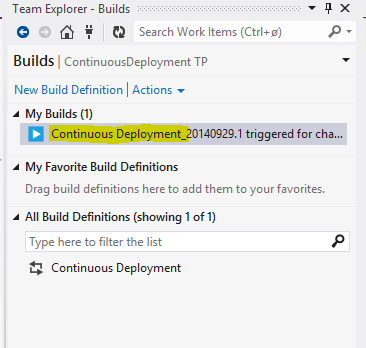
The Build menu of the Team Explorer should show the current build:
Team Explorer的“构建”菜单应显示当前构建:
And finally the Build log should show the progress and status:
最后,构建日志应显示进度和状态:
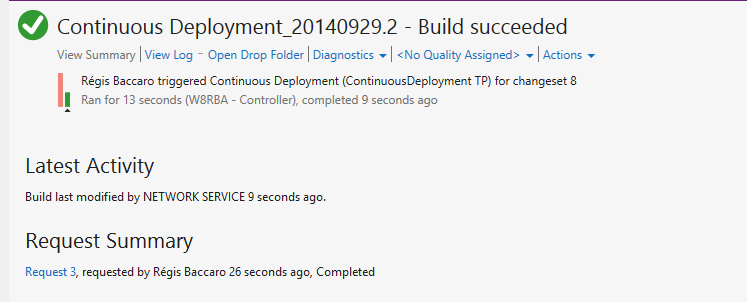
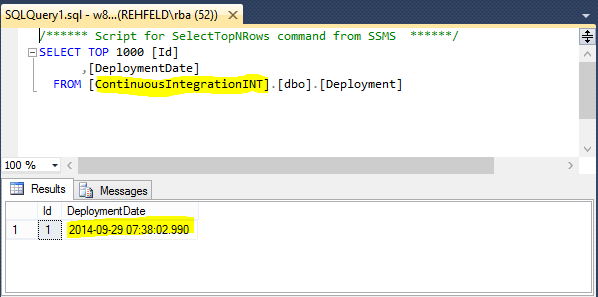
Finally the database specified in your Publish file (ContinuousIntegrationINT) should be created where you specified it and the schema copied and your post deployment script executed so the Deployment table should show the data of the deployment
最后,应该在您指定发布文件(ContinuousIntegrationINT)的位置创建数据库,然后复制该模式并执行部署后脚本,以便Deployment表应显示部署数据
In the next post I will show you how to do unit testing of your SSDT database project. In the meantime: Happy deploying!
在下一篇文章中,我将向您展示如何对SSDT数据库项目进行单元测试。 同时:部署愉快!
翻译自: https://www.sqlshack.com/continuous-integration-sql-server-data-tools-team-foundation-server/


 271
271

 被折叠的 条评论
为什么被折叠?
被折叠的 条评论
为什么被折叠?
 到【灌水乐园】发言


