


 本教程详细介绍了如何使用SQL Server的备份和还原功能,结合SMB协议,将数据库从Windows迁移到Linux。首先在Windows上备份SQL数据库,然后通过Samba设置网络共享,将备份文件传送到Linux计算机,最后在Linux上使用SQLCMD进行数据库还原和数据验证,确保迁移成功。
In an attempt decouple systems, we may modularize them. In most cases, we would need to move databases from one server to another—sometimes, even move them from Windows to Linux.
为了尝试分离系统,我们可以将它们模块化。 在大多数情况下,我们需要将数据库从一台服务器移至另一台服务器,有时甚至需要将它们从Windows移至Linux。
In the case of moving a database to Linux, SQL Server’s Backup and Restore feature is the recommended mode of migration; we would migrate from SQL Server on Windows to SQL Server vNext CTP 1.4 on Linux.
在将数据库移至Linux的情况下,建议使用SQL Server的备份和还原功能。 我们将从Windows上SQL Server迁移到Linux上SQL Server vNext CTP 1.4。
This topic provides step-by-step instructions for this procedure. In this tutorial, you will:
本主题提供此过程的分步说明。 在本教程中,您将:
- Create a database, SQLShack 创建数据库,SQLShack
- Backup SQLShack on a Windows machine 在Windows计算机上备份SQLShack
- Samba. Use Samba将备份转移到Linux计算机上。 使用SambaSamba * to setup an SMB network share between the Windows and the Linux machines. *在Windows和Linux计算机之间设置SMB网络共享。
- Restore the database using the SSMS console (sqlcmd) or GUI
- 使用SSMS控制台( sqlcmd )或GUI还原数据库
示范 (Demonstration)
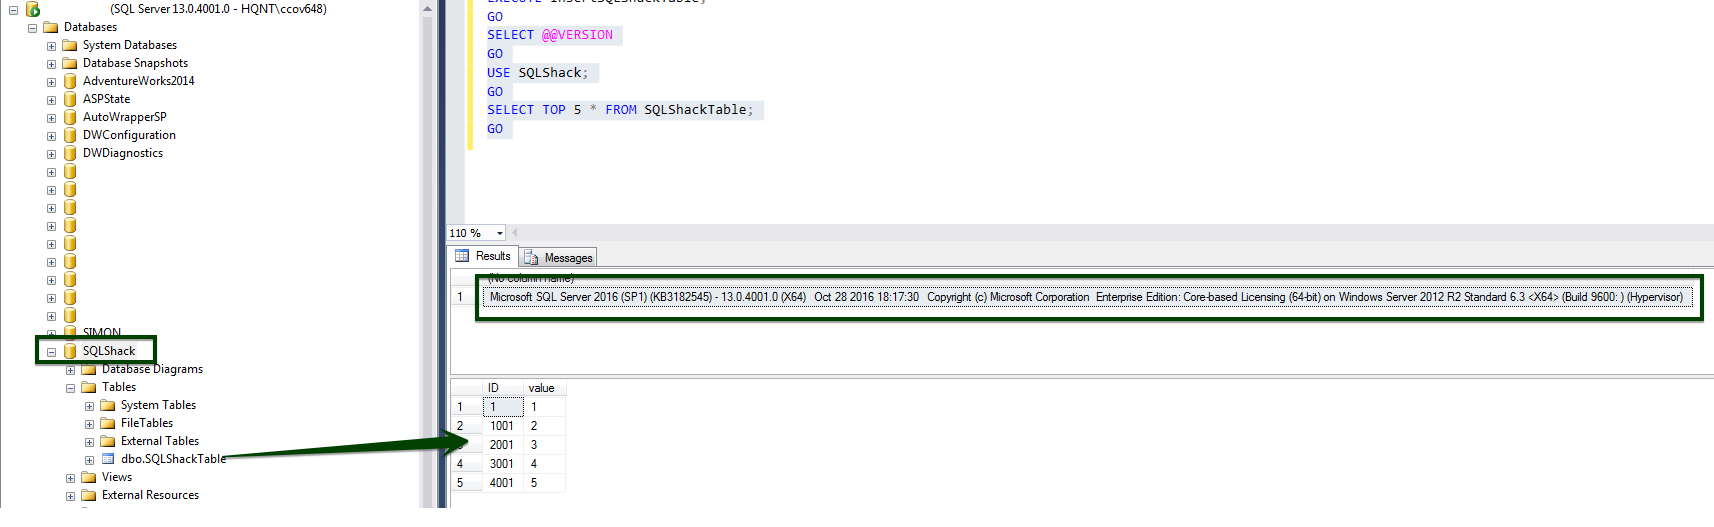
Let’s create a database, SQLShack. I’m going to switch into the SQLShack database to create a sample table to hold dummy data which is needed to demonstrate the restoration process.
让我们创建一个数据库SQLShack 。 我将切换到SQLShack数据库,以创建一个示例表来保存虚拟数据,这是演示还原过程所需的。
-- create a new database for this example
CREATE DATABASE SQLShack;
GO
USE SQLShack;
GO
-- insert some data
CREATE TABLE SQLShackTable (
    ID int IDENTITY(1,1000) PRIMARY KEY NOT NULL,
    value int
);
GO
CREATE PROCEDURE InsertSQLShackTable
AS
DECLARE @i int = 1
WHILE @i <100
    BEGIN
        INSERT SQLShackTable (value) VALUES (@i)
        Set @i +=1
    END
GO
EXECUTE InsertSQLShackTable;
GO
SELECT * FROM SQLShackTable;
GO
Windows计算机上的数据库备份 (Database Backup on Windows Machine)
Backup the database, SQLShack, on a Windows Machine.
在Windows机器上备份数据库SQLShack。
The following simple command creates a backup of SQLShack to a given file location
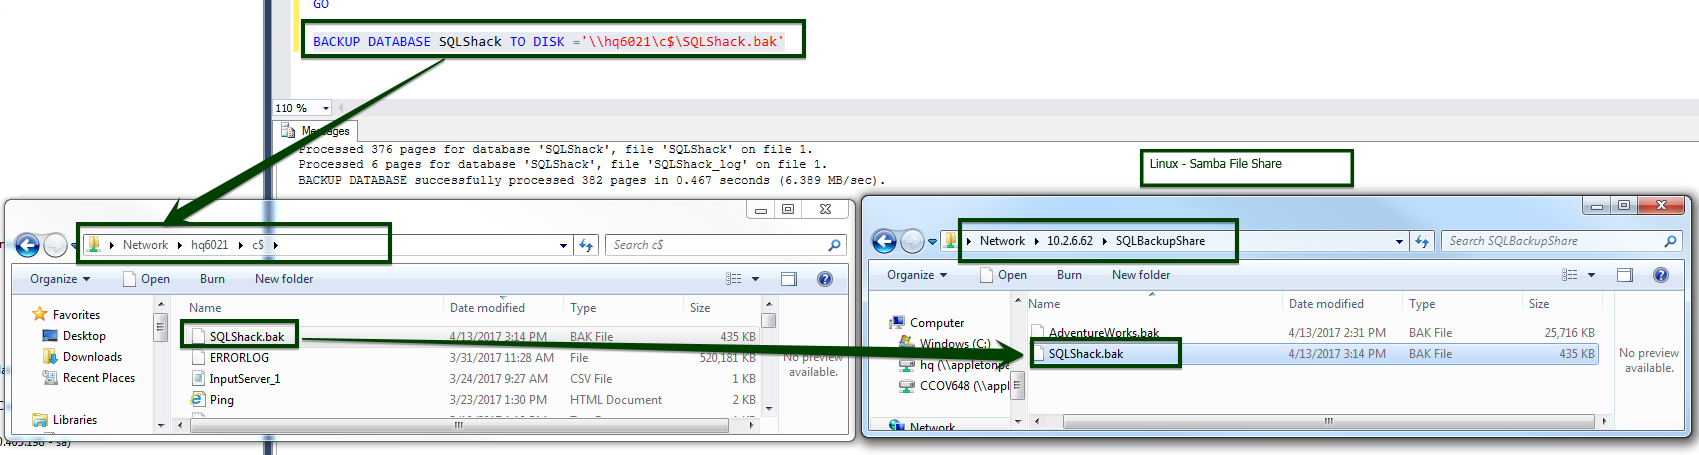
下面的简单命令将SQLShack备份到给定文件位置
BACKUP DATABASE SQLShack TO DISK ='\\hq6021\c$\SQLShack.bak'
将备份文件传输到Linux计算机 (Transfer backup file to the Linux machine)
You can use Samba to create a shared folder on the Linux system and transfer files from the Windows computer to the Linux (CentOS) computer—or vice versa. This allows the files to be shared on the network through the SMB protocol. This will also allow Windows hosts to get remote access to the files using the file explorer.
您可以使用Samba在Linux系统上创建共享文件夹,并将文件从Windows计算机传输到Linux(CentOS)计算机,反之亦然。 这允许文件通过SMB协议在网络上共享。 这也将允许Windows主机使用文件资源管理器远程访问文件。
Let us go through a step-by-step installation and configuration process of Samba so that we can easily share the files between computers running different operating systems.
让我们逐步进行Samba的安装和配置过程,以便我们可以轻松地在运行不同操作系统的计算机之间共享文件。
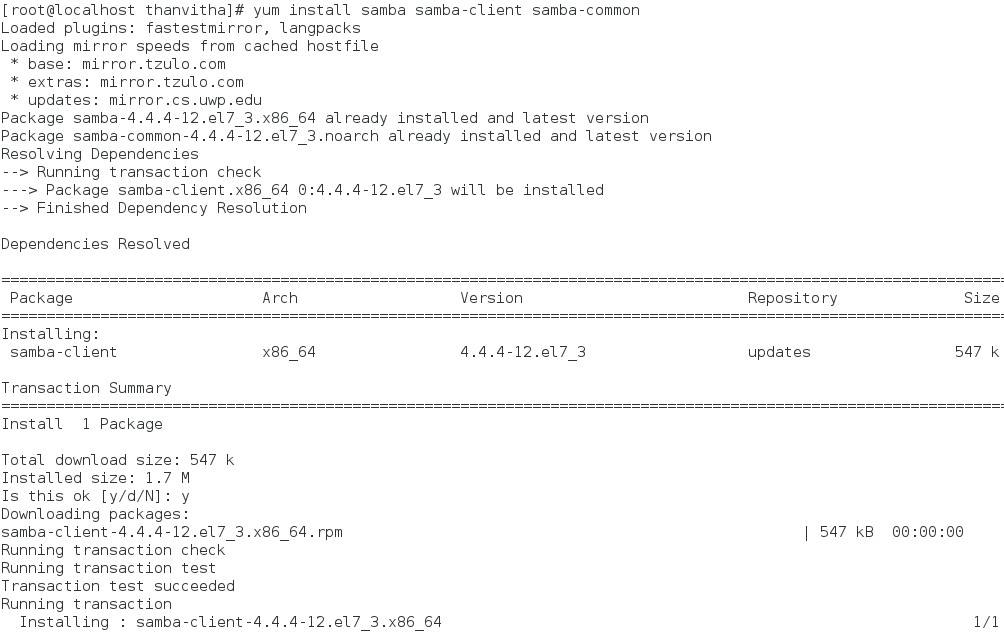
安装Samba客户端和Samba common (Install the Samba client and Samba common)
This section provides details of the installation and configuration of Samba
本节提供有关Samba安装和配置的详细信息
[root@localhost thanvitha ]# yum install samba samba-client samba-common
[root @ localhost thanvitha]#yum install samba samba-client samba-common
将SAMBA服务设置为自动启动 (Setting the SAMBA services to start automatically )
[root@localhost thanvitha ]#setup
[root @ localhost thanvitha] #setup
- Select system services, hit Enter
- 选择系统服务 , 按Enter
- Enable smb.service and click Ok
- 启用smb.service并单击“ 确定”
创建一个SQL备份文件夹 (Create a SQL Backup folder)
Check for SQL backup directory at the /var/opt/ location
在/ var / opt /位置检查SQL备份目录
[root@localhost thanvitha ]#ls -l /var/opt/
[root @ localhost thanvitha] #ls -l / var / opt /
The command lists down the entire directory inside the /var/opt. The output also confirms that we don’t have any SQL Backup folder under /var/opt.
该命令在/ var / opt内列出了整个目录。 输出还确认/ var / opt下没有任何SQL Backup文件夹。
Let’s create a folder, sqlbackup at /var/opt using the mkdir command.
让我们使用mkdir命令在/ var / opt下创建一个文件夹sqlbackup 。
# mkdir /var/opt/sqlbackups
# ls -l#mkdir / var / opt / sqlbackups
#ls -lThe folder thus created is owned by the root user and the group user; it can’t be accessed by a non-root user. You need to change the ownership of the folder by running the following commands:
这样创建的文件夹由root用户和group用户拥有; 非root用户不能访问它。 您需要通过运行以下命令来更改文件夹的所有权:
# chown mssql /var/opt/sqlbackup
# chgrp mssql /var/opt/sqlbackup#chown mssql / var / opt / sqlbackup
#chgrp mssql / var / opt / sqlbackupExecute this command to give everyone full access to /var/opt/sqlbackup:
执行此命令,使所有人都可以完全访问/ var / opt / sqlbackup :
# chmod –R 777 /var/opt/sqlbackup
#chmod –R 777 / var / opt / sqlbackup
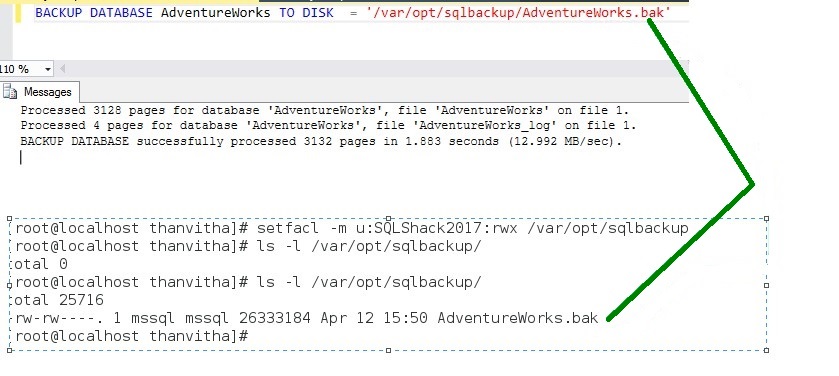
Backup the database
备份数据库
BACKUP DATABASE AdventureWorks TO DISK ='/var/opt/sqlbackup/AdventureWorks.bak'
配置Samba (Configure Samba)
This section deals with required parameter setting in the samba configuration file
本节介绍samba配置文件中所需的参数设置
Edit the file /etc/samba/smb.conf
编辑文件/etc/samba/smb.conf
Before making change ensure to backup the original file as /etc/samba/smb.conf.bak
进行更改之前,请确保将原始文件备份为/etc/samba/smb.conf.bak
#cp /etc/samba/smb.conf /etc/samba/smb.conf.bak
#cp /etc/samba/smb.conf /etc/samba/smb.conf.bak
Configure the parameters on how to access the shared folder
配置如何访问共享文件夹的参数
# vi /etc/samba/smb.conf
#vi /etc/samba/smb.conf
The following content is appended to /etc/samba/smb.conf. The exact configuration on your computer may differ. If it is, update the settings accordingly.
以下内容附加到/etc/samba/smb.conf中 。 您计算机上的确切配置可能有所不同。 如果是这样,请相应地更新设置。
[SQLBAckupShare]
path = /var/opt/sqlbackup
valid users = SQLShack2017
read only = yes
browsable = yes
writable = yes
guest ok = yes
public =yes
[SQLBAckupShare]
路径= / var / opt / sqlbackup
有效用户= SQLShack2017
只读=是
可浏览=是
可写=是
来宾还可以=是
公众=是
防火墙配置 (Firewall Configuration)
The CentOS 7.0 Firewall-cmd will block the samba access. To overcomethat issue we will run:
CentOS 7.0 Firewall-cmd将阻止samba访问。 为了克服这个问题,我们将运行:
# firewall-cmd –permanent –zone=public –add-service=samba
# firewall-cmd –reload
#firewall-cmd –永久–区域=公共–add-service = samba
#firewall-cmd –重新加载
Check the Samba service
检查Samba服务
[root@localhost ~]# systemctl restart smb.service
[root @ localhost〜]#systemctl重新启动smb.service
Next, we want to allow selinux access to the shared folder. To do that, run the command below from the /samba directory
接下来,我们要允许selinux访问共享文件夹。 为此,请从/ samba目录运行以下命令
[root@localhost opt]# chcon -Rt samba_share_t /var/opt/sqlbackup/
[root @ localhost opt]#chcon -Rt samba_share_t / var / opt / sqlbackup /
Now you can access the share created on Centos 7.0, on Windows as follows, go to the Run prompt and type \\10.2.6.62\
现在,您可以按如下所示在Windows上访问在Centos 7.0上创建的共享,转到“运行”提示并键入\\ 10.2.6.62 \
Now, I can copy the files and see the existing backup files:
现在,我可以复制文件并查看现有的备份文件:
还原SQLShack数据库 (Restore SQLShack Database )
Restore the backup of database, SQLShack on the SQL Server vNext instance on the Linux machine, from SSMS on the Windows computer.
从Windows计算机上的SSMS恢复Linux机器上SQL Server vNext实例上的数据库SQLShack的备份。
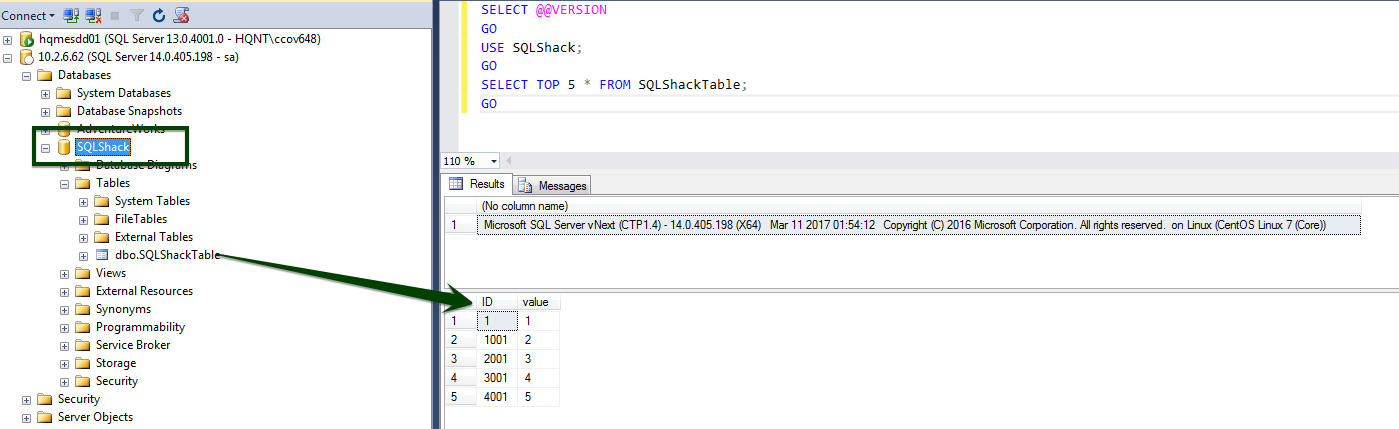
The data that you see below is from the database restored onto the Linux machine. The data, as we can see, is consistent—the restoration was successful.
您在下面看到的数据来自还原到Linux计算机上的数据库。 我们可以看到,数据是一致的-恢复成功。
Browse the location on Windows machine and copy the SQLShack.bak file to the Linux share using the SMB protocol:
浏览Windows机器上的位置,然后使用SMB协议将SQLShack.bak文件复制到Linux共享:
Open SQL Server Management Studio and login to the SQL instance of Linux using SQL authentication
打开SQL Server Management Studio并使用SQL身份验证登录到LinuxSQL实例
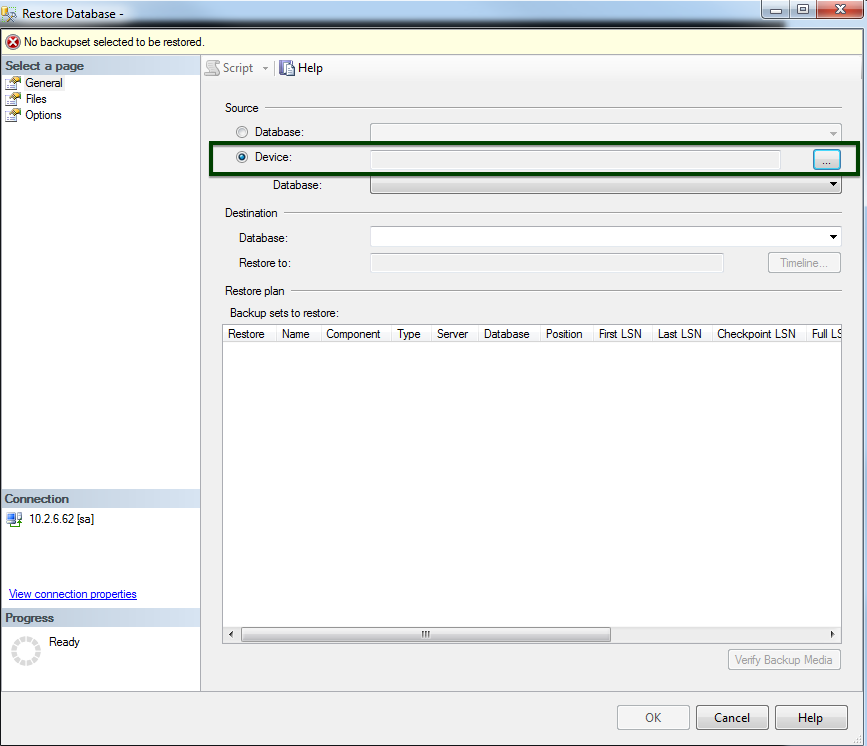
Once logged in, right click on the Databases folder and select Restore Database.
登录后,右键单击Databases文件夹,然后选择Restore Database 。
Click on the radio button against Device and browse the source folder
点击对设备的单选按钮,浏览源文件夹
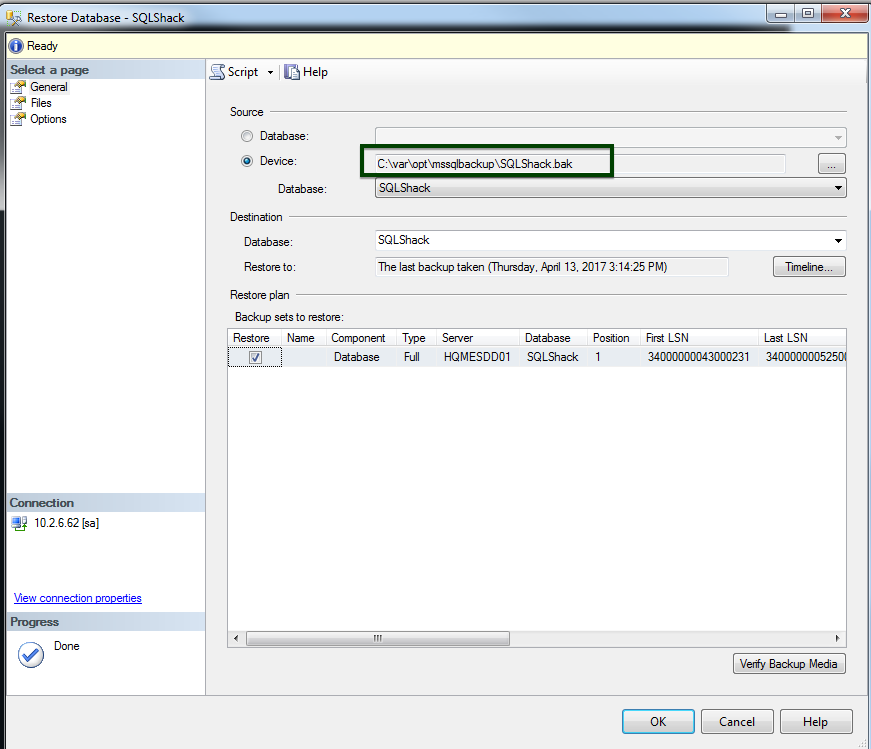
Set the backup media type to File and then click Add
将备份媒体类型设置为“ 文件” ,然后单击“ 添加”。
Browse to the SQL backup (.BAK) file—in this case, SQLShack.BAK—and click OK.
浏览到SQL备份( .BAK )文件(在本例中为SQLShack.BAK) ,然后单击“ 确定” 。
Again, click OK.
再次,单击确定。
Click OK to initiate the restore process
单击“ 确定”启动还原过程
At this point, enough information has been entered for the database to be restored. Click OK.
此时,已经输入了足够的信息来还原数据库。 单击确定 。
After the restoration is successful, connect to the SQLShack database on the Linux machine to view the output.
恢复成功后,连接到Linux计算机上的SQLShack数据库以查看输出。
使用SQLCMD还原 (Restore Using SQLCMD)
Use sqlcmd to make a database connection on the Windows Server.
使用sqlcmd在Windows Server上建立数据库连接。
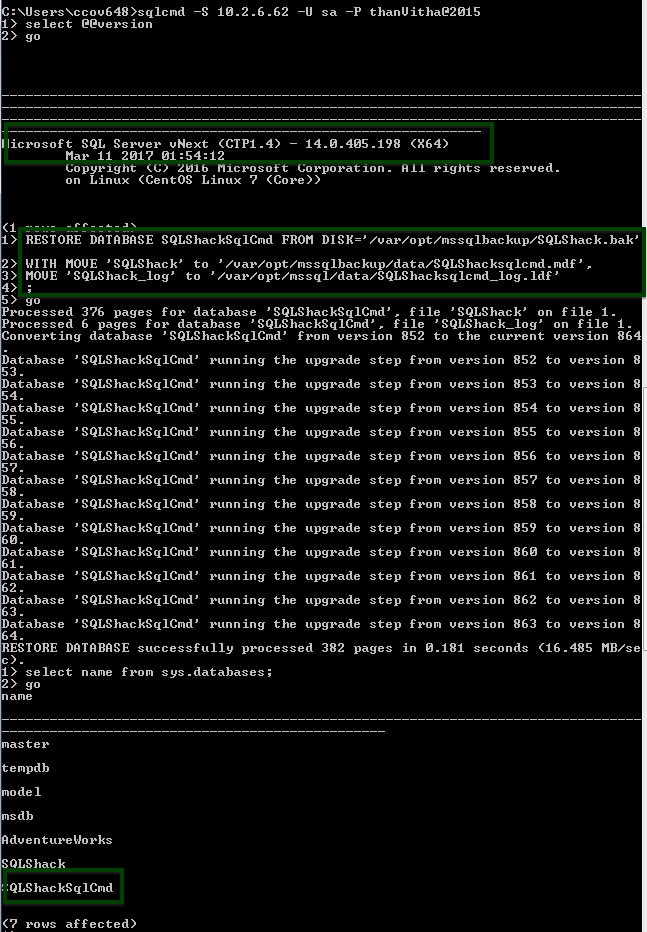
Run the following command to make a connection.
运行以下命令进行连接。
sqlcmd -S 10.2.6.62 -U sa -P thanVitha@2015
sqlcmd -S 10.2.6.62 -U sa -P thanVitha @ 2015
Run the restore command
运行restore命令
RESTORE DATABASE SQLShackSqlCmd FROM DISK='/var/opt/mssqlbackup/SQLShack.bak'
WITH MOVE 'SQLShack' to '/var/opt/mssqlbackup/data/SQLShacksqlcmd.mdf'
MOVE 'SQLShack_log' to '/var/opt/mssql/data/SQLShacksqlcmd_log.ldf'
To restore a database to SQL Server on Linux, the source backup must be taken from SQL Server 2014 or SQL Server 2016. The backup SQL Server build number must not be greater than the restore SQL Server build number.
要将数据库还原到Linux上SQL Server,必须从SQL Server 2014或SQL Server 2016中获取源备份。备份SQL Server内部版本号不能大于还原SQL Server内部版本号。
资料验证 (Data validation)
As we can see that the data is there on both instances, hence we can conclude the restoration process is successful
我们可以看到两个实例上都有数据,因此可以断定还原过程是成功的
结论 (Conclusion)
It is critical to understand how SQL works on non-Windows platforms, when moving from Windows. As DBAs, we need to ensure smooth migration, to ensure effective encapsulation. This article shows that the backup and restore functionality are the same across platforms, with a few specific differences in terms of configuration. It also demonstrates the backup file transfer using the Samba protocol.
从Windows迁移时,了解SQL在非Windows平台上的工作方式至关重要。 作为DBA,我们需要确保平稳迁移,以确保有效封装。 本文表明,备份和还原功能在各个平台上都是相同的,但在配置方面有一些特定的差异。 它还演示了使用Samba协议的备份文件传输。
脚注 (Footnote)
* Samba was designed to allow computers to read and write files to a remote host over a local area network (LAN). The directories on the remote hosts made available via SMB are called shares.
* Samba旨在允许计算机通过局域网(LAN)读写文件到远程主机。 通过SMB可用的远程主机上的目录称为共享。
参考资料 (References)
- Back Up and Restore of SQL Server Databases 备份和还原SQL Server数据库
- SMB protocol SMB协议
- Backup and Restore SQL Server database on Linux 在Linux上备份和还原SQL Server数据库


 218
218

 被折叠的 条评论
为什么被折叠?
被折叠的 条评论
为什么被折叠?
 到【灌水乐园】发言


