


In my first article, we talked about how we can make our SQL Server installation include every single patch and hotfix we plan to install. That process is called slipstreaming and it’s a huge timesaver, so if you missed it, jump here and take a look at it. I seriously believe it could be a game changer for you and how you do some of your work.
In this blog post I want to somehow enhance what we learned in that previous blog post by actually allowing ourselves to install SQL Server without even seeing the installation wizard! So imagine the following scenario – you work for an organization where everything should be standardized or probably you have 10 new SQL instances to be installed because of a business requirement. In both cases you want to install them as like they are created from a template, but you don’t want to lose time and go on each and every server, going through the next-next wizard in order to complete the request. The so called method of “unattended install” is here to save you. Let’s see what this means by actually using a both SQL Server 2012 and SQL Server 2014 media.
在我的第一篇文章中,我们讨论了如何使SQL Server安装包含计划安装的每个修补程序和修补程序。 这个过程称为滑流,它节省了很多时间,因此,如果您错过了它,请跳到这里看看。 我坚信这可能会改变您的口味,并改变您的工作方式。
在本博客文章中,我想通过某种方式使我们自己安装SQL Server甚至不看安装向导,从而增强在上一篇博客文章中学到的知识! 因此,请设想以下情形–您在一个应该对所有事物进行标准化的组织中工作,或者可能由于业务需求而要安装10个新SQL实例。 在这两种情况下,您都希望像从模板中创建它们一样安装它们,但是您不想浪费时间去每台服务器上,通过next-next向导来完成请求。 所谓的“无人值守安装”方法在这里可以节省您的时间。 让我们看看实际上同时使用SQL Server 2012和SQL Server 2014媒体意味着什么。
Every single time you are on your way to deploy a new instance, you go through the SQL installation wizard and at one point, just before you hit the “Install” button, you will be presented with a screen like this one:
每次部署新实例时,都要经过SQL安装向导,并且有一次,在单击“安装”按钮之前,将显示类似以下的屏幕:
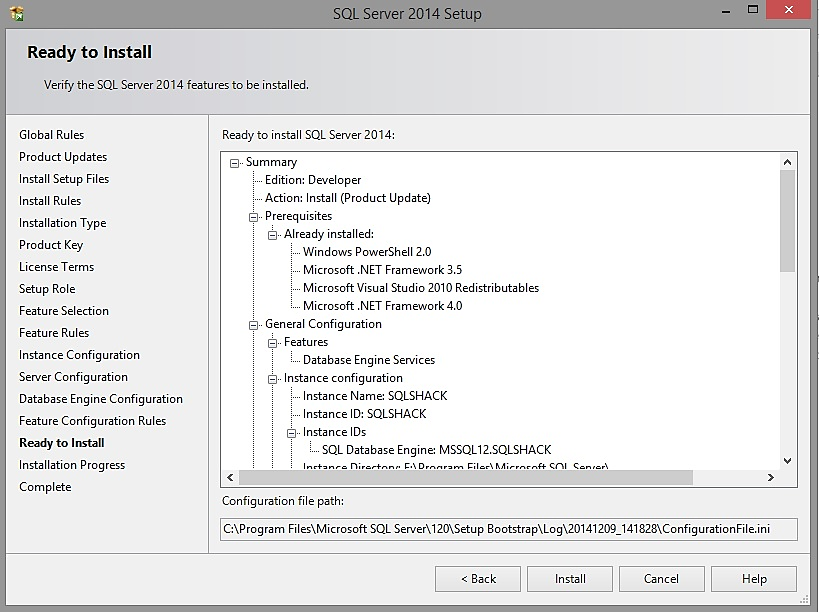
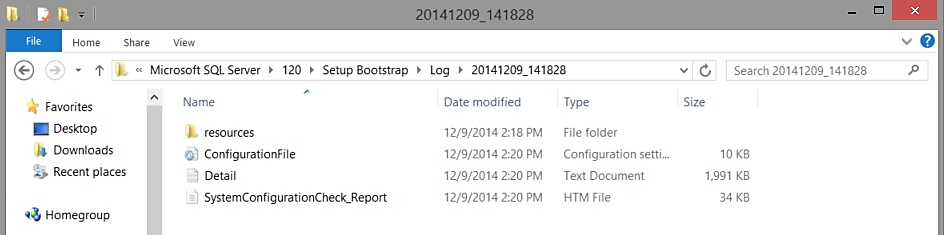
What we are interested in on this screen is that “Configuration file path” field because that ConfigurationFile.ini file is actually the file that we are about to use for our installations. Let’s take a look at it. Here is where it is located – the same directory as the installer actually points you to.
我们在此屏幕上感兴趣的是“配置文件路径”字段,因为该ConfigurationFile.ini文件实际上是我们将用于安装的文件。 让我们来看看它。 它在这里–与安装程序实际指向您的目录相同。
Here is how the file itself looks like and what you will find in there:
这是文件本身的外观以及在其中可以找到的内容:
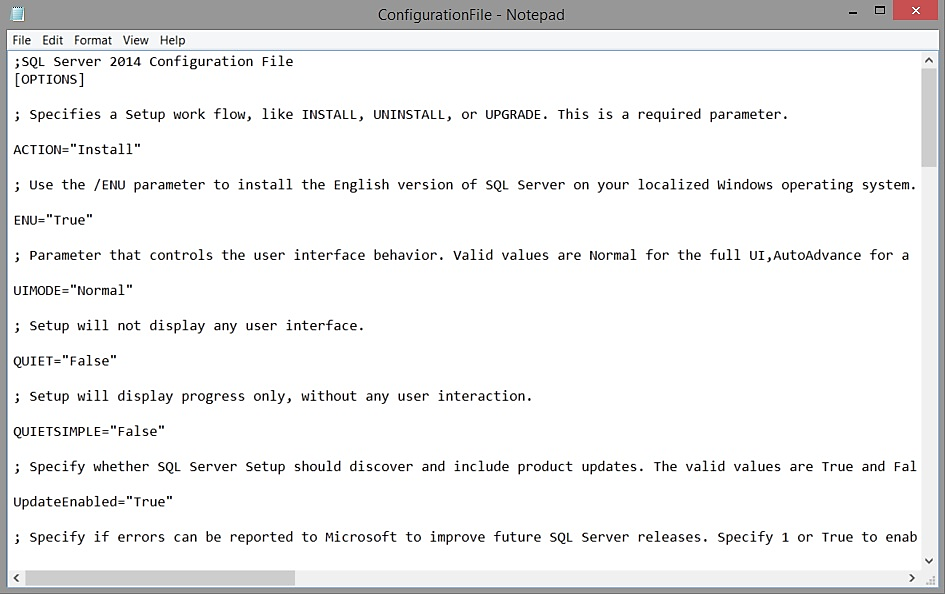
As you can see from the file, there are a lot of parameters in here. At first glance it could even be a bit confusing. However, that’s not the case if you spend a bit of time on it and just explore it for a moment, so here is an idea for you – generate one such file on your machine, take a look at it and move on reading the remaining part of the article after that.
从文件中可以看到,这里有很多参数。 乍看之下,甚至可能会有些混乱。 但是,如果您花一点时间在上面,只是探索片刻,情况就不是这样了,这对您来说是个好主意–在您的机器上生成一个这样的文件,看看并继续阅读其余的文件之后是文章的一部分。
In general, what you will see depends on what features you selected during the installation wizard. Based on that you will have the needed parameters and the size of the text file may vary. Our idea here is to make a configuration file in such way that we will just need one cmd command and that will be enough in order for the instance to be deployed. So once you choose the parameters for the components, what accounts need to be used for each service, the collation, and all the others, what we need to do next is the following:
通常,您将看到的内容取决于在安装向导期间选择的功能。 基于此,您将拥有所需的参数,并且文本文件的大小可能会有所不同。 我们这里的想法是以这种方式制作一个配置文件,我们只需要一个cmd命令,这足以部署实例。 因此,一旦您选择了组件的参数,则每个服务需要使用哪些帐户,排序规则以及所有其他帐户,接下来我们需要做的是:
- Remove the UIMODE=”Normal” together with the comment above it 删除UIMODE =“ Normal”及其上方的注释
- Change the QUIET parameter to “True” instead of “False” 将QUIET参数更改为“ True”而不是“ False”
- Remove the ADDCURRENTUSERASSQLADMIN="False" together with the comment above it as we are not installing Express editions most of the times (if you are – keep that in the configuration file) 删除ADDCURRENTUSERASSQLADMIN =“ False”及其上方的注释,因为我们大多数时候都没有安装Express版本(如果您要–请保留在配置文件中)
- Add IACCEPTSQLSERVERLICENSETERMS="True" somewhere in the file (for example at the top of it) 将IACCEPTSQLSERVERLICENSETERMS =“ True”添加到文件中的某个位置(例如,在文件顶部)
Once we do that you should be seeing something like this:
一旦执行此操作,您应该会看到类似以下内容:
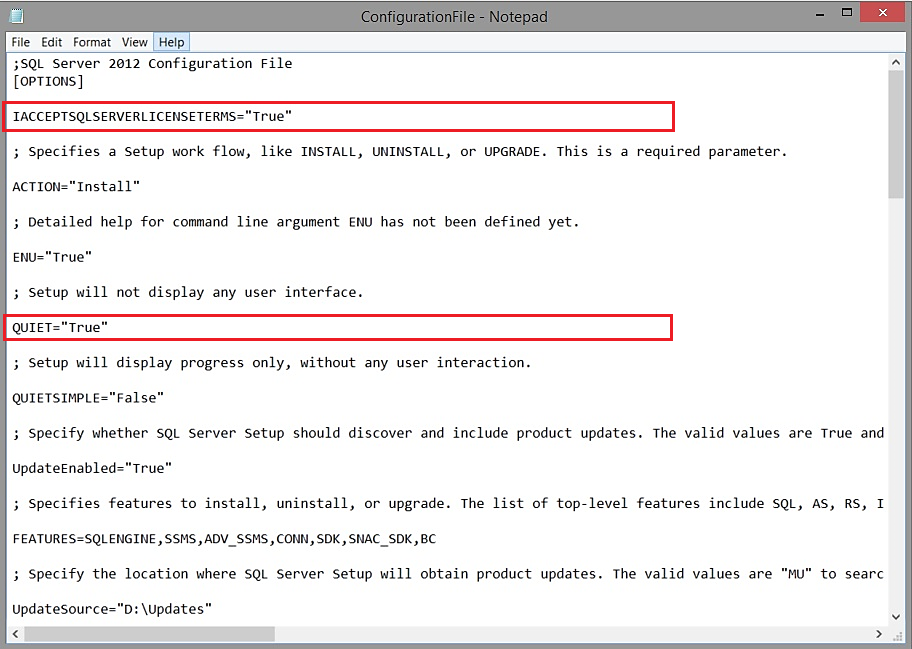
As you can see these are 2 of the parameters that we needed to add or change and the UIMODE one is now removed. However, take a closer look at this file because if you do, you will probably notice two more parameters that can be interesting to you – “UpdateEnabled” and “UpdateSource”. These are the ones that will help us prepare the Slipstreamed installation that we discussed in the previous topic, so if you are planning such – that’s the way you can configure it.
如您所见,这些是我们需要添加或更改的2个参数,现在已删除了UIMODE一个。 但是,请仔细查看此文件,因为如果这样做,您可能会注意到另外两个可能对您很有趣的参数-“ UpdateEnabled”和“ UpdateSource”。 这些是可以帮助我们准备上一个主题中讨论过的Slipstreamed安装的,因此,如果您打算进行这样的配置,这就是配置它的方式。
Once you have your file ready – save it at some folder somewhere on the server, upload or mount the installation media of SQL Server and start cmd.exe. What you need to input there is the following:
准备好文件后–将其保存在服务器上的某个文件夹中,上载或装入SQL Server的安装媒体,然后启动cmd.exe。 您需要输入以下内容:
Path to the setup.exe /ConfigurationFile=”Path to the ConfigurationFile.ini”. In my case this looks like the line below:
setup.exe / ConfigurationFile的路径=“ ConfigurationFile.ini的路径”。 就我而言,这类似于下面的行:
D:\setup.exe /ConfigurationFile="C:\ConfigurationFile.ini"
D:\ setup.exe / ConfigurationFile =“ C:\ ConfigurationFile.ini”
So my SQL Server installation setup.exe is at D:\ and the ConfigurationFile.ini file that we just prepared is in C:\. Here is what you should see once you input this command:
因此,我SQL Server安装setup.exe位于D:\,而我们刚刚准备的ConfigurationFile.ini文件位于C:\。 输入此命令后,您将看到以下内容:
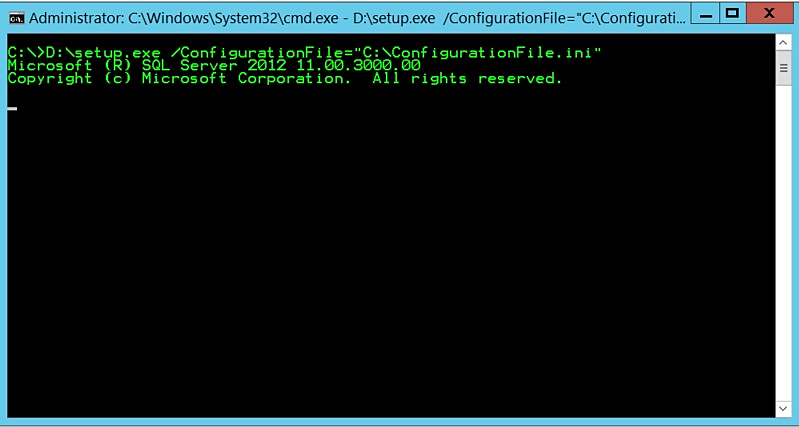
That’s everything that you will see actually. There will be no wizard for you to go through and you just have to go and grab a cup of coffee and hopefully when you come back the SQL installation will be ready. What’s more, because we added the “UpdateEnabled” and “UpdateSource” parameters, our SQL instance will actually be patched to the level that we requested thus we are also skipping the process of going through the installation wizards of all the fixes that we planned. Isn’t that cool?
这就是您将实际看到的所有内容。 向导将不复存在,您只需要去喝杯咖啡,希望当您回来时就可以完成SQL安装。 而且,由于我们添加了“ UpdateEnabled”和“ UpdateSource”参数,因此我们SQL实例实际上将被修补到所需的级别,因此,我们还将跳过所有计划中的修补程序的安装向导。 那不是很酷吗?
In summary, unattended installations of SQL Server are quite useful and can be of great help to you when you want to deploy instances that are based on templates. Also, if you have a request for more than 1 instance to be created, you can easily create one file (if you haven’t saved somewhere the ones that you used already before) and just run a simple command line script instead of going through all the installation wizards.
总之,SQL Server的无人值守安装非常有用,当您要部署基于模板的实例时,对您有很大的帮助。 另外,如果您请求创建多个实例,则可以轻松地创建一个文件(如果尚未将以前使用过的文件保存在某个地方),并且只需运行简单的命令行脚本即可所有安装向导。
To finish with something even better – one Pro tip from me – create as many configuration files as you need in terms of your business environment. For example I have configuration files that I use when I am about to install only the DB engine and SSMS, I have one which helps me install all SQL Server features and I have one more which I use when I need to install SSIS, SSRS or SSAS (or a combination of those). Thus, when a request for a new instance is logged, I can easily fire up a new installation and not lose time on a task that can be not completely – but almost partially automated.
为了获得更好的结果-我的一个专业提示-根据您的业务环境创建所需数量的配置文件。 例如,当我仅要安装DB引擎和SSMS时,我有一些配置文件;有一个可以帮助我安装所有SQL Server功能的配置文件;当我需要安装SSIS,SSRS或SSAS(或这些的组合)。 因此,当记录了对新实例的请求时,我可以轻松启动新安装,而又不会浪费时间来完成一项无法完全完成但几乎可以部分自动化的任务。
翻译自: https://www.sqlshack.com/unattended-installation-sql-server/


 2178
2178

 被折叠的 条评论
为什么被折叠?
被折叠的 条评论
为什么被折叠?
 到【灌水乐园】发言


