


sql azure 语法
In this article, I have explained the step by step process of migrating data from SQL Server to Azure Cosmos database. To perform database migration, we will proceed in the following manner:
在本文中,我解释了将数据从SQL Server迁移到Azure Cosmos数据库的分步过程。 要执行数据库迁移,我们将按照以下方式进行:
- wideworldimporters database in SQL Server 2016中还原SQL Server 2016 wideworldimporters数据库
- Azure Cosmos DB emulator: The Azure Cosmos DB emulator provides a local environment that can be used for development purposes. It simulates cosmos DB services. Using the Azure Cosmos DB emulator, you can develop and test your application locally. You can download it from Azure Cosmos DB模拟器 :Azure Cosmos DB模拟器提供可用于开发目的的本地环境。 它模拟cosmos DB服务。 使用Azure Cosmos DB仿真器,可以在本地开发和测试应用程序。 您可以从here 这里下载
- Azure Cosmos database migration toolkit: Using this tool, we can import data from JSON files, SQL, CSV files, MongoDB, Amazon DynamoDB, etc. You can download the migration tool source code from Azure Cosmos数据库迁移工具包:使用此工具,我们可以从JSON文件,SQL,CSV文件,MongoDB,Amazon DynamoDB等导入数据。您可以从this repository of the GITHUB and compile it locally, or you can download the pre-compiled library from GITHUB的此存储库下载迁移工具源代码并在本地进行编译,或者您可以从here 此处下载预编译的库
To understand the data migration process, I have explained it into multiple steps.
为了理解数据迁移过程,我将其分为多个步骤进行了说明。
步骤1:确定我们要导出的数据 (Step 1: Identify the data that we want to export)
We are going to export the data of the [Purchasing].[Suppliers] table of wideworldimporters database. Execute the following query to populate the data from the [Purchasing].[Suppliers] table:
我们将导出wideworldimporters数据库的[Purchasing]。[Suppliers]表的数据。 执行以下查询以填充[Purchasing]。[Suppliers]表中的数据:
SELECT supplierid as [Supplier.SupplierID],
       suppliername as [Supplier.suppliername],
       bankaccountname as [Supplier.bankaccountname],
       bankaccountcode as [Supplier.bankaccountcode],
       bankaccountnumber as [Supplier.bankaccountnumber],
       Ltrim(Isnull(deliveryaddressline1, ''))
       + ' , ' + deliveryaddressline2 AS [Supplier.Address],
       cityname as [Supplier.cityname]
FROM   wideworldimporters.purchasing.suppliers suppliers
       INNER JOIN wideworldimporters.application.cities cities
               ON suppliers.deliverycityid = cities.cityid
Output:
输出:
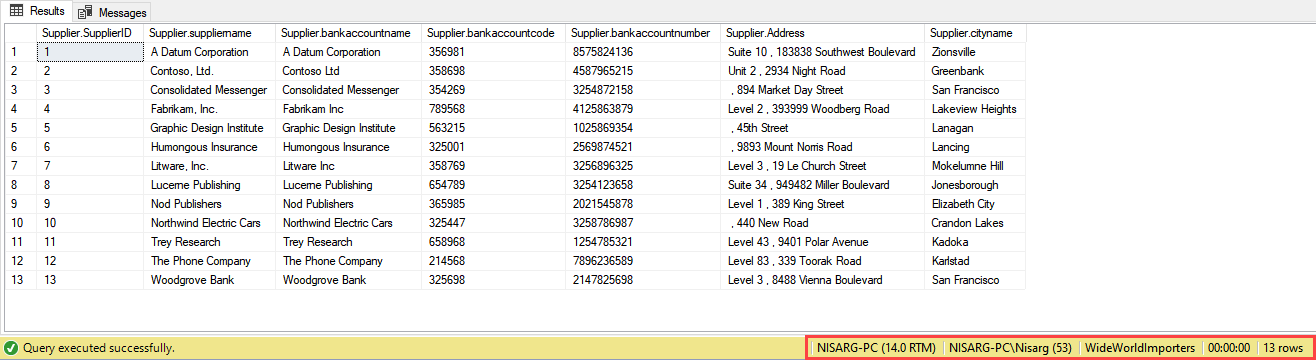
As we can see, the query returns 13 rows.
如我们所见,查询返回13行。
步骤2:安装Azure Cosmos DB模拟器 (Step 2: Install Azure Cosmos DB emulator)
Download and Install the Cosmos DB emulator. The installation process is simple. Once installation completes, open the Data Explorer. Click on the taskbar, right-click on Cosmos DB emulator and select “Open Data explorer”. See the following image:
下载并安装Cosmos DB仿真器。 安装过程很简单。 安装完成后,打开数据浏览器。 单击任务栏,在Cosmos DB仿真器上单击鼠标右键,然后选择“ 打开数据浏览器 ”。 见下图:
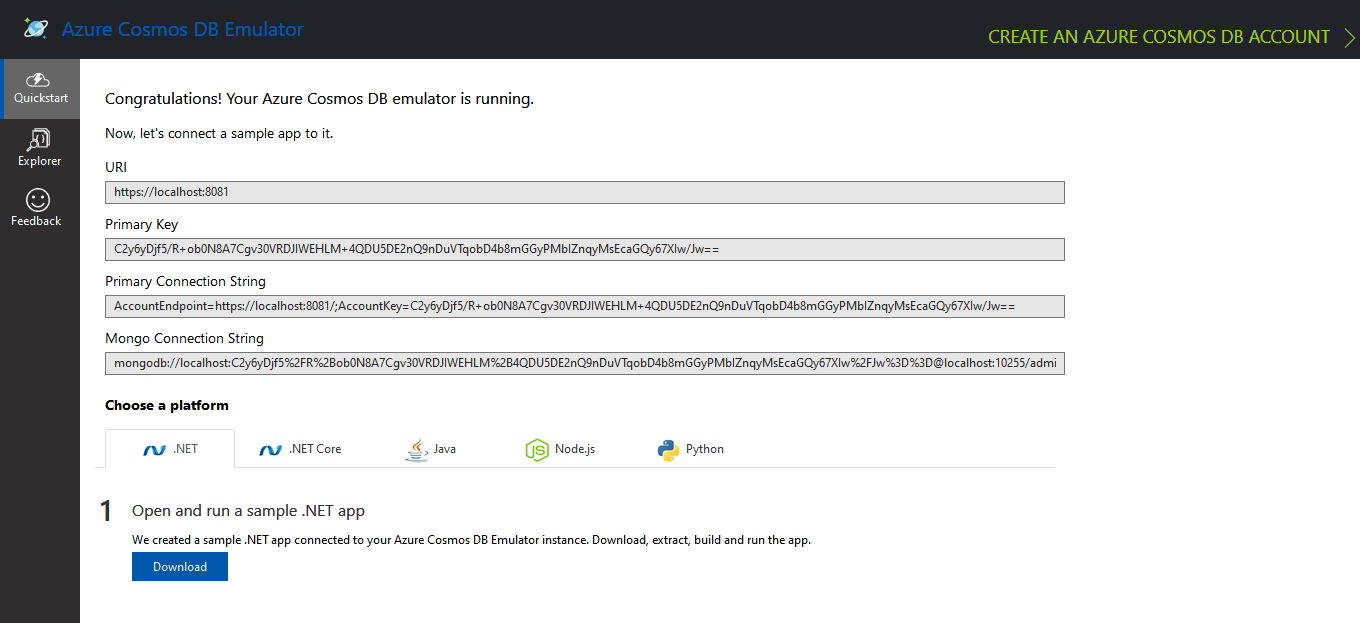
The data explorer should look like the following image:
数据浏览器应如下图所示:
步骤3:执行资料移转 (Step 3: Perform Data migration )
Once the migration tool is downloaded, extract the files, and run any of the following:
下载迁移工具后,解压缩文件,然后运行以下任一程序:
- Dtui.exe: If you want to run the graphical user interface version Dtui.exe :如果要运行图形用户界面版本
- Dt.exe: If you want to run the command-line version of the tool Dt.exe :如果要运行该工具的命令行版本
We are going to use the GUI version of the data migration toolkit hence run the “Dtui.exe.” On the welcome screen, we can see the information about the tools. Also, the link to the online documentation. See the following image. Click on Next:
我们将使用数据迁移工具包的GUI版本,因此运行“ Dtui.exe” 。 在欢迎屏幕上,我们可以看到有关工具的信息。 此外,还有在线文档的链接。 参见下图。 点击下一步:
We want to import data from SQL Server to Azure Cosmos DB; hence on ‘Specify source information’ screen, choose “SQL” from the import from the drop-down box:
我们希望将数据从SQL Server导入到Azure Cosmos DB。 因此,在“指定源信息”屏幕上,从下拉框中的导入中选择“ SQL ”:
In connection string text box, specify the connection string which is going to be used to connect to the wideworldimporters database. The format of the SQL connection string is the standard connection string format.
在连接字符串文本框中,指定将用于连接到wideworldimporters数据库的连接字符串。 SQL连接字符串的格式是标准连接字符串格式。
To connect to the wideworldimporters database, enter the following connection string in the “connection string” dialog box.
要连接到wideworldimporters数据库,请在“ 连接字符串 ”对话框中输入以下连接字符串。
“Data source=<SQL Server name>; Initial catalog=wideworldimporters; User id= <Your Username>;password=<Your Password>;”
“数据源= <SQL Server名称>; 初始目录= wideworld进口商; 用户ID = <您的用户名>;密码= <您的密码>;”
You can verify the connection string by clicking on the “Verify” button. See the following image:
您可以通过单击“ 验证 ”按钮来验证连接字符串。 见下图:
To populate the data from the SQL database, you can provide the T-SQL Query or the choose the T-SQL Script. We are going to use T-SQL Query hence choose the “Enter Query” option and enter the following query in the text box:
要填充SQL数据库中的数据,可以提供T-SQL查询或选择T-SQL脚本。 我们将使用T-SQL查询,因此选择“ 输入查询 ”选项,然后在文本框中输入以下查询:
SELECT supplierid as [Supplier.SupplierID],
       suppliername as [Supplier.suppliername],
       bankaccountname as [Supplier.bankaccountname],
       bankaccountcode as [Supplier.bankaccountcode],
       bankaccountnumber as [Supplier.bankaccountnumber],
       Ltrim(Isnull(deliveryaddressline1, ''))
       + ' , ' + deliveryaddressline2 AS [Supplier.Address],
       cityname as [Supplier.cityname]
FROM   wideworldimporters.purchasing.suppliers suppliers
       INNER JOIN wideworldimporters.application.cities cities
               ON suppliers.deliverycityid = cities.cityid
See the following image:
见下图:
The documents in the Cosmos DB are structured and represented in JSON; hence we must format the query so that it returns the valid JSON output. To represent the hierarchical relationship, we will use a period (.) as a nesting separator.
Cosmos DB中的文档以JSON进行结构化和表示。 因此,我们必须格式化查询,以便它返回有效的JSON输出。 为了表示层次关系,我们将使用句点(。)作为嵌套分隔符。
Click on “Next” to configure the target.
单击“ 下一步 ”以配置目标。
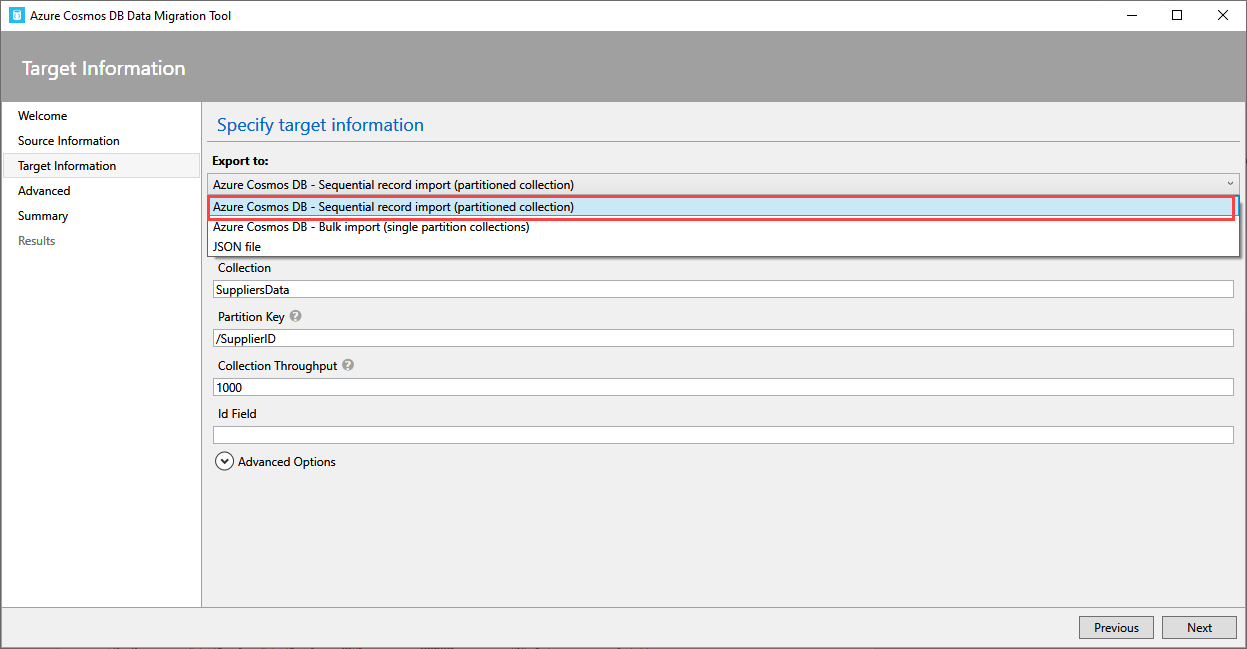
On the ‘Specify target information’ screen, choose “Azure Cosmos DB – Sequential record import (partitioned collection)” from the ‘Export to’ drop-down box. See the following image:
在“指定目标信息”屏幕上,从“导出到”下拉框中选择“ Azure Cosmos DB –顺序记录导入(分区的集合) ”。 见下图:
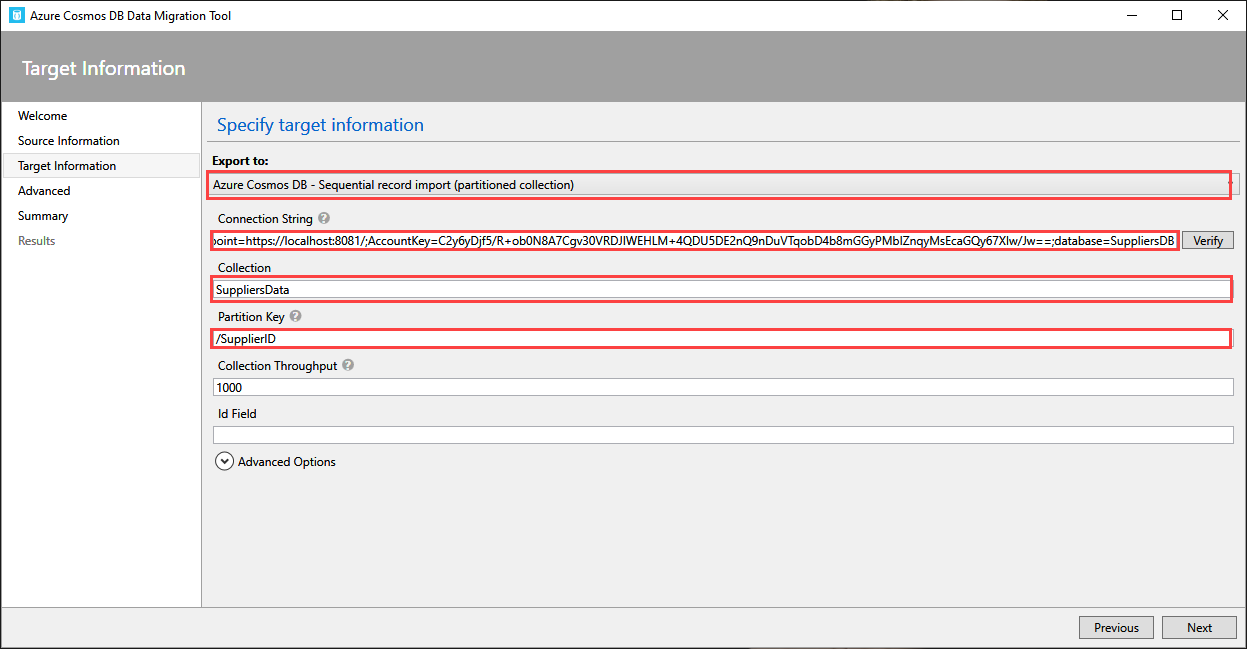
In connection string text box, we must provide the connection string to connect the Cosmos DB. The format of the connection string must be as the following:
在连接字符串文本框中,我们必须提供连接字符串以连接Cosmos DB。 连接字符串的格式必须如下:
AccountEndPoint=<URLEndPoint>;AccountKey=<Account Key>; Database=<Name of the cosmosdb>
AccountEndPoint = <URLEndPoint>; AccountKey = <Account Key>; 数据库= <cosmosdb的名称>
The value of the primary connection string is located on the quick start page of the Azure Cosmos DB emulator. The primary connection string does not have the database name; hence we must append the name of the Cosmos DB at the end of the connection string.
主连接字符串的值位于Azure Cosmos DB模拟器的快速入门页上。 主连接字符串没有数据库名称; 因此,我们必须在连接字符串的末尾附加Cosmos DB的名称。
In the collection name text box, enter “SuppliersData”. In partition key, enter “/SupplierID” and keep the ID field blank and keep other fields unchanged. Click on Next. The following is the screenshot:
在集合名称文本框中,输入“ SuppliersData ”。 在分区键中,输入“ / SupplierID ”,并将ID字段保留为空白,并使其他字段保持不变。 单击下一步。 以下是屏幕截图:
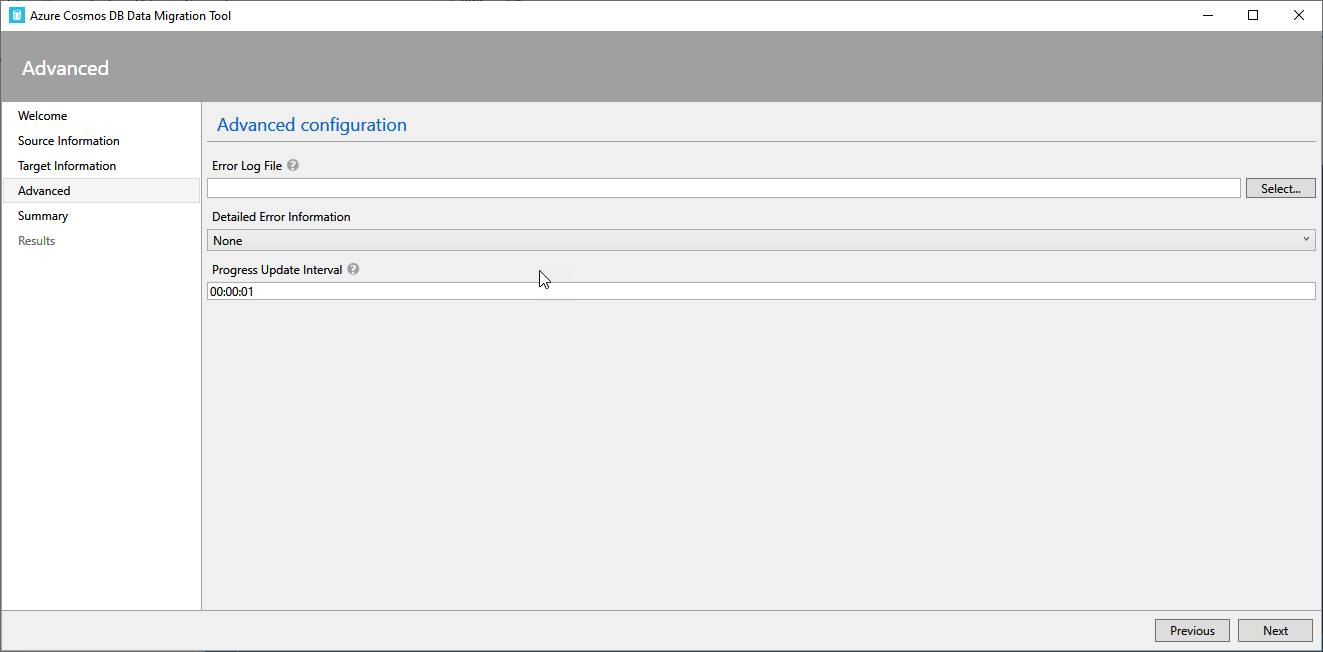
On the advanced configuration screen, we can configure the error log. Skip this step and click on next:
在高级配置屏幕上,我们可以配置错误日志。 跳过此步骤,然后单击下一步:
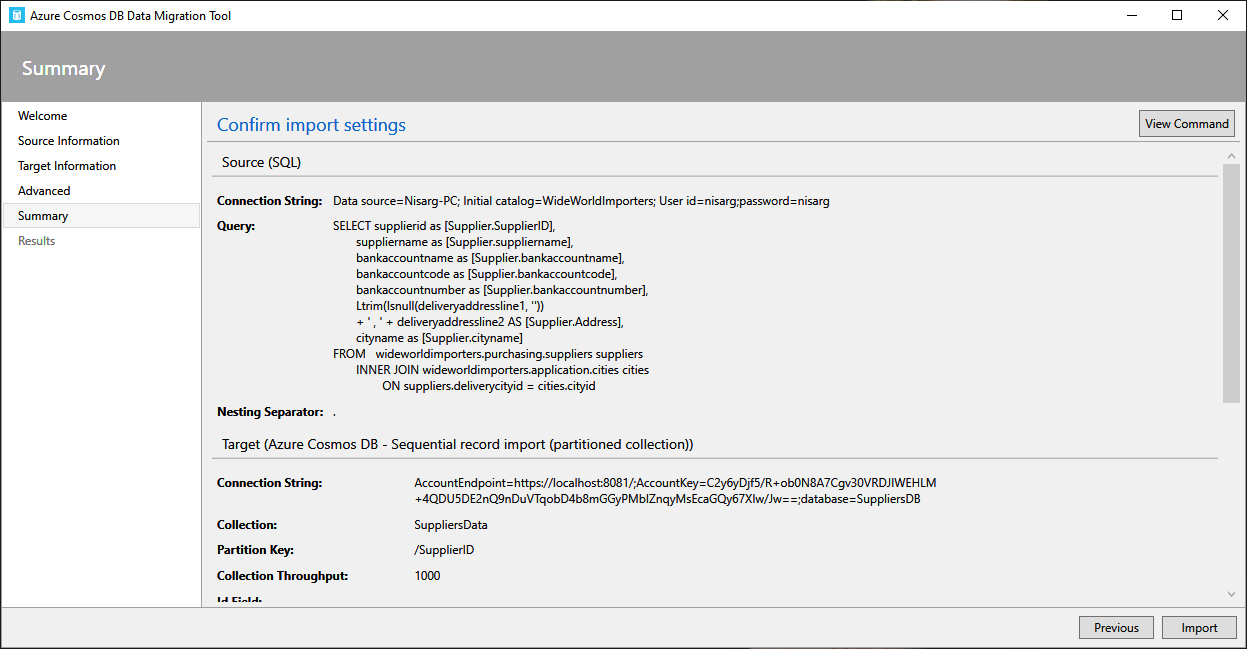
On the summary screen, you can review the import settings and click on the Import button. The following is the screenshot:
在摘要屏幕上,您可以查看导入设置,然后单击“ 导入”按钮。 以下是屏幕截图:
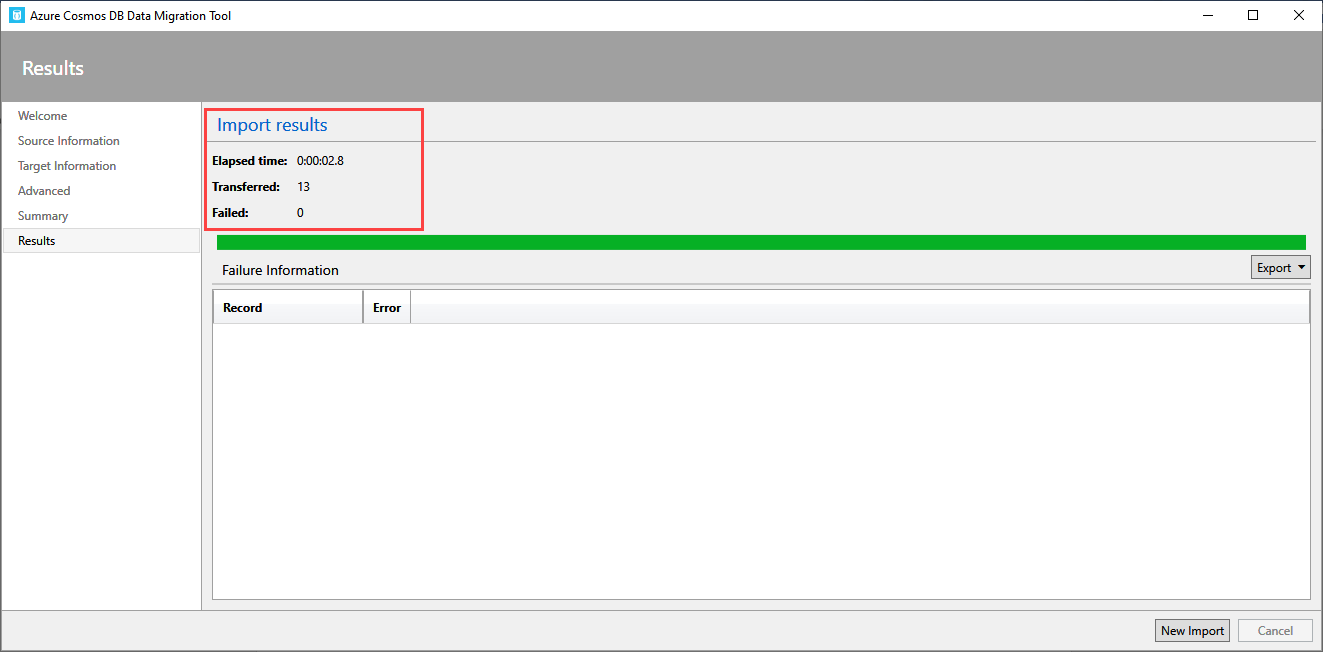
Once the import completes, we can see that 13 records have been migrated to the “SuppliersDB” database:
导入完成后,我们可以看到已将13条记录迁移到“ SuppliersDB ”数据库中:
步骤4:在Cosmos DB中查看数据 (Step 4: View data in Cosmos DB)
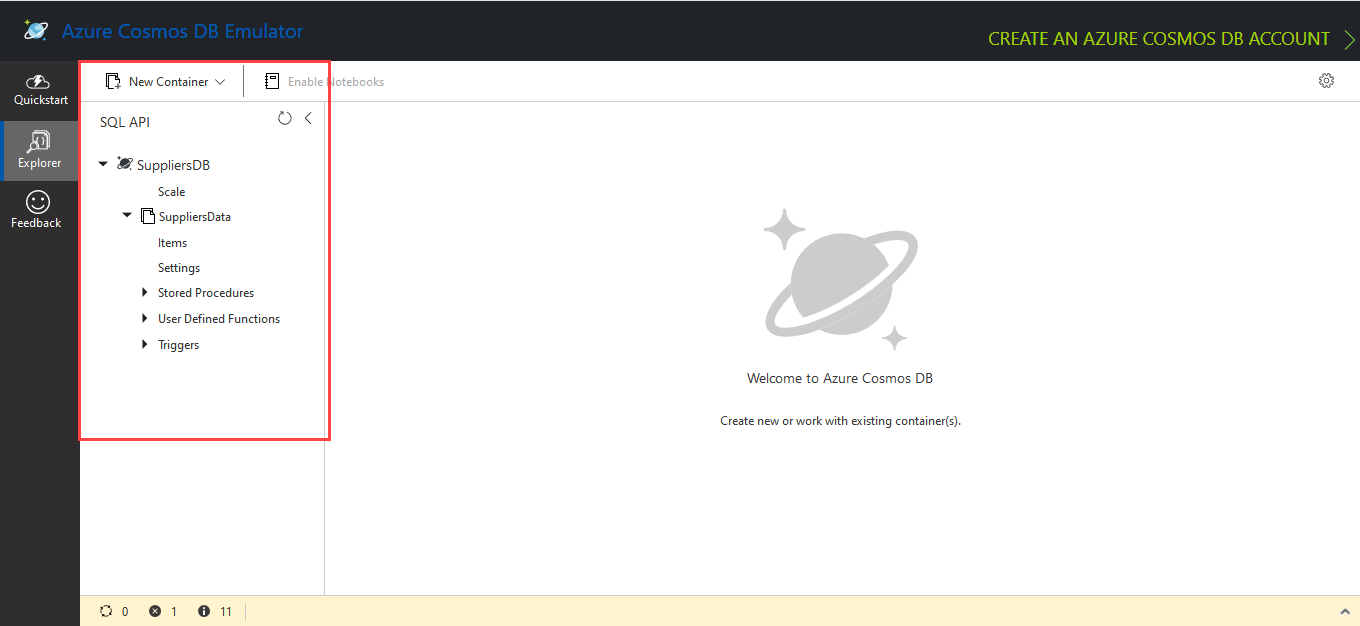
Now, to view database and documents, open Azure Cosmos DB emulator and click on explorer on the left pane of the screen. See the following screenshot.
现在,要查看数据库和文档,请打开Azure Cosmos DB仿真器,然后单击屏幕左窗格上的资源管理器。 请参见以下屏幕截图。
To view the data, we will execute any of the following queries in the data explorer:
要查看数据,我们将在数据浏览器中执行以下任何查询:
Select * from c
OR
Select * from SupplierData
In the query, “c” is the name of the collection. The following is the output:
在查询中,“ c ”是集合的名称。 以下是输出:
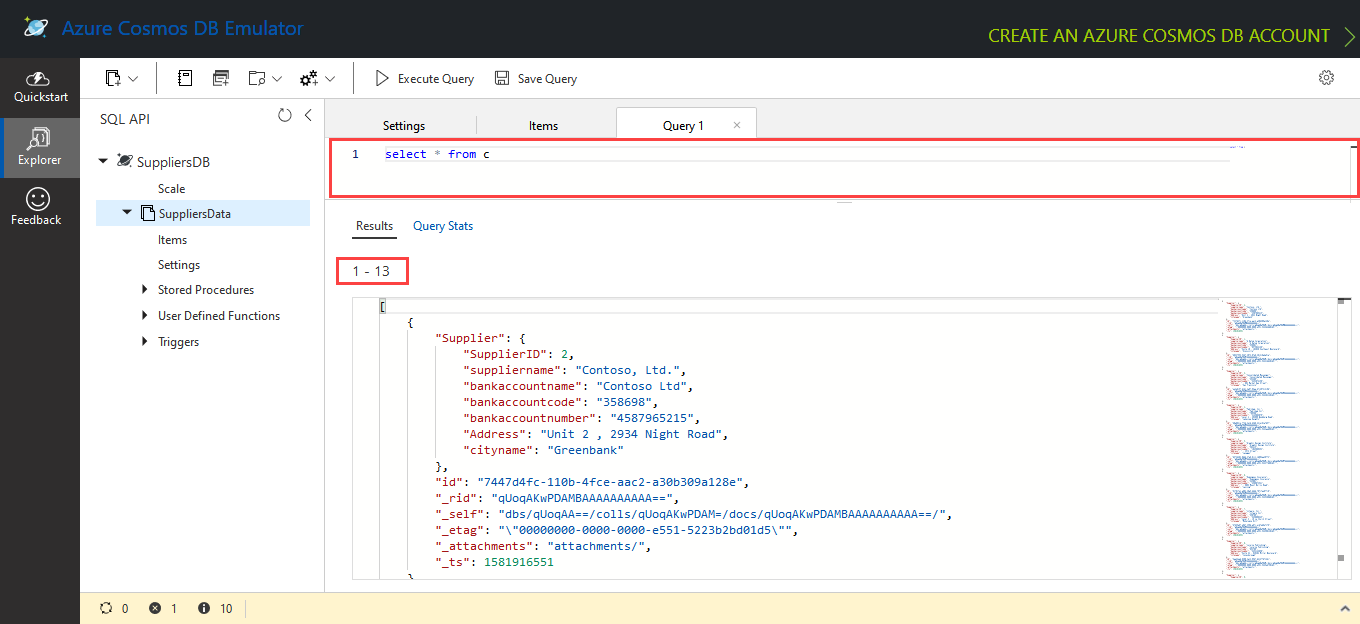
As we can see, 13 records have been returned, which indicates that the data has been migrated successfully.
我们可以看到,已经返回了13条记录,这表明数据已成功迁移。
摘要 (Summary)
In this article, I have explained the step by step process of migrating data from the SQL Server database to Azure Cosmos database using Azure Cosmos DB data migration toolkit.
在本文中,我介绍了使用Azure Cosmos DB数据迁移工具包将数据从SQL Server数据库迁移到Azure Cosmos数据库的分步过程。
翻译自: https://www.sqlshack.com/how-to-migrate-sql-data-to-azure-cosmos-db/
sql azure 语法


 363
363

 被折叠的 条评论
为什么被折叠?
被折叠的 条评论
为什么被折叠?
 到【灌水乐园】发言


