


azure云数据库
In this article, we will review how to configure email notifications in the Azure SQL single database or elastic pool.
在本文中,我们将回顾如何在Azure SQL单一数据库或弹性池中配置电子邮件通知。
Azure SQL single database or elastic pool does not have database mail feature to send emails using sp_send_dbmail like in Azure SQL Server managed instance or on-premises SQL Server. We will walk through one of the alternatives to send emails in the Azure SQL database.
Azure SQL单一数据库或弹性池没有数据库邮件功能,无法像在Azure SQL Server托管实例或本地SQL Server中那样使用sp_send_dbmail发送电子邮件。 我们将逐步介绍在Azure SQL数据库中发送电子邮件的替代方法之一。
The following are the steps involved in sending the emails from an Azure SQL database.
以下是从Azure SQL数据库发送电子邮件所涉及的步骤。
- Creating a SendGrid account 创建一个SendGrid帐户
- Creating a Logic App 创建一个逻辑应用
- Creating a trigger and Actions in Logic App 在Logic App中创建触发器和动作
Let’s go over these steps one by one.
让我们一步一步地进行这些步骤。
创建一个SendGrid帐户 (Creating a SendGrid account)
SendGrid is a cloud-based service which delivers emails in Azure. It offers 25000 free emails every month and they charge a minimal fee beyond that.
SendGrid是一项基于云的服务,可在Azure中传递电子邮件。 它每月提供25000封免费电子邮件,除此之外,他们收取的最低费用。
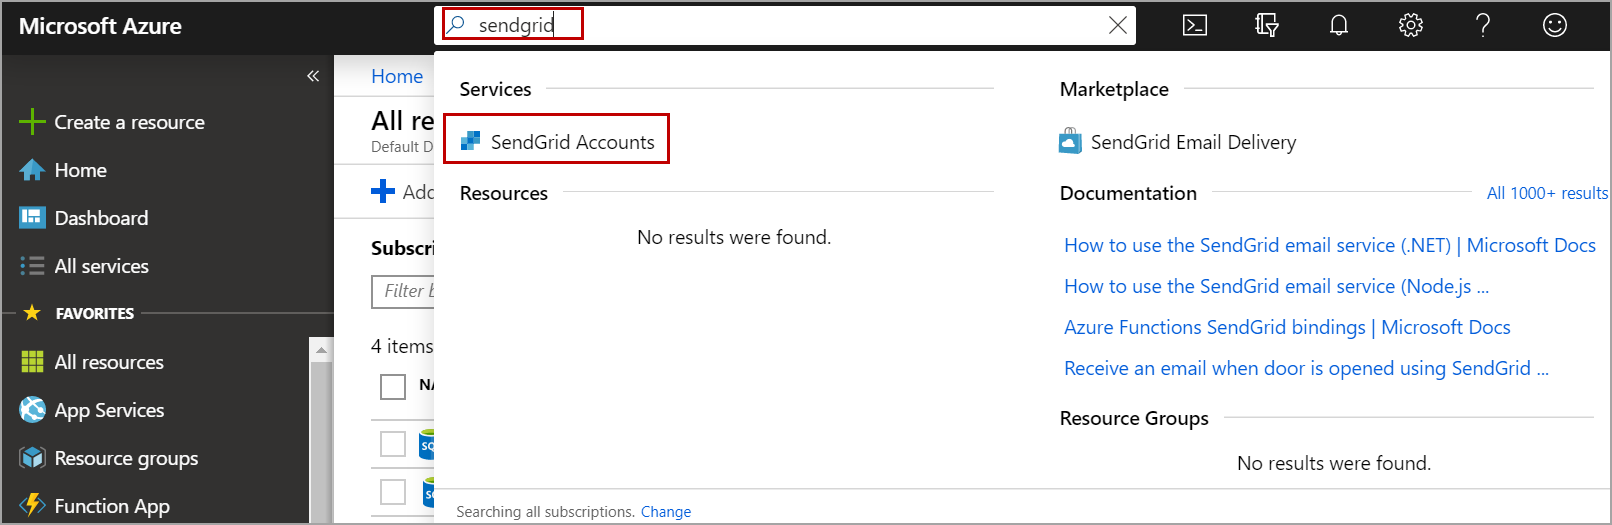
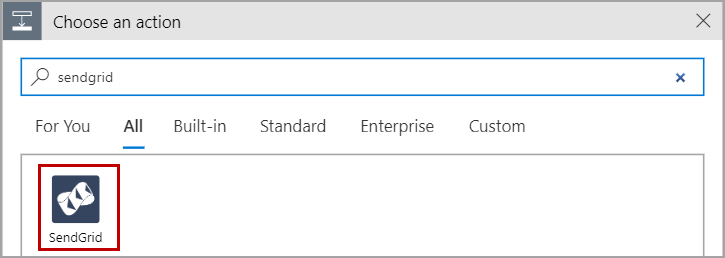
To create a SendGrid account, Login to the Azure portal. Search for SendGrid as shown in the below image.
若要创建一个SendGrid帐户,请登录到Azure门户。 搜索SendGrid,如下图所示。
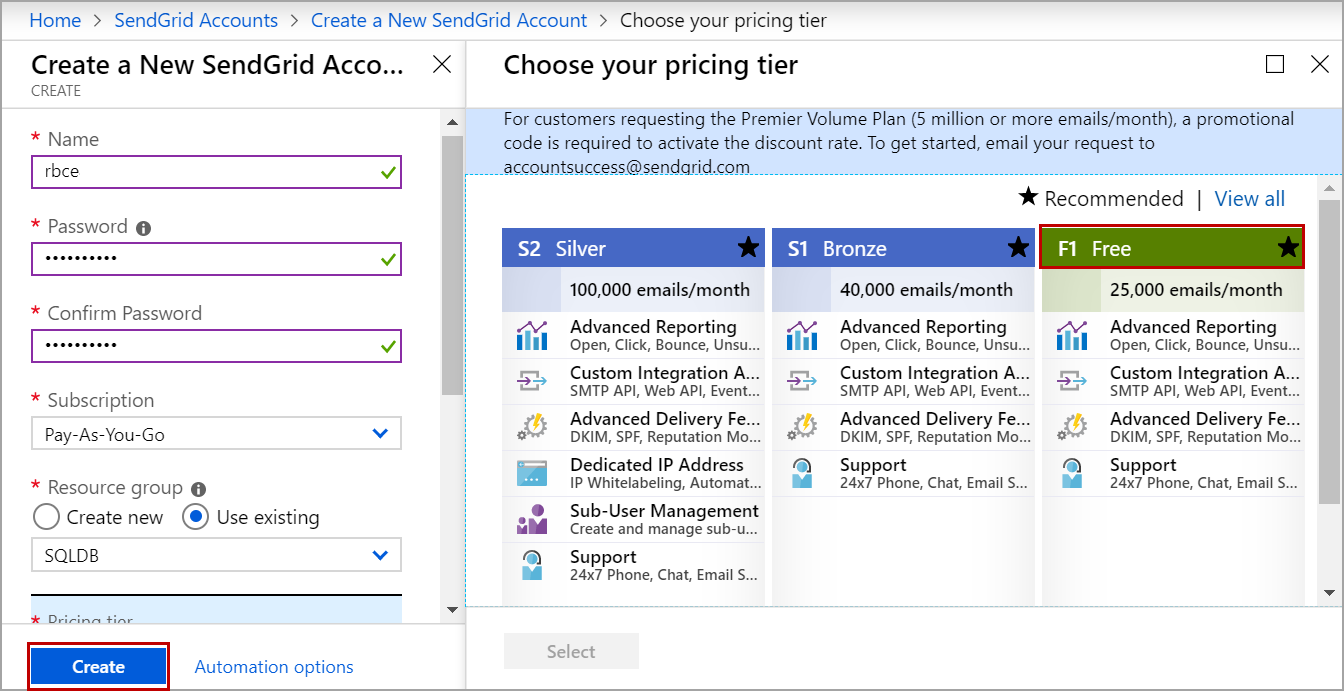
Click on the Add button to create a new account. Enter the name of the account, password, select free tier if you are testing SendGrid or if your Azure SQL database email notifications do not cross 25000 per month. Enter the contact information and accept terms. Click on the Create button. Please refer to the below image.
单击添加按钮创建一个新帐户。 输入帐户名称,密码,如果要测试SendGrid或Azure SQL数据库电子邮件通知每月不超过25000,则选择免费。 输入联系信息并接受条款。 单击创建按钮。 请参考下图。
Once the account is created, click on the account you just created and then click on Manage which will navigate to the send grid dashboard.
创建帐户后,单击刚创建的帐户,然后单击“ 管理” ,它将导航到发送网格仪表板。
Verify your email by clicking on “Confirm Email Address” in the email you received. Now we must create an API key that will be used in Logic App to send out emails.
在收到的电子邮件中单击“ 确认电子邮件地址 ”,以验证您的电子邮件。 现在,我们必须创建一个API密钥,该密钥将在Logic App中用于发送电子邮件。
In SendGrid dashboard, Under Settings, Click on API Keys and then click on Create API Key.
在SendGrid仪表板的“设置”下,单击“ API密钥”,然后单击“ 创建API密钥” 。
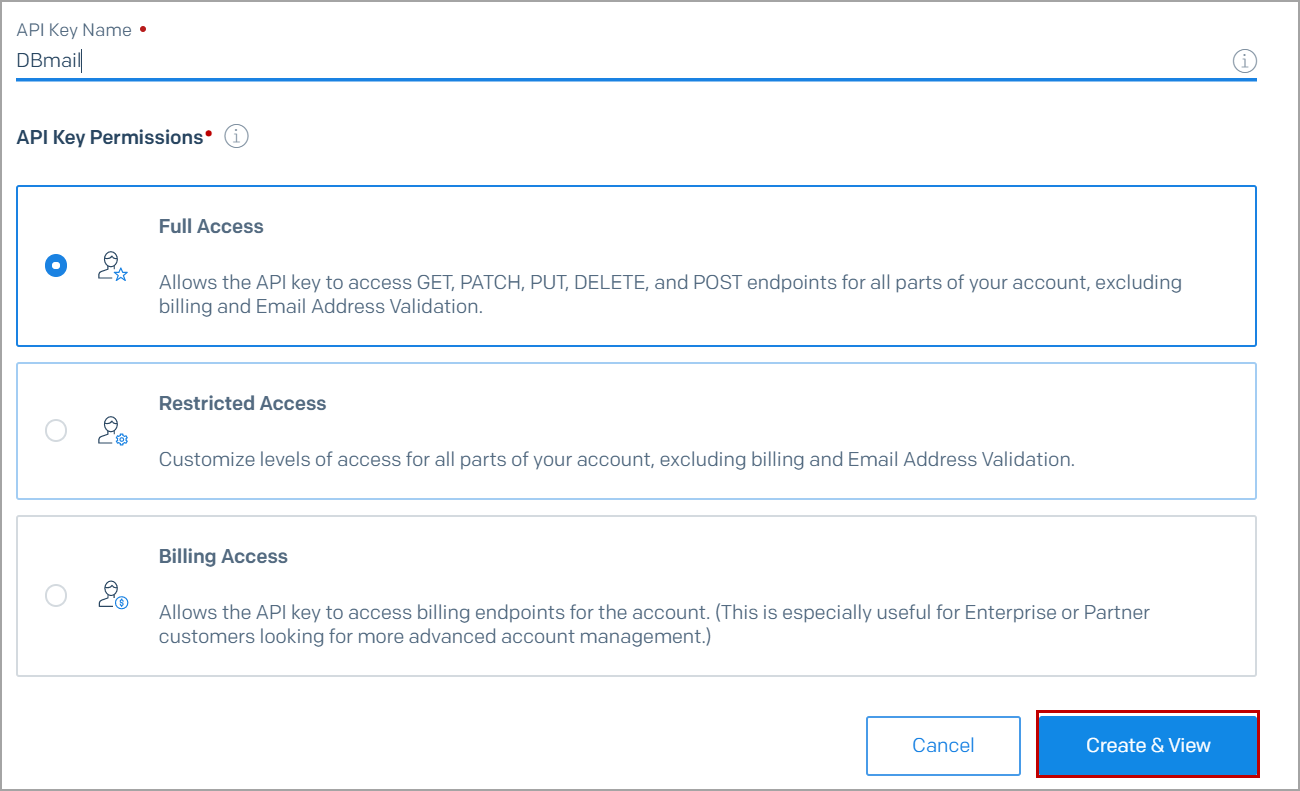
Enter the name of the API key and select the access level. In this case, I used Full Access. Click on Create and View.
输入API密钥的名称,然后选择访问级别。 在这种情况下,我使用了完全访问权限。 单击创建和查看 。
Copy the key and save it to use later while configuring the Logic App.
复制密钥并保存以供以后在配置Logic App时使用。
配置逻辑应用 (Configuring a Logic App)
To configure a Logic App, Navigate to the Azure portal. Search for the logic app as shown in the below image. Click on Logic Apps from the services list.
若要配置Logic App,请导航到Azure门户。 搜索逻辑应用程序,如下图所示。 从服务列表中单击Logic Apps。
Click on Add. Enter the name of the app, choose resource group and location. Click on Create.
点击添加。 输入应用程序的名称,选择资源组和位置。 点击创建 。
在Logic App中创建触发器和动作 (Creating trigger and Actions in Logic App)
Before creating trigger and actions, we need to create a table in the Azure SQL database that holds the message data. In this demo, I am creating a sample table.
在创建触发器和操作之前,我们需要在Azure SQL数据库中创建一个表来保存消息数据。 在此演示中,我将创建一个示例表。
Following is the T-SQL script to create a sample table. Please note that the table must have an identity column that will be used by Logic App to identify new rows in the table.
以下是用于创建示例表的T-SQL脚本。 请注意,该表必须具有一个标识列,Logic App将使用该列来标识表中的新行。
Create TABLE EmailNotifications (MessageID int identity(1,1),MessageText nvarchar(max) )
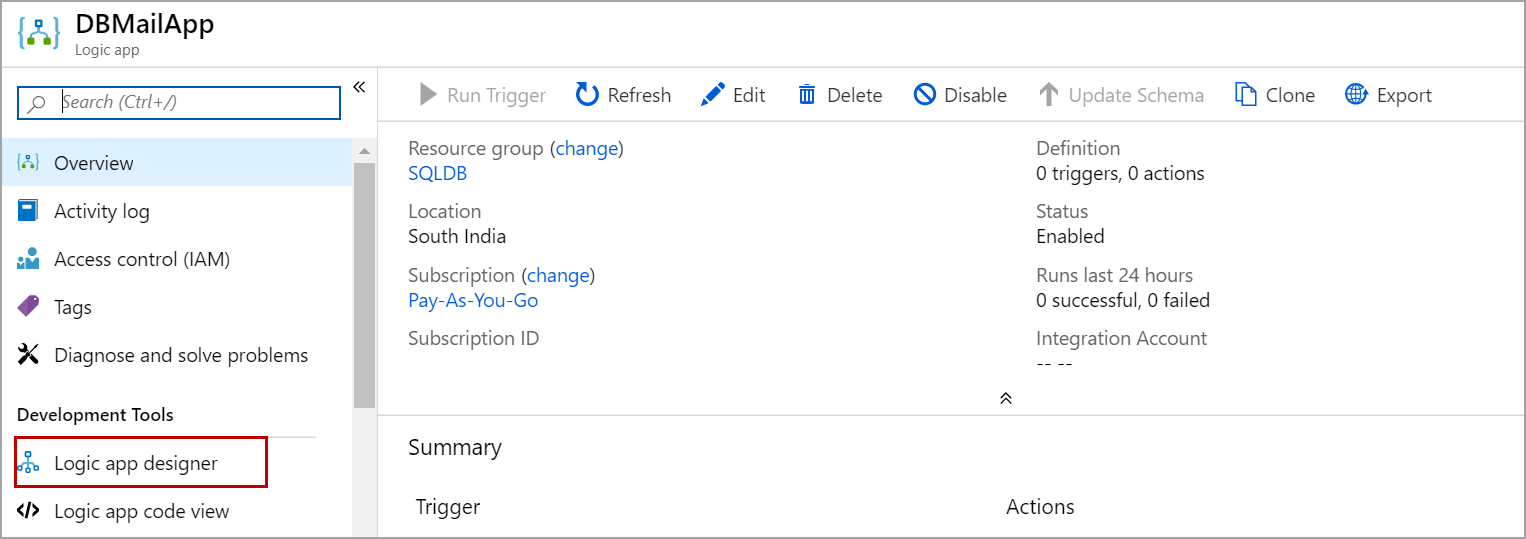
Navigate to All Resources page and click on the Logic App you created above. Click on Logic app designer as shown in the below image.
导航到“所有资源”页面,然后单击您在上面创建的Logic App。 单击Logic应用程序设计器 ,如下图所示。
In the designer, Click on the Blank Logic App and search for SQL Server.
在设计器中,单击Blank Logic App并搜索SQL Server。
Under triggers, select when an item is created.
在触发器下,选择创建项目的时间。
Select the server name and the Azure SQL database on which you created the table. Enter username, password and click on Create.
选择服务器名称和在其上创建表的Azure SQL数据库。 输入用户名,密码,然后单击创建 。
Select the table you created from the drop-down list and specify the interval.
从下拉列表中选择您创建的表,并指定间隔。
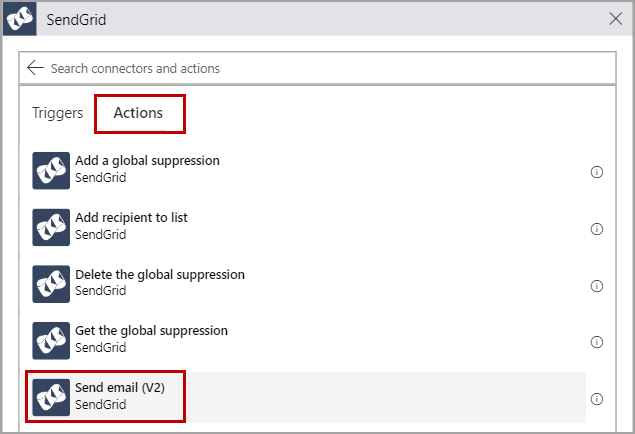
Now click on New Step and search for SendGrid as shown in the below image.
现在单击New Step并搜索SendGrid,如下图所示。
Select the Send Email action and enter the connection name and the API key you created earlier. Click on Create.
选择发送电子邮件操作,然后输入您先前创建的连接名称和API密钥。 单击创建。
Enter the relevant address information in ‘From’ and ‘To’ fields and also enter the Subject of the email. In the Email body, click on Add dynamic content and select the MessageText column from the table. Please refer to the below image.
在“发件人”和“收件人”字段中输入相关的地址信息,并输入电子邮件的主题。 在电子邮件正文中,单击添加动态内容,然后从表中选择MessageText列。 请参考下图。
Finally, save the Logic App.
最后,保存Logic App。
Now the trigger runs every three minutes and sees if any new records are inserted in the Azure SQL database table. If it finds any, it will send an email with MessageText as email body.
现在,触发器每三分钟运行一次,并查看是否在Azure SQL数据库表中插入了任何新记录。 如果找到任何内容,它将发送一封以MessageText作为电子邮件正文的电子邮件。
Now I will insert a row in the table “EmailNotifications” in HTML format.
现在,我将以HTML格式在表“ EmailNotifications ”中插入一行。
INSERT INTO EmailNotifications (MessageText) VALUES
('<html>
<body>

<h2>Sample Table</h2>

<table style="width:100%">
  <tr>
    <th>FirstName</th>
    <th>Lastname</th>
  </tr>
  <tr>
    <td>Denis</td>
    <td>Steven</td>
  </tr>
  <tr>
    <td>Dane</td>
    <td>Ainsworth</td>
  </tr>
  <tr>
    <td>Seema</td>
    <td>Dam</td>
  </tr>
</table>

</body>
</html>
')
The identity column must be auto-generated. Do not set IDENTITY_INSERT on and manually insert the identity column value, the logic app does not recognize such inserts and does not fire email.
标识列必须是自动生成的。 请勿将IDENTITY_INSERT设置为打开并手动插入标识列值,逻辑应用程序无法识别此类插入并且不会触发电子邮件。
Please refer to the below image for the email notification which was fired from the above insert.
请参阅下图,以了解从以上插入内容触发的电子邮件通知。
So, whenever I want to send an email notification, I will generate the message and insert into the EmailNotifications table on the Azure SQL database. we can also have other columns to store address and dynamically send out an email to different people or groups.
因此,每当我要发送电子邮件通知时,我都会生成消息并将其插入到Azure SQL数据库的EmailNotifications表中。 我们还可以使用其他列来存储地址,并动态地向不同的人或团体发送电子邮件。
发送存储过程的结果集作为附件 (Send result set of a stored procedure as an attachment)
We can also send the result set of a T-SQL query or a stored procedure as a CSV attachment. In the designer search for Schedule.
我们还可以将T-SQL查询或存储过程的结果集作为CSV附件发送。 在设计器中搜索Schedule。
Select Recurrence, specify the interval and click on the New step as shown below.
选择“重复发生”,指定间隔,然后单击“ 新建”步骤 ,如下所示。
Search for SQL server and add Execute stored procedure action.
搜索SQL Server并添加“ 执行存储过程”操作。
Select the procedure from the drop-down list.
从下拉列表中选择过程。
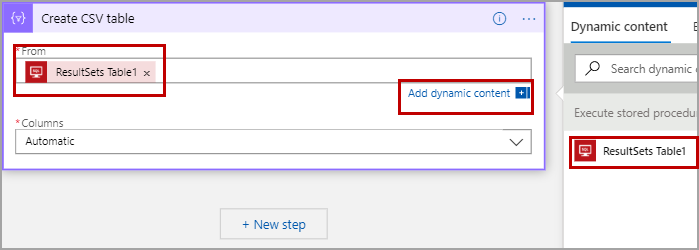
Add a new step and select the data operations. Select Create a CSV table in the actions.
添加一个新步骤并选择数据操作。 在操作中选择创建CSV表。
In the From field, add ResultSets Table1 which is the result set of the above procedure.
在“ 发件人”字段中,添加ResultSets Table1 ,它是上述过程的结果集。
Add a new step and search for SendGrid.
添加一个新步骤,并搜索SendGrid。
Select send email action and enter all the required fields. In the attachment field, choose the output of the CSV table and save the Logic App.
选择发送电子邮件操作,然后输入所有必填字段。 在附件字段中,选择CSV表的输出并保存Logic App。
Now the schedule is invoked every three minutes, executes the procedure, export the result set to CSV table and attach the CSV table as an attachment in the SendGrid email.
现在,每三分钟调用一次调度,执行该过程,将结果集导出到CSV表,并将CSV表作为附件附加到SendGrid电子邮件中。
Please refer to the below image for sample email with an attachment.
请参阅下图以获取带有附件的示例电子邮件。
结论 ( Conclusion)
In this article, we explored how to configure email notification in the Azure SQL database using SendGrid and Logic App. In case you have any questions, please feel free to ask in the comment section below.
在本文中,我们探讨了如何使用SendGrid和Logic App在Azure SQL数据库中配置电子邮件通知。 如果您有任何疑问,请随时在下面的评论部分中提问。
翻译自: https://www.sqlshack.com/configuring-email-notifications-in-azure-sql-database/
azure云数据库


 296
296

 被折叠的 条评论
为什么被折叠?
被折叠的 条评论
为什么被折叠?
 到【灌水乐园】发言


