


sql azure 语法
介绍 ( Introduction )
In this chapter, we will work with Visual Studio to connect to SQL Databases in Azure.
在本章中,我们将使用Visual Studio来连接到Azure中SQL数据库。
The first part of this chapter will be to create a Database in the Azure Portal and the second part will be to connect in Visual Studio and create some Database Objects.
本章的第一部分将在Azure门户中创建一个数据库,第二部分将在Visual Studio中进行连接并创建一些数据库对象。
要求 ( Requirements )
- An Azure subscription. Azure订阅。
- A local machine with Windows and Visual Studio installed. In this example, the Visual Studio 2015 was used. 安装了Windows和Visual Studio的本地计算机。 在此示例中,使用了Visual Studio 2015。
入门 ( Getting started )
Let’s start opening the Azure New Portal
让我们开始打开Azure新门户
To create a new SQL database, in the new Portal Press Browse All.
要创建新SQL数据库,请在新的门户网站中按浏览所有。
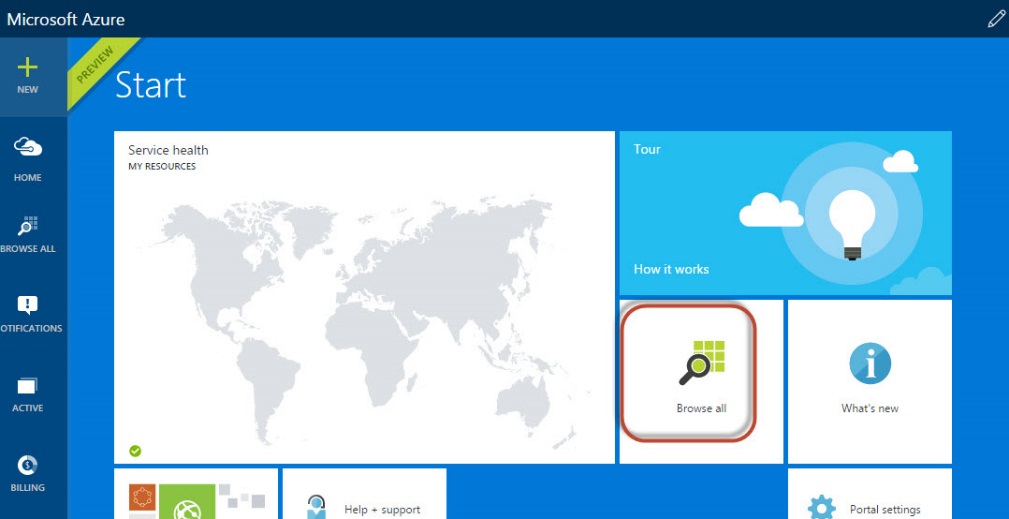
Figure 1. The Azure Portal 图1. Azure门户 Go to SQL databases and press the Add icon to add a new SQL database.
转到SQL数据库 ,然后按“添加”图标以添加新SQL数据库。
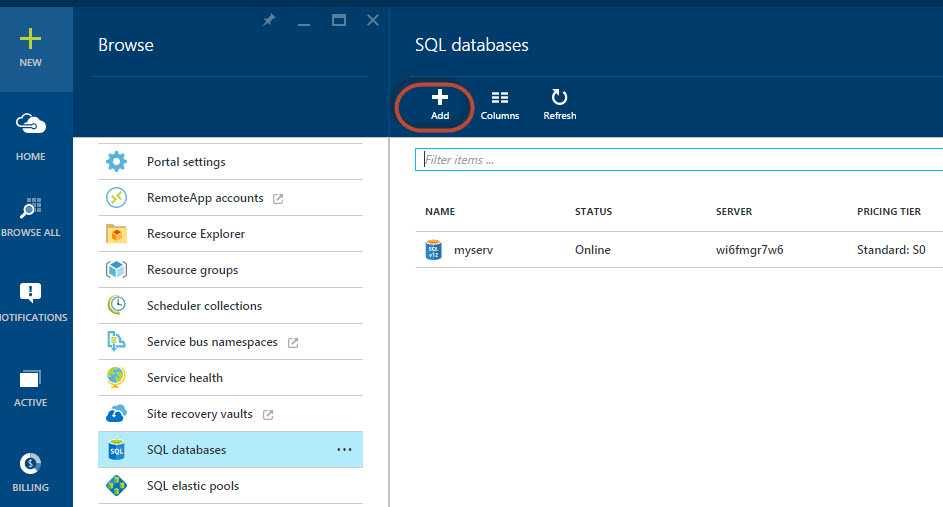
Figure 2. The SQL databases 图2. SQL数据库 Add a name for the SQL Database and click on the Pricing tier option.
为SQL数据库添加一个名称,然后单击“定价层”选项。
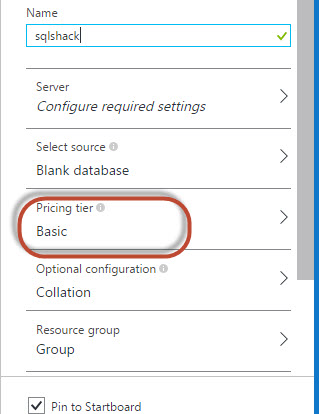
Figure 3. The sql database options 图3. sql数据库选项 If you like your money use a database cheaper. Specially if you are testing like me. The more GB, the more expensive it is. I will use the Basic Pricing. Verify your company needs and the space required for your company in order to chose the best option. The basic are usually the cheapest options, the standard is the intermediate option and the premium the most expensive option.
如果您喜欢您的钱,请使用便宜的数据库。 特别是如果您像我一样进行测试。 GB越大,价格越高。 我将使用基本定价。 验证您的公司需求和公司所需的空间,以便选择最佳选项。 基本通常是最便宜的选择,标准是中间选择,高级是最昂贵的选择。
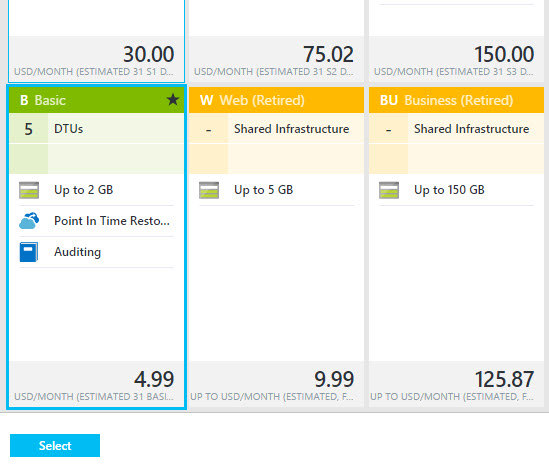
Figure 4. The prices for databases 图4.数据库价格 Select the server option to select an existing server or to create a new one. In this example, we will create a new Server.
选择服务器选项以选择现有服务器或创建新服务器。 在此示例中,我们将创建一个新的服务器。
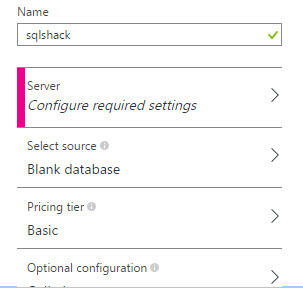
Figure 5. Server options 图5.服务器选项 Select the option to create a new server.
选择选项以创建新服务器。
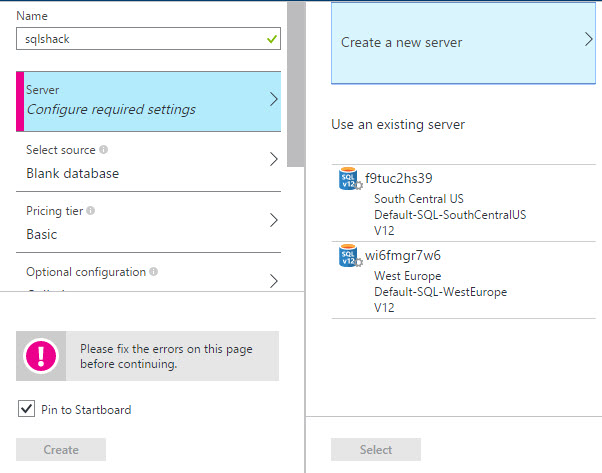
Figure 6. New server 图6.新服务器 Specify the server name, the login and password for the server. You will also need to verify the password. The location will allow you to specify where do you want to store the server.
指定服务器名称,服务器的登录名和密码。 您还需要验证密码。 该位置将允许您指定要将服务器存储在何处。
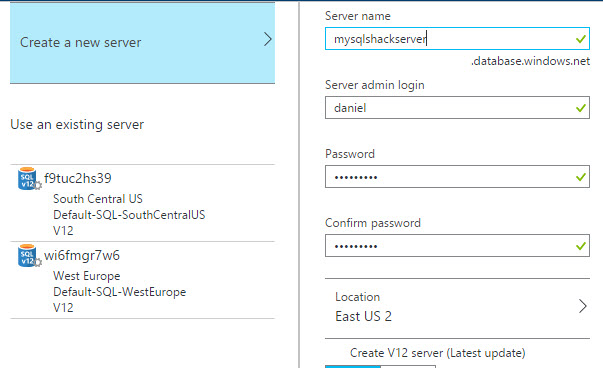
Figure 7. Server admin 图7.服务器管理员 In the portal, you will see a notification and a message that the database is being created.
在门户中,您将看到一条通知和一条消息,提示正在创建数据库。

Figure 8. Database Creation 图8.数据库创建 If everything is OK, a database will be created. The complete name is the Server Name. You can group the resources and assign your database to a group. The last version of groups is the V12.
如果一切正常,将创建一个数据库。 全名是服务器名称。 您可以对资源进行分组,然后将数据库分配给一个组。 组的最新版本是V12。
You can connect from other application with the information displayed in the Show database connection strings.
您可以使用显示数据库连接字符串中显示的信息从其他应用程序进行连接。
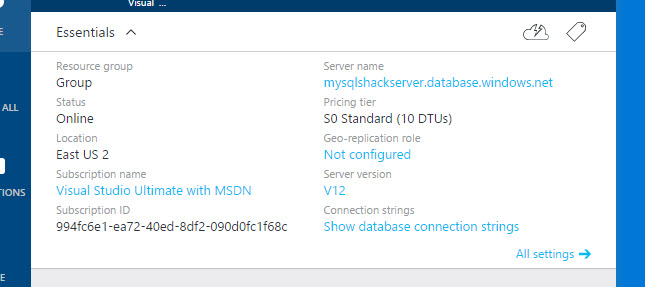
Figure 9. The SQL Database characteristics 图9. SQL数据库特征 The pricing tier is the Basic S0. The DTU is the Database Throughput Unit. It is used to measure the performance. For example, a machine with 10 DTUs is 10 times more powerful in performance than a machine of 1 DTU.
定价层是基本S0。 DTU是数据库吞吐量单位。 它用于衡量性能。 例如,具有10个DTU的计算机的性能比具有1个DTU的计算机强大10倍。
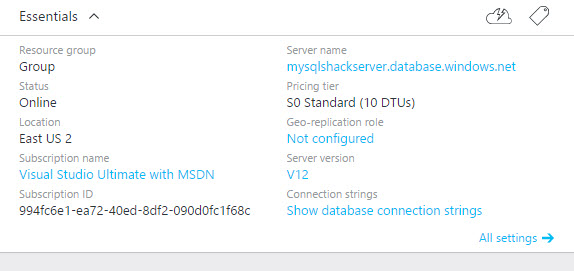
Figure 10. The pricing tier 图10.定价层 Visual Studio ( The Visual Studio )
We created a SQL Database in Azure, now we will connect with Azure.
我们在Azure中创建了一个SQL数据库,现在我们将与Azure连接。
Press the Connect to Azure option.
按“连接到Azure”选项。
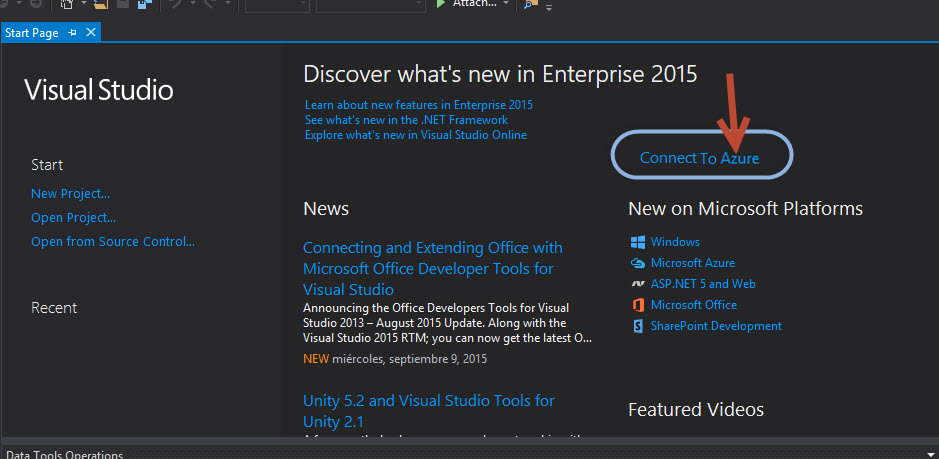
Figure 11. Visual Studio 图11. Visual Studio Specify the email address associated with your Azure Subscription and press continue.
指定与您的Azure订阅关联的电子邮件地址,然后按继续。
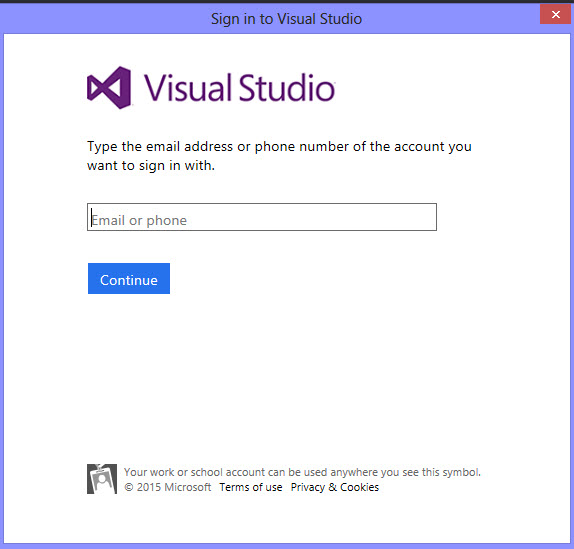
Figure 12. Connection to Visual Studio 图12.连接到Visual Studio Click on the Server Explorer to verify the existing Azure objects
单击服务器资源管理器以验证现有的Azure对象
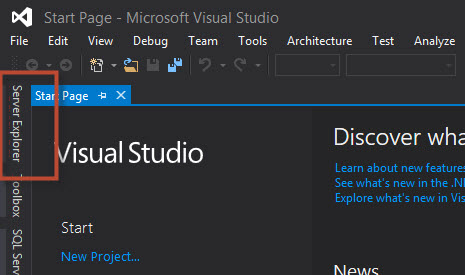
Figure 13. The Server Explorer 图13.服务器浏览器 You will be able to see the Azure icon associated with the subscription. Expand it and expand the SQL Databases.
您将能够看到与订阅关联的Azure图标。 展开它并展开SQL数据库。
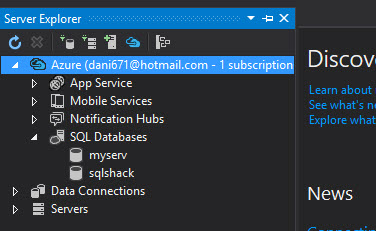
Figure 14. Connection to Azure 图14.连接到Azure Right click on the databases created in steps 1 to 10, and select Open in SQL Server Object Explorer. With this option, you will be able to see the database objects in Azure.
右键单击在步骤1到10中创建的数据库,然后在SQL Server Object Explorer中选择“打开”。 使用此选项,您将能够在Azure中查看数据库对象。
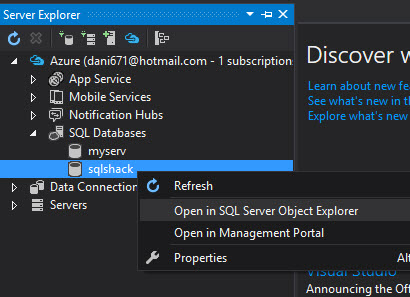
Figure 15. The SQL Server Object Explorer 图15. SQL Server对象资源管理器 You will receive a request to include the IP address in the firewall rules. With this option you will be able to access to the Azure Database. Press the Add Firewall Rule button. Now your IP Address is enabled.
您将收到一个将IP地址包含在防火墙规则中的请求。 使用此选项,您将能够访问Azure数据库。 按添加防火墙规则按钮。 现在,您的IP地址已启用。
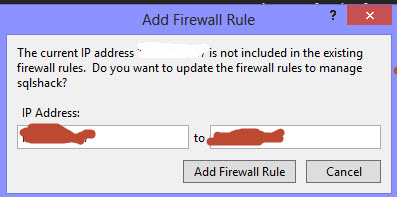
Figure 16. Adding Firewall Rule 图16.添加防火墙规则 Now, connect to SQL Server using the credentials specified on step 7.
现在,使用第7步中指定的凭据连接到SQL Server。
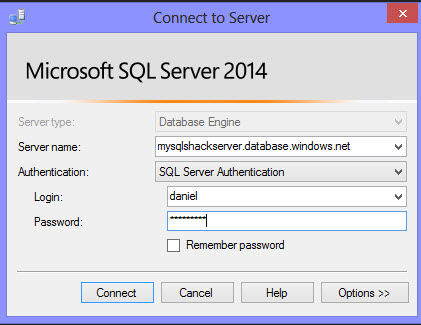
Figure 17. Database credentials 图17.数据库凭证 You are now connected to Azure. Expand the database and you will be able to see the Tables, Views, synonyms and the Programmability section to create stored procedures, functions.
您现在已连接到Azure。 展开数据库,您将能够看到Tables,Views,同义词和Programmability部分,以创建存储过程,函数。
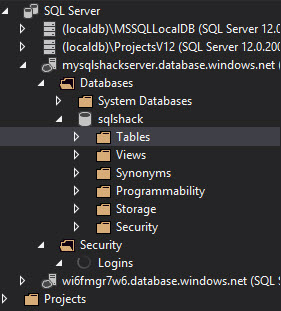
Figure 18. The database objects 图18.数据库对象 To create a new table select the tables folder and press the Add New Table option.
要创建新表,请选择表文件夹,然后按添加新表选项。
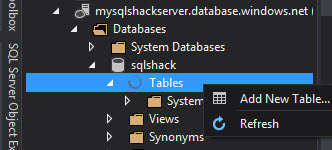
Figure 19. Adding new tables 图19.添加新表 Add some columns and define the datatypes for your table. In this example we are adding a Name a Lastname, the salary and the Id. The name and lastname are characters and the Id and Salary are integers.
添加一些列并定义表的数据类型。 在此示例中,我们添加了一个姓,名,薪水和ID。 名称和姓氏是字符,而ID和Salary是整数。
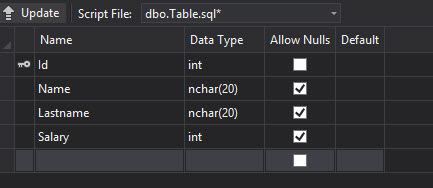
Figure 20. The Table Columns and data types 图20.表列和数据类型 As you can see, you can design the table and see the T-SQL script also. This is very useful if you want to edit the T-SQL directly or if you want to learn T-SQL. Change the table name of the table to employees.
如您所见,您可以设计表并同时查看T-SQL脚本。 如果要直接编辑T-SQL或要学习T-SQL,这将非常有用。 将表的表名称更改为employees。
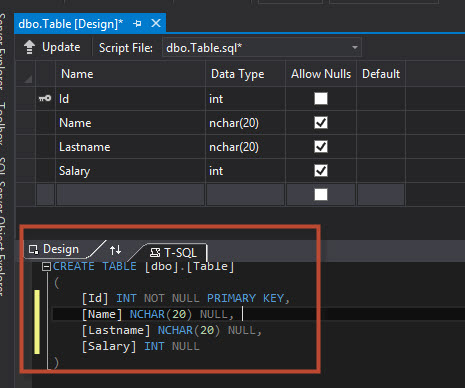
Figure 21. The T-SQL code 图21. T-SQL代码 Press Update to update the table in Azure. The script will be executed in the Azure database to create the new table named dbo.employees.
按更新以更新Azure中的表。 该脚本将在Azure数据库中执行,以创建名为dbo.employees的新表。

Figure 22. The Update option 图22. Update选项 You will receive a Preview Database Updates to confim the update. Press the Update Database.
您将收到预览数据库更新以确认更新。 按更新数据库。
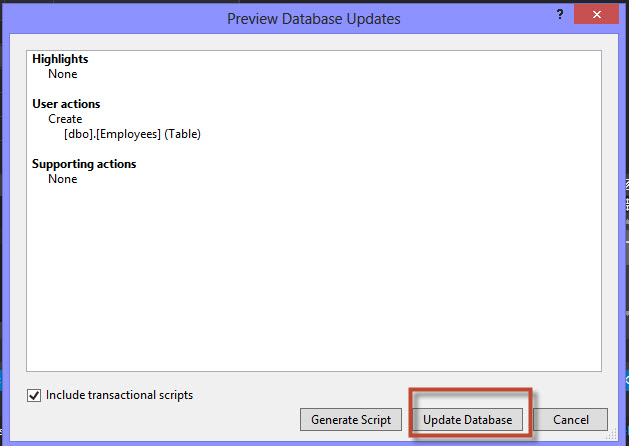
Figure 23. Preview Database Update 图23.预览数据库更新 The details of the execution will be displayed. The script will be created and executed in Azure. If there are failures, the windows below will show where the execution failed.
将显示执行的详细信息。 该脚本将在Azure中创建并执行。 如果失败,则以下窗口将显示执行失败的位置。
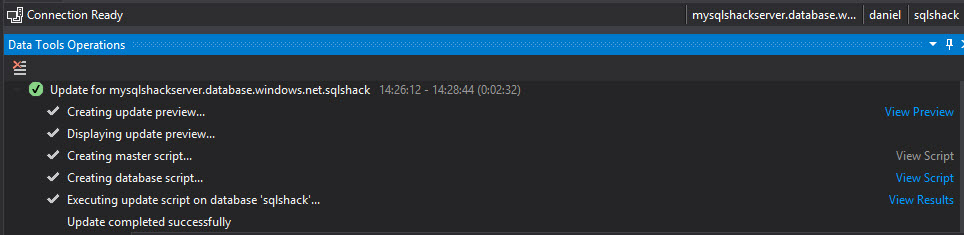
Figure 24.The Data Tools Operations 图24.数据工具操作 In the SQL Server Object Explorer, you will be able to see the table dbo.employees created.
在SQL Server对象资源管理器中,您将看到创建的表dbo.employees。
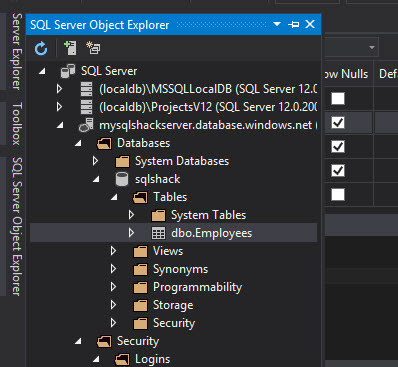
Figure 25. The table created 图25.创建的表 To view the data of the table, right click on the table and select View Data.
要查看表的数据,请在表上单击鼠标右键,然后选择“查看数据”。
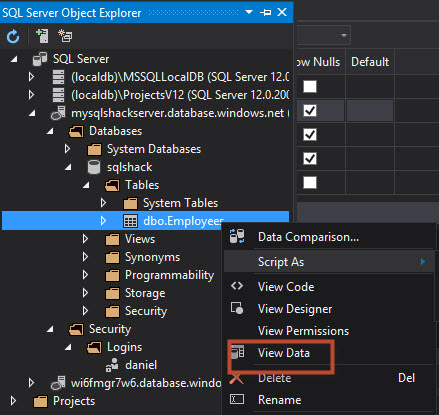
Figure 26. View Data 图26.查看数据 Write names, lastnames, salaries, ids. Try to add data similar to the following picture:
写出姓名,姓氏,薪水,身份证。 尝试添加类似于下图的数据:
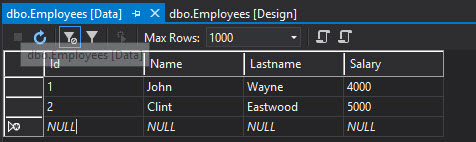
Figure 27. Adding data to the table 图27.将数据添加到表 To create a view related to the table dbo.Employees, right click on the Views and select Add New view.
要创建与表dbo.Employees相关的视图,请右键单击“视图”,然后选择“添加新视图”。
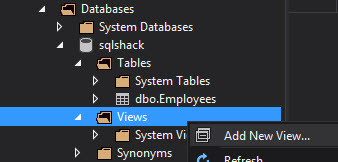
Figure 28. New View 图28.新建视图 We will name the view v_employees_high_salary and the view will show all the employees from the employees table whose salary is higher than 4000.
我们将视图命名为v_employees_high_salary,该视图将显示employee表中薪水高于4000的所有雇员。
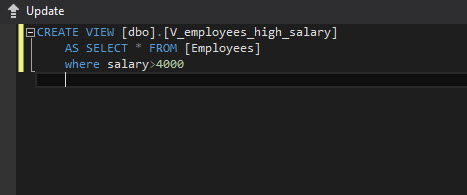
Figure 29. T-SQL code to create a new view 图29.创建新视图的T-SQL代码 Repeat the steps 22 to 24 to update the view in Azure. Once you create the view, go to the SQL Server Explorer, select the database and expland the Views folder to see the new folder created. To verify the data right click on the view and select View data.
重复步骤22至24,以更新Azure中的视图。 创建视图后,转到SQL Server资源管理器,选择数据库并展开Views文件夹以查看创建的新文件夹。 要验证数据,请在视图上单击鼠标右键,然后选择“查看数据”。
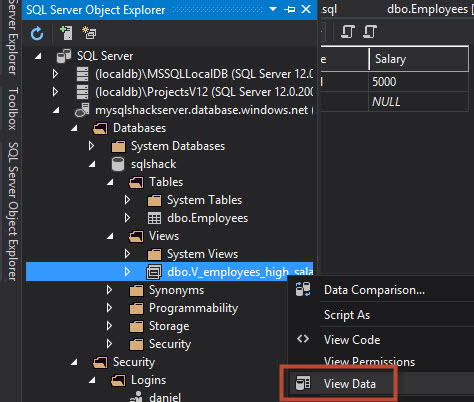
Figure 30. Checking the View Data 图30.检查视图数据 
Figure 31. The View Data filtered from the table 图31.从表中过滤出的View Data
结论 ( Conclusion )
In this article, we showed how to create tables in SQL Azure and views using Visual Studio. As you can see, the process is very simple. In later chapters, we will learn more.
在本文中,我们展示了如何使用Visual Studio在SQL Azure中创建表和视图。 如您所见,该过程非常简单。 在后面的章节中,我们将学习更多。
翻译自: https://www.sqlshack.com/working-with-visual-studio-and-sql-azure-databases/
sql azure 语法


 668
668

 被折叠的 条评论
为什么被折叠?
被折叠的 条评论
为什么被折叠?
 到【灌水乐园】发言


