


 chroot命令可以创建一个隔离的环境,防止与主系统交互,用于软件开发、系统恢复、运行旧软件等。通过创建必要的目录结构,复制必要的二进制文件和依赖,就可以设置一个简单的chroot环境。此过程可以自动化,便于管理和维护。
The chroot command can send you to jail, keep your development or test environments isolated, or just improve your system’s security. We show you the easiest way to use it.
chroot命令可以将您送入监狱,使您的开发或测试环境保持隔离,或者只是提高系统的安全性。 我们向您展示最简单的使用方式。
什么是chroot? (What’s a chroot?)
If you try to measure the usefulness of a command, you must take into account the functionality it provides and its ease of use. If it is too complicated for people to use or too long-winded to make them want to try to use it, the functionality might as well be zero. If no one uses it, it doesn’t provide any functionality.
如果尝试衡量命令的有用性,则必须考虑到该命令提供的功能及其易用性。 如果对于人来说使用它太复杂或太费力以致于他们不想尝试使用它,那么该功能可能也为零。 如果没有人使用它,它将不提供任何功能。
In discussions with Linux users—in person and on forums—it seems that the chroot command is one that is pegged as being difficult to use, or too persnickety and tedious to setup. It seems this terrific utility isn’t used as much as it might be.
在与Linux用户的讨论中,无论是在现场还是在论坛上,似乎chroot命令都是一个难于使用的命令,或者安装起来过于麻烦和乏味。 看来,这个实用工具并未得到应有的利用。
With chroot you can set up and run programs or interactive shells such as Bash in an encapsulated filesystem that is prevented from interacting with your regular filesystem. Everything within the chroot environment is penned in and contained. Nothing in the chroot environment can see out past its own, special, root directory without escalating to root privileges. That has earned this type of environment the nickname of a chroot jail. The term “jail” shouldn’t be confused with FreeBSD’s jail command, which creates a chroot environment that is more secure than the usual chroot environment.
使用chroot您可以在封装的文件系统中设置和运行程序或交互式shell,例如Bash,以防止与常规文件系统进行交互。 chroot环境中的所有内容都被写入并包含在其中。 如果不升级到root特权, chroot环境中的任何内容都无法超越它自己的特殊根目录。 这为这种类型的环境赢得了chroot监狱的绰号。 术语“ jail”不应与FreeBSD的jail命令混淆,该命令创建的chroot环境比通常的chroot环境更安全。
But actually, there’s a very straightforward way to use chroot, which we’re going to step through. We’re using regular Linux commands which will work on all distributions. Some Linux distributions have dedicated tools to set up chroot environments, such as debootstrap for Ubuntu, but we’re being distro-agnostic here.
但是实际上,有一种非常直接的方法可以使用chroot ,我们将逐步介绍它。 我们正在使用可在所有发行版上正常运行的常规Linux命令。 一些Linux发行版具有专用的工具来设置chroot环境,例如Ubuntu的debootstrap ,但在这里我们与发行版无关。
什么时候应该使用chroot? (When Should You Use a chroot?)
A chroot environment provides functionality similar to that of a virtual machine, but it is a lighter solution. The captive system doesn’t need a hypervisor to be installed and configured, such as VirtualBox or Virtual Machine Manager. Nor does it need to have a kernel installed in the captive system. The captive system shares your existing kernel.
chroot环境提供的功能类似于虚拟机,但解决方案更轻便。 专属系统不需要安装和配置虚拟机监控程序,例如VirtualBox或Virtual Machine Manager 。 也不需要在自备系统中安装内核。 专属系统共享您现有的内核。
In some senses, chroot environments are closer to containers such as LXC than to virtual machines. They’re lightweight, quick to deploy, and creating and firing one up can be automated. Like containers, one convenient way to configure them is to install just enough of the operating system for you to accomplish what is required. The “what is required” question is answered by looking at how you’re going to use your chroot environment.
从某种意义上说, chroot环境比诸如虚拟机更靠近LXC之类的容器。 它们重量轻,部署Swift,并且可以自动创建和启动一个。 像容器一样,一种方便的配置方式是安装足够多的操作系统,以完成所需的操作。 通过查看如何使用chroot环境,可以回答“需要什么”问题。
Some common uses are:
一些常见的用途是:
Software Development and Product Verification. Developers write software and the product verification team (PV) tests it. Sometimes issues are found by PV that can’t be replicated on the developer’s computer. The developer has all sorts of tools and libraries installed on their development computer that the average user—and PV—won’t have. Often, new software that works for the developer but not for others turns out to be using a resource on the developer’s PC that hasn’t been included in the test release of the software. chroot allows the developers to have a plain vanilla captive environment on their computer that they can sheep-dip the software in before giving it to PV. The captive environment can be configured with the bare minimum dependencies that the software requires.
软件开发和产品验证。 开发人员编写软件,产品验证团队(PV)对其进行测试。 有时PV发现的问题无法在开发人员的计算机上复制。 开发人员在其开发计算机上安装了普通用户和PV所没有的各种工具和库。 通常,适用于开发人员但不适用于其他开发人员的新软件原来正在使用开发人员PC上的资源,该资源未包含在该软件的测试版本中。 chroot允许开发人员在其计算机上拥有一个普通的香草俘虏环境,他们可以在将该软件提供给PV之前先将其浸入水中。 可以使用软件所需的最低限度依赖项来配置俘虏环境。
Reducing Development Risk. The developer can create a dedicated development environment so that nothing that happens in it can mess up his actual PC.
减少发展风险。 开发人员可以创建一个专用的开发环境,以便其中发生的任何事情都不会破坏他的实际PC。
Running Deprecated Software. Sometimes you just have to have an old version of something running. If the old software has requirements that would clash or be incompatible with your version of Linux you can chroot an environment for the problem software.
运行不推荐使用的软件。 有时,您只需要运行旧版本即可。 如果旧的软件有将与您Linux版本冲突或不兼容的要求,你可以chroot的问题,软件的环境。
Recovery and Filesystem Upgrades: If a Linux installation becomes inoperable, you can use chroot to mount the damaged filesystem to a mount point on a Live CD. This allows you to work in the damaged system and attempt to fix it as though it were mounted normally at root /. This means the expected file paths within the damaged system will be correctly referenced from the root directory, and not from the mount point of the Live CD. A similar technique was used in the article describing how to migrate the Linux filesystem from ext2 or ext3 to ext4.
恢复和文件系统升级:如果无法进行Linux安装,则可以使用chroot将损坏的文件系统安装到Live CD上的安装点。 这使您可以在损坏的系统中工作,并尝试像在根目录/上正常安装一样对其进行修复。 这意味着将从根目录而不是从Live CD的安装点正确引用损坏的系统中的预期文件路径。 文章中使用了类似的技术,描述了如何将Linux文件系统从ext2或ext3迁移到ext4。
Ringfencing Applications. Running an FTP server or other internet-connected appliance inside a chroot environment limits the damage an external attacker can do. This can be a valuable step in hardening the security of your system.
环形防护应用。 在chroot环境中运行FTP服务器或其他与Internet连接的设备会限制外部攻击者可能造成的损害。 这是加强系统安全性的重要步骤。
创建一个chroot环境 (Creating a chroot Environment)
We need a directory to act as the root directory of the chroot environment. So that we have a shorthand way of referring to that directory we’ll create a variable and store the name of the directory in it. Here we’re setting up a variable to store a path to the “testroot” directory. It doesn’t matter if this directory doesn’t exist yet, we’re going to create it soon. If the directory does exist, it should be empty.
我们需要一个目录作为chroot环境的根目录。 为了方便我们引用该目录,我们将创建一个变量并将目录名称存储在其中。 在这里,我们设置一个变量来存储“ testroot”目录的路径。 此目录是否不存在无关紧要,我们将很快创建它。 如果目录确实存在,则应为空。
chr=/home/dave/testroot

If the directory doesn’t exist, we need to create it. We can do that with this command. The -p (parents) option ensures any missing parent directories are created at the same time:
如果该目录不存在,则需要创建它。 我们可以使用此命令来做到这一点。 -p (父级)选项可确保同时创建所有丢失的父目录:
mkdir -p $chr

We need to create directories to hold the portions of the operating system our chroot environment will require. We’re going to set up a minimalist Linux environment that uses Bash as the interactive shell. We’ll also include the touch, rm, and ls commands. That will allow us to use all Bash’s built-in commands and touch, rm, and ls. We’ll be able to create, list and remove files, and use Bash. And—in this simple example—that’s all.
我们需要创建目录来保存chroot环境所需的操作系统部分。 我们将建立一个使用Bash作为交互式外壳的极简主义Linux环境。 我们还将包括touch , rm和ls命令。 这将使我们能够使用Bash的所有内置命令以及touch , rm和ls 。 我们将能够创建,列出和删除文件,并使用Bash。 而且,在这个简单的示例中,仅此而已。
List the directories you need to create within the {} brace expansion.
列出您需要在{}括号扩展中创建的目录。
mkdir -p $chr/{bin,lib,lib64}

Now we’ll change directory into our new root directory.
现在,我们将目录更改为新的根目录。
cd $chr

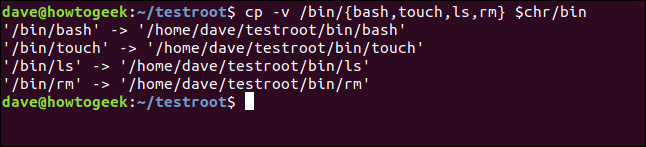
Let’s copy the binaries that we need in our minimalist Linux environment from your regular “/bin” directory into our chroot “/bin” directory. The -v (verbose) option makes cp tell us what it is doing as it performs each copy action.
让我们将极简Linux环境中所需的二进制文件从常规的“ / bin”目录复制到chroot “ / bin”目录中。 -v (详细)选项使cp在执行每个复制操作时告诉我们它在做什么。
cp -v /bin/{bash,touch,ls,rm} $chr

The files are copied in for us:
这些文件将为我们复制:
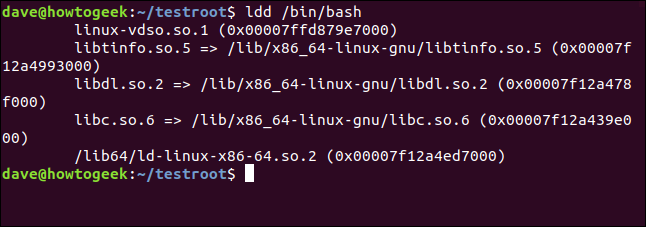
These binaries will have dependencies. We need to discover what they are and copy those files into our environment as well, otherwise bash, touch, rm, and ls will not be able to function. We need to do this in turn for each of our chosen commands. We’ll do Bash first. The ldd command will list the dependencies for us.
这些二进制文件将具有依赖性。 我们需要发现它们是什么并将这些文件也复制到我们的环境中,否则bash , touch , rm和ls将无法运行。 我们需要依次为每个选择的命令执行此操作。 我们将首先进行Bash。 ldd命令将为我们列出依赖项。
ldd /bin/bash

The dependencies are identified and listed in the terminal window:
在终端窗口中标识并列出了依赖性:
We need to copy those files into our new environment. Picking the details out of that listing and copying them one at a time is going to be time-consuming and error-prone.
我们需要将这些文件复制到我们的新环境中。 从清单中挑选细节并一次复制一个细节将非常耗时且容易出错。
Thankfully, we can semi-automate it. We’ll list the dependencies again, and this time we’ll form a list. Then we’ll loop through the list copying the files.
幸运的是,我们可以将其半自动化。 我们将再次列出依赖关系,这次我们将形成一个列表。 然后,我们将遍历复制文件的列表。
Here we’re using ldd to list the dependencies and feed the results through a pipe into egrep. Using egrep is the same as using grep with the -E (extended regular expressions) option. The -o (only matching) option restricts the output to the matching parts of lines. We’re looking for matching library files that end in a number [0-9].
在这里,我们使用ldd列出依赖项,并将结果通过管道输入到egrep 。 使用egrep与使用带有-E (扩展正则表达式)选项的grep相同。 -o (仅匹配)选项将输出限制为行的匹配部分。 我们正在寻找以数字[0-9]结尾的匹配库文件。
list="$(ldd /bin/bash | egrep -o '/lib.*\.[0-9]')"
![list="$(ldd /bin/bash | egrep -o '/lib.*\.[0-9]')" in a terminal window](https://i-blog.csdnimg.cn/blog_migrate/920b9541a2e635c8a17bbdef50761751.png)
We can check the contents of the list using echo:
我们可以使用echo检查列表的内容:
echo $list

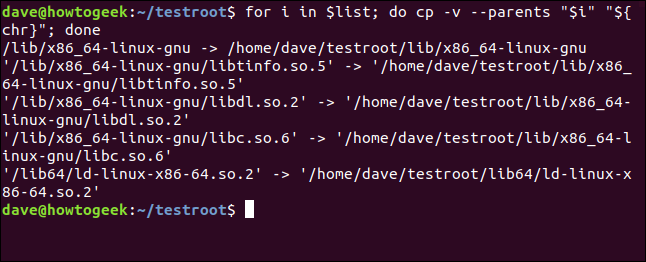
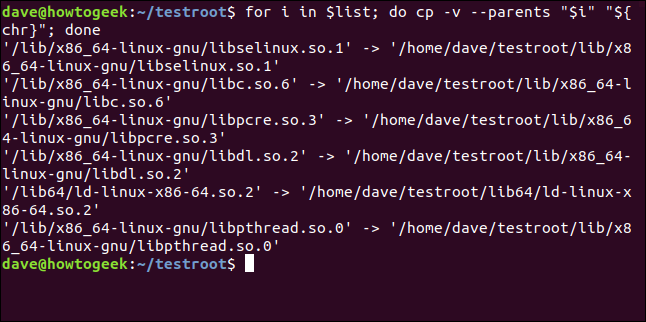
Now that we have the list, we can step through it with the following loop, copying the files one at a time. We’re using the variable i to step through the list. For each member of the list, we copy the file to our chroot root directory which is the value held in $chr.
现在我们有了列表,我们可以通过以下循环逐步执行该列表,一次复制一个文件。 我们正在使用变量i来遍历列表。 对于列表的每个成员,我们将文件复制到chroot根目录,该目录是$chr保存的值。
The -v (verbose) option causes cp to announce each copy as it performs it. The --parents option ensures any missing parent directories are created in the chroot environment.
-v (详细)选项使cp在执行每个副本时宣布其副本。 --parents选项可确保在chroot环境中创建所有丢失的父目录。
for i in $list; do cp -v --parents "$i" "${chr}"; done

And this is the output:
这是输出:
We’ll use that technique to capture the dependencies of each of the other commands. And we’ll use the loop technique to perform the actual copying. The good news is we only need to make a tiny edit to the command that gathers the dependencies.
我们将使用该技术来捕获其他每个命令的依赖性。 然后,我们将使用循环技术执行实际的复制。 好消息是,我们只需要对收集依赖项的命令进行少量编辑即可。
We can retrieve the command from our command history by hitting the Up Arrow key a few times and then make the edit. The looping copy command doesn’t need to change at all.
我们可以通过几次单击Up Arrow键从命令历史记录中检索命令,然后进行编辑。 循环复制命令根本不需要更改。
Here we’ve used the Up Arrow key to find the command, and we’ve edited it to say touch instead of bash.
在这里,我们使用了Up Arrow键来查找命令,并且对其进行了编辑,使其说成touch而不是bash 。
list="$(ldd /bin/touch | egrep -o '/lib.*\.[0-9]')"
![list="$(ldd /bin/touch | egrep -o '/lib.*\.[0-9]')" in a terminal window](https://i-blog.csdnimg.cn/blog_migrate/cf50a32c408e3ea6b1edd8b7f143037b.png)
We can now repeat the exact same loop command as before:
现在,我们可以重复与之前完全相同的循环命令:
for i in $list; do cp -v --parents "$i" "${chr}"; done
And our files are copied for us:
并且为我们复制了文件:

We can now edit the list command line for ls:
现在,我们可以编辑ls的list命令行:
list="$(ldd /bin/ls | egrep -o '/lib.*\.[0-9]')"
![list="$(ldd /bin/ls | egrep -o '/lib.*\.[0-9]')" in a terminal window](https://i-blog.csdnimg.cn/blog_migrate/d285713c9de97f4f1afc31dd37ae5285.png)
Again, we’ll use the same loop command. It doesn’t care what files are in the list. It blindly works through the list copying the files for us.
同样,我们将使用相同的循环命令。 不在乎列表中有哪些文件。 它会盲目地处理列表,为我们复制文件。
for i in $list; do cp -v --parents "$i" "${chr}"; done
And the dependencies for ls are copied over for us:
ls的依赖项已复制给我们:
We edit the list command line for the last time, making it work for rm:
我们最后一次编辑list命令行,使其适用于rm :
list="$(ldd /bin/ls | egrep -o '/lib.*\.[0-9]')"
![list="$(ldd /bin/ls | egrep -o '/lib.*\.[0-9]')" in a terminal window](https://i-blog.csdnimg.cn/blog_migrate/249a69e590680699e7c06f328e4589fb.png)
We use the looping copy command one last time:
我们上一次使用循环复制命令:
for i in $list; do cp -v --parents "$i" "${chr}"; done
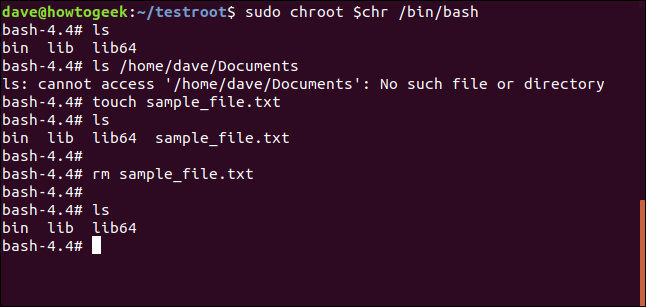
The last of our dependencies are copied into our chroot environment. We’re finally ready to use the chroot command. This command sets the root of the chroot environment, and specifies which application to run as the shell.
我们的最后一个依赖项被复制到chroot环境中。 我们终于可以使用chroot命令了。 此命令设置chroot环境的根目录,并指定要作为外壳程序运行的应用程序。
sudo chroot $chr /bin/bash

Our chroot environment is now active. The terminal window prompt has changed, and the interactive shell is the being handled by the bash shell in our environment.
我们的chroot环境现在处于活动状态。 终端窗口提示已更改,并且交互式shell由我们环境中的bash shell处理。

We can try out the commands that we have brought into the environment.
我们可以尝试引入环境中的命令。
ls
ls /home/dave/Documents

The ls command works as we’d expect when we use it within the environment. When we try to access a directory outside of the environment, the command fails.
当在环境中使用ls命令时,它的工作与预期的一样。 当我们尝试访问环境外部的目录时,命令失败。
We can use touch to create a file, ls to list it, and rm to remove it.
我们可以使用touch创建一个文件,使用ls列出它,使用rm删除它。
touch sample_file.txt
ls
rm sample_file.txt
ls
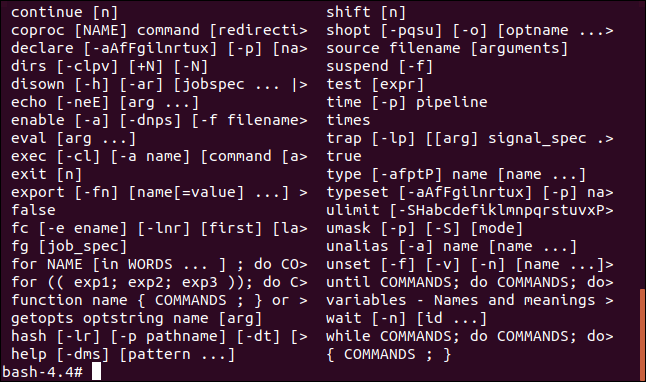
Of course, we can also use the built-in commands that the Bash shell provides. If you type help at the command line, Bash will list them for you.
当然,我们也可以使用Bash shell提供的内置命令。 如果您在命令行输入help ,Bash将为您列出它们。
help
Use exit to leave the chroot environment:
使用exit离开chroot环境:
exit

If you want to remove the chroot environment, you can simply delete it:
如果要删除chroot环境,只需删除它即可:
rm -r testroot/

This will recursively delete the files and directories in the chroot environment.
这将递归删除chroot环境中的文件和目录。
自动化便利 (Automate for Convenience)
If you’re thinking that chroot environments might be useful to you, but they’re a bit fiddly to set up, remember that you can always take the strain and the risk out of repetitive tasks by using aliases, functions, and scripts.
如果您认为chroot环境可能对您有用,但是设置起来有些麻烦,请记住,您始终可以使用别名,函数和脚本来减轻重复性任务的负担和风险。
翻译自: https://www.howtogeek.com/441534/how-to-use-the-chroot-command-on-linux/


 981
981

 被折叠的 条评论
为什么被折叠?
被折叠的 条评论
为什么被折叠?
 到【灌水乐园】发言


