


 本文介绍如何在Microsoft Outlook中设置规则以自动对特定电子邮件进行密件抄送,包括两个规则的具体设置步骤。

如何显示密件抄送人员地址
Sometimes, you might want to copy your sent emails to another address without the recipient knowing. In Microsoft Outlook, you can set up rules for doing this. We’ll walk you through the process and share an important caveat.
有时,您可能想将发送的电子邮件复制到另一个地址,而收件人却不知道。 在Microsoft Outlook中,您可以设置执行此操作的规则。 我们将引导您完成整个过程并分享重要的警告。
Most people are familiar with the CC (carbon copy) option in their email program. CC’ing someone means you’re sending them a copy of the message. The other recipients can also see who’s been CC’ed.
大多数人都熟悉电子邮件程序中的CC(抄送)选项。 抄送某人意味着您正在向他们发送邮件的副本。 其他收件人也可以看到谁被抄送了。
There’s also a BCC (blind carbon copy) option. Anyone you BCC will be hidden from the other recipients, but he or she will be able to see the sender and the recipients.
还有一个密件抄送(BCC)选项。 您密件抄送的任何人都将对其他收件人隐藏,但他或她将能够看到发件人和收件人。
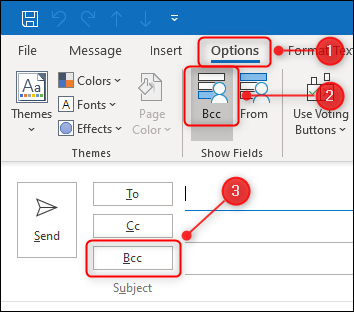
In Outlook, you can add the BCC field to emails with a simple toggle switch. To do so, open a new email, switch to the “Options” tab, and then click “Bcc.” This will make the “Bcc” field visible on this and all new emails. To hide it once again, click Options > Bcc on any new email.
在Outlook中,您可以使用简单的切换开关将“密件抄送”字段添加到电子邮件中。 为此,请打开新电子邮件,切换到“选项”标签,然后单击“密件抄送”。 这将在此电子邮件和所有新电子邮件中显示“密件抄送”字段。 要再次隐藏它,请在任何新电子邮件上单击选项>密件抄送。
If you want to BCC someone on a specific email, simply type that person’s email address in the “Bcc” field the same way you would in the “To” or “Cc” fields.
如果要在特定电子邮件中对某人进行密件抄送,只需在“密件抄送”字段中键入该人的电子邮件地址,就像在“收件人”或“抄送”字段中一样。
The “Bcc” field is most commonly used when sending bulk emails to lots of recipients, such as a newsletter. Depending on where you are in the world, you might be legally obliged to hide people’s email addresses for data protection reasons.
向大量收件人(例如新闻稿)发送批量电子邮件时,最常使用“密件抄送”字段。 根据您在世界上的位置,出于数据保护的原因,您可能在法律上有义务隐藏人们的电子邮件地址。
Even if there isn’t a compelling legal obligation, it’s still a good practice (and common courtesy) not to broadcast people’s email addresses without their consent.
即使没有强制性的法律义务,仍然是一种好习惯(并且出于普遍的礼貌),不要未经他人同意就广播他们的电子邮件地址。
There are other scenarios in which you might want to BCC someone. For example, if you’re dealing with a troublesome employee or coworker, you might want to keep a record of your email interactions in case you need to raise a grievance. BCC allows you to send copies of the messages to any address you want, without the recipients knowing about it.
在其他情况下,您可能希望对某人进行密送。 例如,如果您要与麻烦的员工或同事打交道,则可能需要保留电子邮件交互的记录,以防您需要提出申诉。 密件抄送使您可以将邮件的副本发送到所需的任何地址,而收件人却不知道。
If you want to add a BCC recipient to every email automatically or to specific emails—such as those to a certain individual or that contain specific words in the subject line—there’s no simple way to do so. If you’ve used Outlook rules, you might expect this to be an option, but unfortunately, it isn’t.
如果要将BCC收件人自动添加到每封电子邮件或特定电子邮件(例如某人的电子邮件或主题行中包含特定单词的电子邮件),则没有简单的方法。 如果您使用过Outlook规则,则可能希望这是一个选择,但不幸的是,事实并非如此。
It is possible to use rules, but you have to create more than one. Specifically, one rule to apply a category to emails you want to BCC, and another to auto-forward emails within that category to another address. This isn’t quite the same as a BCC, but it achieves the same thing.
可以使用规则,但是您必须创建多个规则。 具体来说,一种规则是将类别应用于您要密送的电子邮件,另一种规则是将该类别内的电子邮件自动转发到另一个地址。 这与BCC不太一样,但是它实现了相同的目的。
The important caveat we mentioned earlier is a lot of businesses block their staff from auto-forwarding emails outside the company. This is because auto-forwarding rules are a common method cybercriminals use to get data from businesses.
我们前面提到的重要警告是,许多企业阻止其员工将电子邮件自动转发到公司外部。 这是因为自动转发规则是网络罪犯从企业获取数据的常用方法。
Any business large enough to have its own IT department will most likely block auto-forwarding. It will also probably get an alert when someone sets up an auto-forwarding rule.
任何规模足够大,拥有自己的IT部门的企业都很可能会阻止自动转发。 当有人设置自动转发规则时,它也可能会收到警报。
If your company blocks auto-forwarding, you’ll have to add the BCC manually if it’s going to an external email address. If you’re forwarding to another mailbox within your company, or your company doesn’t block auto-forwarding, though, you’re good to go.
如果您的公司阻止了自动转发,则如果要发送到外部电子邮件地址,则必须手动添加密件抄送。 但是,如果您要转发到公司内的另一个邮箱,或者公司没有阻止自动转发,那很好。
With that caveat in mind, here’s how to set up the two rules.
考虑到这一警告,下面是设置这两个规则的方法。
规则1:套用类别 (Rule 1: Apply a Category)
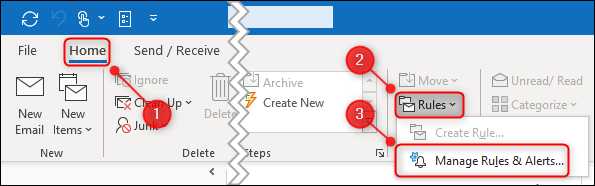
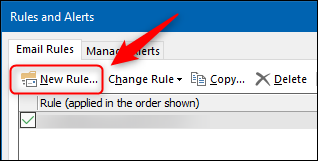
Make sure you’re in your Outlook Inbox, and then, while viewing the “Home” tab, click Rules > Manage Rules and Alerts.
确保您在Outlook收件箱中,然后在查看“主页”选项卡时,单击“规则”>“管理规则和警报”。
In the “Rules and Alerts” panel, click “New Rule.”
在“规则和警报”面板中,单击“新规则”。
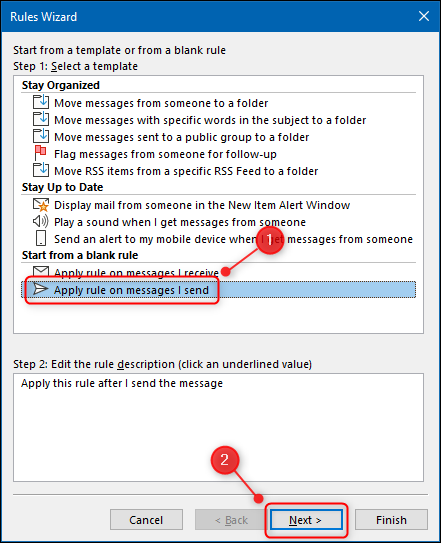
Select “Apply Rule On Messages I Send” in the “Rules Wizard” that appears, and then click “Next.”
在出现的“规则向导”中选择“对发送的邮件应用规则”,然后单击“下一步”。
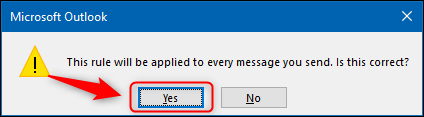
Next, you choose the emails to which you want to automatically apply the category. If you want to categorize all emails, click “Next.” A warning will be displayed; click “Yes.”
接下来,选择要自动应用类别的电子邮件。 如果要对所有电子邮件进行分类,请单击“下一步”。 将显示警告; 点击“是”。
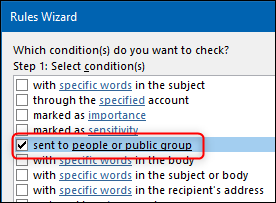
If you only want to categorize specific messages, you’ll have to choose which kind. There are a large number of conditions to choose from, including those with certain words in the subject line or the body, those with attachments, and so on.
如果只想对特定邮件进行分类,则必须选择哪种邮件。 有很多条件可供选择,包括主题行或正文中带有某些单词的条件,带有附件的条件,等等。
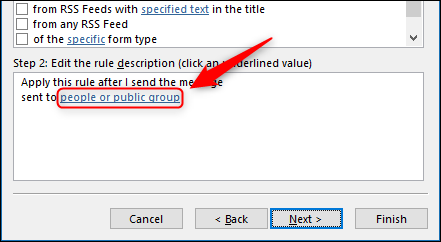
We’re going to categorize emails sent to a specific person, so we select the “Sent to People or Public Group” option.
我们将对发送给特定人员的电子邮件进行分类,因此我们选择“发送给人员或公共组”选项。
We click the “People or Public Group” link to choose the recipient.
我们单击“人员或公共组”链接以选择收件人。
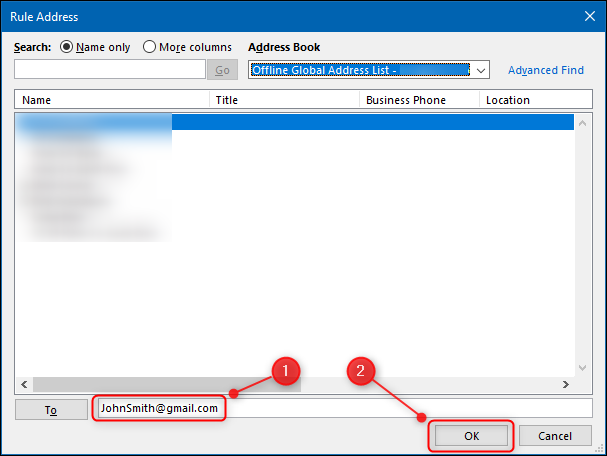
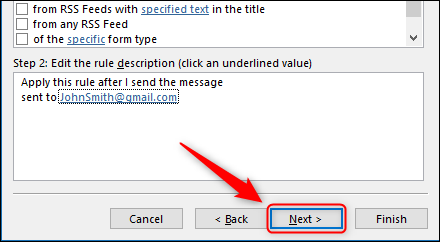
We can select the person from our address book or type the email address directly in the “To” field, and then click “OK.”
我们可以从通讯录中选择该人,或者直接在“收件人”字段中键入电子邮件地址,然后单击“确定”。
We click “Next.”
我们单击“下一步”。
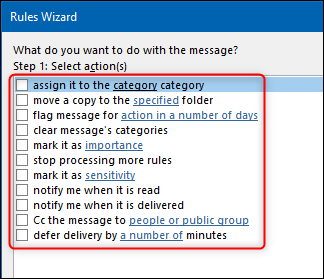
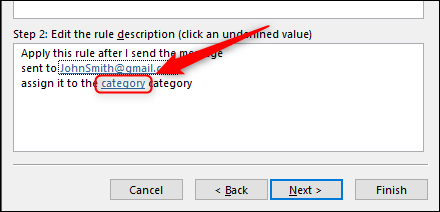
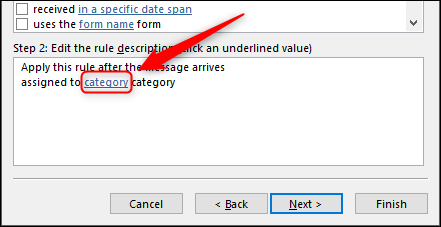
On the next page of the wizard, we select the “Assign It to the Category Category.”
在向导的下一页上,我们选择“将其分配给类别类别”。
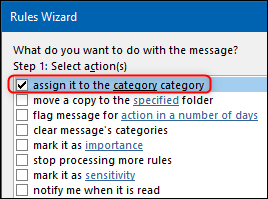
We then click the “Category” link to assign a category.
然后,我们单击“类别”链接来分配类别。
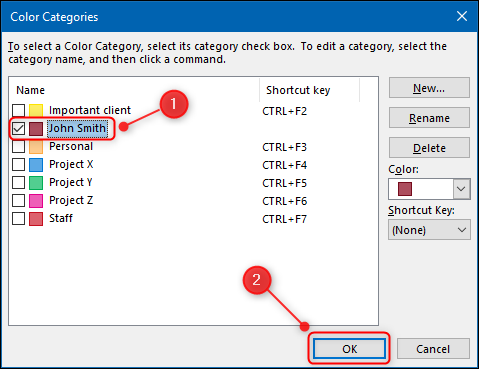
In the “Color Categories” window that opens, we choose the category to which we want this to apply. You can also click “New” to create a new one, and then click “OK.”
在打开的“颜色类别”窗口中,选择要应用此类别的类别。 您也可以单击“新建”来创建一个新的,然后单击“确定”。
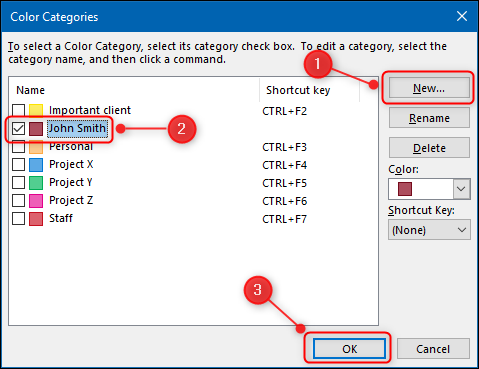
To avoid auto-forwarding the wrong emails to yourself, consider creating an entirely new category just for this.
为避免将错误的电子邮件自动转发给您自己,请考虑为此专门创建一个全新的类别。
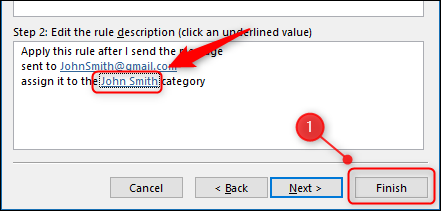
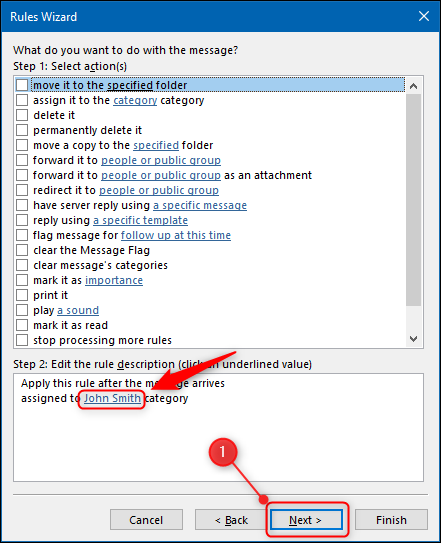
The category in the wizard will change to the one you’ve selected. Click “Finish.”
向导中的类别将更改为您选择的类别。 点击“完成”。
Click “OK” in the confirmation box and your first rule is created.
在确认框中单击“确定”,您的第一条规则已创建。

规则2:自动转发电子邮件 (Rule 2: Auto Forward the Emails)
Now you have to set up a rule which auto forwards emails that have the category you chose in Rule 1.
现在,您必须设置一个规则,该规则将自动转发具有在规则1中选择的类别的电子邮件。
First, click your “Sent” items folder to switch to it. This step is essential, otherwise, the rule will only run on emails in your Inbox.
首先,单击“已发送”项目文件夹以切换到该文件夹。 此步骤至关重要,否则,该规则将仅在收件箱中的电子邮件上运行。
On the “Home” tab in Outlook, click Rules > Manage Rules and Alerts.
在Outlook的“主页”选项卡上,单击“规则”>“管理规则和警报”。
Select “New Rule.”
选择“新规则”。
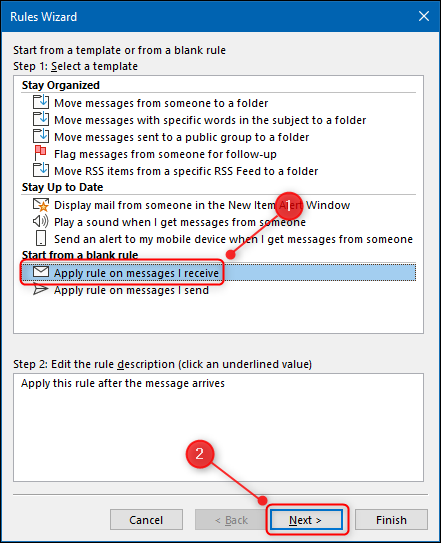
In the “Rules Wizard,” click “Apply Rule On Messages I Receive,” and then click “Next.”
在“规则向导”中,单击“对收到的邮件应用规则”,然后单击“下一步”。
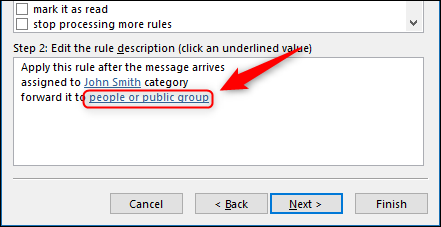
On the next page of the wizard, select “Assigned to Category Category.”
在向导的下一页上,选择“分配给类别类别”。

Click the “Category” link to choose the category to which you want to assign it.
点击“类别”链接以选择您要分配的类别。
In the “Color Categories” window, choose the category you set in Rule 1, and then click “OK.”
在“颜色类别”窗口中,选择在规则1中设置的类别,然后单击“确定”。
The category in the wizard will change to the one you selected. Click “Next.”
向导中的类别将更改为您选择的类别。 点击下一步。”
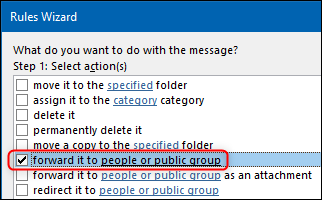
On the next page, select “Forward It to People or Public Group.”
在下一页上,选择“转发给用户或公共组”。
Click the “People or Public Group” link to choose a recipient.
单击“人员或公共组”链接以选择收件人。
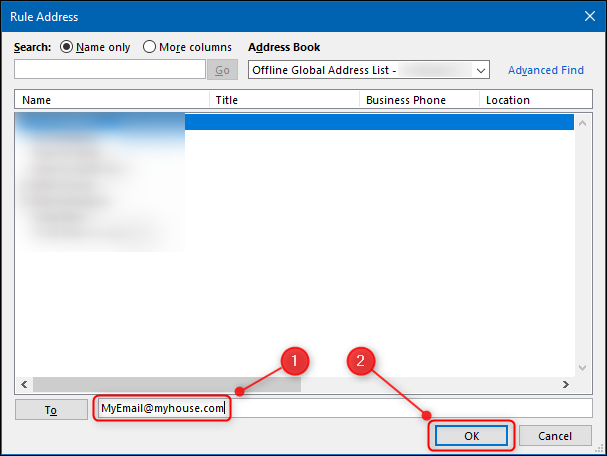
You can select the address to which you want to forward the emails from your address book or type it in the “To” field. Then, click “OK.”
您可以从通讯录中选择要将电子邮件转发到的地址,或在“收件人”字段中键入。 然后,单击“确定”。
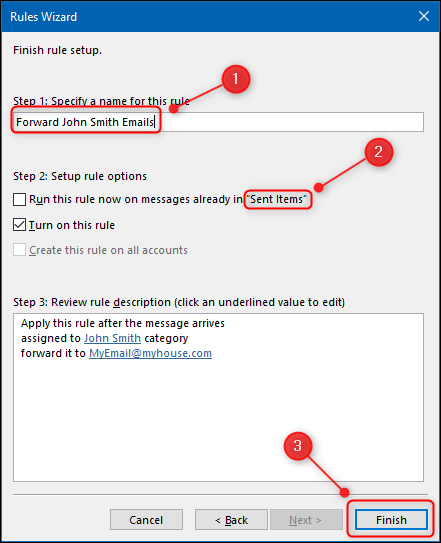
Click “Next” twice to get to the final page of the wizard. Give your rule a name, make sure it applies to the “Sent Items” folder, and then click “Finish.”
单击两次“下一步”以转到向导的最后一页。 给您的规则起一个名字,确保它适用于“已发送邮件”文件夹,然后单击“完成”。
Your rules are now created! Whenever you send an email to the person you specified, a category will be added to the email (Rule 1). Once the email reaches your “Sent Items” folder, it’ll be automatically forwarded to the address you specified in Rule 2.
现在,您的规则已创建! 每当您将电子邮件发送给指定的人时,都会在电子邮件中添加一个类别(规则1)。 电子邮件到达“已发送邮件”文件夹后,它将自动转发到您在规则2中指定的地址。
翻译自: https://www.howtogeek.com/684902/how-to-automatically-bcc-emails-using-rules-in-outlook/
如何显示密件抄送人员地址


 1909
1909

 被折叠的 条评论
为什么被折叠?
被折叠的 条评论
为什么被折叠?
 到【灌水乐园】发言


