


linux中fstab文件
Adding a new hard drive or solid-state drive to your Linux computer? You’ll need to edit your fstab file. A lot of people find the very idea scary. Yes, it’s critical that you get it right, but armed with the right knowledge, it really isn’t difficult. We step you through the process of editing your fstab file to integrate your new drive into your file system.
在您Linux计算机上添加新的硬盘驱动器或固态驱动器? 您需要编辑fstab文件。 很多人觉得这个主意很吓人。 是的,正确的选择至关重要,但是拥有正确的知识,这并不难。 我们将引导您完成编辑fstab文件的过程,以将新驱动器集成到文件系统中。
fstab,文件系统表 (fstab, the File Systems Table)
Although adding a new hard drive to a Linux computer isn’t too complicated, it can be a little confusing the first time you try. You connect up the hardware, power on the computer, and log in to the operating system. But you cannot see your new drive anywhere. Why doesn’t it show up? How do you get Linux to “see” the drive so you can start to configure it?
尽管在Linux计算机上添加新的硬盘驱动器并不太复杂,但是第一次尝试时可能会有些混乱。 您已连接硬件,打开计算机电源,然后登录到操作系统。 但是您无法在任何地方看到新驱动器。 为什么不显示? 您如何使Linux“看到”驱动器,以便您可以开始对其进行配置?
Actually, Linux has seen your hardware, but it doesn’t readily announce it. Or even give you a hint that it has found your new hardware. You have to interrogate Linux to obtain the information you’re going to need to put into your fstab file.
实际上,Linux已经看到了您的硬件,但并没有立即宣布。 甚至提示您已找到新硬件。 您必须询问Linux以获得将要放入fstab文件中的信息。
Here’s how to set up your new hard drive so that Linux—and you—can see it and use it. There are two parts to the process. The first part is doing some reconnaissance to identify the hard drive and to gather some information on it. The second part is editing the fstab file, using the information we’ve gathered in the reconnaissance phase.
这是设置新硬盘驱动器的方法,以便Linux和您都能看到并使用它。 该过程分为两个部分。 第一部分是进行侦查以识别硬盘驱动器并收集有关它的一些信息。 第二部分是使用我们在侦察阶段收集的信息来编辑fstab文件。
寻找新的驱动器 (Finding Your New Drive)
We’re adding two new drives to this system. One is a 32 GB mechanical hard drive (HD), and the other is a 16 GB solid-state drive (SSD).
我们将向该系统添加两个新驱动器。 一个是32 GB的机械硬盘驱动器(HD),另一个是16 GB的固态驱动器(SSD) 。
We need to know that Linux can see them, and what block devices Linux is using for them. In Linux and Unix-like operating systems, a block device is a special file that acts as an interface to a device that data can be read from and written to (unless it is read-only). Block devices often represent a mass-storage unit of some kind (for example, a partition on a hard disk or a CD-ROM. They are created in the /dev directory.
我们需要知道Linux可以看到它们,以及Linux用于它们的块设备。 在Linux和类似Unix的操作系统中,块设备是一个特殊文件,充当与设备之间的接口,可以从中读取和写入数据(除非它是只读的)。 块设备通常代表某种大容量存储单元(例如,硬盘或CD-ROM上的分区。它们在/dev目录中创建)。
We can use the lsblk command to list the block devices connected to your Linux computer.
我们可以使用lsblk命令列出连接到Linux计算机的块设备。
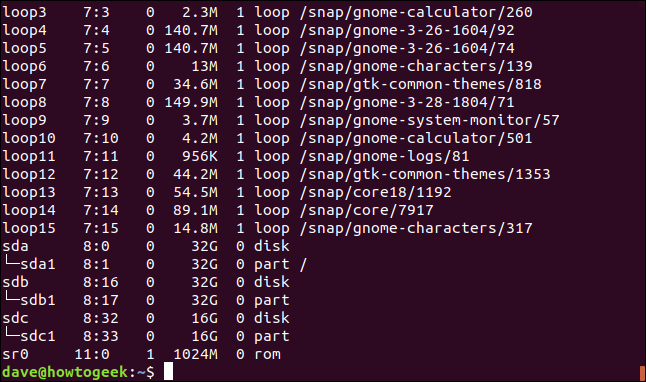
lsblk

The output from lsblk is in columns.
lsblk的输出以lsblk单位。
The columns are:
这些列是:
Name: This is the device name. Devices names that start “sd” and are followed by a letter represent SCSI hard disks. The letter identifies individual hard disks, with “a” being the first, “b”. being the second and so on. If there is a number appended, it indicates a partition. For example, “sdb2” would be partition 2 on the second SCSI hard drive.
名称:这是设备名称。 以“ sd”开头并后接字母的设备名称代表SCSI硬盘。 该字母标识单个硬盘,其中“ a”是第一个,“ b”。 是第二位,依此类推。 如果附加数字,则表示分区。 例如,“ sdb2”将是第二个SCSI硬盘驱动器上的分区2。
Maj:Min: This column holds the major and minor numbers of the device. The major number indicates the type of the device (or, more precisely, the type of driver used to talk to that device). The minor number is a count of the number of devices of that type.
Maj:Min :此列包含设备的主要和次要编号。 主数字表示设备的类型(或更准确地说,是用于与该设备通信的驱动程序的类型)。 次设备号是该类型设备数量的计数。
Rm: This column shows whether the device is removable or not. Note that device
sr0has a value of 1, indicating it is removable. This is a CD-ROM drive.Rm :此列显示设备是否可移动。 请注意,设备
sr0的值为1,表示它是可移动的。 这是CD-ROM驱动器。Size: This is the amount of data that can be stored in the device.
大小:这是可以存储在设备中的数据量。
Ro: This column will show 1 for read-only devices and 0 for read-write devices. The
loopdevices are all read-only.Ro :此列将对只读设备显示1,对于读写设备显示0。
loop设备均为只读。Type: This identifies the type of device. The “disk” entry means a disk drive, the “part” entry stands for partition, and “rom” means Read-Only Memory (CD-ROM).
类型:标识设备的类型。 “ disk”条目表示磁盘驱动器,“ part”条目表示分区,“ rom”表示只读存储器(CD-ROM)。
Mountpoint: This shows the point in the file system at which this device is mounted. If this is blank, the device is not mounted.
Mountpoint :这显示文件系统中此设备的安装点。 如果为空,则未安装设备。
In the screenshot above, you can see that the loop devices are all given a major number of 7 (meaning a loopback, or loop, device), and the minor numbers simply increment by 1 each time. loop devices are used with the squashfs file system. A squashfs file system is created each time an application is installed using the snappy package management system.
在上面的屏幕截图中,您可以看到loop设备的主数均为7(表示回送或循环device ),次设备每次仅增加1。 循环设备与squashfs文件系统一起使用。 每次使用snappy软件包管理系统安装应用程序时,都会创建一个squashfs文件系统。
The SCSI hard drives are given names like sda, sdb, and sdc, and all have a major number of 8 (SCSI hard drive). The minor numbers are grouped in 16’s. The minor numbers for the first drive, sda , run from 0 to 15. The 0 represents the physical drive, and the minor number of 1 represents the first partition on that drive. For the second drive, sdb , the minor numbers run from 16 to 31. 16 represents the physical drive, and 17 represents the first partition on that drive. The next 16 numbers, 32 to 47, are used for the minor numbers of sdc , and so on.
SCSI硬盘驱动器具有sda , sdb和sdc ,并且全部具有8个主要编号(SCSI硬盘驱动器)。 次要数字分组为16。 第一个驱动器的次要编号sda从0到15。0代表物理驱动器,次要编号1代表该驱动器上的第一个分区。 对于第二个驱动器sdb ,次编号从16到31。16表示物理驱动器,而17表示该驱动器上的第一个分区。 接下来的16个数字(32到47)用于sdc的次要数字,依此类推。
Other common major numbers are 3 (for a IDE hard drive) and 11 for CD-ROMS.
其他常见的主要数字是3(对于IDE硬盘)和11(对于CD-ROMS)。
Actually, the /dev/sr0 style for SDCSI CD-ROM drives is deprecated. The approved format is /dev/scd0. Despite that, the /dev/sr0 format was still in use on all of the machines used to research this article.
实际上,不建议使用SDCSI CD-ROM驱动器的/dev/sr0样式。 批准的格式为/dev/scd0 。 尽管如此, /dev/sr0格式仍在用于研究本文的所有机器上使用。
The kernel documentation contains a long listing of all values that the major and minor numbers can take. It’s a surprisingly long list.
内核文档包含一长串,列出了主要和次要数字可以采用的所有值。 这是一个出奇的长名单。
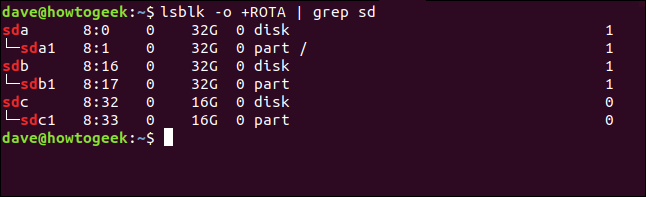
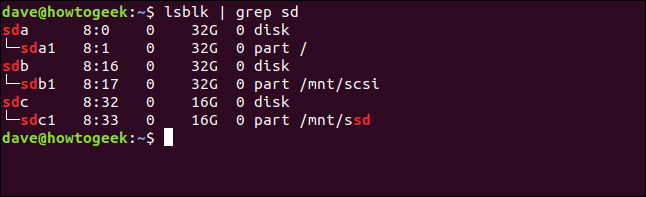
To de-clutter the output from lsblk we can use grep to select only the items of interest to us. We know we’ve not added a loop device, so let’s select all of the SCSI hard drives. we know these will have “sd” in their names.
为了使lsblk的输出lsblk我们可以使用grep仅选择我们感兴趣的项目。 我们知道我们还没有添加环路设备,因此让我们选择所有SCSI硬盘驱动器。 我们知道这些名称将带有“ sd”。
lsblk | grep sd

This command will cause grep to print only lines that have “sd” in the. On our test machine, we see:
此命令将使grep只打印其中带有“ sd”的行。 在我们的测试机上,我们看到:

So, we have three SCSI drives. The first one, /dev/sda , is mounted at the root of the file system, /. The other two are not mounted at all, which is to be expected for brand new drives. We can see that drive /dev/sdb is 32 GB in size, which means it is our traditional mechanical drive. Drive /dev/sdc is 16 GB in size, and this is our SSD drive.
因此,我们有三个SCSI驱动器。 第一个/dev/sda安装在文件系统的根目录/ 。 其余两个根本没有安装,这是全新驱动器所期望的。 我们可以看到驱动器/dev/sdb大小为32 GB,这意味着它是我们的传统机械驱动器。 驱动器/dev/sdc大小为16 GB,这是我们的SSD驱动器。
Actually, as this is a virtual computer, these are also virtual disks. So the SSD is showing up just like a SCSI mechanical drive. On my regular desktop my NVMe SSD shows up as /dev/nvme0n1, and the first partition on it is /dev/nvme0n1p1. Its major number is 259. Those differences don’t change what we’ve got to do in the fstab file, but be aware if you have an SSD, it isn’t going to show up as a physical drive.
实际上,由于这是虚拟计算机,因此它们也是虚拟磁盘。 因此,SSD就像SCSI机械驱动器一样出现。 在常规桌面上,我的NVMe SSD显示为/dev/nvme0n1 ,其第一个分区为/dev/nvme0n1p1 。 它的主要编号是259。这些差异不会改变我们在fstab文件中要做的工作,但是请注意,如果您有SSD,它就不会显示为物理驱动器。
Also, your drives probably won’t have a partition on them if they are brand new. You can use fdisk to create a partition if required.
另外,如果驱动器是全新的,则驱动器上可能没有分区。 如果需要,可以使用fdisk创建分区。
识别旋转和非旋转驱动器 (Identifying Rotating and Non-rotating Drives)
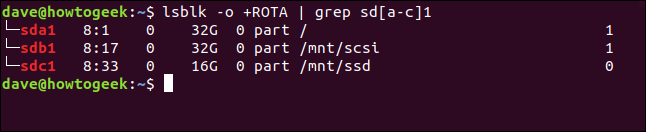
If we use the -o (output) option with lsblk and add the ROTA (rotating) column to the display, lsblk will use a 1 to indicate a rotating storage device (mechanical drive) and a 0 to indicate a non-rotating storage device (solid-state drive).
如果我们将-o (输出)选项与lsblk一起lsblk ,并将ROTA (旋转)列添加到显示中,则lsblk将使用1指示旋转存储设备(机械驱动器),使用0指示非旋转存储设备(固态硬盘)。
lsblk -o +ROTA | grep sd

We get an extra column on the right of the display, which is the ROTA (rotating) column. As you can see, the “SSD” has a 0 for the device and partition. That makes sense because an SSD is a non-rotating storage device.
在显示的右侧,我们还有一个额外的列,即ROTA (旋转)列。 如您所见,“ SSD”的设备和分区为0。 这是有道理的,因为SSD是不可旋转的存储设备。
挂载文件系统 (Mounting The File Systems)
Before we start thinking about the fstab file, let’s check that we can mount the drives by hand. This way, if something doesn’t work when we use the fstab file, we’ll know the problem must be our syntax and not a problem with the drive itself.
在开始考虑fstab文件之前,让我们检查一下是否可以手动安装驱动器。 这样,如果在使用fstab文件时某些操作不起作用,我们将知道问题一定是我们的语法,而不是驱动器本身的问题。
We’ll create some temporary mount points in the /mnt directory. You’ll need to use sudo , and you’ll be prompted for your password.
我们将在/mnt目录中创建一些临时挂载点。 您将需要使用sudo ,并且将提示您输入密码。
sudo mkdir /mnt/scsi

sudo mkdir /mnt/ssd

Now let’s mount the SCSI drive on the new mount point. We’ll use the mount command in its simplest form. We’ll tell it the name of the partition we want to mount, and the mount point we want it mounted on. mount will mount the file system on that partition at the mount point we specify.
现在,让我们在新的安装点上安装SCSI驱动器。 我们将以最简单的形式使用mount命令。 我们将告诉它要挂载的分区的名称以及要挂载其的挂载点。 mount将在我们指定的安装点将文件系统安装在该分区上。
We’re specifying the partition that holds the file system, not the drive, so be sure to include the digit for the partition, in this case, “1”.
我们指定的是用于存放文件系统的分区,而不是驱动器,因此请确保包括该分区的数字,在本例中为“ 1”。
sudo mount /dev/sdb1 /mnt/scsi

If all goes well, there’ll be no response from mount. You’re silently returned to the command prompt.
如果一切顺利, mount不会响应。 您将无提示返回命令提示符。
Mounting the SSD is just as simple. We tell mount which partition on which device to mount, and the mount point to mount it on.
安装SSD非常简单。 我们告诉mount在哪个设备上mount哪个分区,以及在哪个分区上安装它。
sudo mount /dev/sdc1 /mnt/ssd

Again, silence is golden.
同样,沉默是金色的。
检查坐骑 (Checking the Mounts)
To verify that the mounts have taken place, we’ll use lsblk again. We’ll pipe its output through grep and select the “sda1”, “sdb2”, and “sdc1” entries.
为了验证是否已进行安装,我们将再次使用lsblk 。 我们将通过grep输出其输出,然后选择“ sda1”,“ sdb2”和“ sdc1”条目。
lsblk -o +ROTA | grep sd[a-c]1
![lsblk -o +ROTA | grep sd[a-c]1 in a terminal window](https://i-blog.csdnimg.cn/blog_migrate/05e3f9681b97f77ff67c9d15f078605b.png)
mount shows us the three mounted partitions. That’s the two we’ve just mounted and the original partition mounted on /.
mount向我们显示了三个已安装的分区。 那就是我们刚刚挂载的两个,原始分区挂载在/上。
The partition /dev/sdb1 is mounted on /mnt/scsi, and is on a rotating storage device. The partition /dev/sdc1 is mounted on /mnt/ssd and is on a non-rotating storage device. All seems well.
分区/dev/sdb1安装在/mnt/scsi ,并且在旋转的存储设备上。 分区/dev/sdc1挂载在/mnt/ssd并且位于非旋转存储设备上。 一切似乎都很好。
Now we need to configure the fstab file so that these devices are mounted each time the computer is started up.
现在,我们需要配置fstab文件,以便在每次启动计算机时都安装这些设备。
fstab文件 (The fstab File)
The fstab file contains an entry for each file system that is mounted when your computer is restarted. Each entry is made up of six fields. The fields are:
fstab文件包含重新启动计算机时安装的每个文件系统的条目。 每个条目由六个字段组成。 字段是:
File system: Not, as its name would suggest, the type of file system on the partition (that’s what the type field is for). This is the identifier for the partition that should be mounted.
文件系统:顾名思义,它不是分区上文件系统的类型(这就是类型字段的作用)。 这是应该挂载的分区的标识符。
Mount point: The location in the filesystem at which you wish to have the partition mounted.
挂载点:文件系统中您希望挂载分区的位置。
Type: The type of file system on the partition.
Type :分区上文件系统的类型。
Options: Each file system can have options specified to turn on or off functionality.
选项:每个文件系统都可以指定选项来打开或关闭功能。
Dump: A reference to an all-but obsolete means of backing up file systems, where the entire file system was “dumped” to tape.
转储:对备份文件系统的一种过时的手段的引用,其中整个文件系统都被“转储”到了磁带上。
Pass: This is the “passing” flag. It tells Linux which partitions should be checked for errors using
fsck, and in which order. Your main boot and operating system partition should be 1, and the rest can be set to 2. If the flag is set to zero, it means “don’t check at all.” If your file system isn’t a journaling file system (such as ext2 or FAT16/32, for example), it is best to turn this off by setting it to 0.通过:这是“通过”标志。 它告诉Linux应该使用
fsck检查哪个分区是否有错误,以及检查顺序。 您的主引导和操作系统分区应该为1,其余分区可以设置为2。如果该标志设置为零,则表示“完全不检查”。 如果您的文件系统不是日记文件系统(例如ext2或FAT16 / 32),则最好将其设置为0以将其关闭。
These fields must be specified in this order, and they must have a space or a tab between them. Finding the values for these fields can be daunting, particularly the values for the “options” field. The “options” field options must be in a comma-separated list with no spaces between them.
必须按此顺序指定这些字段,并且它们之间必须有空格或制表符。 寻找这些字段的值可能会令人生畏,尤其是“选项”字段的值。 “选项”字段选项必须在逗号分隔的列表中,并且之间不能有空格。
The man page for each file system will list the options that can be used. ext4 has about 40 options. Here are some of the more common options:
每个文件系统的man页将列出可以使用的选项。 ext4有大约40个选项。 以下是一些较常见的选项:
Auto: The file system will be mounted at boot time, automatically.
自动:文件系统将在引导时自动安装。
Noauto: The file system is only mounted when you enter the
mount -acommand.Noauto :仅在输入
mount -a命令时才挂载文件系统。Exec: The execution of binaries is allowed on this file system.
执行:在此文件系统上允许执行二进制文件。
Noexec: The execution of binaries is not allowed on this file system.
Noexec :在此文件系统上不允许执行二进制文件。
Ro: The file system should be mounted as read-only.
Ro :文件系统应安装为只读。
Rw: The file system should be mounted as read-write.
Rw :文件系统应以读写方式安装。
Sync: File writes should be conducted immediately and not buffered. Best reserved for floppy disks, if anyone is still using them. Incurs a performance penalty.
同步:应立即进行文件写入,而不要缓冲。 最好保留给软盘(如果有人仍在使用它们)。 导致性能下降。
Async: File writes should be buffered and optimized.
异步:应缓冲和优化文件写入。
User: Any user is allowed to mount the file system.
用户:允许任何用户挂载文件系统。
Nouser: The root user is the only user who can mount this file system.
Nouser :root用户是唯一可以安装此文件系统的用户。
Defaults: This is a shorthand way of specifying a set of common settings: rw, suid, dev, exec, auto, nouser, and async).
默认值:这是指定一组通用设置的快捷方式:rw,suid,dev,exec,auto,nouser和async)。
Suid: Allows the operation of the
suidandsgidbits. Thesuidbit is used to allow a file to be executed as root, by a normal user, without giving the user full root privileges. When thesgidbit is set on a directory, files and directories created within that directory have their group ownership set to that of the directory, not to the group of the user who created them.Suid :允许
suid和sgid位的操作。suid位用于允许普通用户以root用户身份执行文件,而无需授予该用户完全root权限。 当在目录上设置sgid位时,在该目录中创建的文件和目录的组所有权设置为目录的所有者,而不是创建它们的用户组的所有权。Nosuid: Do not permit the use of the
suidandsgidbits.Nosuid :不允许使用
suid和sgid位。Noatime: – Do not update the file access times on the file system. This can help performance on old hardware.
Noatime: –不要更新文件系统上的文件访问时间。 这有助于提高旧硬件的性能。
Nodiratime: Do not update the directory access times on the file system.
Nodiratime :不要更新文件系统上的目录访问时间。
Relatime: Update file access times relative to the file modified time.
Relatime :相对于文件修改时间更新文件访问时间。
The “defaults” option is a good opening gambit. You can add or remove further options if some fine-tuning is required. If only there was a neat way to get the settings you need, in the order you need to enter them into the fstab file.
“默认”选项是一个很好的开场白。 如果需要一些微调,则可以添加或删除其他选项。 如果只有一种巧妙的方法来获取所需的设置,则需要按顺序将其输入到fstab文件中。
Enter the mtab file.
输入mtab文件。
mtab文件 (The mtab File)
The mtab file is the list of currently mounted file systems. This is in contrast to the fstab file which lists the file systems that should be mounted at boot time. The mtab file includes manually mounted file systems. We’ve already mounted our new drives, so they should show up in the mtab file.
mtab文件是当前已安装文件系统的列表。 这与fstab文件相反,后者列出了在引导时应挂载的文件系统。 mtab文件包括手动安装的文件系统。 我们已经安装了新驱动器,因此它们应该显示在mtab文件中。
We can see the contents of the mtab file using cat. We’ll restrict the output by piping it through grep and looking at /dev/sdb1 and /dev/sdc1 only.
我们可以使用cat查看mtab文件的内容。 我们将限制输出,方法是将其通过grep传递给管道,然后仅查看/dev/sdb1和/dev/sdc1 。
cat /etc/mtab | grep sd[b-c]1
![cat /etc/mtab | grep sd[b-c]1 in a terminal window](https://i-blog.csdnimg.cn/blog_migrate/dd19a3e617f74882013206b79e9de908.png)
The output shows the mtab entries for these two partitions.
输出显示了这两个分区的mtab条目。

We could lift those values and drop them straight into the fstab file, making sure there was a space or a tab between each field. And that would be that. The drives would be mounted when we rebooted.
我们可以提升这些值并将其直接放入fstab文件中,确保每个字段之间都有空格或制表符。 那就是那样。 重新启动时,驱动器将被挂载。
There are two caveats to that. One is the mount point. We created temporary mount points just to prove we could mount the new partitions on the new drives. We’d need to enter the real mount points instead of our temporary ones—if they were different.
有两个警告。 一个是挂载点。 我们创建临时安装点只是为了证明我们可以在新驱动器上安装新分区。 如果它们不同,我们需要输入实际的挂载点而不是临时的挂载点。
The second caveat is, if we use the settings from the mtab file, we’ll be using the block device file as the identifier for each partition. That would work, but the values /dev/sda and /dev/sdb and so on are at risk of changing if new mass storage hardware is added to the computer. That would mean the settings in the fstab file would be incorrect.
第二个警告是,如果我们使用mtab文件中的设置,则将使用块设备文件作为每个分区的标识符。 可以,但是如果将新的大容量存储硬件添加到计算机中,则/dev/sda和/dev/sdb等值可能会发生更改。 这意味着fstab文件中的设置将不正确。
Each partition has a Universally Unique Identifier (UUID), which we can use to identify the partition. This will never change. If we use the UUID to identify the partitions in the fstab file, the settings will always remain accurate and true.
每个分区都有一个通用唯一标识符(UUID),我们可以使用它来标识该分区。 这将永远不会改变。 如果我们使用UUID来标识fstab文件中的分区,则设置将始终保持准确和真实。
If you are using your new partitions as part of a Redundant Array of Inexpensive Disks (RAID) system, check with the documentation for that system. It might specify that you must use the block device identifier instead of the UUID.
如果您将新分区用作廉价磁盘冗余阵列(RAID)系统的一部分,请查阅该系统的文档。 它可能指定您必须使用块设备标识符而不是UUID。
查找分区的UUID (Finding a Partition’s UUID)
To find the UUID of a partition, we can use blkid to print the attributes of the block devices. We’ll limit the output to our two new partitions on our new drives:
要查找分区的UUID,我们可以使用blkid打印块设备的属性。 我们将输出限制为新驱动器上的两个新分区:
blkid | grep sd[b-c]1
![blkid | grep sd[b-c]1 in a terminal window](https://i-blog.csdnimg.cn/blog_migrate/7934f35d14ed659a3845aa9839b71ef3.png)
The output includes the UUID for each partition.
输出包括每个分区的UUID。
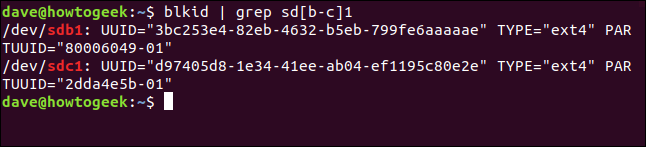
The PARTUUID is a form of UUID that can be used with the GUID Partition Tables (GPT) partitioning method (if you’re not using the Master Boot Record (MBR) partitioning method).
PARTUUID是UUID的一种形式,可以与GUID分区表(GPT)分区方法一起使用(如果您不使用主引导记录(MBR)分区方法)。
编辑fstab文件 (Editing the fstab File)
Open the fstab file in an editor. We’re using gedit, an easy to use editor found in most Linux distributions.
在编辑器中打开fstab文件。 我们使用的gedit是大多数Linux发行版中都易于使用的编辑器。
sudo gedit /etc/fstab

The editor appears with your fstab file loaded in it.
随即出现编辑器,其中已加载了fstab文件。
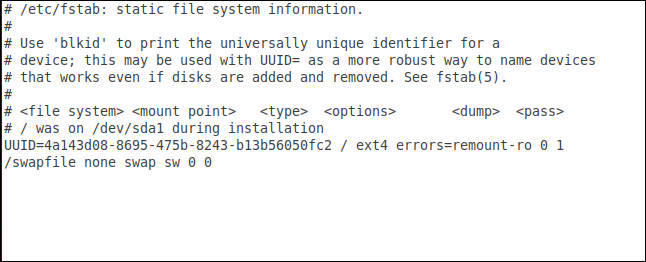
This fstab file has two entries already in it. They are the partition on the existing hard drive /dev/sda1, and the swap file system. Be careful not to alter these entries.
该fstab文件中已经有两个条目。 它们是现有硬盘驱动器/dev/sda1上的分区,以及交换文件系统。 注意不要更改这些条目。
We need to add two new entries to the fstab file. One for the partition on the SCSI drive and one for the partition on the SSD drive. We’ll add the SCSI partition first. Note that lines that start with a hash # are comments.
我们需要在fstab文件中添加两个新条目。 一个用于SCSI驱动器上的分区,另一个用于SSD驱动器上的分区。 我们将首先添加SCSI分区。 请注意,以井号#开头的行是注释。
In the “file system” field, we’ll use the UUID that
blkidretrieved for us earlier. Start the line with “UUID=” and then paste the UUID. Press space or tab.在“文件系统”字段中,我们将使用
blkid先前为我们检索的UUID。 从“ UUID =”开始行,然后粘贴UUID。 按空格或制表符。For the “mount point” field, we’re going to use the mount point we created earlier,
/mnt/scsi. You’d use the appropriate mount point from your system. Press space or tab.对于“挂载点”字段,我们将使用我们先前创建的挂载点
/mnt/scsi。 您将在系统中使用适当的安装点。 按空格或制表符。For “type” we’re going to enter
ext4, which is the type of file system on our partition. Press space or tab.对于“类型”,我们将输入
ext4,这是分区上文件系统的类型。 按空格或制表符。In the “options” field we’ll use the options that we retrieved using cat
/etc/mtab. These are “rw,relatime”. Press space or tab.在“选项”字段中,我们将使用通过cat
/etc/mtab检索的选项。 这些是“ rw,relatime”。 按空格或制表符。- The “dump” field is set to zero. Press space or tab. “转储”字段设置为零。 按空格或制表符。
- The “pass” field is set to zero. “通过”字段设置为零。
Now we’ll add the fstab entry partition on the SSD drive on a separate line.
现在,我们将fstab条目分区添加到SSD驱动器的单独一行中。
In the “file system” field, we’ll enter the UUID that
blkidretrieved for the partition on the SSD drive. Start the line with “UUID=” and then paste the UUID. Press space or tab.在“文件系统”字段中,我们将输入
blkid为SSD驱动器上的分区检索的UUID。 以“ UUID =”开头,然后粘贴UUID。 按空格或制表符。For the “mount point” field, we’re going to use the mount point we created earlier,
/mnt/ssd. Press space or tab.对于“挂载点”字段,我们将使用我们先前创建的挂载点
/mnt/ssd。 按空格或制表符。For “type” we’re going to enter
ext4, which is the type of file system on our partition. Press space or tab.对于“类型”,我们将输入
ext4,这是分区上文件系统的类型。 按空格或制表符。- In the “options” field—just to make the two new entries different in our example—we’ll use the “defaults” option. Press space or tab. 在“选项”字段中-只是为了使示例中的两个新条目不同-我们将使用“默认值”选项。 按空格或制表符。
- The “dump” field is set to zero. Press space or tab. “转储”字段设置为零。 按空格或制表符。
- The “pass” field is set to zero. “通过”字段设置为零。
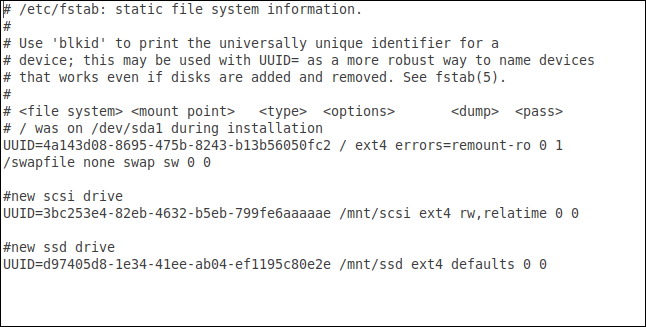
Save the file and close the editor.
保存文件并关闭编辑器。
在不重新引导的情况下测试fstab (Testing fstab Without Rebooting)
We can unmount our new drives and then force a refresh on the fstab file. The successful mounting of our new partitions will verify that the settings and parameters we’ve entered are syntactically correct. That means our fstab file should be processed correctly during a reboot or power-up sequence.
我们可以卸载新驱动器,然后在fstab文件上强制刷新。 成功安装新分区将验证我们输入的设置和参数在语法上是否正确。 这意味着我们的fstab文件应在重新引导或加电顺序期间正确处理。
To unmount the SCSI drive, use this command. Note that there is only one “n” in “umount”:
要卸载SCSI驱动器,请使用此命令。 请注意,“ umount”中只有一个“ n”:
sudo umount /dev/sdb1

To unmount the SSD drive, use this command:
要卸载SSD驱动器,请使用以下命令:
sudo umount /dev/sdc1

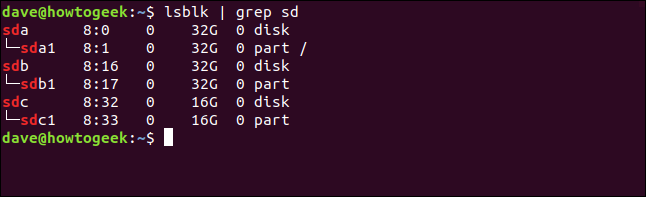
Now we’ll use lsblk to check whether these block devices are mounted.
现在,我们将使用lsblk来检查是否已安装这些块设备。
lsblk | grep sd

And we see that the block devices are present in the computer, but not mounted anywhere.
并且我们看到了块设备存在于计算机中,但是没有安装在任何地方。
We can use the mount command with the -a (all) option to remount all the file systems in fstab.
我们可以将mount命令与-a (all)选项一起使用,以重新挂载fstab所有文件系统。
sudo mount -a

And we can check once more with lsblk to see if our new partitions are now mounted:
我们可以再次使用lsblk进行检查,以查看是否已安装新分区:
lsblk | grep sd
Everything is mounted where it should be. All we have to do now is change the ownership of the mount points, otherwise root will be the only one who can access the new storage devices.
一切都安装在应有的位置。 我们现在要做的就是更改安装点的所有权,否则root将是唯一可以访问新存储设备的人。
We can do this easily using chown . This is the command for the SCSI mount point:
我们可以使用chown轻松地做到这一点。 这是用于SCSI挂载点的命令:
sudo chown dave:users /mnt/scsi

And this is the command for the SSD mount point:
这是SSD挂载点的命令:
sudo chown dave:users /mnt/ssd

We can now reboot our computer with confidence, knowing that the partitions we’ve added will be mounted for us, and we have access to them.
现在,我们知道已经添加的分区将为我们装载,并且可以访问它们了,因此我们可以放心地重新启动计算机。
毕竟不是那么可怕 (Not That Scary After All)
All the hard work is in the reconnaissance phase—and that wasn’t hard either. Editing the fstab file once you’ve gathered the information you need is a breeze. Preparation is everything.
所有艰苦的工作都在侦察阶段,这也不难。 一旦收集了所需的信息,就可以轻松编辑fstab文件。 准备就是一切。
翻译自: https://www.howtogeek.com/444814/how-to-write-an-fstab-file-on-linux/
linux中fstab文件


 1400
1400

 被折叠的 条评论
为什么被折叠?
被折叠的 条评论
为什么被折叠?
 到【灌水乐园】发言


