


亚马逊alexa智能家电
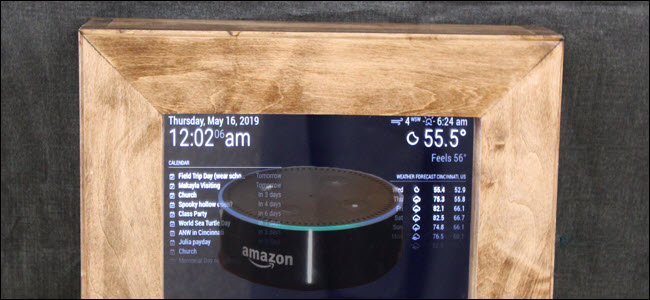
If you built a smart mirror, you already have handy access to calendars, weather, and news. But you can do more than that! The Magic Mirror software lets you add modules for extra features, like Alexa for voice control.
如果您构建了智能镜像,则已经可以轻松访问日历,天气和新闻。 但是您可以做得更多! Magic Mirror软件使您可以添加用于附加功能的模块,例如用于语音控制的Alexa。
Other developers create these modules. The options vary from the useful, like Alexa or presence detection (through a camera or Passive Infrared sensor), to the entertaining, like snowflakes and Spotify playback info.
其他开发人员创建这些模块。 选项从有用的选项(例如Alexa或存在检测(通过相机或被动红外传感器))到娱乐性(例如雪花和Spotify播放信息)不等。
We recommend mmm-awesome-alexa as it appears to be well maintained by an active developer, although there are other Alexa modules for the Magic Mirror software.
我们建议使用mmm-awesome-alexa,因为它似乎可以由活跃的开发人员很好地维护,尽管Magic Mirror软件还有其他Alexa模块。
If you would prefer to install Google Assistant, Google offers a complete tutorial for installing Assistant on a Raspberry Pi, including steps, images, and download links. While a few Magic Mirror modules for Google Assistant exist, our investigation revealed the modules to be problematic, often crashing or covering the mirror information. If you want the most straightforward setup, we recommend adding the Google AIY kit and using its specific tutorial.
如果您想安装Google Assistant,则Google提供了完整的教程,用于在Raspberry Pi上安装Assistant,包括步骤,图像和下载链接。 尽管存在一些适用于Google Assistant的Magic Mirror模块,但我们的调查显示这些模块存在问题,经常崩溃或覆盖镜像信息。 如果您想要最简单的设置,建议您添加Google AIY工具包并使用其特定的教程。
To install most modules, you’ll go through some basic steps:
要安装大多数模块,您将完成一些基本步骤:
- Download the module code from GitHub 从GitHub下载模块代码
- Configure module-specific options配置模块特定的选项
- Add the module to the mirror configuration将模块添加到镜像配置
Depending on the module, steps two and three may be more or less involved. Setting up Alexa requires more configuration than adding snowflakes, for instance. Additionally, this particular Alexa module requires installing some additional software (dependencies) before downloading the module.
根据模块,第二或第三步可能会或多或少地涉及到。 例如,设置Alexa需要比添加雪花更多的配置。 此外,此特定的Alexa模块需要在下载模块之前安装一些其他软件(依赖项)。
您需要的材料 (The Materials You’ll Need)
This guide assumes you’ve already created a Smart Mirror. If you haven’t yet, start there but keep in mind the extra materials listed here in your costs and space considerations.
本指南假定您已经创建了Smart Mirror 。 如果您还没有开始,请从这里开始,但请记住,此处列出了您在成本和空间方面的其他材料。
- Completed Smart Mirror 完成的智能镜
- Microphone麦克风
- Speaker扬声器
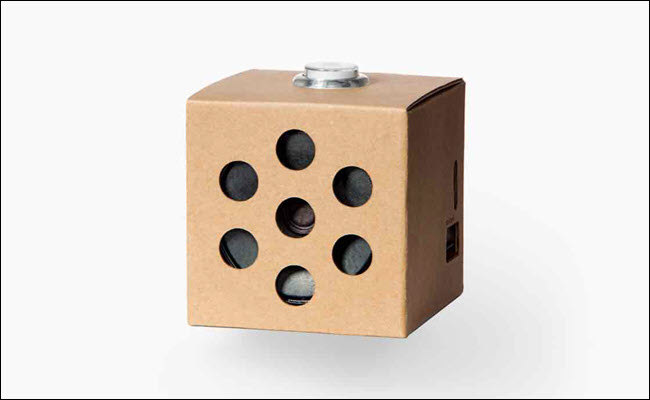
For the microphone and speaker, we recommend the original Google AIY Voice Kit. At $16, you’ll be hard-pressed to find a cheaper microphone and speaker combination. You don’t necessarily need to use the included cardboard box; it may be more effective to leave the components out and run the microphone and speaker outside the mirror.
对于麦克风和扬声器,我们建议使用原始的Google AIY语音工具包。 售价16美元,您将很难找到便宜的麦克风和扬声器组合。 您不一定需要使用随附的纸板箱。 将组件放在外面并在镜外运行麦克风和扬声器可能会更有效。
A second version of the Google AIY Voice Kit is available, but it’s more expensive and includes a Raspberry Pi Zero, which isn’t powerful enough to run wake words or the Magic Mirror software, so you should skip it.
Google AIY语音工具包有第二个版本,但价格更高,并且包含Raspberry Pi Zero,它的功能不足以运行唤醒单词或Magic Mirror软件,因此您应该跳过它。
Connect your speaker and microphone, and you’re ready to install the Alexa module. If you’re using the Google AIY kit, just follow its assembly guide for connecting the microphone and speaker components.
连接扬声器和麦克风,就可以安装Alexa模块了。 如果您使用的是Google AIY工具包,请按照其组装指南连接麦克风和扬声器组件。
安装模块依赖项 (Installing Module Dependencies)
Before you can download and configure mmm-awesome-alexa, you need to install a few dependencies the module relies on. It’s always a good idea to update your Raspberry Pi before trying to install anything else. On your Raspberry Pi, start by running this command:
在下载和配置mmm-awesome-alexa之前,您需要安装模块依赖的一些依赖项。 在尝试安装其他任何组件之前,最好先更新您的Raspberry Pi。 在您的Raspberry Pi上,首先运行以下命令:
sudo apt update && sudo apt upgrade
Once your Raspberry Pi is up to date, run the following commands one by one:
一旦您的Raspberry Pi更新,请一一运行以下命令:
sudo apt-get install sox libsox-fmt-all
sudo apt-get install swig3.0 python-pyaudio python3-pyaudio sox
pip install pyaudio
sudo apt-get install libasound-dev portaudio19-dev libportaudio2 libportaudiocpp0 ffmpeg libav-tools
sudo apt-get install libatlas-base-dev
Each command installs a dependency, and they’re all necessary to run. Just run a command, wait for the download and install to finish, then run the next command.
每个命令都安装一个依赖项,它们都是运行所必需的。 只需运行一个命令,等待下载和安装完成,然后运行下一个命令。
下载模块代码 (Downloading the Module Code)
The first step to adding any module for the Magic Mirror is to download the module’s code Github. To do this, you’ll need to log into the Raspberry Pi, open terminal, and change directory to where modules are stored. Then you’ll use a download command to pull the code from Github If you have shell access, you can do all of this remotely.
为魔镜添加任何模块的第一步是下载该模块的代码Github。 为此,您需要登录Raspberry Pi,打开终端,并将目录更改为模块的存储位置。 然后,您将使用下载命令从Github中提取代码。如果您具有shell访问权限,则可以远程完成所有这些操作。
Once you have a terminal open, type the following:
打开终端后,键入以下内容:
cd ~/MagicMirror/modules
This command moves you to the working directory of the modules folder for the Magic Mirror software. Anytime you download a new module, you’ll want to be here to keep everything organized. The next step is to download the software from Github with this command:
此命令将您移至Magic Mirror软件的modules文件夹的工作目录。 每当您下载一个新模块时,您都希望可以在这里保持一切井井有条。 下一步是使用以下命令从Github下载软件:
git clone https://github.com/dolanmiu/MMM-awesome-alexa.git
When it finishes, change directories into the module with the following command:
完成后,使用以下命令将目录更改为模块:
cd MMM-awesome-alexa
The Alexa module requires a few additional dependencies to work correctly. Run this command to install them:
Alexa模块需要一些其他依赖项才能正常工作。 运行以下命令以安装它们:
npm install --only=prod
Now, change directories into the newly created node_modules folder:
现在,将目录更改为新创建的node_modules文件夹:
cd node_modules
Delete the snowboy folder the previous commands added. We need a newer version of snowboy:
删除先前命令中添加的snowboy文件夹。 我们需要更新版本的snowboy:
rm -rf snowboy
Next, we’ll download the latest version of snowboy with the following command:
接下来,我们将使用以下命令下载最新版本的snowboy:
git clone https://github.com/Kitt-AI/snowboy.git
Before we continue, change directory to the new snowboy folder.
在继续之前,将目录更改为新的snowboy文件夹。
cd snowboy
Now we need to remove the node_modules folder and install some additional dependencies. It’s important that you stay inside the snowboy folder for these steps; don’t change directories. Run the following commands one by one:
现在,我们需要删除node_modules文件夹并安装一些其他依赖项。 这些步骤必须留在snowboy文件夹中,这一点很重要。 不要更改目录。 一一运行以下命令:
rm -rf node_modules
npm install nan --save
npm install node-pre-gyp@0.12.0 --save
npm install
npm run prepublish
npm install --save-dev electron-rebuild
npm install nan
./node_modules/.bin/electron-rebuild
Now the module is fully downloaded and installed.
现在,该模块已完全下载并安装。
配置Alexa模块 (Configuring the Alexa Module)
Now that the mmm-awesome-alexa module is installed, we need to configure it. The first step is to change directories to the root of the module. In terminal type the following command and then hit Enter:
现在已经安装了mmm-awesome-alexa模块,我们需要对其进行配置。 第一步是将目录更改为模块的根目录。 在终端中,键入以下命令,然后按Enter:
cd ~/MagicMirror/modules/MMM-awesome-alexa
This Alexa module has a configuration helper; we want to run that. In terminal type:
这个Alexa模块有一个配置助手。 我们要运行它。 在终端类型中:
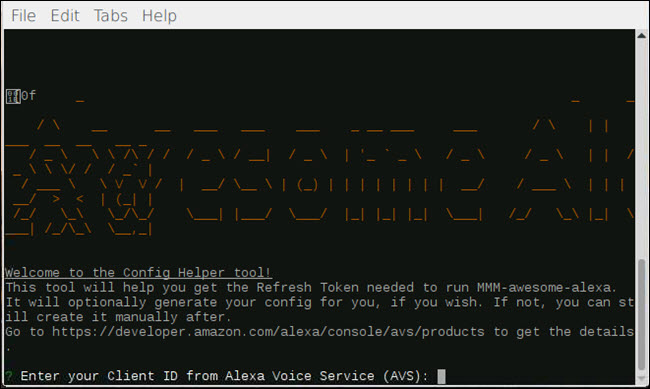
npm run config-helper
You’ll see a prompt asking for a Client ID. Since you’re essentially setting up a custom-built Echo, you’ll need to open a browser and head to the Alexa developer site. Then sign in with your Amazon account.
您将看到提示询问客户ID的提示。 由于本质上是在设置定制的Echo,因此需要打开浏览器并转到Alexa开发人员站点。 然后使用您的Amazon帐户登录。
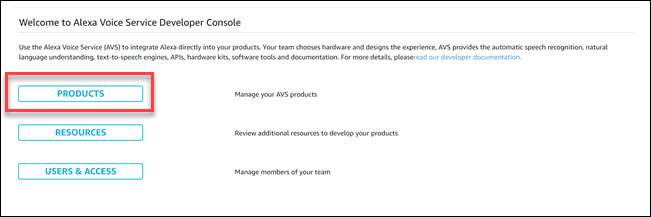
Once signed in, click on the “Get Started” button. You’re creating a device, so click “Products” and click “Create Product.”
登录后,单击“入门”按钮。 您正在创建设备,因此请单击“产品”,然后单击“创建产品”。
On the next screen, give your product a name and product ID—we suggest “Magic_Mirror_Alexa” for the name and “YourFirstName_MM_Alexa” for the product ID. Select Smart Home for the category, and enable both the hands-free and far-field options. You’ll see a series of yes or no questions, select “No” for all of them and then click “Next.”
在下一个屏幕上,为您的产品提供名称和产品ID-我们建议使用“ Magic_Mirror_Alexa”作为名称,并使用“ YourFirstName_MM_Alexa”作为产品ID。 选择“智能家居”作为类别,然后启用免提和远场选项。 您将看到一系列的是或否问题,为所有问题选择“否”,然后单击“下一步”。
On the security profile screen, click “Create new profile.” Use the same name for your security profile as you did for the product ID. Then type any description you would like, then click Next.
在安全配置文件屏幕上,单击“创建新的配置文件”。 安全配置文件使用与产品ID相同的名称。 然后键入您想要的任何描述,然后单击下一步。
Check the agreement and click Finish.
检查协议,然后单击完成。
Click on your newly created product, then security profile, and you should see a Client ID and client secret.
单击您新创建的产品,然后单击安全配置文件,您应该看到客户端ID和客户端密码。
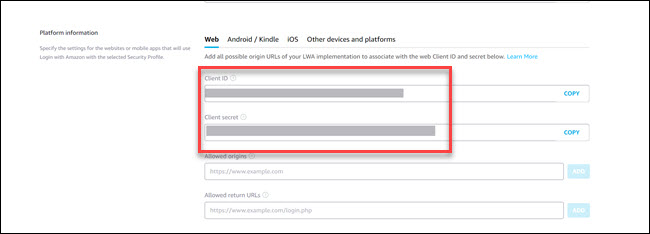
In the allowed return URL entry type: https://magic-mirror-avs.github.io/Alexa-Web-Helper/authresponse
在允许的返回URL条目中,输入:https://magic-mirror-avs.github.io/Alexa-Web-Helper/authresponse
Then click the add button. Scroll down and click the update box to finish adding the URL.
然后单击添加按钮。 向下滚动并单击更新框以完成添加URL。
In the terminal, you’ll see a prompt for the client ID. Copy the client ID from the browser, paste it into the Terminal, and then hit Enter. Now the terminal will prompt for a client secret. Switch back to the browser, copy the client secret, then paste it into Terminal and hit Enter.
在终端中,您将看到提示输入客户端ID的提示。 从浏览器复制客户端ID,将其粘贴到终端中,然后按Enter。 现在终端将提示输入客户密码。 切换回浏览器,复制客户端密码,然后将其粘贴到Terminal中并按Enter。
When prompted for the Device ID, Enter the name you created above as a product ID (Magic_Mirror_Alexa in our example).
当提示您输入设备ID时,输入您在上面创建的名称作为产品ID(在我们的示例中为Magic_Mirror_Alexa)。
When you’re asked to provide a return URL, type the following command and press Enter:
当要求您提供返回URL时,键入以下命令并按Enter:
https://magic-mirror-avs.github.io/Alexa-Web-Helper/authresponse
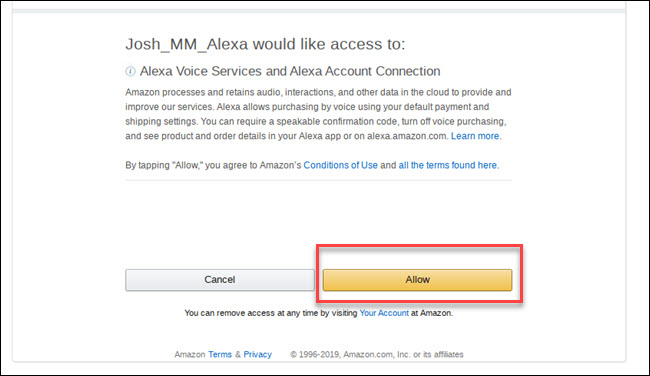
The terminal will display a custom built link. Copy that and paste it into your browser. Then log in with your Amazon account, if prompted. Click Allow on the next screen.
终端将显示一个定制的链接。 复制该内容并将其粘贴到您的浏览器中。 然后,如果出现提示,请使用您的Amazon帐户登录。 在下一个屏幕上单击允许。
You’ll see an error on the browser, but don’t worry! This is expected. Scroll through the URL of the error page and find the “Code=xxxxxx” section.
您会在浏览器中看到错误,但请放心! 这是预期的。 滚动浏览错误页面的URL,然后找到“ Code = xxxxxx”部分。
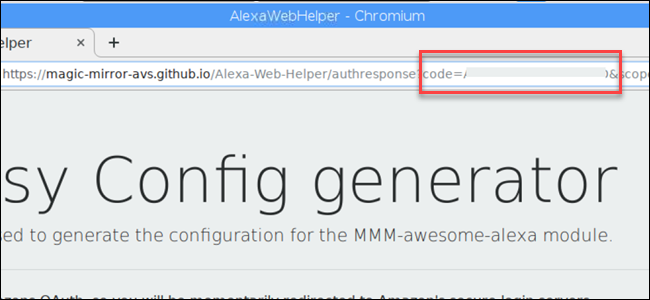
Copy the letters and numbers that appear between “code=” and “&scope” and paste them into the terminal. Hit Enter when you’re done.
复制出现在“ code =”和“&scope”之间的字母和数字,并将其粘贴到终端中。 完成后,按Enter键。
When asked if you want to generate the MagicMirror config, type Y, and hit Enter.
当询问您是否要生成MagicMirror配置时,键入Y,然后按Enter。
You’ll be asked which wake word to use. Alexa is the default selection so hit Enter.
系统将询问您要使用哪个唤醒词。 Alexa是默认选择,因此请按Enter。
Answer no for using lite mode and visualization.
对于使用精简模式和可视化的回答为否。
The configuration helper will generate your module information. It will look something like this:
配置助手将生成您的模块信息。 它看起来像这样:
{
 module: "MMM-awesome-alexa",
 position: "bottom_bar",
 config: {
 wakeWord: "Alexa",
 clientId: "YOUR_CLIENT_ID",
 clientSecret: "YOUR_CLIENT_SECRET",
 deviceId: "YOUR_DEVICE_ID",
 refreshToken: "YOUR_REFRESH_TOKEN",
 lite: false,
 isSpeechVisualizationEnabled: false
 }
 }
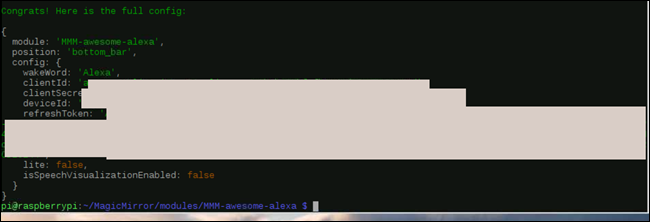
Copy those lines. We need to add them to the Magic Mirror configuration.
复制这些行。 我们需要将它们添加到Magic Mirror配置中。
将Alexa模块添加到Magic Mirror配置中 (Add the Alexa Module to the Magic Mirror Configuration)
Then change directory to the Magic Mirror config folder with the following command:
然后使用以下命令将目录更改为Magic Mirror config文件夹:
cd ~/MagicMirror/config
cd ~/MagicMirror/config
And open the config.js using the nano command:
然后使用nano命令打开config.js:
nano config.js
纳米config.js
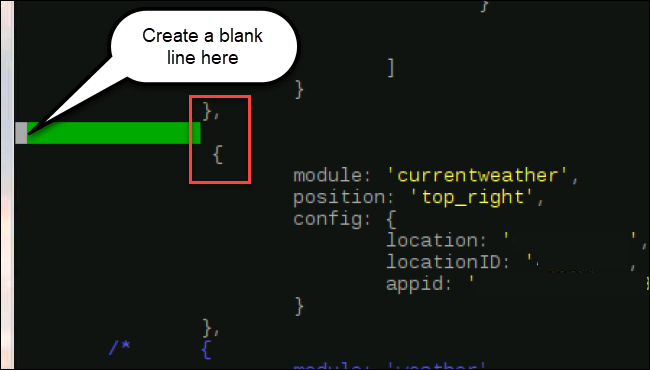
Just after the first instance of }, (which is the end of the module) hit Enter to create a blank line before the next { entry (which is the start of a new module).
在},的第一个实例(模块的末尾)之后,按Enter键以在下一个{条目(这是新模块的开始)之前创建空白行。
On the new blank line you created, paste in the module code from the config helper steps. The auto-generated code does have a mistake; you’ll also need to type a comma after the final bracket so that your module ends with },
在您创建的新空白行上,从config helper步骤中粘贴模块代码。 自动生成的代码确实有错误; 您还需要在最后一个括号后面输入逗号,以便模块以}结尾,

Use Ctrl+x to close the file. When prompted, type “y” to confirm the save and hit Enter to keep the file name the same.
使用Ctrl + x关闭文件。 出现提示时,键入“ y”以确认保存,然后按Enter键以保持文件名相同。
The module is completed. To restart your Magic Mirror software with the module in place, type pm2 restart mm and the Magic Mirror software will reboot. Alexa should now work on your Magic Mirror.
模块完成。 要在模块就位的情况下重新启动Magic Mirror软件,请type pm2 restart mm ,Magic Mirror软件将重新启动。 Alexa现在应该在您的魔术镜上工作。
This is one of the more complicated modules you can set up for the Magic Mirror. But for other modules, the basic steps are the same, download the code, configure module-specific options, add the module to configuration. You can add snowflakes to your mirror, or motion detection, or even display your Google Photos.
这是可以为魔术镜设置的更复杂的模块之一。 但是对于其他模块,基本步骤相同,下载代码,配置模块特定的选项,将模块添加到配置中。 您可以在镜子上添加雪花,或进行运动检测,甚至显示Google相册。
翻译自: https://www.howtogeek.com/423233/how-to-add-alexa-to-your-smart-mirror/
亚马逊alexa智能家电


 4390
4390


 被折叠的 条评论
为什么被折叠?
被折叠的 条评论
为什么被折叠?
 到【灌水乐园】发言


