


 本文介绍了如何在不小心删除文件后,利用Ubuntu Live CD从NTFS硬盘驱动器恢复已删除的文件。通过识别硬盘设备、使用ntfsundelete命令以及根据文件Inode进行恢复,即使在不启动Windows的情况下,也能找回丢失的文件。
Accidentally deleting a file is a terrible feeling. Not being able to boot into Windows and undelete that file makes that even worse. Fortunately, you can recover deleted files on NTFS hard drives from an Ubuntu Live CD.
不小心删除文件是一种可怕的感觉。 无法启动进入Windows并取消删除该文件的情况更加糟糕。 幸运的是,您可以从Ubuntu Live CD恢复NTFS硬盘驱动器上已删除的文件。
To show this process, we created four files on the desktop of a Windows XP machine, and then deleted them. We then booted up the same machine with the bootable Ubuntu 9.10 USB Flash Drive that we created last week.
为了显示此过程,我们在Windows XP计算机的桌面上创建了四个文件,然后将其删除。 然后,我们使用上周创建的可启动Ubuntu 9.10 USB闪存驱动器启动了同一台计算机。
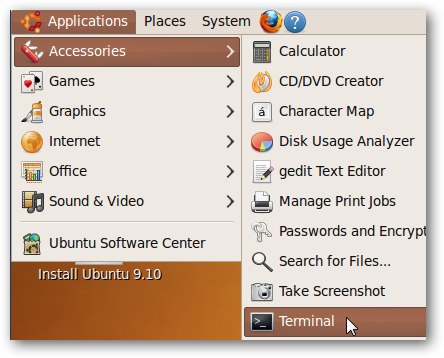
Once Ubuntu 9.10 boots up, open a terminal by clicking Applications in the top left of the screen, and then selecting Accessories > Terminal.
Ubuntu 9.10启动后,通过单击屏幕左上方的应用程序,然后选择附件>终端来打开终端。
To undelete our files, we first need to identify the hard drive that we want to undelete from. In the terminal window, type in:
要取消删除文件,我们首先需要确定要从中删除的硬盘驱动器。 在终端窗口中,输入:
sudo fdisk –l
sudo fdisk –l
and press enter.
然后按回车。
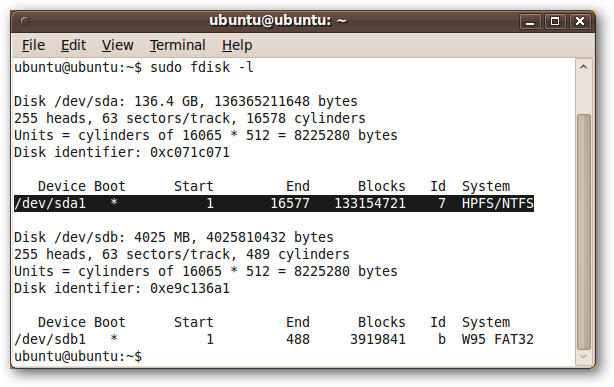
What you’re looking for is a line that ends with HPSF/NTFS (under the heading System). In our case, the device is “/dev/sda1”. This may be slightly different for you, but it will still begin with /dev/. Note this device name.
您正在寻找的是以HPSF / NTFS结尾的行(在系统标题下)。 在我们的例子中,设备是“ / dev / sda1”。 对于您来说,这可能略有不同,但仍以/ dev /开头。 记下该设备名称。
If you have more than one hard drive partition formatted as NTFS, then you may be able to identify the correct partition by the size. If you look at the second line of text in the screenshot above, it reads “Disk /dev/sda: 136.4 GB, …” This means that the hard drive that Ubuntu has named /dev/sda is 136.4 GB large. If your hard drives are of different size, then this information can help you track down the right device name to use. Alternatively, you can just try them all, though this can be time consuming for large hard drives.
如果您将多个硬盘驱动器分区格式化为NTFS,则可以通过大小识别正确的分区。 如果您看上面屏幕截图中的第二行文本,它将显示为“ Disk / dev / sda:136.4 GB,…”。这意味着Ubuntu命名为/ dev / sda的硬盘驱动器大136.4 GB。 如果您的硬盘驱动器大小不同,则此信息可以帮助您找到要使用的正确设备名称。 或者,您可以尝试所有方法,尽管这对于大型硬盘驱动器可能会很费时。
Now that you know the name Ubuntu has assigned to your hard drive, we’ll scan it to see what files we can uncover.
既然您已经知道Ubuntu分配给您的硬盘驱动器的名称,我们将对其进行扫描以查看可以发现哪些文件。
In the terminal window, type:
在终端窗口中,键入:
sudo ntfsundelete <HD name>
sudo ntfsundelete <HD名称>
and hit enter. In our case, the command is:
然后按回车。 在我们的例子中,命令是:
sudo ntfsundelete /dev/sda1
须藤ntfsundelete / dev / sda1
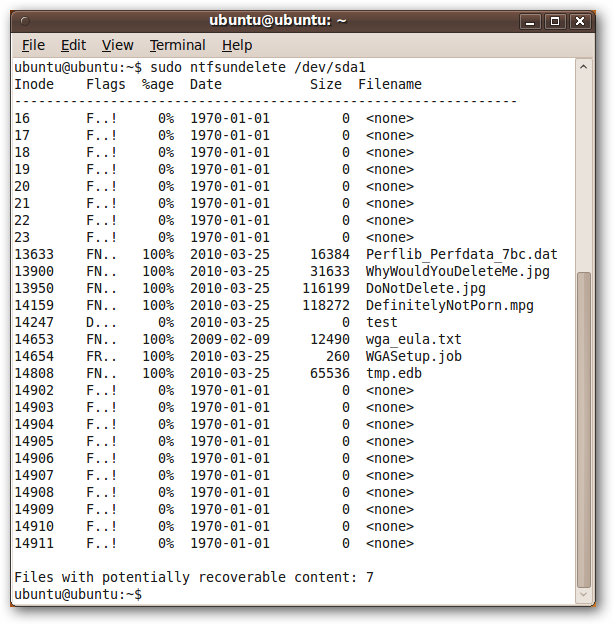
The names of files that can recovered show up in the far right column. The percentage in the third column tells us how much of that file can be recovered. Three of the four files that we originally deleted are showing up in this list, even though we shut down the computer right after deleting the four files – so even in ideal cases, your files may not be recoverable.
可以恢复的文件名称显示在最右列。 第三列中的百分比告诉我们可以恢复多少文件。 我们最初删除的四个文件中的三个显示在此列表中,即使我们在删除四个文件后立即关闭了计算机,因此即使在理想情况下,您的文件也可能无法恢复。
Nevertheless, we have three files that we can recover – two JPGs and an MPG.
但是,我们有三个可以恢复的文件-两个JPG和一个MPG。
Note: ntfsundelete is immediately available in the Ubuntu 9.10 Live CD. If you are in a different version of Ubuntu, or for some other reason get an error when trying to use ntfsundelete, you can install it by entering “sudo apt-get install ntfsprogs” in a terminal window.
注意:ntfsundelete可在Ubuntu 9.10 Live CD中立即使用。 如果您使用的是其他版本的Ubuntu,或者由于其他原因尝试使用ntfsundelete时出现错误,则可以通过在终端窗口中输入“ sudo apt-get install ntfsprogs”进行安装。
To quickly recover the two JPGs, we will use the * wildcard to recover all of the files that end with .jpg.
为了快速恢复两个JPG,我们将使用*通配符恢复所有以.jpg结尾的文件。
In the terminal window, enter
在终端窗口中,输入
sudo ntfsundelete <HD name> –u –m *.jpg
sudo ntfsundelete <HD名称> –u –m * .jpg
which is, in our case,
就我们而言,
sudo ntfsundelete /dev/sda1 –u –m *.jpg
sudo ntfsundelete / dev / sda1 –u –m * .jpg
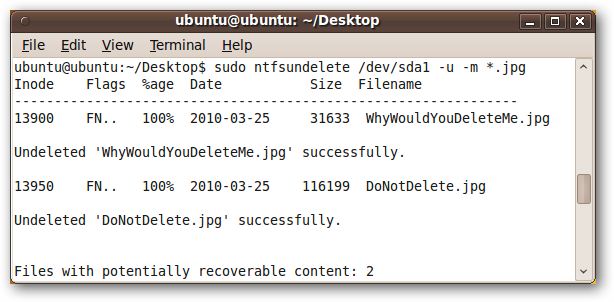
The two files are recovered from the NTFS hard drive and saved in the current working directory of the terminal. By default, this is the home directory of the current user, though we are working in the Desktop folder.
这两个文件是从NTFS硬盘驱动器中恢复的,并保存在终端的当前工作目录中。 默认情况下,这是当前用户的主目录,尽管我们使用的是Desktop文件夹。
Note that the ntfsundelete program does not make any changes to the original NTFS hard drive. If you want to take those files and put them back in the NTFS hard drive, you will have to move them there after they are undeleted with ntfsundelete. Of course, you can also put them on your flash drive or open Firefox and email them to yourself – the sky’s the limit!
请注意,ntfsundelete程序不会对原始NTFS硬盘驱动器进行任何更改。 如果要获取这些文件并将它们放回NTFS硬盘驱动器,则在使用ntfsundelete取消删除它们之后,必须将它们移到那里。 当然,您也可以将它们放在闪存驱动器上或打开Firefox并通过电子邮件将其发送给自己-天空无极限!
We have one more file to undelete – our MPG.
我们还有一个文件要删除-MPG。

Note the first column on the far left. It contains a number, its Inode. Think of this as the file’s unique identifier. Note this number.
请注意最左边的第一列。 它包含一个数字,即其Inode。 将此视为文件的唯一标识符。 注意这个数字。
To undelete a file by its Inode, enter the following in the terminal:
要通过文件的Inode取消删除文件,请在终端中输入以下内容:
sudo ntfsundelete <HD name> –u –i <Inode>
sudo ntfsundelete <HD名称> –u –i <Inode>
In our case, this is:
在我们的情况下,这是:
sudo ntfsundelete /dev/sda1 –u –i 14159
sudo ntfsundelete / dev / sda1 –u –i 14159
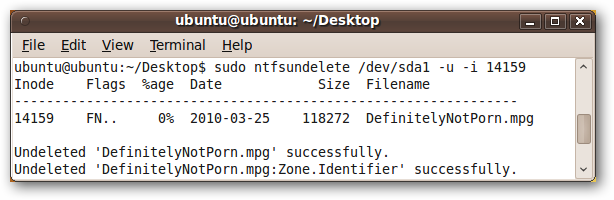
This recovers the file, along with an identifier that we don’t really care about. All three of our recoverable files are now recovered.
这将恢复文件,以及我们并不真正关心的标识符。 现在,我们的所有三个可恢复文件都已恢复。
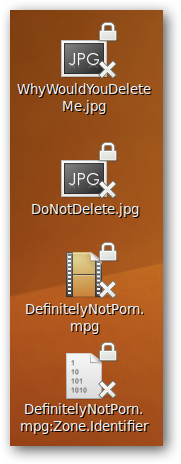
However, Ubuntu lets us know visually that we can’t use these files yet. That’s because the ntfsundelete program saves the files as the “root” user, not the “ubuntu” user.
但是,Ubuntu让我们直观地知道我们还不能使用这些文件。 这是因为ntfsundelete程序将文件另存为“ root”用户,而不是“ ubuntu”用户。
We can verify this by typing the following in our terminal window:
我们可以通过在终端窗口中键入以下内容来验证这一点:
ls –l
ls –l
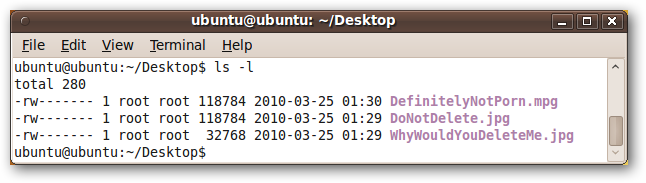
We want these three files to be owned by ubuntu, not root. To do this, enter the following in the terminal window:
我们希望这三个文件归ubuntu所有,而不是root。 为此,请在终端窗口中输入以下内容:
sudo chown ubuntu <Files>
sudo chown ubuntu <文件>
If the current folder has other files in it, you may not want to change their owner to ubuntu. However, in our case, we only have these three files in this folder, so we will use the * wildcard to change the owner of all three files.
如果当前文件夹中包含其他文件,则您可能不想将其所有者更改为ubuntu。 但是,在本例中,此文件夹中只有这三个文件,因此我们将使用*通配符更改所有这三个文件的所有者。
sudo chown ubuntu *
须藤市长ubuntu *

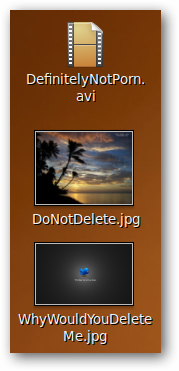
The files now look normal, and we can do whatever we want with them.
这些文件现在看起来正常,我们可以对它们进行任何操作。
Hopefully you won’t need to use this tip, but if you do, ntfsundelete is a nice command-line utility. It doesn’t have a fancy GUI like many of the similar Windows programs, but it is a powerful tool that can recover your files quickly.
希望您不需要使用此技巧,但是如果您这样做,ntfsundelete是一个很好的命令行实用程序。 它不像许多其他类似Windows程序那样具有精美的GUI,但它是可以快速恢复文件的强大工具。
See ntfsundelete’s manual page for more detailed usage information
有关更多详细的使用信息,请参见ntfsundelete的手册页


 5775
5775

 被折叠的 条评论
为什么被折叠?
被折叠的 条评论
为什么被折叠?
 到【灌水乐园】发言


