


mfc匹配关键字颜色显示
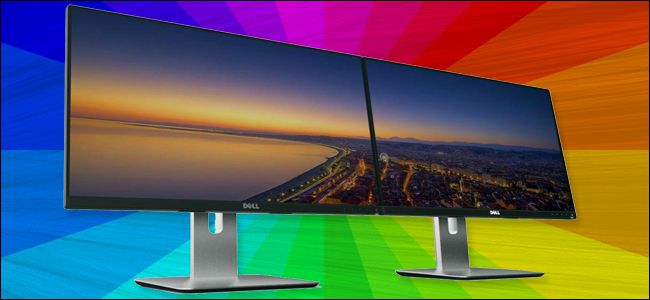
If you’re anything like me, you love working on a big, beefy desktop PC with as many monitors as will fit on your big, beefy desk. And if you’re anything like me, it also drives you crazy when the colors and image settings on those monitors don’t match exactly.
如果您像我一样,则喜欢在大型的台式机上工作,并在其大型台式机上安装尽可能多的显示器。 如果您像我一样,当这些显示器的颜色和图像设置不完全匹配时,也会使您发疯。
I won’t lie: getting your monitors to match each other is a tough chore, especially if they’re from multiple manufacturers or product lines. It’s doubly difficult if you’re trying for color accuracy, a crucial component if you’re working in media production. But there are a few tips you can use to get your multiple screens as close as possible.
我不会说谎:让您的显示器相互匹配是一件艰巨的工作,尤其是当它们来自多个制造商或产品线时。 如果您要追求色彩准确性,这将变得非常困难,而色彩准确性是从事媒体制作的关键要素。 但是,您可以使用一些技巧来尽可能多地关闭多个屏幕。
为什么我的屏幕不匹配? (Why Don’t My Screens Match?)
There are a variety of reasons why the images on your different monitors don’t match each other. The simplest is that each monitor is different; production variables and assembly flaws can mean that even monitors with exactly the same model won’t have colors that match up perfectly.
导致不同监视器上的图像不匹配的原因有多种。 最简单的是,每个监视器都不同。 生产变量和装配缺陷可能意味着即使具有完全相同型号的显示器也不会具有完美匹配的颜色。
Even if you buy identical monitors, it’s possible that they still won’t be close enough for your discerning eyes. The age and use of a monitor will affect its LCD screen, and manufacturers sometimes use multiple part suppliers for the same products—two “identical” monitors might have LCD panels that didn’t even come from the same country. And all of that assumes that there aren’t any flaws with the specific monitor units you’re using, which is certainly possible, since monitors are big, bulky items that are easily damaged when being packed or moved.
即使您购买相同的显示器,也有可能它们距离您的眼睛不够近。 显示器的寿命和使用将影响其LCD屏幕,制造商有时会为同一产品使用多个零件供应商-两台“完全相同”的显示器可能甚至都没有来自同一国家/地区的LCD面板。 所有这些都假定您使用的特定显示器单元没有任何缺陷,这是可能的,因为显示器是大而笨重的物品,在包装或移动时很容易损坏。
These problems are multiplied if your monitors aren’t the same model from the same manufacturer. Different types and qualities of LCD (TN, IPS, VA), backlight types and quality, brightness, connection type, contrast ratio, viewing angle and of course, size and resolution can all affect the colors that you see on screen. To put it bluntly, if you’re mixing and matching monitors, it’s almost impossible to get them to match perfectly. It’s a bummer, especially if you’re upgrading a setup over a few years and looking for deals along the way.
如果您的显示器不是同一制造商提供的同一型号,则会成倍增加这些问题。 LCD的不同类型和质量(TN,IPS,VA),背光类型和质量,亮度,连接类型,对比度,视角,当然大小和分辨率都会影响您在屏幕上看到的颜色。 坦率地说,如果您要混合和匹配监视器,几乎不可能使它们完美匹配。 这真是令人b目结舌,尤其是如果您要在几年内升级设置并一路寻找交易的话。
简单方法:监控显示控件 (The Easy Way: Monitor Display Controls)
This has probably already occurred to you, but you can manually adjust picture settings by using the control buttons on the front or side of your monitor. Yes, this is obvious. But don’t discount it: combined with the methods below, it’ll let you get much closer to parity between your monitors than any one method by itself.
您可能已经发生了这种情况,但是您可以使用显示器正面或侧面的控制按钮来手动调整图片设置。 是的,这很明显。 但是请不要低估它:与下面的方法结合使用,可以使您比单独使用任何一种方法更接近显示器之间的奇偶校验。
(Note: With some monitors, you may also be able to adjust your screen’s brightness with an app like ScreenBright or Display Tuner, which will be much easier than using the on-panel buttons—though these apps won’t work with all monitors.)
(注意:对于某些显示器,您还可以使用ScreenBright或Display Tuner之类的应用来调整屏幕的亮度,这比使用面板上的按钮要容易得多,尽管这些应用并非适用于所有显示器。 )

The most crucial bit to adjust manually is the monitor brightness. Not only does this affect color brightness and tone, it’s pretty much the only thing that can’t be adjusted via software. So use the brightness adjustment tool in the hardware settings to get all of your monitors at roughly the same level of light output—you may need to adjust some non-obvious settings like “economy mode” or “game mode” to get the closest match possible.
手动调整最关键的一点是显示器的亮度。 这不仅会影响颜色的亮度和色调,而且几乎是唯一无法通过软件进行调整的东西。 因此,请使用硬件设置中的亮度调整工具使所有显示器的光输出大致相同,您可能需要调整一些非显而易见的设置(例如“经济模式”或“游戏模式”)才能获得最接近的匹配可能。
If you want to go for crazy precision, set one monitor to a blank white screen (Google for a white image then set your browser to full screen for an easy way to do this), then turn off the others. You can use a photography light meter app on your phone to measure the light output. Hold your phone about six inches from one monitor, check the light level, then repeat the process with your other monitors. Match them as close as you can.
如果您想达到疯狂的精确度,请将一台显示器设置为空白白屏(Google将其设置为白屏,然后将浏览器设置为全屏以方便执行此操作),然后关闭其他显示器。 您可以在手机上使用摄影测光表应用程序来测量光输出。 将手机离一台显示器约六英寸,检查照明水平,然后对另一台显示器重复该过程。 尽可能匹配它们。
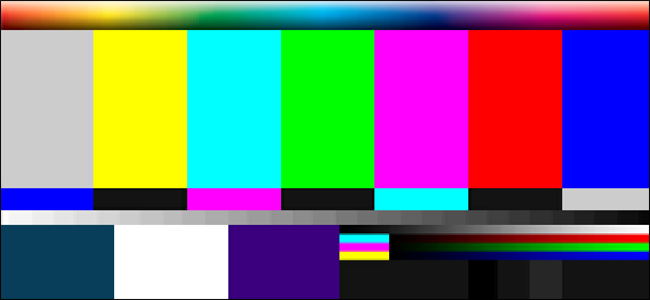
Once you have brightness matched up, adjust the rest of the color and picture values on all monitors simultaneously. A color pattern image, like the one below, can help. Move the window with the image onto each monitor as necessary, or just open it in multiple tabs and spread them out.
一旦亮度匹配,就可以同时调整所有显示器上的其余颜色和图像值。 如下图所示,彩色图案图像可以提供帮助。 根据需要将带有图像的窗口移动到每个监视器上,或者只是在多个选项卡中将其打开并展开。
Check the following settings, and any other options that can affect the picture contrast, brightness, and color:
检查以下设置,以及可能影响图片对比度,亮度和色彩的所有其他选项:
- Contrast 对比
- Sharpness清晰度
- Red/Green/Blue color values红色/绿色/蓝色值
- Color “Tone” or “Warmth”颜色“色调”或“温暖”
- Gamma Setting 伽玛设置
- “Display Modes” like gaming, video, etc.游戏,视频等“显示模式”
This will take a while. If your monitors offer it as an option, it’s best to set the on-screen menu timeout to its maximum setting, so that the menu for one monitor won’t shut off while you’re working on another one.
这需要一段时间。 如果您的显示器提供此选项,则最好将屏幕菜单超时设置为其最大设置,这样一来,当您使用另一台显示器时,一台显示器的菜单就不会关闭。
艰难的道路:操作系统和图形卡设置 (The Hard Way: Your Operating System and Graphics Card Settings)
Windows and macOS both offer OS-level color calibration tools that can be adjusted per monitor.
Windows和macOS均提供可在每个显示器上进行调整的OS级色彩校准工具。
视窗 (Windows)
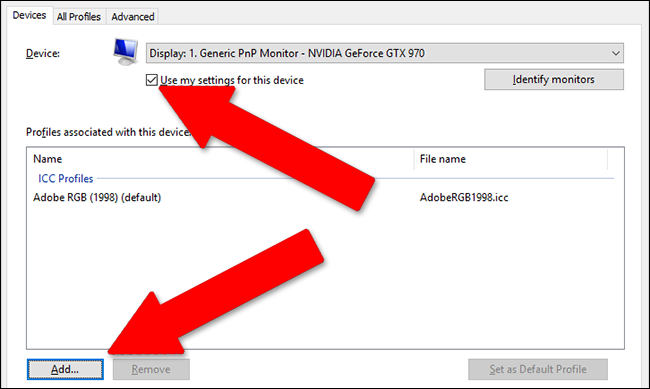
In Windows, this tool is Color Management, under the Control Panel. You’ll need to make a custom profile for each monitor: select the display from drop-down menu under Device, then click “Use my settings for this device.” Now click “Add.” You can choose from dozens of pre-set profiles. (You might even be able to find one for your monitor as a starting point.)
在Windows中,此工具是“控制面板”下的“色彩管理”。 您需要为每个监视器创建一个自定义配置文件:从“设备”下的下拉菜单中选择显示,然后单击“使用我的设备设置”。 现在单击“添加”。 您可以从数十种预设配置文件中进行选择。 (您甚至可以为您的显示器找到一个作为起点。)
Now select the next monitor under “Device” and repeat the process, selecting the same profile.
现在,在“设备”下选择下一个监视器,然后重复该过程,选择相同的配置文件。
Click the “Advanced” tab, then the “Calibrate Display” button. This will open a wizard that will let you adjust more advanced controls for the selected profile, like the gamma, brightness, and contrast…though it’s mostly a series of reference images. You can use this process to re-do the section above with hardware controls, checking the various color profiles available for matching and accuracy.
单击“高级”选项卡,然后单击“校准显示”按钮。 这将打开一个向导,该向导可让您调整所选配置文件的更多高级控件,例如伽玛,亮度和对比度……尽管它主要是一系列参考图像。 您可以使用此过程对硬件控件重新执行上述部分,检查各种可用于匹配和准确性的颜色配置文件。

Once all of your monitors are using the same profile, you can go back to the first section and fine tune your settings with the hardware controls.
一旦所有监视器都使用相同的配置文件,就可以返回第一部分并使用硬件控件微调设置。
苹果系统 (macOS)
In macOS, click the System Preferences icon on the dock (the grey gear on the right), Then click “Displays.” Clock the “Color” setting on the right.
在macOS中,单击扩展坞上的“系统偏好设置”图标(右侧的灰色齿轮),然后单击“显示器”。 计时右侧的“颜色”设置。
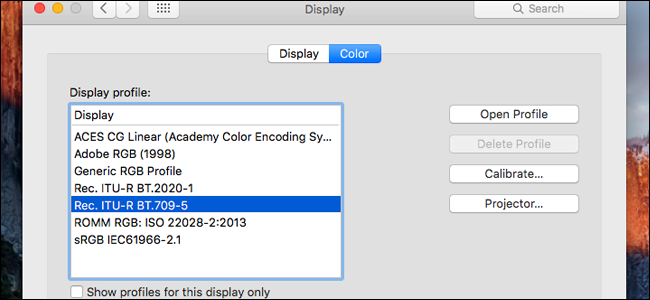
You can click all of the available profiles and see how they apply to the screen immediately (or grab one for your model monitor). When you’ve found the one you want, click “Calibrate.” Thankfully, macOS has a neat step-by-step calibration wizard that will walk you through all of the applicable settings and let you adjust them one by one.
您可以单击所有可用的配置文件,然后立即查看它们如何应用于屏幕(或为模型监视器获取一个)。 找到所需的对象后,请单击“校准”。 值得庆幸的是,macOS拥有一个整洁的逐步校准向导,它将引导您完成所有适用的设置,并一步一步地对其进行调整。

Just click “Continue” and follow the process through to the “Target White Point.” Un-click the “Use native white point” option to adjust this manually, matching up with your other displays. Click “Continue” until you’re all the way through the wizard. Repeat this process for all your connected displays.
只需单击“继续”,然后按照过程进行操作即可到达“目标白点”。 取消单击“使用本机白点”选项以手动调整此设置,使其与其他显示相匹配。 单击“继续”,直到完全完成向导。 对所有连接的显示器重复此过程。
图形适配器设置 (Graphics Adapter Settings)
For more exact options on Windows, you’ll want to dive into the settings application provided by your GPU maker. For most laptops and inexpensive desktops, this will be Intel (because the graphics adapter is integrated into the CPU), though AMD machines will have something similar. All of them can be accessed from the context menu on the desktop—this right-click menu.
要在Windows上获得更多确切的选项,您需要深入了解GPU制造商提供的设置应用程序。 对于大多数笔记本电脑和价格便宜的台式机,这将是Intel(因为图形适配器已集成到CPU中),尽管AMD机器将具有类似的功能。 可以从桌面上的上下文菜单(此右键单击菜单)访问所有这些菜单。
英特尔 (Intel)
For Intel integrated graphics, right-click an empty area of the desktop to open the context menu, then click “Graphics properties.” The next steps will vary depending upon your model and its Intel GPU, but you’re looking for the main display menu.
对于Intel集成图形,右键单击桌面的空白区域以打开上下文菜单,然后单击“图形属性”。 下一步将根据您的型号及其Intel GPU而有所不同,但是您正在寻找主显示菜单。
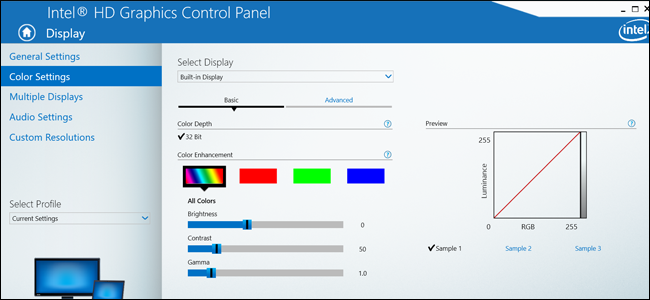
From here, click “Color Settings.” This screen allows you to adjust settings like brightness, contrast, gamma, and the individual RGB levels. It’ll select your main display by default—choose other screens my clicking the “Select Display” menu. Repeat the process on multiple screens, and combine with hardware controls to get the closest match you can.
在此处,单击“颜色设置”。 通过此屏幕,您可以调整亮度,对比度,伽玛和各个RGB级别等设置。 默认情况下,它将选择您的主显示-单击“选择显示”菜单,选择其他屏幕。 在多个屏幕上重复该过程,并与硬件控件结合使用以获取最接近的匹配。
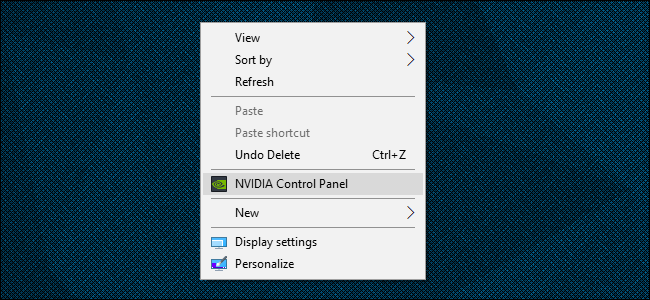
英伟达 (NVIDIA)
If your PC has an NVIDIA GPU, right-click the desktop, then click “NVIDIA Control Panel.” (If you don’t see this option, you may need to install the correct driver for your graphics card.) In the menu on the left, click “Adjust desktop color settings.”
如果您的PC具有NVIDIA GPU,请右键单击桌面,然后单击“ NVIDIA控制面板”。 (如果看不到此选项,则可能需要为图形卡安装正确的驱动程序。)在左侧菜单中,单击“调整桌面颜色设置”。
This screen will allow you to select your monitor at the top, then make adjustments to the picture at the bottom. Make sure the option for “Use NVIDIA settings” is enabled, then make adjustments as you like. Note that you can use the “Color channel” drop-down menu for even finer controls based on Red, Green, or Blue channels.
该屏幕允许您在顶部选择显示器,然后在底部调整图片。 确保已启用“使用NVIDIA设置”选项,然后根据需要进行调整。 请注意,您可以使用“颜色通道”下拉菜单基于红色,绿色或蓝色通道进行更精细的控制。
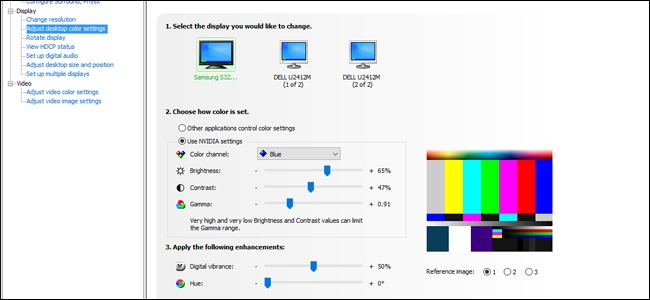
Keep an eye on the reference image on the right. You can switch between reference images, and move the window between monitors to check your changes. Click “Apply” to save your settings for the current monitor, then select a new one and repeat the process.
注意右边的参考图像。 您可以在参考图像之间切换,并在监视器之间移动窗口以检查更改。 单击“应用”保存当前监视器的设置,然后选择一个新监视器并重复该过程。
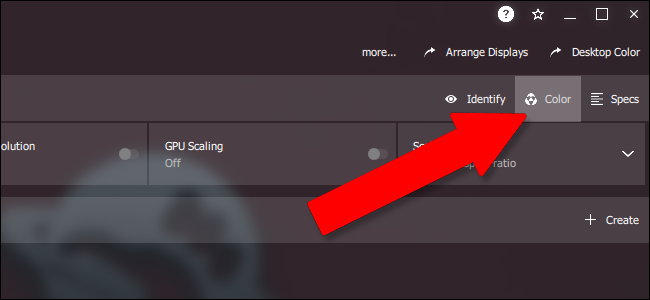
AMD公司 (AMD)
If your PC has an AMD GPU or APU, right-click the desktop, then click AMD Radeon Settings. If you don’t see this option, download the latest graphics card driver and install it. In the Radeon Settings menu, click the “Display” tab, then the “Color” icon on the right.
如果您的PC具有AMD GPU或APU,请右键单击桌面,然后单击“ AMD Radeon设置”。 如果看不到此选项,请下载并安装最新的图形卡驱动程序。 在Radeon设置菜单中,单击“显示”选项卡,然后单击右侧的“颜色”图标。
From here you can adjust the Color Temperature, brightness, hue, contrast, and saturation values. The controls aren’t quite as fine as NVIDIA’s, but you can still use the reference images on the right to check the colors against other displays and move the window back and forth.
在这里,您可以调整色温,亮度,色相,对比度和饱和度值。 控件不如NVIDIA的控件好,但是您仍然可以使用右侧的参考图像来对照其他显示器检查颜色并来回移动窗口。
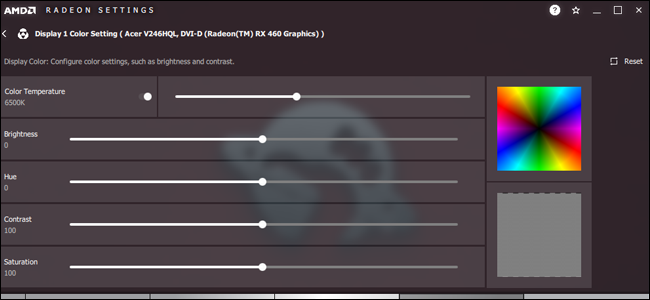
Click the Display button at the top of the window and repeat the process for each monitor.
单击窗口顶部的显示按钮,然后为每个监视器重复该过程。
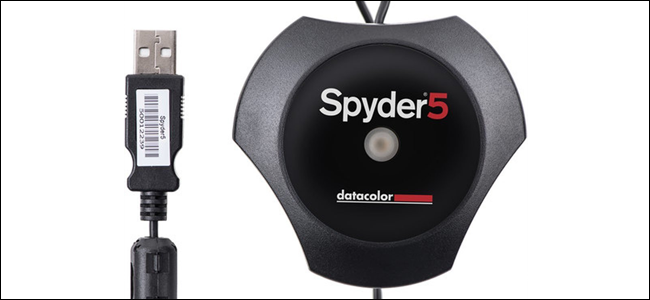
最困难(也是最昂贵)的方式:专用硬件校准 (The Hardest (and Most Expensive) Way: Dedicated Hardware Calibration)
If you need seriously accurate colors, like if you work with photography, printing, or video media and your job depends on colors matching perfectly, you might want to consider a dedicated color calibration device. These dedicated machines allow users to adjust their monitors to specific color conditions, typically with the aim of getting them to match print outputs exactly.
如果您需要非常准确的颜色,例如与摄影,打印或视频媒体配合使用,而您的工作取决于完全匹配的颜色,则可能需要考虑使用专用的颜色校准设备。 这些专用机器允许用户将其显示器调整为特定的颜色条件,通常目的是使它们与打印输出完全匹配。
They’re designed to match a monitor to a printer or other professional-grade equipment, but the digital tools work equally well for matching color profiles between different monitors. But make no mistake: these are professional-level tools, and each one requires a certain amount of experience to use. They also come from different manufacturers, with different setup styles and approaches to the calibration process, so we can’t really guide you on how any specific model works.
它们的设计目的是使显示器与打印机或其他专业级设备相匹配,但是数字工具同样可以很好地匹配不同显示器之间的色彩配置文件。 但是请不要误会:这些都是专业级别的工具,每个工具都需要一定的经验才能使用。 它们也来自不同的制造商,具有不同的设置样式和校准过程的方法,因此我们无法真正指导您任何特定模型的工作方式。
They’re also expensive. The cheapest of these USB calibration gadgets is around $100, with more elaborate, feature-packed options quickly climbing much higher. But if you simply must have the most accurate and consistent display possible on multiple monitors, this is the ultimate solution.
它们也很贵。 这些USB校准小工具中最便宜的大约是100美元,功能更丰富,功能更丰富的选件Swift攀升了很多。 但是,如果您只是必须在多台显示器上显示最准确和一致的显示,那么这就是最终的解决方案。
This article from graphic design site Creative Bloq breaks down the most common models, their features, and current prices. Check it out if you’re interested in a considerable investment in color accuracy.
平面设计网站Creative Bloq的这篇文章详细介绍了最常见的模型,它们的功能和当前的价格。 如果您对彩色精度方面的大量投资感兴趣,请查看。
翻译自: https://www.howtogeek.com/342756/how-to-match-colors-on-your-multiple-monitors/
mfc匹配关键字颜色显示


 879
879

 被折叠的 条评论
为什么被折叠?
被折叠的 条评论
为什么被折叠?
 到【灌水乐园】发言


