


The Mac App Store is the default way to upgrade or install macOS, but it doesn’t work for everyone. Maybe you’ve got multiple Macs and a limited amount of bandwidth, and don’t want to download the entire operating system for every system. Or maybe you’re looking to install the operating system from scratch.
Mac App Store是升级或安装macOS的默认方法,但并不适用于所有人。 也许您有多台Mac和有限的带宽,并且不想为每个系统下载整个操作系统。 也许您正在寻找从头开始安装操作系统的信息。
Whatever your reason, installing macOS from a USB drive isn’t hard. You just need a few things:
无论出于何种原因,从USB驱动器安装macOS都不难。 您只需要几件事:
An 8GB USB drive. This process will overwrite the entire drive, so back up anything stored on it. If your drive is larger than 8GB, and you’d like to use the rest of the drive for something else, you could use Disk Utility to partition the drive: just create an empty, 8GB partition for the installer.
8GB USB驱动器。 此过程将覆盖整个驱动器,因此请备份存储在其上的所有内容。 如果您的驱动器大于8GB,并且您想将驱动器的其余部分用于其他用途,则可以使用“磁盘工具”对驱动器进行分区:只需为安装程序创建一个空的8GB分区。
- Access to at least one working Mac with access to the Mac App Store. This can be a friend’s machine if necessary. 可以访问至少一台可以运行的Mac,并可以访问Mac App Store。 如有必要,这可以是朋友的机器。
That’s it! Once you have those things we can get started.
而已! 一旦有了这些东西,我们就可以开始。
首先,从Mac App Store下载macOS (First, Download macOS From The Mac App Store)
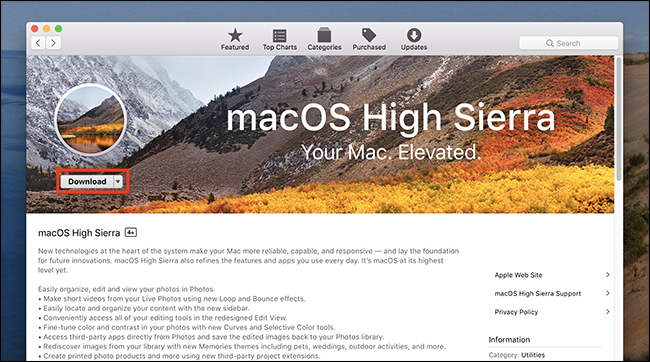
To begin, you need the installer for whatever version of macOS you want on a thumb drive. Head to the Mac App Store. If what you’re looking for is the latest version of macOS, search for that operating system and click the “Download” or “Install” button.
首先,您需要在拇指驱动器上安装所需版本的macOS的安装程序。 前往Mac App Store。 如果您要查找的是最新版本的macOS,请搜索该操作系统,然后单击“下载”或“安装”按钮。
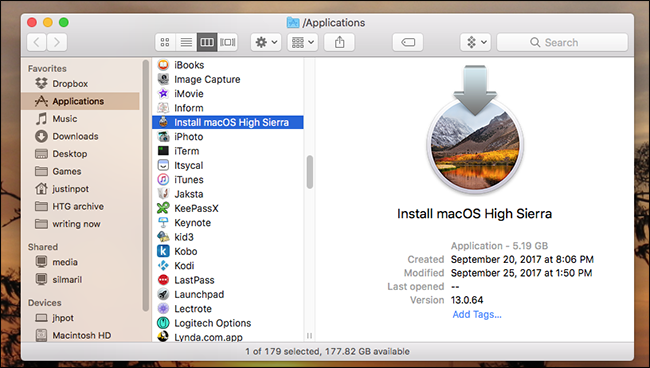
The download will take a while, so make sure your Mac is plugged in and has a consistent connection to the Internet. The installer will load when the process is done; simply close the window, then head to your Applications folder to confirm the installer is there.
下载将需要一段时间,因此请确保您的Mac已插入电源并与Internet保持一致的连接。 该过程完成后,安装程序将加载; 只需关闭窗口,然后转到“应用程序”文件夹以确认安装程序在那里。
If you don’t want the latest version of macOS, searching the App Store won’t help you. Instead, you’ll have to head to the “Purchases” tab in the installer and scroll down until you find the version of macOS you want on your thumb drive.
如果您不想要最新版本的macOS,则搜索App Store将无济于事。 相反,您必须转到安装程序中的“购买”选项卡并向下滚动,直到在拇指驱动器上找到所需的macOS版本。
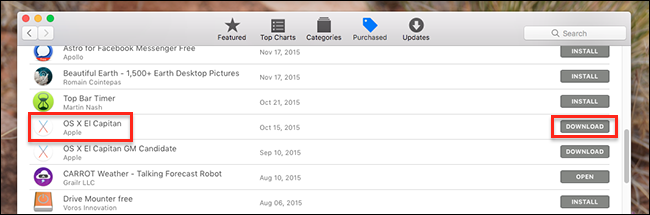
You will only find versions you’ve previously downloaded here. Click the “Download” button to the left of the release you want to install, and your Mac will download it. Again, the installer will launch when the download is complete; close the window when this happens. We’re now ready to create our disk. There are two ways to do this: one with third party software, and another with the Terminal.
您只能在这里找到以前下载的版本。 单击要安装的发行版左侧的“下载”按钮,Mac将会下载它。 同样,下载完成后,安装程序将启动。 发生这种情况时,请关闭窗口。 现在我们准备创建磁盘。 有两种方法可以执行此操作:一种使用第三方软件,另一种使用终端机。
简单方法:使用DiskMaker X (The Easy Way: With DiskMaker X)
The simplest way to create a boot USB drive is to download DiskMaker X and use it to create your drive. Generally, the latest version supports only the latest version of macOS; if you want to install something older than macOS High Sierra, check the list of older versions and download one that’s compatible with your chosen operating system.
创建启动USB驱动器的最简单方法是下载DiskMaker X并使用它来创建驱动器。 通常,最新版本仅支持macOS的最新版本。 如果要安装比macOS High Sierra更旧的版本,请检查较旧版本的列表并下载与您选择的操作系统兼容的版本。
Installing is simple: just mount the DMG, then drag the program to your Applications folder.
安装很简单:只需安装DMG,然后将程序拖到Applications文件夹中即可。
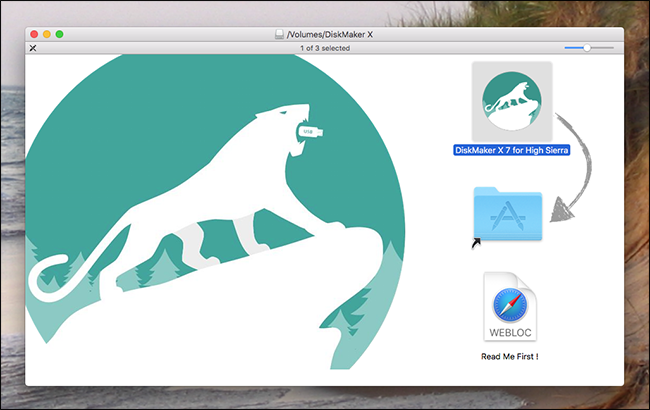
Start the program and it should find the installer you downloaded above. If you’ve put the installer somewhere besides the Applications folder, you can direct DiskMaker X to the file manually.
启动该程序,它将在上面找到您下载的安装程序。 如果将安装程序放在Applications文件夹旁边,则可以将DiskMaker X手动定向到该文件。

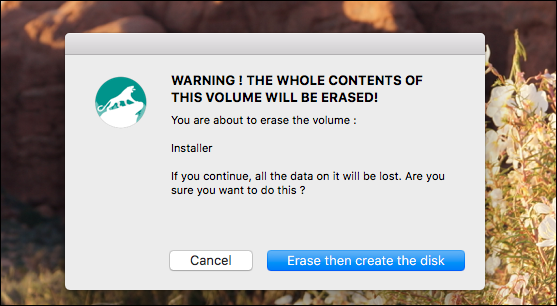
After that, you’ll be asked which disk you’d like to use. Choose the drive or partition, knowing that it will be completely overwritten.
之后,系统将询问您要使用哪个磁盘。 选择驱动器或分区,因为它会被完全覆盖。
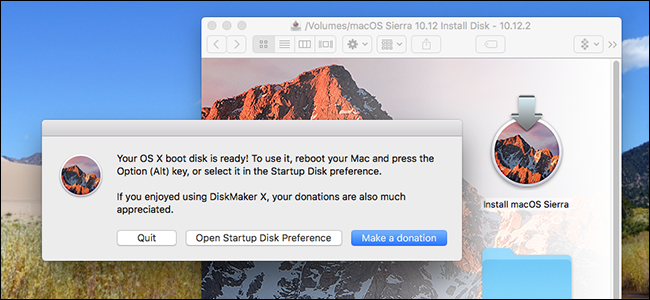
Once you authorize the action, DiskMakerX will mostly run in the background. When the process is done you’ll hear a loud lion roar (seriously, it freaked me out), and you’ll see the completed drive.
授权操作后,DiskMakerX通常将在后台运行。 完成此过程后,您会听到一声巨大的狮子吼声(严重的是,它吓坏了我),并且您会看到完整的驱动器。
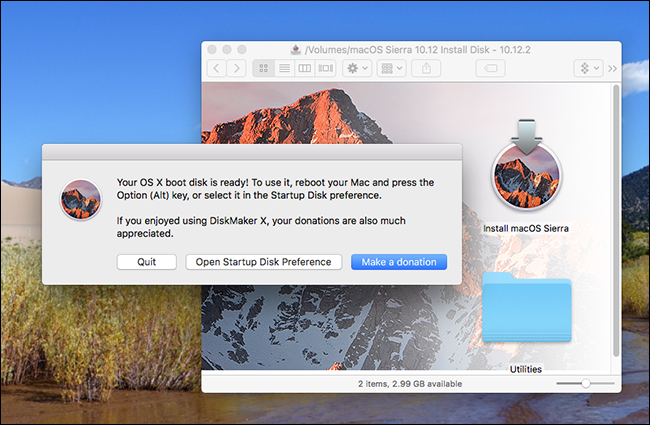
Diskmaker X also offers a variety of utilities, which can come in handy. The Terminal method, outlined below, does not include these.
Diskmaker X还提供了多种实用工具,它们可以派上用场。 下面概述的Terminal方法不包括这些。
(略)困难的方法:使用终端 (The (Slightly) Harder Way: With the Terminal)
If you’d rather not rely on a third-party tool to create your disk, Apple offers a built-in Terminal-driven method outlined here. To summarize: there is a script, called createinstallmedia, included in every macOS installer, and we’re going to run it.
如果您不想依靠第三方工具来创建磁盘,则Apple提供了此处概述的内置的终端驱动方法。 总结一下:每个macOS安装程序中都包含一个名为createinstallmedia的脚本,我们将运行它。
First, insert your thumb drive and give it a name—I’m using “Installer” for the purposes of this writeup, but make note of whatever name the drive has.
首先,插入您的拇指驱动器并给它起一个名字-在撰写本文时,我使用的是“安装程序”,但请记下该驱动器的名称。
Next, let’s find the installation script. Open the Terminal, which you can find in Applications > Utilities, and run the following command. Note that the exact command will vary depending on which version of macOS you’re trying to install; this one is specific to Sierra.
接下来,让我们找到安装脚本。 打开终端,您可以在“应用程序”>“实用程序”中找到该终端,然后运行以下命令。 请注意,确切的命令将根据您要安装的macOS版本而有所不同。 这是针对Sierra的。
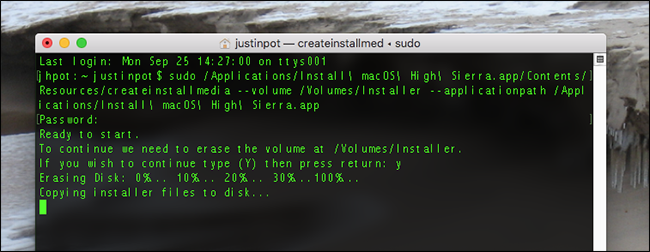
sudo /Applications/Install\ macOS\ High\ Sierra.app/Contents/Resources/createinstallmedia --volume /Volumes/Installer --applicationpath /Applications/Install\ macOS\ High\ Sierra.app
In case you’re curious, here’s how this breaks down:
如果您感到好奇,请按以下步骤解决:
To run the command as root. This means the command must start with
sudo以超级用户身份运行命令。 这意味着命令必须以
sudo开头/Applications/Install\ macOS\ High\ Sierra.app/Contents/Resources/createinstallmedia/Applications/Install\ macOS\ High\ Sierra.app/Contents/Resources/createinstallmediaTo provide the application with a path to the volume that will be overwritten. In our case, this is
/Volumes/Installer为应用程序提供将被覆盖的卷的路径。 在我们的例子中,这是
/Volumes/InstallerTo provide the application with a path to the installer package. For macOS Sierra, this is
/Applications/Install\ macOS\ High\ Sierra.app为应用程序提供安装程序包的路径。 对于macOS Sierra,这是
/Applications/Install\ macOS\ High\ Sierra.app
You will be asked to confirm that you’re ready for the disk to be deleted:
系统将要求您确认已准备好删除磁盘:
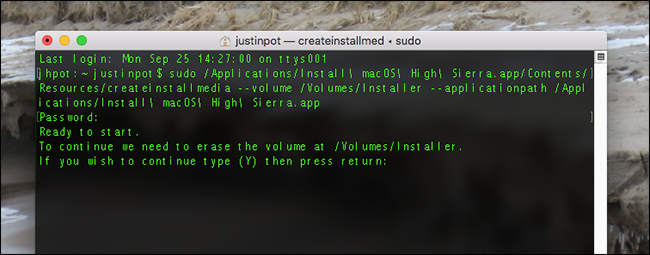
Yet “y”, then Enter, and the process will begin. First the disk will be deleted, then the entire installer will be copied to your disk.
再按“ y”,然后按Enter,过程将开始。 首先将删除磁盘,然后将整个安装程序复制到您的磁盘。
The process will take a while, but when it’s done you’ll have a bootable drive with the installer.
该过程将花费一些时间,但是完成后,安装程序将具有可引导驱动器。
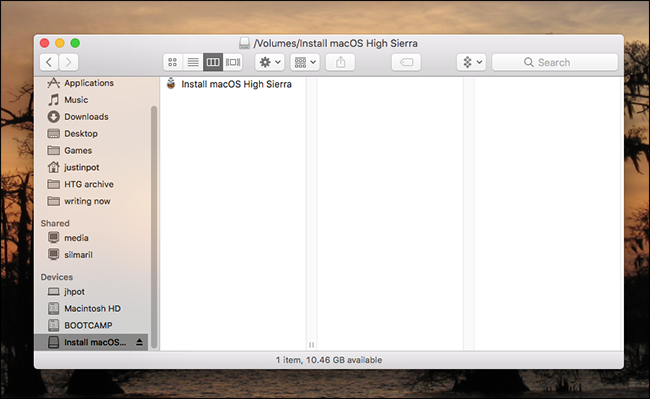
Notice that the Utilities folder, offered by DiskMaker X, is not here.
注意,DiskMaker X提供的Utilities文件夹不在此处。
The command above is specifically for High Sierra (and a disk named “Installer.”) Previous versions of macOS will have slightly different names. Here’s the complete command for a few recent releases:
上面的命令专门用于High Sierra(以及名为“ Installer”的磁盘)。macOS的早期版本的名称会稍有不同。 这是一些最新版本的完整命令:
Sierra:
sudo /Applications/Install\ macOS\ Sierra.app/Contents/Resources/createinstallmedia --volume /Volumes/Installer --applicationpath /Applications/Install\ macOS\ Sierra.appSierra:
sudo /Applications/Install\ macOS\ Sierra.app/Contents/Resources/createinstallmedia --volume /Volumes/Installer --applicationpath /Applications/Install\ macOS\ Sierra.appEl Capitan:
sudo /Applications/Install\ OS\ X\ El\ Capitan.app/Contents/Resources/createinstallmedia --volume /Volumes/Installer --applicationpath /Applications/Install\ OS\ X\ El\ Capitan.appEl Capitan:
sudo /Applications/Install\ OS\ X\ El\ Capitan.app/Contents/Resources/createinstallmedia --volume /Volumes/Installer --applicationpath /Applications/Install\ OS\ X\ El\ Capitan.appYosemite:
sudo /Applications/Install\ OS\ X\ Yosemite.app/Contents/Resources/createinstallmedia --volume /Volumes/Installer --applicationpath /Applications/Install\ OS\ X\ Yosemite.app优胜美地:
sudo /Applications/Install\ OS\ X\ Yosemite.app/Contents/Resources/createinstallmedia --volume /Volumes/Installer --applicationpath /Applications/Install\ OS\ X\ Yosemite.appMavericks::
sudo /Applications/Install\ OS\ X\ Mavericks.app/Contents/Resources/createinstallmedia --volume /Volumes/Installer --applicationpath /Applications/Install\ OS\ X\ Mavericks.app小牛::
sudo /Applications/Install\ OS\ X\ Mavericks.app/Contents/Resources/createinstallmedia --volume /Volumes/Installer --applicationpath /Applications/Install\ OS\ X\ Mavericks.app
Hopefully you get the idea: you need to run the script from within the installer itself, point to your drive, then point to the installer.
希望您能明白:您需要从安装程序本身中运行脚本,指向驱动器,然后指向安装程序。
如何从安装驱动器引导 (How to Boot From Your Installation Drive)
Now that you’ve created an external installer, you need to boot from it on your target Mac. Shut the Mac down, then plug in your installer disk. Turn the Mac on while holding the Option key. You’ll be asked which drive to boot from:
现在,您已经创建了外部安装程序,您需要在目标Mac上从其启动。 关闭Mac,然后插入安装盘。 按住Option键的同时打开Mac。 系统将询问您要从哪个驱动器启动:
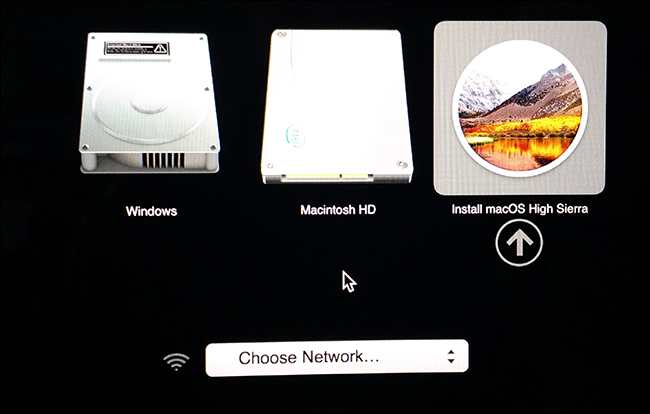
Pick the drive you wrote the installer to. The installer for macOS will boot from it, at which point you can upgrade macOS, or install a fresh version.
选择您将安装程序写入的驱动器。 macOS的安装程序将由此启动,此时您可以升级macOS或安装新版本。
翻译自: https://www.howtogeek.com/285922/how-to-create-a-bootable-usb-installer-for-macos-sierra/


 651
651

 被折叠的 条评论
为什么被折叠?
被折叠的 条评论
为什么被折叠?
 到【灌水乐园】发言


