


vue在日历表上面创建事件

The Calendar app included with Windows 10 is a modern, universal app that integrates wonderfully with Mail and other Windows 10 apps. If you’re looking for a place in Windows 10 to manage your days, weeks, and months, here’s how to set up a Calendar in Windows 10’s Calendar app.
Windows 10附带的日历应用程序是一种现代的通用应用程序,可与Mail和其他Windows 10应用程序完美集成。 如果您要在Windows 10中寻找位置来管理自己的日,周和月,请按照以下方法在Windows 10的“日历”应用中设置日历。
添加和配置您的帐户 (Add and Configure Your Accounts )
Calendar can sync with your online accounts, like Google Calendar, Outlook, or iCloud. In fact, the Calendar and Mail apps are linked, so if you’ve already set up an account in Mail, it will show up in Calendar as well. If not, you can add it manually in the Calendar app.
日历可以与您的在线帐户同步,例如Google日历,Outlook或iCloud。 实际上,“日历”和“邮件”应用程序是链接的,因此,如果您已经在“邮件”中设置了帐户,则该帐户也会显示在“日历”中。 如果没有,您可以在“日历”应用中手动添加它。
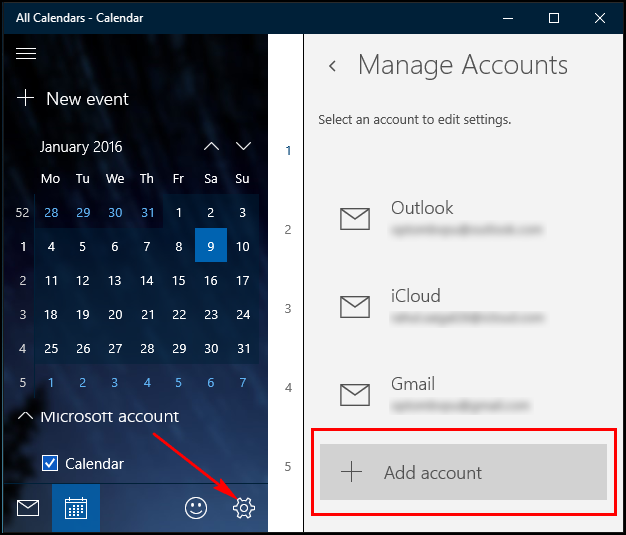
Calendar supports a range of account types: Outlook.com (default), Exchange, Office 365 for business, Google Calendar, and Apple’s iCloud. To add an account to the Calendar app, point your mouse to the lower-left of the screen and click the “Settings” cog. From the right sidebar that appears, click “Manage Accounts > + Add account.”
日历支持多种帐户类型:Outlook.com(默认),Exchange,Office 365商业版,Google日历和Apple的iCloud。 要将帐户添加到“日历”应用中,请将鼠标指向屏幕的左下角,然后单击“设置”齿轮。 在显示的右侧栏中,单击“管理帐户> +添加帐户”。
The “Choose an Account” window appears. Just like Mail app, it’s equipped with all kinds of popular calendar services. Choose the type of account you want and follow the on-screen instructions. If your settings are correct, then you get ported directly into that account’s calendar.
出现“选择帐户”窗口。 就像邮件应用程序一样,它配备了各种流行的日历服务。 选择所需的帐户类型,然后按照屏幕上的说明进行操作。 如果您的设置正确,则可以直接移植到该帐户的日历中。

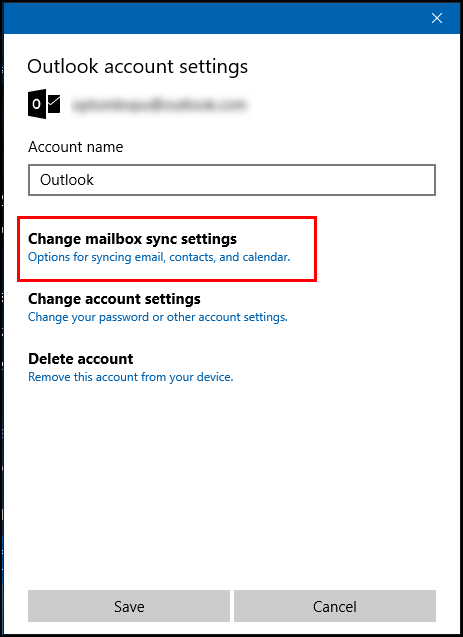
If you do not wish to see calendars from a particular account, then you can switch them off. Point your mouse to the lower-left of the screen and click “Settings.” Select the account listed in the “Manage Accounts” pane that you wish to limit and click “Change mailbox sync settings.”
如果您不希望看到来自特定帐户的日历,则可以将其关闭。 将鼠标指向屏幕的左下角,然后单击“设置”。 选择您要限制在“管理帐户”窗格中列出的帐户,然后单击“更改邮箱同步设置”。
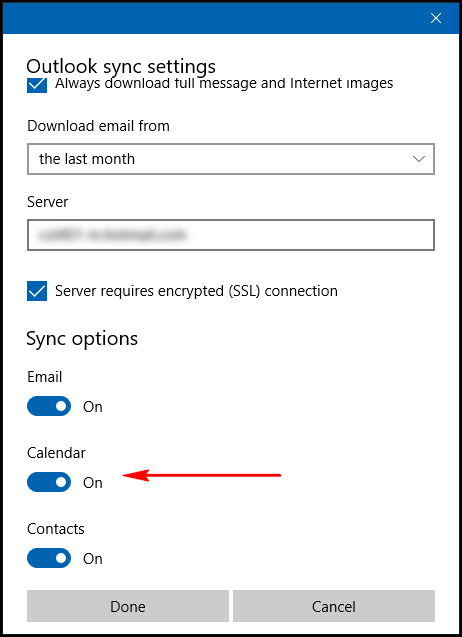
Scroll down, and under the “Sync Options” toggle “Calendar” option to off. If you’re having any sync related issues with the calendar server, click “Advanced mailbox settings” and configure the server details.
向下滚动,然后在“同步选项”下将“日历”选项切换为关闭。 如果日历服务器出现任何与同步相关的问题,请单击“高级邮箱设置”并配置服务器详细信息。
使用不同的日历视图 (Working With Different Calendar Views )
The Calendar app has a simple, minimalistic interface. The interface is divided into two sections:
日历应用程序具有简单,简约的界面。 该界面分为两部分:
On the left, Calendar provides an overview of your calendars. Press the “hamburger menu” to collapse that pane. A compact calendar also appears at the left side. You can use it to jump to a date that’s far in the past or future.
日历左侧显示日历的概述。 按“汉堡菜单”以折叠该窗格。 紧凑型日历也出现在左侧。 您可以使用它跳到过去或将来的某个日期。
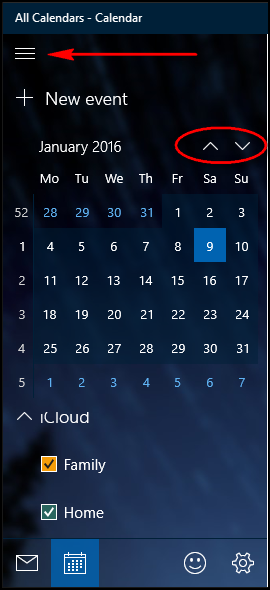
On the right, Calendar offers all the date-based views. Using the toolbar at top, you can switch among different Day, Work Week, Week, and Month view. You can click on them or press “Ctrl + Alt +1″, “Ctrl + Alt + 2”, and so on to switch between different views. The left and right arrow keys go to the previous or next day, and the up and down arrow keys go to the previous or next hour.
在右侧,日历提供所有基于日期的视图。 使用顶部的工具栏,您可以在不同的日,工作周,周和月视图之间切换。 您可以单击它们或按“ Ctrl + Alt +1”,“ Ctrl + Alt + 2”等等,以在不同的视图之间切换。 左右箭头键移至前一天或第二天,上下箭头键移至前一小时或下一个小时。
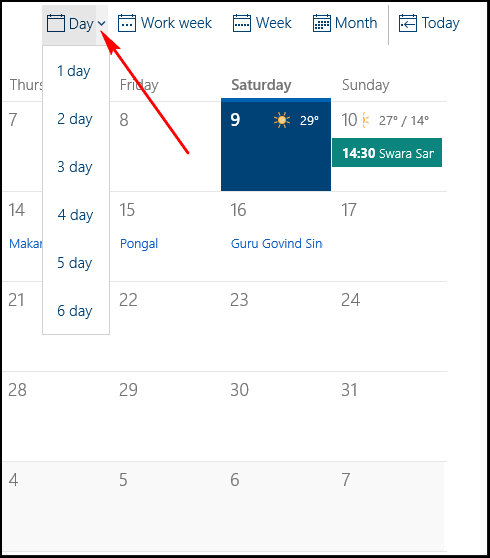
The “Day” view includes a drop-down menu, click them to specify how many Day columns you want to fit on the screen. “Work Week” view displays a traditional Monday through Friday work week in a list view. “Week” view shows up to 24 hours in a day and seven days of the week. “Month” view shows the entire month and highlights today’s date.
“日”视图包括一个下拉菜单,单击它们以指定要在屏幕上容纳多少“日”列。 “工作周”视图在列表视图中显示传统的星期一至星期五工作周。 “周”视图显示一周中的一天和一周的7天多达24小时。 “月”视图显示整个月并突出显示今天的日期。
添加新活动或约会 (Adding a New Event or Appointment )
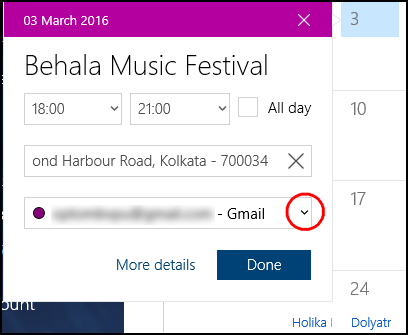
To enter a new event directly into your calendar, tap or click the correct time slot or date square. A small pane will appear for a new calendar entry on that date. Enter a name for your event. Select the beginning and ending time of your event. If the event has no time (like a Birthday or Anniversary), select the “All Day” checkbox. Enter the location and calendar account associated with it. This is a quick way for adding a calendar and most of the time, this is all you need.
要将新事件直接输入到日历中,请点击或单击正确的时隙或日期方块。 在该日期将出现一个小窗格,用于显示新的日历条目。 输入活动的名称。 选择活动的开始和结束时间。 如果活动没有时间(例如生日或周年纪念日),请选中“全天”复选框。 输入与之关联的位置和日历帐户。 这是添加日历的快速方法,大多数情况下,这就是您所需要的。
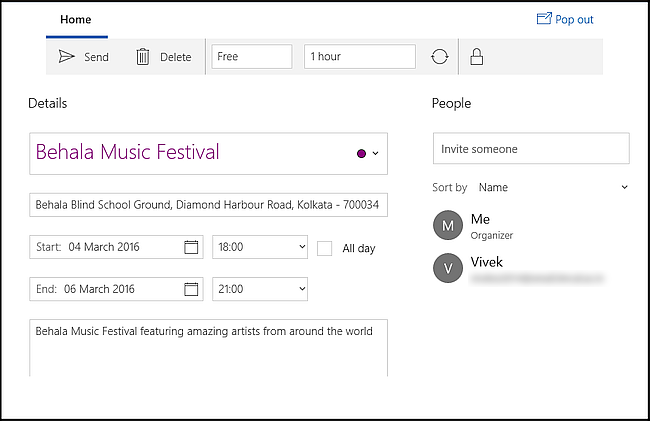
You can also click “New Event” at the top-left corner of the screen to create an event with more details. A big screen will pop up, allowing you to:
您也可以单击屏幕左上角的“新事件”以创建具有更多详细信息的事件。 将会弹出一个大屏幕,您可以:
- Add the start and Ending Date, and their Time 添加开始和结束日期及其时间
- Use the “Show As” field to choose between Free, Tentative, Busy, or Out of Office使用“显示为”字段在“免费”,“暂定”,“忙碌”或“不在办公室”之间进行选择
- Update the “Reminder” field using increments from None to 1 week.使用从无到1周的增量来更新“提醒”字段。
- Set the event as Private by selecting the padlock 通过选择挂锁将活动设置为私人
- Add an Event Description and Location.添加事件描述和位置。
To invite people, select the text field and start typing. Contacts will appear from your list of contacts in the People app. Choose the contact to add them to the event. You can invite someone by typing the email address too. Finally, click “Save and Close” or if you have invited someone, then click “Send.”
要邀请他人,请选择文本字段并开始输入。 联系人将从“人脉”应用中的联系人列表中显示。 选择联系人以将其添加到事件中。 您也可以通过输入电子邮件地址来邀请某人。 最后,单击“保存并关闭”,或者如果您邀请了某人,则单击“发送”。
查看,编辑或删除事件 (View, Edit, or Delete an Event )
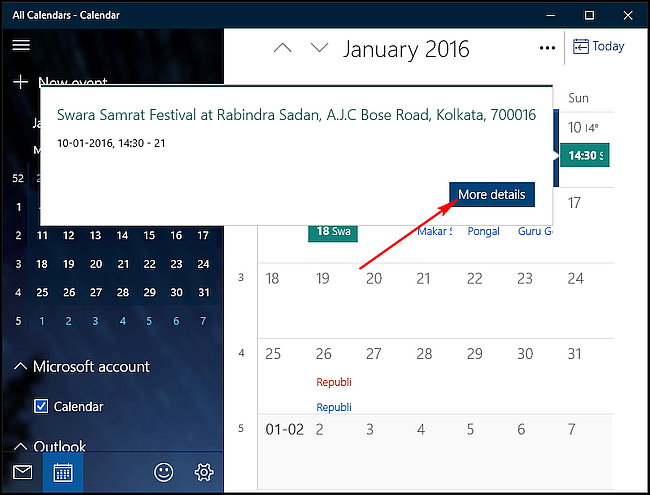
By default, Calendar will show you the event’s name and time in the main view. If you mouse over an event, then a little box will pop out to show more detail, including the name of the event, location, starting date, and time. Click “More Details” to switch the event to “Details” view. Once you’ve opened the event, you can of course edit them as much as you want. Click “Save and Close” when you’re finished editing.
默认情况下,日历会在主视图中显示事件的名称和时间。 如果将鼠标悬停在某个事件上,则会弹出一个小框以显示更多详细信息,包括事件的名称,位置,开始日期和时间。 单击“更多详细信息”将事件切换到“详细信息”视图。 打开活动后,当然可以根据需要进行编辑。 完成编辑后,单击“保存并关闭”。
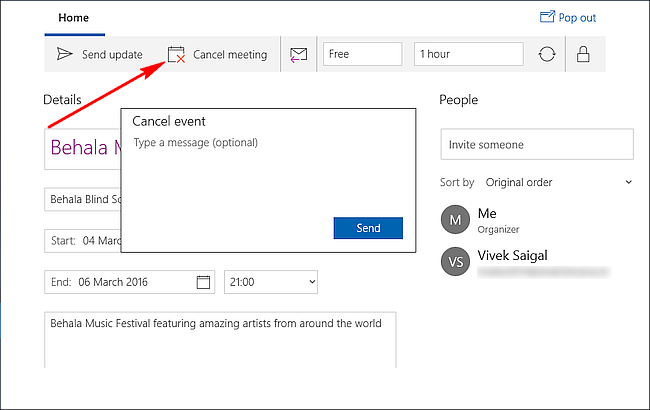
To delete an event or appointment, open the event and click “Delete” situated at the top of the toolbar. If other people have been invited, then click “Cancel meeting” instead of Delete. Type a short message and click “Send.”
要删除事件或约会,请打开事件,然后单击工具栏顶部的“删除”。 如果邀请了其他人,则单击“取消会议”而不是“删除”。 输入一条短信,然后单击“发送”。
Adding event and appointments to Calendar app is quite an easy and intuitive procedure. The entries you add to Calendar app will get synced to every Windows 10, Android, or iOS device you have, assuming that you have linked your accounts in those devices as well.
将事件和约会添加到“日历”应用程序是一个非常简单直观的过程。 假设您也已在这些设备上关联了帐户,则添加到“日历”应用程序的条目将同步到您拥有的每个Windows 10,Android或iOS设备。
翻译自: https://www.howtogeek.com/238656/how-to-set-up-a-basic-calendar-in-windows-10/
vue在日历表上面创建事件


 455
455

 被折叠的 条评论
为什么被折叠?
被折叠的 条评论
为什么被折叠?
 到【灌水乐园】发言


