


 本文介绍了如何在Microsoft Word中绘制和操纵箭头,包括绘制基本箭头、调整大小、旋转、更改颜色,以及使用块、弯曲和连接器箭头的方法。通过这些步骤,用户可以创建出各种形状和样式的箭头,适用于强调、指示或流程图设计。

qt中如何绘制指向性的箭头

Whether you need to point to an image for emphasis or demonstrate where to click for interactivity, there is a wide range of arrow shapes that you can create and customize in Microsoft Word. Let’s take a look at how they work.
无论是需要强调图像还是要在哪里单击以进行交互,都可以在Microsoft Word中创建和自定义各种各样的箭头形状。 让我们看看它们是如何工作的。
绘制基本的箭头形状 (Drawing a Basic Arrow Shape)
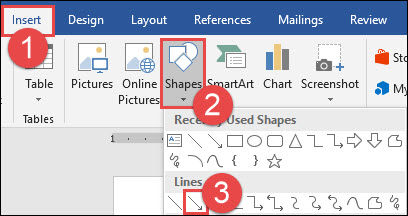
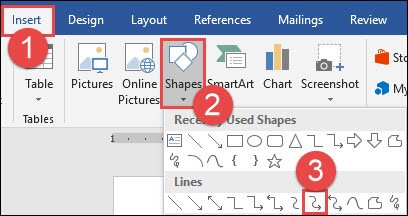
First, let’s review the steps on how to draw a basic arrow. On the “Insert” tab on the Ribbon, click the “Shapes” button. In the Lines group on the drop-down menu, click the “Line Arrow” option.
首先,让我们回顾一下如何绘制基本箭头的步骤。 在功能区的“插入”选项卡上,单击“形状”按钮。 在下拉菜单的“线”组中,单击“线箭头”选项。
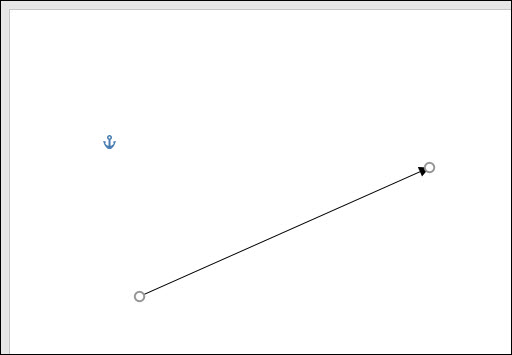
A crosshair symbol will display. Press and hold your mouse button, then drag to draw the arrow. Release the mouse button to finish drawing the arrow.
十字线符号将显示。 按住鼠标按钮,然后拖动以绘制箭头。 释放鼠标按钮以完成箭头的绘制。

Here’s the result:
结果如下:
调整大小,旋转和更改箭头的颜色 (Resizing, Rotating and Changing the Color of Arrows)
Now let’s go a step further. If you don’t change a thing, your arrow will default to the normal settings, which is black for the color and 3/4 point for the width. But what if the thin black arrow doesn’t suit your fancy? Maybe you need a thick, shorter blue arrow. No problem. You can make changes to it in a snap.
现在让我们更进一步。 如果您不进行任何更改,则箭头将默认为常规设置,即颜色为黑色,宽度为3/4点。 但是,如果黑色细箭头不适合您的情况怎么办? 也许您需要一个较粗,较短的蓝色箭头。 没问题。 您可以快速对其进行更改。
调整箭头大小 (Resizing an Arrow)
To change the length of your arrow, one way you can quickly accomplish this is with your mouse. Hover over the arrow tip until you see the double-arrow symbol.
要更改箭头的长度,可以使用鼠标快速完成此操作的一种方法。 将鼠标悬停在箭头提示上,直到看到双箭头符号。
Click and then drag your mouse to make the arrow shorter or longer or point it in a new direction. If you only want to shorten or lengthen the arrow without risking reorienting it, hold Shift down while you click and drag it.
单击然后拖动鼠标,使箭头变短或变长或将其指向新的方向。 如果只想缩短或加长箭头而又没有重新定位箭头的风险,请在单击并拖动时按住Shift键。
To make even more changes to your arrow, you can:
要对箭头进行更多更改,您可以:
- Use the options in the Format tab in the Ribbon 使用功能区中“格式”选项卡中的选项
- Click “Advanced Tools” (the small diagonal arrow on the bottom right of the Shape Styles group) in the Ribbon单击功能区中的“高级工具”(“形状样式”组右下角的小对角箭头)
- Right click on the arrow to open the Format Autoshape/Picture dialog box to see even more options 右键单击箭头以打开“格式自选图形/图片”对话框,以查看更多选项

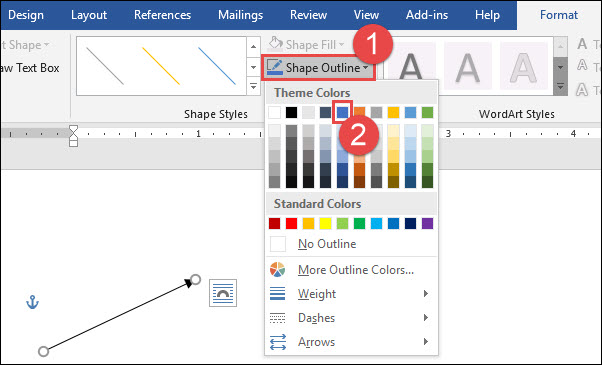
更改箭头的颜色(Changing the Color of an Arrow)
To change the arrow color, click the “Shape Outline” button on the “Format” tab and then click the color of your choice.
要更改箭头颜色,请单击“格式”选项卡上的“形状轮廓”按钮,然后单击您选择的颜色。
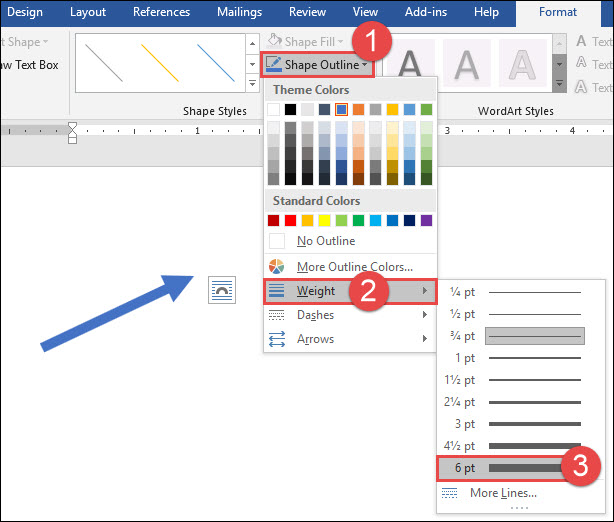
更改箭头的粗细 (Changing the Thickness of an Arrow)
To change the thickness of the arrow, click the “Shape Outline” button, point to the “Weight” menu, and then click on the thickness you want.
要更改箭头的厚度,请单击“形状轮廓”按钮,指向“重量”菜单,然后单击所需的厚度。
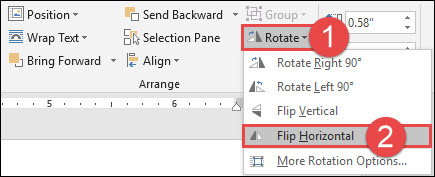
旋转箭头 (Rotating an Arrow)
To rotate the arrow, click the “Rotate” button on the Format tab and choose a rotation option. Hovering over each option lets you preview how your arrow will look.
要旋转箭头,请单击“格式”选项卡上的“旋转”按钮,然后选择一个旋转选项。 将鼠标悬停在每个选项上可以预览箭头的外观。
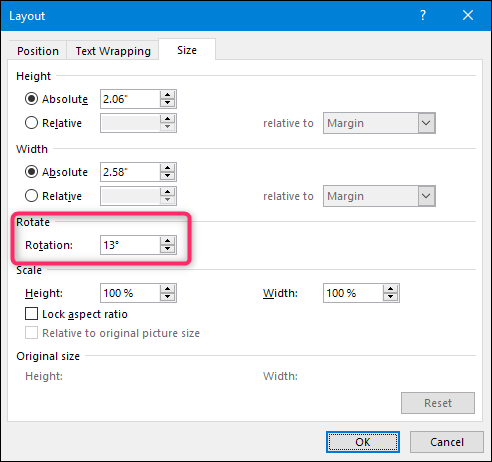
For even more rotation options, click the “More Rotation Options” command. On the “Size” tab of the Layout window that opens, you can specify an exact rotation in degrees.
要获得更多旋转选项,请单击“更多旋转选项”命令。 在打开的“布局”窗口的“大小”选项卡上,您可以指定精确的旋转度数。
使用块,弯曲和连接器箭头 (Using Block, Curved, and Connector Arrows)
If a straight arrow doesn’t cut it, there are other arrow types available, including block, curved, and connector arrows. Let’s take a look.
如果没有切出直线箭头,则还有其他箭头类型可用,包括块箭头,曲线箭头和连接器箭头。 让我们来看看。
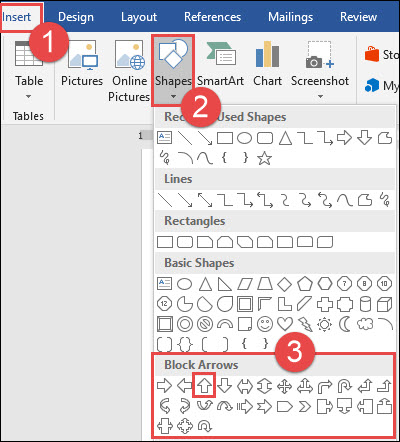
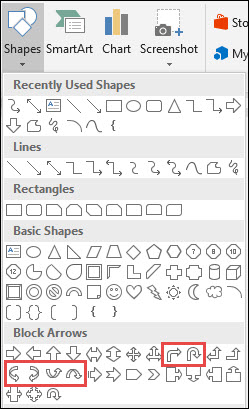
如何创建箭头 (How to Create a Block Arrow)
On the “Insert” tab of the Ribbon, click the “Shapes” button. In the “Block Arrows” section of the drop-down menu, click arrow style you want. In this example, we’re using an upward block arrow.
在功能区的“插入”选项卡上,单击“形状”按钮。 在下拉菜单的“阻止箭头”部分,单击所需的箭头样式。 在此示例中,我们使用向上的箭头。
Your pointer turns into a crosshair symbol. Click and drag to draw the arrow. Release the mouse button to finish.
您的指针变成十字线符号。 单击并拖动以绘制箭头。 释放鼠标按钮以完成操作。
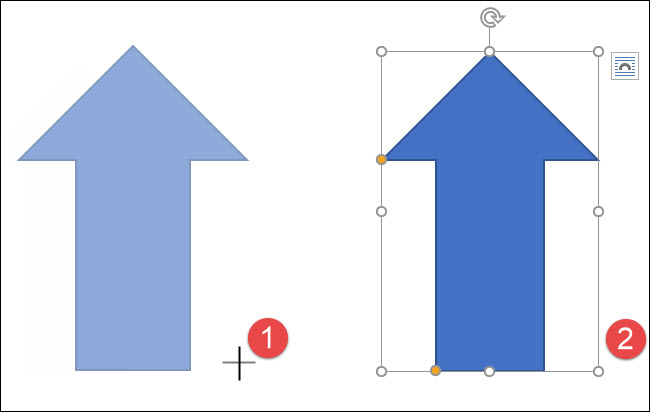
You can use the same formatting tools we talked about in the previous section to change the color, outline, and so on. Also, you can any of the eight white handles to resize the overall arrow. Grab the yellow handles to reshape the arrows head and shaft separately.
您可以使用上一节中讨论的相同格式设置工具来更改颜色,轮廓等。 另外,您可以使用八个白色手柄中的任何一个来调整整个箭头的大小。 抓住黄色手柄,分别重塑箭头的头部和杆身。
如何创建弯曲的箭头 (How to Create a Curved Arrow)
On the “Insert” tab of the Ribbon, click the “Shapes” button. In the “Lines” section, click one of the curved arrow shapes. You’ll find one with a single arrowhead, one with two heads, and a simple curved line with no arrowheads.
在功能区的“插入”选项卡上,单击“形状”按钮。 在“线”部分中,单击弯曲的箭头形状之一。 您会发现其中一个带有单个箭头,一个带有两个头部,以及一条没有箭头的简单曲线。
Your pointer turns into a crosshair symbol. Click and drag to draw the arrow. Release the mouse button to finish.
您的指针变成十字线符号。 单击并拖动以绘制箭头。 释放鼠标按钮以完成操作。
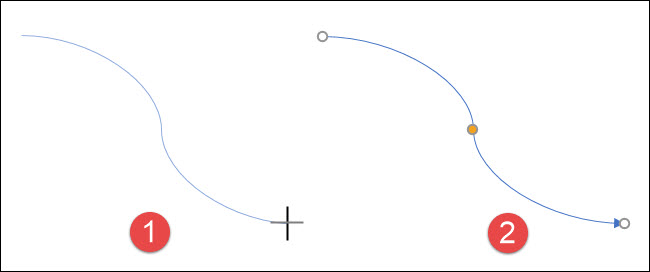
After drawing the curved arrow, you can change the curve by dragging the yellow handle in the center of the arrow. Here, we’ve dragged it out to the right to make a more sweeping curve.
绘制曲线箭头后,您可以通过拖动箭头中心的黄色手柄来更改曲线。 在这里,我们将其拖到右侧以绘制更宽的曲线。

For even more curved arrow options, check the curved arrows in the Block Arrows section.
有关更多弯曲箭头的选项,请检查“箭头箭头”部分中的弯曲箭头。
And just like with any other shape, you can use the standard formatting tools to change the color, outline, and so on.
与其他任何形状一样,您可以使用标准的格式设置工具来更改颜色,轮廓等。
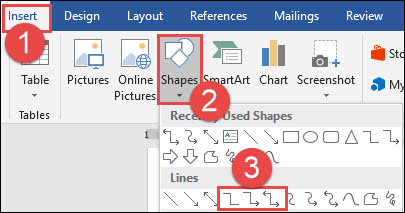
如何创建直形连接器箭头 (How to Create a Straight Connector Arrow)
Finally, there’s the connector arrow. These are great for connecting the kinds of shapes you’d use in flowcharts or organizational diagrams.
最后,有连接器箭头。 这些非常适合连接您在流程图或组织图中使用的各种形状。
On the “Insert” tab of the Ribbon, click the “Shapes” button. In the “Lines” section of the drop-down menu, choose one of the connector arrows. Just like with curved arrows, you’re just choosing how many arrowheads you want.
在功能区的“插入”选项卡上,单击“形状”按钮。 在下拉菜单的“线”部分中,选择连接器箭头之一。 就像弯曲的箭头一样,您只需选择所需的箭头数即可。
Your pointer turns into a crosshair symbol. Click and drag to draw the arrow. Release the mouse button to finish.
您的指针变成十字线符号。 单击并拖动以绘制箭头。 释放鼠标按钮以完成操作。
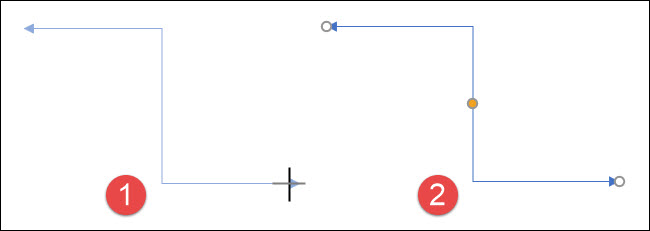
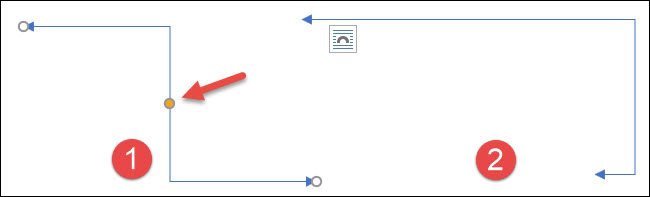
After drawing the connector arrow, you can grab the yellow handle to change the shape of the arrow. Use the white handles at either end to change the length of that portion of the arrow.
绘制连接器箭头后,您可以抓住黄色手柄来更改箭头的形状。 使用任一端的白色手柄更改箭头那部分的长度。
And there you have it. It’s probably more than you wanted to know about using arrows in Microsoft Word, but it’s always good to know what’s available.
那里有。 有关在Microsoft Word中使用箭头的知识可能比您想知道的要多,但是知道可用的东西总是很好。
翻译自: https://www.howtogeek.com/365465/how-to-draw-and-manipulate-arrows-in-microsoft-word/
qt中如何绘制指向性的箭头


 被折叠的 条评论
为什么被折叠?
被折叠的 条评论
为什么被折叠?
 到【灌水乐园】发言


