As a webmaster, I’ve often wanted to be able to see real-time hits as they arrive. Sure, Google Analytics is a wonderful package for looking at trends over time, but there’s a delay of a few hours there, and you really can’t see data like requests per second or total bytes.
作为网站管理员,我经常希望能够在到达时看到实时点击。 当然,Google Analytics(分析)是一个用于查看随时间变化趋势的出色软件包,但是延迟了几个小时,您真的看不到每秒请求数或总字节数之类的数据。
This is where the apachetop utility comes in. It’s a very simple command line utility that you can use to monitor traffic real-time. It accomplishes this by parsing the apache logfiles and displaying meaningful output to the screen.
这是apachetop实用程序出现的地方。它是一个非常简单的命令行实用程序,可用于实时监视流量。 它通过解析apache日志文件并在屏幕上显示有意义的输出来实现此目的。
Using Apachetop
使用Apachetop
Once you’ve installed the utility (instructions below), you can launch it by simply running apachetop from the command line. Since apachetop sometimes defaults to the wrong directory for the logfiles, you can pass in the -f parameter to specify the location of the logfile. This is also helpful when you have many virtual hosts on the same box.
一旦安装了该实用程序(下面的说明),就可以通过在命令行中简单地运行apachetop来启动它。 由于apachetop有时默认为日志文件使用错误的目录,因此您可以传递-f参数以指定日志文件的位置。 当同一机箱上有许多虚拟主机时,这也很有用。
apachetop -f /var/www/vhosts/howtogeek.com/statistics/logs/access_log
apachetop -f /var/www/vhosts/howtogeek.com/statistics/logs/access_log
This is what you’ll see after a few requests have come in:
在收到一些请求后,您将看到以下内容:

Monitoring Timeframe
监控时间表
The first thing to note is that the default time range for data shown is 30 seconds, so don’t expect the total counts to continue to climb forever. You can change this by passing in a few different arguments.
首先要注意的是,所显示数据的默认时间范围是30秒,因此不要指望总数会永远增长。 您可以通过传入一些不同的参数来更改此设置。
apachetop -H hits (Will display stats on the last x number of hits)
apachetop -H hits(将显示最后x次的统计数据)
apachetop -T secs (Will display stats on the last x number of seconds)
apachetop -T secs(将显示最后x秒的统计信息)
I’ve been using a range of 5-10 minutes in my testing, and it really shows some useful feedback. There’s other options you can try out as well.
我在测试中一直使用5-10分钟的时间,它确实显示了一些有用的反馈。 您还可以尝试其他选择。
Filters
筛选器
The next thing to note is that you can filter what gets shown in the view. To access the filters, use the f key, and you should see a small line pop up.
接下来要注意的是,您可以过滤视图中显示的内容。 要使用过滤器,请使用f键,然后您应该会看到一条小提示。

Hit the a key to add a filter and the line should switch. Now you can choose to filter by URL, referrer, or host.
按a键添加一个过滤器,该行将切换。 现在,您可以选择按URL,引荐来源网址或主机进行过滤。

I’m going to choose URL by hitting the u key. The filter dialog will show up near the bottom:
我将通过按u键选择URL。 过滤器对话框将显示在底部附近:
Since all of my articles are under the subdirectory /howto/, I’m going to enter that. Now apachetop will only show the hits relevant to hits to the articles, instead of every hit for every image.
由于我所有的文章都在/ howto /子目录下,因此我将输入它。 现在,apachetop将仅显示与文章匹配相关的匹配,而不是每个图像的匹配。
Viewing Request Details
查看请求详细信息
If you use the up/down keys, you’ll notice the cursor move up and down to allow you to select a request. (notice the * char)
如果使用向上/向下键,您会注意到光标向上和向下移动以允许您选择一个请求。 (注意*字符)

If you hit the Right arrow key, you’ll be taken to the details page for that request. From here you can see the actual hosts hitting your site, as well as the referrers. I’m not going to show the hosts, since I don’t want to give out user’s IP address, but you can see the referrer here:
如果您按下向右箭头键,则将转到该请求的详细信息页面。 在这里,您可以看到实际访问您网站的主机以及引荐来源网址。 我不想显示主机,因为我不想透露用户的IP地址,但是您可以在此处看到引荐来源网址:

To go back to the list, just use the Left arrow key.
要返回列表,只需使用向左箭头键。
Switch Between Hosts, Referrers and URLs
在主机,引荐来源网址和URL之间切换
If you use the d key, you can easily switch between the different views.
如果使用d键,则可以轻松地在不同视图之间切换。

For instance, here I can see what traffic StumbleUpon is sending me, and then I can use the details view(right arrow) to see the exact articles that are getting hit from stumbleupon.
例如,在这里我可以看到StumbleUpon发送给我的流量,然后可以使用详细信息视图(右箭头)查看来自stumbleupon的确切文章。
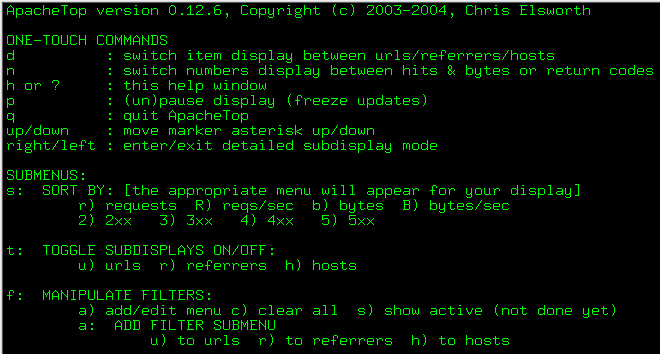
Help
帮帮我
At any point you can hit the ? or the h keys to take you to the help screen, which will give you a quick view of all the options.
在任何时候都可以打? 或使用h键进入帮助屏幕,这将使您快速查看所有选项。

I find the sort by very useful.
我发现排序非常有用。
Installing on Ubuntu
在Ubuntu上安装
sudo apt-get install apachetop
须藤apt-get install apachetop
Installing from Source on CentOS
在CentOS上从源代码安装
wget http://www.webta.org/apachetop/apachetop-0.12.6.tar.gz
wget http://www.webta.org/apachetop/apachetop-0.12.6.tar.gz
yum install readline-devel
百胜安装readline-devel
yum install ncurses-devel
百胜安装ncurses-devel
tar xvzf apachetop-0.12.6.tar.gz
焦油xvzf apachetop-0.12.6.tar.gz
cd apachetop-0.12.6
cd apachetop-0.12.6
./configure
。/配置
make
使
The binary can be found in src/apachetop, and you can copy it anywhere you’d like.
二进制文件可以在src / apachetop中找到,您可以将其复制到任何位置。
Installing from Source on Ubuntu
在Ubuntu上从源代码安装
wget http://www.webta.org/apachetop/apachetop-0.12.6.tar.gz
wget http://www.webta.org/apachetop/apachetop-0.12.6.tar.gz
sudo apt-get install ncurses-dev
须藤apt-get install ncurses-dev
sudo apt-get install libreadline5-dev
须藤apt-get install libreadline5-dev
tar xvzf apachetop-0.12.6.tar.gz
焦油xvzf apachetop-0.12.6.tar.gz
cd apachetop-0.12.6
cd apachetop-0.12.6
./configure
。/配置
make
使
The binary can be found in src/apachetop, and you can copy it anywhere you’d like.
二进制文件可以在src / apachetop中找到,您可以将其复制到任何位置。
翻译自: https://www.howtogeek.com/howto/ubuntu/monitor-your-website-in-real-time-with-apachetop/


 3094
3094

 被折叠的 条评论
为什么被折叠?


