


linux dig命令

The Linux dig command allows you to query DNS servers and perform DNS lookups. You can also find the domain an IP address leads back to. We’ll show you how!
Linux dig命令允许您查询DNS服务器并执行DNS查找。 您还可以找到IP地址返回的域。 我们将向您展示如何!
dig命令的工作方式 (How the dig Command Works)
People use the Linux dig command to query Domain Name System (DNS) servers. dig is an acronym for Domain Information Groper. With dig, you can query DNS servers for information regarding various DNS records, including host addresses, mail exchanges, name servers, and related information. It was intended to be a tool for diagnosing DNS issues. However, you can use it to poke around and learn more about DNS, which is one of the central systems that keep the internet routing traffic.
人们使用Linux dig命令来查询域名系统(DNS)服务器。 dig是Domain Information Groper的首字母缩写。 使用dig ,您可以查询DNS服务器以获取有关各种DNS记录的信息,包括主机地址,邮件交换,名称服务器和相关信息。 它旨在成为诊断DNS问题的工具。 但是,您可以使用它来四处浏览并了解有关DNS的更多信息,DNS是保持Internet路由流量的中央系统之一。
The internet uses internet protocol (IP) addresses to identify “locations” around the web, but people use domain names. When you type a domain name into an application, like a web browser or SSH client, something has to translate from the domain name to the actual IP address. This is where the Domain Name System comes in.
Internet使用Internet协议(IP)地址来标识Web上的“位置”,但是人们使用域名。 当您在Web浏览器或SSH客户端等应用程序中键入域名时,必须将某些内容从域名转换为实际IP地址。 这就是域名系统的用武之地。
When you use a domain name with any internet-connected program, your local router can’t resolve it (unless it’s cached from a previous request). So, your router queries either your Internet Service Provider’s (ISP) DNS server, or any other you’ve configured your system to use. These are called DNS precursor servers.
当您将域名与任何连接到Internet的程序一起使用时,本地路由器将无法解析它(除非从先前的请求中缓存了该域名)。 因此,您的路由器可以查询Internet服务提供商(ISP)的DNS服务器,或者已配置要使用的任何其他服务器。 这些被称为DNS前体服务器。
If the DNS server recently received the same request from someone else on the same computer, the answer might be in its cache. If that’s the case, it simply sends that same information back to your program.
如果DNS服务器最近从同一台计算机上的其他人收到相同的请求,则答案可能在其缓存中。 如果是这种情况,它只是将相同的信息发送回您的程序。
If the DNS precursor server can’t locate the domain in its cache, it contacts a DNS root name server. A root server won’t hold the information required to resolve domain names to IP addresses, but it will hold lists of servers that can help with your request.
如果DNS前体服务器无法在其缓存中找到域,则它将与DNS根名称服务器联系。 根服务器不会保存将域名解析为IP地址所需的信息,但是会保留可以帮助您处理请求的服务器列表。
The root server looks at the top-level domain to which your domain name belongs, such as .COM, .ORG, .CO.UK, and so on. It then sends a list of the top-level domain servers that handle those types of domains back to the DNS precursor server. The DNS precursor server can then make its request once more, to a top-level domain server.
根服务器查看您的域名所属的顶级域,例如.COM,.ORG,.CO.UK等。 然后,它将将处理这些类型的域的顶级域服务器的列表发送回DNS前体服务器。 然后,DNS前体服务器可以再次向顶级域服务器发出请求。
The top-level domain server sends the details of the authoritative name server (where the details of the domain are stored) back to the DNS precursor server. The DNS server then queries the authoritative name server that’s hosting the zone of the domain you originally entered into your program. The authoritative name server sends the IP address back to the DNS server, which, in turn, sends it back to you.
顶级域服务器将权威名称服务器的详细信息(存储域的详细信息)发送回DNS前体服务器。 然后,DNS服务器查询托管您最初在程序中输入的域的区域的权威名称服务器。 权威名称服务器将IP地址发送回DNS服务器,而DNS服务器又将其发送回您。
安装挖 (Installing dig)
dig was already installed on our Ubuntu 18.04 and Fedora 30 computers. However, we had to install it on the Manjaro 18.04 computer with the following command:
dig已经安装在我们的Ubuntu 18.04和Fedora 30计算机上。 但是,我们必须使用以下命令将其安装在Manjaro 18.04计算机上:
sudo pacman -Sy bind-tools

挖掘入门 (Getting Started with dig)
In our first example, we’ll return the IP addresses associated with a domain name. Often, multiple IP addresses are associated with a single domain name. This often happens if load balancing is used, for example.
在第一个示例中,我们将返回与域名关联的IP地址。 通常,多个IP地址与一个域名相关联。 例如,如果使用负载平衡,通常会发生这种情况。
We use the +short query option, as shown below, which gives us a terse response:
我们使用+short查询选项,如下所示,它使我们得到了简洁的响应:
dig howtogeek.com +short

All the IP addresses associated with the howtogeek.com domain are listed for us. At the other end of the spectrum, if we don’t use the +short query option, the output is quite verbose.
为我们列出了与howtogeek.com域关联的所有IP地址。 另一方面,如果我们不使用+short查询选项,则输出非常冗长。
So, we type the following to pipe it through less:
因此,我们键入以下内容以使其通过less传递:
dig howtogeek.com | less

The output is displayed in less, as shown below.
输出显示为less ,如下所示。

Here’s the full listing:
这是完整的清单:
; <<>> DiG 9.11.3-1ubuntu1.11-Ubuntu <<>> howtogeek.com
;; global options: +cmd
;; Got answer:
;; ->>HEADER<<- opcode: QUERY, status: NOERROR, id: 12017
;; flags: qr rd ra; QUERY: 1, ANSWER: 4, AUTHORITY: 0, ADDITIONAL: 1

;; OPT PSEUDOSECTION:
; EDNS: version: 0, flags:; udp: 65494
;; QUESTION SECTION:
;howtogeek.com. IN A

;; ANSWER SECTION:
howtogeek.com. 3551 IN A 151.101.194.217
howtogeek.com. 3551 IN A 151.101.130.217
howtogeek.com. 3551 IN A 151.101.66.217
howtogeek.com. 3551 IN A 151.101.2.217

;; Query time: 0 msec
;; SERVER: 127.0.0.53#53(127.0.0.53)
;; WHEN: Sun Mar 22 07:44:37 EDT 2020
;; MSG SIZE rcvd: 106
Let’s dissect that piece by piece.
让我们逐一剖析。
标头 (Header)
First, let’s take a look at we have in the Header:
首先,让我们看一下Header中的内容:
; <<>> DiG 9.11.3-1ubuntu1.11-Ubuntu <<>> howtogeek.com
;; global options: +cmd
;; Got answer:
;; ->>HEADER<<- opcode: QUERY, status: NOERROR, id: 12017
;; flags: qr rd ra; QUERY: 1, ANSWER: 4, AUTHORITY: 0, ADDITIONAL: 1
Now, here’s what all of that means:
现在,这就是所有这些的意思:
First line: The version of
digand the domain that was queried.第一行:
dig的版本和查询的域。Global options: As we’ll see, you can use
digto query multiple domains simultaneously. This line shows the options that have been applied to all of the domain queries. In our simple example, it was just the default+cmd(command) option.全局选项:我们将看到,您可以使用
dig同时查询多个域。 此行显示已应用于所有域查询的选项。 在我们的简单示例中,它只是默认的+cmd(命令)选项。Opcode: Query: This is the type of operation that was requested which, in this case, was a
query. This value can also beiqueryfor an inverse query, orstatusif you’re just testing the state of the DNS system.操作码:查询:这是所请求的操作类型,在这种情况下,它是一个
query。 该值也可以是用于反向查询的iquery,也可以是status如果您只是在测试DNS系统的状态)。Status: Noerror: There were no errors and the request was correctly resolved.
状态:无错误:没有错误,请求已正确解决。
ID: 12017: This random ID ties the request and response together.
ID:12017 :此随机ID将请求和响应绑定在一起。
Flags: qr rd ra: These stand for
query,recursion desired, andrecursion available. Recursion is one form of DNS lookup (the other is iterative). You might also seeAA, which stands for Authoritative Answer, meaning an Authoritative Name Server provided the response.标志:qr rd ra:这些代表
query,recursion desiredrecursion available和recursion available。 递归是DNS查找的一种形式(另一种是迭代形式)。 您可能还会看到AA,它代表权威答案,表示权威名称服务器提供了响应。Query: 1: The number of queries in this session, which was one.
查询:1:此会话中的查询数为1。
Answer: 4: The number of answers in this response, which is four.
答案:4:此响应中的答案数为4。
Authority: 0: The number of answers that came from an Authoritative Name Server, which was zero in this case. The response was returned from the cache of a DNS precursor server. There will be no authoritative section in the response.
权限:0:来自权威名称服务器的答案数量,在这种情况下为零。 该响应是从DNS前体服务器的缓存返回的。 答复中将没有权威部分。
Additional: 1: There is one piece of additional information. (Strangely, nothing is listed unless this value is two or higher.)
附加:1:有一个附加信息。 (奇怪的是,除非此值是两个或更大,否则什么都没有列出。)
选择伪切片 (Opt Pseudosection)
Next, we see the following in the Opt Pseudosection:
接下来,我们在“选择伪”部分中看到以下内容:
;; OPT PSEUDOSECTION:
; EDNS: version: 0, flags:; udp: 65494
Let’s break that down:
让我们分解一下:
EDNS: version 0: The version of Extension System for DNS that’s being used. EDNS transmits extended data and flags by extending the size of the User Datagram Protocol (UDP) packets. This is indicated by a variable size flag.
EDNS:版本0:正在使用的DNS扩展系统的版本。 EDNS通过扩展用户数据报协议(UDP)数据包的大小来传输扩展的数据和标志。 这由可变大小标志指示。
flags: No flags are in use.
标志:未使用任何标志。
udp: 4096: The UDP packet size.
udp : 4096: UDP数据包大小。
问题部分 (Question Section)
In the Question section, we see the following:
在“问题”部分,我们看到以下内容:
;; QUESTION SECTION:
;howtogeek.com. IN A
Here’s what this means:
这是什么意思:
howtogeek.com: The domain name we’re querying.
howtogeek.com:我们正在查询的域名。
IN: We’re making an internet class query.
IN:我们正在进行互联网类查询。
A: Unless we specify otherwise,
digwill request an A (address) record from the DNS server.答:除非我们另外指定,否则
dig将向DNS服务器请求A(地址)记录。
Answer Section
答案部分
The Answer section contains the following four answers we received from the DNS server:
答案部分包含我们从DNS服务器收到的以下四个答案:
howtogeek.com. 3551 IN A 151.101.194.217
howtogeek.com. 3551 IN A 151.101.130.217
howtogeek.com. 3551 IN A 151.101.66.217
howtogeek.com. 3551 IN A 151.101.2.217
Here’s what these answers mean:
这些答案的含义如下:
3551: This is the Time to Live (TTL), a 32-bit signed integer that holds the time interval for which a record can be cached. When it expires, the data must be used in an answer to a request until it’s been refreshed by the DNS server.
3551:这是生存时间(TTL),这是一个32位有符号整数,其中包含可以缓存记录的时间间隔。 过期时,必须将数据用于请求的应答中,直到DNS服务器将其刷新为止。
IN: We made an Internet class query.
IN:我们进行了Internet类查询。
A: We asked for an A record from the DNS server.
答:我们要求DNS服务器提供A记录。
统计科 (Statistics Section)
Statistics is the final section, and it contains the following information:
统计信息是最后一部分,其中包含以下信息:
;; Query time: 0 msec
;; SERVER: 127.0.0.53#53(127.0.0.53)
;; WHEN: Sun Mar 22 07:44:37 EDT 2020
;; MSG SIZE rcvd: 106
Here’s what we’ve got:
这是我们得到的:
Query Time: 0 msec: The time it took to get the response.
查询时间:0毫秒:获得响应所花费的时间。
SERVER: 127.0.0.53#53(127.0.0.53): The IP Address and port number of the DNS server that responded. In this case, it’s pointing to the local caching stub resolver. This forwards DNS requests to whichever upstream DNS servers are configured. On the Manajro test computer, the address listed here was 8.8.8.8#53, which is Google’s public DNS service.
服务器:127.0.0.53#53(127.0.0.53):响应的DNS服务器的IP地址和端口号。 在这种情况下,它指向本地缓存存根解析器。 这会将DNS请求转发到配置的任何上游DNS服务器。 在Manajro测试计算机上,此处列出的地址为8.8.8.8#53,这是Google的公共DNS服务。
WHEN: Sun Mar 22 07:44:37 EDT 2020: When the request was made.
时间:星期三3月22日07:44:37美国东部夏令时间2020:发出请求时。
MSG SIZE rcvd: 106: The size of the message received from the DNS server.
MSG大小rcvd:106:从DNS服务器接收的消息的大小。
有选择性 (Being Selective)
You don’t have to settle for the two extremes of tight-lipped and garrulous. The dig command allows you to selectively include or exclude sections from the results.
您不必满足于双唇和乱码的两个极端。 dig命令使您可以有选择地从结果中包括或排除部分。
The following query options will remove that section from the results:
以下查询选项将从结果中删除该部分:
+nocomments: Don’t show comment lines.
+ nocomments:不显示评论行。
+noauthority: Don’t show the authority section.
+ noauthority:不显示授权部分。
+noadditional: Don’t show the additional section.
+ noadditional:不显示其他部分。
+nostats: Don’t show the stats section.
+ nostats:不显示“统计信息”部分。
+noanswer: Don’t show the answer section.
+否答案:不显示答案部分。
+noall: Don’t show anything!
+ noall:什么也不要显示!
The +noall query option is usually combined with one of those above to include a section in the results. So, instead of typing a long string of query options to turn off multiple sections, you can use +noall to turn them all off.
+noall查询选项通常与上述选项之一结合使用,以在结果中包含一个部分。 因此,您无需输入一长串查询选项即可关闭多个部分,而可以使用+noall将其全部关闭。
You can then use the following inclusive query options to turn those you want to see back on:
然后,您可以使用以下包含性查询选项将要查看的内容重新打开:
+comments: Show comment lines.
+评论:显示评论行。
+authority: Show the authority section.
+ authority:显示权限部分。
+additional: Show the additional section.
+其他:显示其他部分。
+stats: Show the stats section.
+ stats:显示“统计信息”部分。
+answer: Show the answer section.
+ answer:显示答案部分。
+all: Show everything.
+全部:显示所有内容。
We type the following to make a request and exclude the comment lines:
我们输入以下内容进行请求,并排除注释行:
dig howtogeek.com +nocomments

If we use the +noall query option on its own, as shown below, we won’t get any useful output:
如果我们+noall使用+noall查询选项,如下所示,我们将不会获得任何有用的输出:
dig howtogeek.com +noall

We can selectively add the sections we want to see. To add the answer section, we type the following:
我们可以有选择地添加我们要查看的部分。 要添加答案部分,我们输入以下内容:
dig howtogeek.com +noall +answer

If we type the following to turn on +stats, we’ll also see the statistics section:
如果我们键入以下内容打开+stats ,我们还将看到“统计信息”部分:
dig howtogeek.com +noall +answer +stats

The +noall +answer combination is used often. You can add other sections to the command line as required. If you want to avoid typing +noall +answer on the command line every time you use dig, you can put them in a configuration file called “.digrc.” It’s located in your home directory.
+noall +answer组合经常使用。 您可以根据需要将其他部分添加到命令行。 如果要避免每次使用dig都在命令行上输入+noall +answer ,则可以将其放入名为“ .digrc”的配置文件中。 它位于您的主目录中。
We type the following to create one with echo:
我们键入以下内容以创建带有echo :
echo "+noall +answer" > $HOME/.digrc
We can then type the following to check its contents:
然后,我们可以键入以下内容来检查其内容:
cat .digrc

Those two options will now be applied to all future uses of dig, as shown below:
这两个选项现在将应用于dig所有将来用法,如下所示:
dig ubuntu.org
dig linux.org
dig github.com

This dig configuration file will be in use for the remaining examples in this article.
本文的其余示例将使用此dig配置文件。
DNS记录 (DNS Records)
The information returned to your dig requests is pulled from different types of records held on the DNS server. Unless we ask for something different, dig queries the A (address) record. The following are the types of records commonly used with dig:
返回到dig请求的信息是从DNS服务器上保留的不同类型的记录中提取的。 除非我们要求其他内容,否则dig查询A(地址)记录。 以下是dig常用的记录类型:
A Record: Links the domain to an IP version 4 address.
一条记录:将域链接到IP版本4地址。
MX Record: Mail exchange records direct emails sent to domains to the correct mail server.
MX记录:邮件交换将发送到域的直接电子邮件记录到正确的邮件服务器。
NS Record: Name server records delegate a domain (or subdomain) to a set of DNS servers.
NS Record:名称服务器记录将一个域(或子域)委托给一组DNS服务器。
TXT Record: Text records store text-based information regarding the domain. Typically, they might be used to suppress spoofed or forged email.
TXT记录:文本记录存储有关域的基于文本的信息。 通常,它们可能被用来禁止欺骗或伪造的电子邮件。
SOA Record: Start of authority records can hold a lot of information about the domain. Here, you can find the primary name server, the responsible party, a timestamp for changes, the frequency of zone refreshes, and a series of time limits for retries and abandons.
SOA记录:授权记录的开始可以保存有关该域的许多信息。 在这里,您可以找到主要名称服务器,负责方,更改的时间戳记,区域刷新的频率以及重试和放弃的一系列时间限制。
TTL: Time to live is a setting for each DNS record that specifies how long a DNS precursor server is allowed to cache each DNS query. When that time expires, the data must be refreshed for subsequent requests.
TTL:生存时间是每个DNS记录的设置,它指定允许DNS前体服务器缓存每个DNS查询多长时间。 该时间到期后,必须刷新数据以用于后续请求。
ANY: This tells
digto return every type of DNS record it can.ANY:这告诉
dig返回它可以返回的每种DNS记录类型。
Specifying the A record type doesn’t change the default action, which is to query the address record and obtain the IP address, as shown below:
指定A记录类型不会更改默认操作,即查询地址记录并获取IP地址,如下所示:
dig redhat.com A

To query the mail exchange records, we use the following MX flag:
要查询邮件交换记录,我们使用以下MX标志:
dig yahoo.com MX

The name server flag returns the following name of the root name servers associated with the top-level domain:
名称服务器标志返回与顶级域关联的根名称服务器的以下名称:
dig fedora.com NS

To query the start of authority record, we type the following SOA flag:
要查询授权记录的开始,我们键入以下SOA标志:
dig manjaro.com SOA

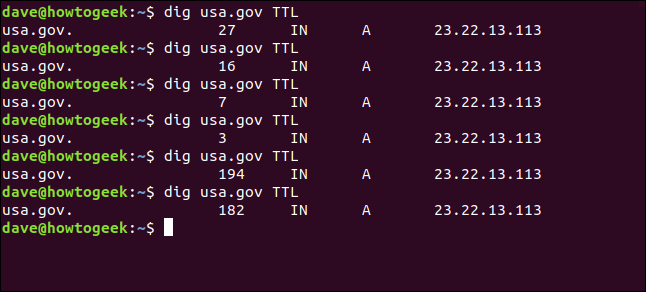
The TTL flag will show us the time to live for the data in the DNS server’s cache. If we make a series of requests, we see the time to live reduce to nothing, and then jump back to its starting value.
TTL标志将向我们显示DNS服务器缓存中的数据保留时间。 如果我们提出了一系列要求,我们会发现生存时间减少到零,然后跳回其初始值。
We type the following:
我们输入以下内容:
dig usa.gov TTL
To see the text records, we type the TX flag:
要查看文本记录,我们输入TX标志:
dig usa.gov TXT

指定DNS服务器 (Specifying the DNS Server)
If you want to use a particular DNS server for your request, you can use the at sign (@) to pass it to dig as a command-line parameter.
如果要为请求使用特定的DNS服务器,则可以使用at符号( @ )将其传递为dig作为命令行参数。
With the default DNS server (see below), dig references the local caching stub resolver at 127.0.0.53.
使用默认的DNS服务器(请参阅下文), dig引用位于127.0.0.53的本地缓存存根解析器。
dig usa.gov +stats
Now, we type the following to use Google’s public DNS server at 8.8.8.8:
现在,我们键入以下内容以使用位于8.8.8.8的Google的公共DNS服务器:
dig @8.8.8.8 usa.gov +stats

对多个域使用挖掘 (Using dig with Multiple Domains)
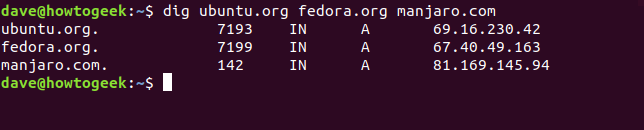
We can pass multiple domains to dig on the command line, as shown below:
我们可以在命令行中传递多个域进行dig ,如下所示:
dig ubuntu.org fedora.org manjaro.com
If you regularly check a set of domains, you can store them in a text file and pass it to dig. All the domains in the file will be checked in turn.
如果您定期检查一组域,则可以将它们存储在文本文件中,并将其传递给dig 。 文件中的所有域将被依次检查。
Our file is called “domains.txt.” We’ll use cat to show its contents, and then pass it to dig with the -f (file) option. We type the following:
我们的文件称为“ domains.txt”。 我们将使用cat来显示其内容,然后使用-f (文件)选项将其传递给dig 。 我们输入以下内容:
cat domains.txt
dig -f domains.txt

反向DNS查找 (Reverse DNS Lookups)
If you have an IP address and want to know where it goes, you can try a reverse DNS lookup. If it resolves to a server registered with a DNS server, you might be able to find out its domain.
如果您有IP地址,并且想知道它的去向,则可以尝试反向DNS查找。 如果它解析为在DNS服务器上注册的服务器,则您可能能够找到其域。
Whether you can depends on the presence of a PTR (pointer record). PTRs resolve an IP address to a fully qualified domain name. However, because these aren’t mandatory, they’re not always present on a domain.
是否可以取决于PTR(指针记录)的存在。 PTR将IP地址解析为完全限定的域名。 但是,由于这些不是强制性的,因此它们并不总是存在于域中。
Let’s see if we can find out where the IP address 209.51.188.148 takes us. We type the following, using the -x (reverse lookup) option:
让我们看看是否可以找到IP地址209.51.188.148将我们带到何处。 我们使用-x (反向查找)选项键入以下内容:
dig -x 209.51.188.148
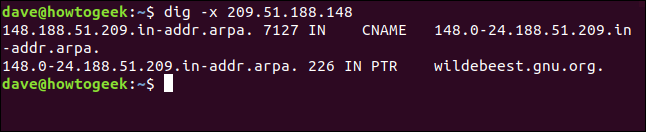
Presto! The IP address resolves to gnu.org.
快点! IP地址解析为gnu.org。
Because a PTR is a DNS record, and we know dig can request specified DNS records, couldn’t we just ask dig to retrieve the PTR for us? Yes, we can, but it does take a bit more work.
因为PTR是DNS记录,并且我们知道dig可以请求指定的DNS记录,所以我们不能只是要求dig为我们检索PTR吗? 是的,我们可以,但是还需要做更多的工作。
We have to provide the IP address in reverse order and tack .in-addr.arpa on the end, as shown below:
我们必须提供相反的IP地址,并在末尾添加.in-addr.arpa ,如下所示:
dig ptr 148.188.51.209.in-addr.arpa

We get the same result; it just took a bit more effort.
我们得到相同的结果; 只是花了一点力气。
你能挖一下它么? (Can You dig It?)
We all use the internet daily, and inquisitive minds have often wondered how the magic happens when we type the name of a website into a browser. With dig, you can explore the processes of network conjuring.
我们每个人每天都在使用互联网,好奇的人经常想知道当我们在浏览器中输入网站名称时魔术是如何发生的。 使用dig ,您可以探索网络魔术师的过程。
翻译自: https://www.howtogeek.com/663056/how-to-use-the-dig-command-on-linux/
linux dig命令


 462
462


 被折叠的 条评论
为什么被折叠?
被折叠的 条评论
为什么被折叠?
 到【灌水乐园】发言


