


从头开始vue创建项目

Microsoft Flow is a trigger-based system for creating automated workflows. There are lots of templates available, but if they don’t fit the bill for you then here’s how to create a brand new Flow from scratch.
Microsoft Flow是用于创建自动化工作流的基于触发器的系统。 有许多可用的模板,但是如果它们不适合您,那么这里是从头开始创建全新Flow的方法。
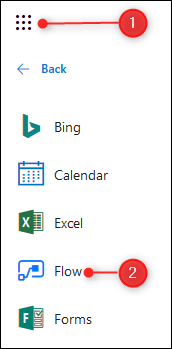
You’ll need a free or paid-for plan to use Flow, so go ahead and sign up for one if you haven’t already. Head to the Office 365 app launcher (the nine dots in the top left corner) and click Flow to launch it.
您需要免费或付费的计划才能使用Flow,因此,如果尚未注册,请继续注册。 转到Office 365应用程序启动器(左上角的九个点),然后单击“流程”以启动它。
第一步:创建新流程 (Step One: Create a New Flow)
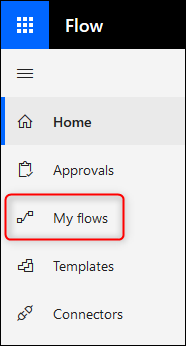
The front page throws you straight into the templates, but we’re going to create a Flow from scratch, so click “My Flows” in the menu on the left-hand side.
第一页将您直接带入模板,但是我们将从头开始创建Flow,因此请在左侧菜单中单击“我的Flows”。
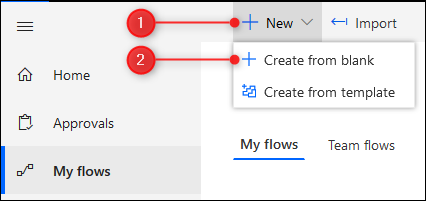
If you’ve never created a Flow before then this page will be blank; otherwise, it’ll contain any flows you’ve previously created. Click New > Create from blank to start a new Flow from scratch.
如果您之前从未创建过流程,那么此页面将为空白; 否则,它将包含您先前创建的所有流。 单击新建>从空白创建,以从头开始创建新的流程。
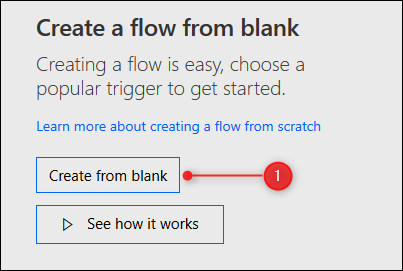
You’ll be given the option to start from a popular trigger, but we’re going to start from nothing, so click the “Create from blank” button.
您可以选择从流行的触发器开始,但是我们将从零开始,因此请单击“从空白创建”按钮。
第二步:选择触发器 (Step Two: Select a Trigger)
At this point, you’ll have to select a trigger to kick off your flow. You can search for a particular service or choose one from the list. Click on the downwards arrow under the two rows of icons to see all of the available services.
在这一点上,您必须选择一个触发器来启动流程。 您可以搜索特定服务或从列表中选择一项。 单击两行图标下方的向下箭头以查看所有可用服务。
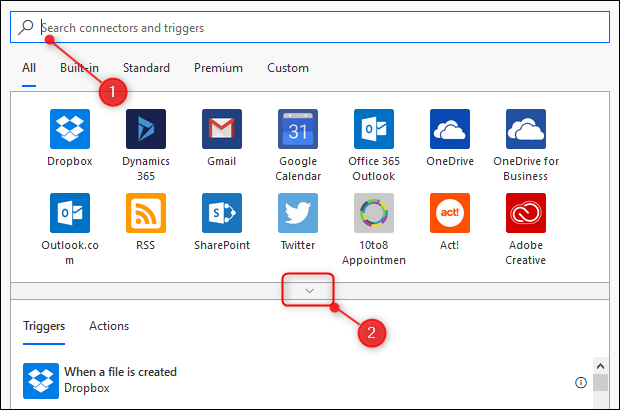
We’re going to set up a simple flow that sends an email when any file in a specific folder in OneDrive is modified. This is useful if you’ve shared a folder with someone and you want to know when they change anything in the folder. To set up this flow, we need to select a trigger action, which is a OneDrive file modification. Start by clicking on the OneDrive service.
我们将建立一个简单的流程,当修改OneDrive中特定文件夹中的任何文件时,该流程将发送电子邮件。 如果您已与某人共享了一个文件夹,并且想知道他们何时更改了该文件夹中的任何内容,这将很有用。 要设置此流程,我们需要选择一个触发动作,这是对OneDrive文件的修改。 首先单击OneDrive服务。

Make sure you’ve clicked on the right OneDrive—there’s “OneDrive” (which is included with free and personal Office 365 subscriptions) and “OneDrive for Business” (which is included with business plans). When you click the OneDrive service, you’ll have to sign in to Office 365 again to make sure it’s still you. Once you’ve signed in, a list of OneDrive triggers is displayed. We’re looking for the “When a file is modified” trigger, which is towards the bottom.
确保单击了正确的OneDrive,即“ OneDrive”(包含在免费和个人Office 365订阅中)和“ OneDrive for Business”(包含在业务计划中)。 当您单击OneDrive服务时,您必须再次登录Office 365以确保它仍然是您。 登录后,将显示OneDrive触发器列表。 我们正在寻找底部的“何时修改文件”触发器。
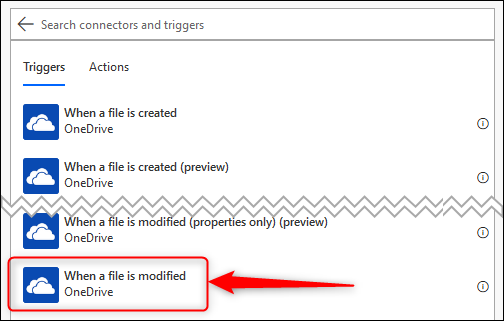
Click “When a file is modified” to open up the options for this trigger. The only required option is to select the folder that contains the files you want to monitor, so click the folder icon.
单击“修改文件时”以打开此触发器的选项。 唯一需要的选项是选择包含要监视的文件的文件夹,因此单击文件夹图标。
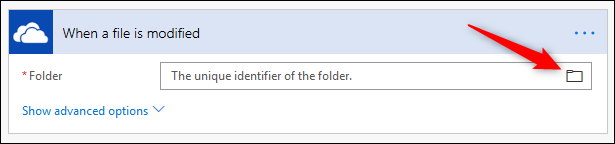
A dialogue box will display the OneDrive file structure, starting with “Root.” You can select this if you want to be notified whenever any file in OneDrive is modified, or you can click the arrow next to Root to browse your OneDrive folder structure and select the folder you want to monitor.
对话框将显示以“ Root”开头的OneDrive文件结构。 如果希望在修改OneDrive中的任何文件时收到通知,则可以选择此选项,也可以单击“根”旁边的箭头浏览OneDrive文件夹结构并选择要监视的文件夹。

We’ve chosen our /How-To Geek folder.
我们选择了/ How-To Geek文件夹。
第三步:选择要执行的动作 (Step Three: Select an Action to Perform)
That’s the trigger sorted, so now we need to select an action to perform. Click on “New Step” to open up the options again.
那是触发事件,所以现在我们需要选择一个要执行的动作。 单击“新步骤”以再次打开选项。

We want to send an email whenever an item in the How-To Geek folder is modified, so we need to select the Outlook.com service. There are a lot of services to choose from (and annoyingly they’re not in alphabetical order) so put in “Outlook” as the filter term and choose the Outlook.com service.
每当要修改How-To Geek文件夹中的项目时,我们都希望发送电子邮件,因此我们需要选择Outlook.com服务。 有很多服务可供选择(而且令人讨厌的是,它们不是按字母顺序排列的),因此将“ Outlook”作为过滤条件并选择Outlook.com服务。
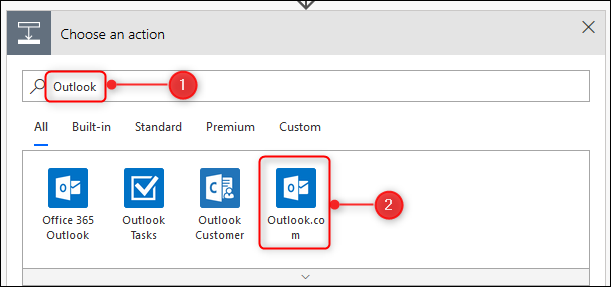
Select the “Send an email” action.
选择“发送电子邮件”操作。

This brings up the “Send an email” options. You can start to see how the flow is taking shape, with a trigger at the top and actions below.
这将显示“发送电子邮件”选项。 您可以开始查看流程的形成方式,顶部是触发器,下面是操作。

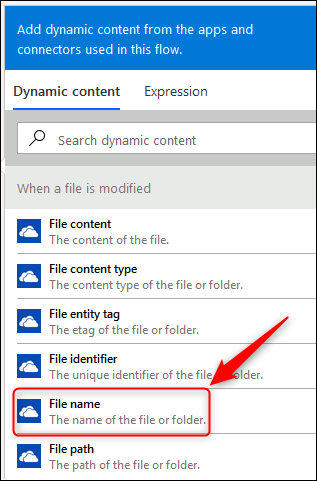
Add the email address to which you want to send the email into the “To” field. When you click in the “Subject” box, you’ll notice that a “Dynamic content” panel appears to the right. This gives you the option of adding a subject line to the email based on the file that’s been modified. We want the subject line to say “[file name] has been modified,” where “[file name]” is replaced with the name of the file. To do this, click “File name” in the “Dynamic content” panel.
将您要发送电子邮件的电子邮件地址添加到“收件人”字段。 当您单击“主题”框时,您会注意到右侧显示“动态内容”面板。 这使您可以选择基于已修改的文件将主题行添加到电子邮件中。 我们希望主题行说“ [[文件名]”已被修改”,其中“ [[文件名]””被替换为文件名。 为此,请在“动态内容”面板中单击“文件名”。
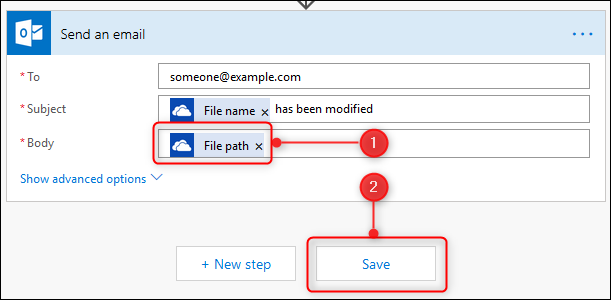
“File name” will appear in the “Subject” line. Add in the text ” has been modified” (not forgetting to put a space in before the word “has”).
“文件名”将出现在“主题”行中。 在文本中添加“已被修改”(不要忘记在“有”之前加一个空格)。

We want to make it easy to find the file as well, so in the “Body” line go to the “Dynamic content” panel again and click “File path” to add that to the body. The flow is complete now, so click Save.
我们也希望使查找文件变得容易,因此在“正文”行中再次转到“动态内容”面板,然后单击“文件路径”将其添加到正文中。 该流程现已完成,因此请单击“保存”。
第四步:测试流程 (Step Four: Test the Flow)
The next step is to test the flow. Click on the Test option in the top right corner.
下一步是测试流程。 单击右上角的“测试”选项。

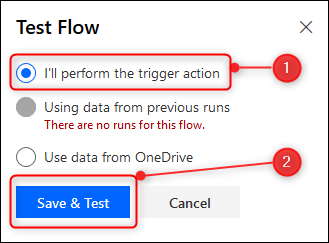
In the “Test Flow” panel that slides out, click “I’ll perform the trigger action” and click “Save & Test.”
在滑出的“测试流程”面板中,单击“我将执行触发操作”,然后单击“保存并测试”。
Now, leaving the tab with your flow open, go to the folder you’re monitoring in OneDrive and make a change to a file (you can do this in the OneDrive web app or OneDrive on your computer). Save the change, and go back to the tab where Flow is open. You’ll see a message telling you the flow has run successfully.
现在,在流程保持打开状态的选项卡下,转到OneDrive中要监视的文件夹并更改文件(可以在OneDrive Web应用程序或计算机上的OneDrive中进行此操作)。 保存更改,然后返回到“流”已打开的选项卡。 您会看到一条消息,告诉您流程已成功运行。

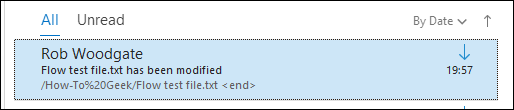
When you check your email you’ll see that an email alert has been sent to you, with the subject line showing the file name and text you added, and the body showing the file path.
查看电子邮件时,您会看到已向您发送电子邮件警报,主题行显示您添加的文件名和文本,正文显示文件路径。
This is a simple flow, of course, but you can add multiple triggers and actions across a large range of services, as well as use variables, set up approval criteria, route data to specific security groups in Office 365 and much, much more. Microsoft adds new features regularly, and while a lot of these features are aimed at business users (and only available on business plans), many of them are available and useful for the home user as well.
当然,这是一个简单的流程,但是您可以跨多个服务添加多个触发器和操作,还可以使用变量,设置批准条件,将数据路由到Office 365中的特定安全组等等。 Microsoft会定期添加新功能,尽管其中许多功能是针对业务用户的(并且仅在业务计划中可用),但其中许多功能对于家庭用户也是可用且有用的。
翻译自: https://www.howtogeek.com/407944/how-to-create-a-flow-from-scratch/
从头开始vue创建项目


 8206
8206

 被折叠的 条评论
为什么被折叠?
被折叠的 条评论
为什么被折叠?
 到【灌水乐园】发言


