linux chgrp

The chgrp command on Linux changes the group ownership of a file or directory. Why use it instead of chown ? Sometimes a Swiss Army knife is great, but when you really need a scalpel, only a scalpel will do.
Linux上的chgrp命令更改文件或目录的组所有权。 为什么用它代替chown ? 有时候,瑞士军刀很棒,但是当您真的需要手术刀时,只有手术刀会做。
什么时候应该使用chgrp (When You Should Use chgrp)
You use the chgrp command to change the group ownership of a file or directory. The chown command allows you to change the user owner and the group owner of a file or directory. So why would you need or use chgrp?
您可以使用chgrp命令更改文件或目录的组所有权。 chown命令允许您更改文件或目录的用户所有者和组所有者。 那么,为什么需要或使用chgrp呢?
Well, for one thing, it’s easy. Using chown to change just the group owner setting is a little counterintuitive. You have to be very careful with the syntax. It hinges on the correct placing of a colon “:”. Misplace that, and you’re not making the change you thought you were.
好吧,一方面,这很容易。 使用chown仅更改组所有者设置有点违反直觉。 您必须非常小心语法。 它取决于冒号“:”的正确放置。 放错了地方,而您并没有做出您认为是的改变。
The syntax of chgrp is altogether more straightforward. It also has a neat feature that tells you in simple terms what changes it has just made.
chgrp的语法更加简单明了。 它还具有一个简洁的功能,可以简单地告诉您它刚刚进行了哪些更改。
It is a purpose-built and dedicated tool for the task at hand. chgrp completely embraces the Unix design principle of doing one thing and doing it well. Let’s see what it has to offer.
它是为即将完成的任务量身定制的专用工具。 chgrp完全遵循Unix设计原则:一件事做得好。 让我们看看它提供了什么。
更改文件的组所有权 (Changing the Group Ownership of a File)
To change the group ownership of a file is very straightforward. You must use sudo with chgrp. Groups are not owned by users, so whether a file or directory is moved from one group to another is not a decision that sits with the average user. That’s a job for someone with root privileges.
更改文件的组所有权非常简单。 您必须将sudo与chgrp一起使用。 组不是用户所有的,因此,将文件或目录从一个组移到另一个组并不是由普通用户决定的。 对于具有root特权的人来说,这是一项工作。
We’re going to change the group ownership of a C source file called “gc.c.” We’re going to change it to the “devteam” group.
我们将更改名为“ gc.c”的C源文件的组所有权。 我们将其更改为“ devteam”组。
We can check the current ownership values by using ls with the -l (long listing) option.
我们可以通过将ls与-l (长列表)选项一起使用来检查当前所有权值。
ls -l
ls -l
This is the command to change the group ownership. Type sudo, a space, chgrp , a space, the name of the group we’re going to set as the group owner, a space, and the name of the file.
这是更改组所有权的命令。 输入sudo ,一个空格, chgrp ,一个空格,要设置为群组所有者的群组名称,一个空格以及文件名。
sudo chgrp devteam gc.c
We’ll check that the change has been made by using ls -l again.
我们将再次使用ls -l检查是否已进行更改。
ls -l

We can see that the group ownership has been changed from “dave” to “devteam.”
我们可以看到组所有权已从“ dave”更改为“ devteam”。
To change the group ownership for a set of files all at once, you can use wildcards. Let’s change the group ownership for all of the C source files in the current directory. We will use this command:
要一次更改一组文件的组所有权,可以使用通配符。 让我们更改当前目录中所有C源文件的组所有权。 我们将使用以下命令:
sudo chgrp devteam *.c
We can check the change has been made as we expected by using ls -l.
我们可以使用ls -l检查是否按预期进行了更改。
ls -l

All of the C source files in this directory have been changed so that their group ownership is “devteam.”
此目录中的所有C源文件均已更改,因此其组所有权为“ devteam”。
By using the -c (changes) option chgrp will list the changes it has made to each file. Suppose we made a mistake, we wanted the C source files to have their group ownership set to “researchlab.” Let’s correct that now. We’ll use this command:
通过使用-c (更改)选项, chgrp将列出它对每个文件所做的更改。 假设我们犯了一个错误,我们希望C源文件将其组所有权设置为“ researchlab”。 让我们现在更正。 我们将使用以下命令:
sudo chgrp -c researchlab *.c

The changes are made for us, and each one is listed as it happens, allowing us to verify that what we have changed is correct.
所做的更改是为我们所做的,并且每项更改都会列出来,以便我们验证更改是否正确。
更改目录的组所有权 (Changing the Group Ownership of a Directory)
Changing the group ownership of a directory is just as simple. We can use this command to change the group ownership for the directory “backup.”
更改目录的组所有权非常简单。 我们可以使用此命令来更改目录“ backup”的组所有权。
sudo chgrp -c devteam ./backup
To be clear, this command will change the group ownership of the directory itself, not the files inside the directory. We will use ls -l with the -d (directory) option to verify that this is the case.
为了清楚起见,此命令将更改目录本身的组所有权,而不是目录内部的文件。 我们将ls -l与-d (目录)选项一起使用,以验证是否是这种情况。
ls -l -d

The group ownership of the directory itself has been changed to “devteam.”
目录本身的组所有权已更改为“ devteam”。
递归选项 (The Recursive Option)
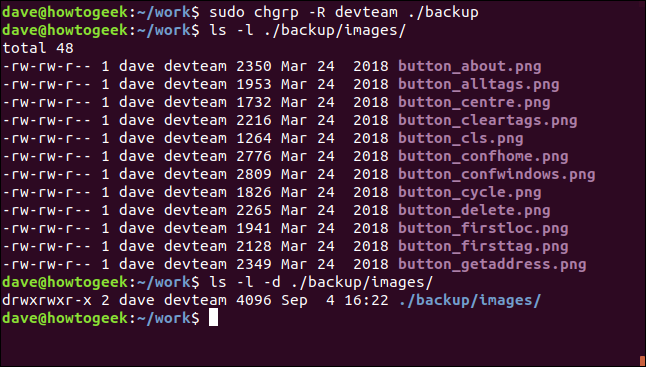
If we want to change the group ownership for the files and directories stored within a directory, we can use the -R (recursive) option. This will cause chgrp to change the group ownership for all files and subdirectories below the target directory.
如果要更改目录中存储的文件和目录的组所有权,可以使用-R (递归)选项。 这将导致chgrp更改目标目录下所有文件和子目录的组所有权。
Let’s try this with the “backup” directory. Here is the command:
让我们尝试使用“备份”目录。 这是命令:
sudo chgrp -R devteam ./backup
We’ll review the files in one of the nested subdirectories with the ls command, and we’ll also check the settings of one of the nested subdirectories by using ls .
我们将使用ls命令查看其中一个嵌套子目录中的文件,并且还将使用ls检查其中一个嵌套子目录的设置。
ls -l ./backup/images
ls -l -d ./backup/images

We can see that the group ownership has been changed both for the files in the nested subdirectories and for the nested subdirectories.
我们可以看到,嵌套子目录中的文件和嵌套子目录的组所有权都已更改。
使用参考文件 (Using a Reference File)
So far, we’ve been explicitly telling chgrp the name of the group we wish to use. We can also use chgrp in way that says “set the group ownership of this file to the same group ownership as that file.”
到目前为止,我们已经明确地告诉chgrp我们希望使用的组的名称。 我们还可以使用chgrp在说的方式“设置这个文件在同一组所有权作为该文件的组所有权。”
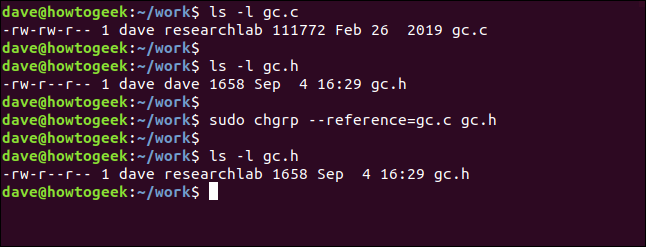
Let’s set the group ownership of “gc.h” to be the same as “gc.c.”
让我们将“ gc.h”的组所有权设置为与“ gc.c”相同。
We can check the current settings of “gc.c” and “gc.h” using ls.
我们可以使用ls检查“ gc.c”和“ gc.h”的当前设置。
ls -l gc.c
ls -l gc.h
The option we need to use is the --reference option. The group ownership is copied from the reference file to the other file. Take care to get the files the right way round.
我们需要使用的选项是--reference选项。 组所有权从参考文件复制到另一个文件。 注意正确获取文件。
sudo chgrp --reference=gc.c gc.h
We’ll use ls to check the settings have been transferred to “gc.h.”
我们将使用ls检查设置是否已转移到“ gc.h”。
ls -l gc.h

The file “gc.h” now has the same group ownership as “gc.c.”
文件“ gc.h”现在具有与“ gc.c”相同的组所有权。
将chgrp与符号链接一起使用 (Using chgrp with Symbolic Links)
We can use chgrp to change the group ownership of symbolic links, or of the file pointed to by the symbolic link.
我们可以使用chgrp更改符号链接或符号链接指向的文件的组所有权。
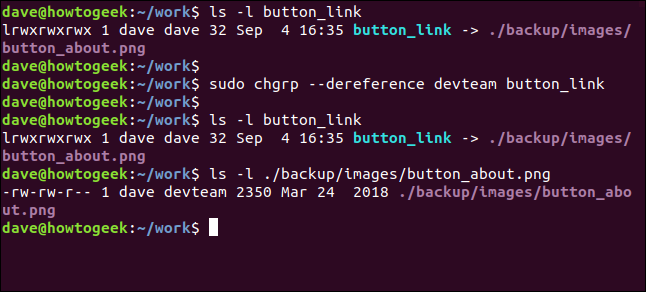
For this example, we’ve created a symbolic link called “button_link.” This points to a file called “./backup/images/button_about.png.” To change the group ownership of the file, we must use the --dereference option. This will change the settings for the file and leave the symbolic link unchanged.
在此示例中,我们创建了一个名为“ button_link”的符号链接。 这指向一个名为“ ./backup/images/button_about.png”的文件。 要更改文件的组所有权,我们必须使用--dereference选项。 这将更改文件的设置,并保持符号链接不变。
Let’s check the settings for the symbolic link using ls -l.
让我们使用ls -l检查符号链接的设置。
ls -l button_link
The command to change the file is:
更改文件的命令是:
sudo chgrp --dereference devteam button_link
We’ll check that the symbolic link is unchanged using ls, and we’ll also check the group ownership settings for the file.
我们将使用ls检查符号链接是否保持不变,并且还将检查文件的组所有权设置。
ls -l button_link
ls -l ./backup/images/button_about.png

The symbolic link is unchanged, and the “button_about.png” file has had its group ownership modified.
符号链接保持不变,并且“ button_about.png”文件的组所有权已修改。
To change the group ownership of the symbolic link itself, we must use the --no-dereference option.
要更改符号链接本身的组所有权,我们必须使用--no-dereference选项。
The command to use is:
使用的命令是:
sudo chgrp --no-dereference devteam button_link
We’ll use ls -l to verify that the new group ownership has been set for the symbolic link.
我们将使用ls -l来验证是否已为符号链接设置了新的组所有权。
ls -l button-link

This time the affected item was the symbolic link itself, not the file it points to.
这次受影响的项目是符号链接本身,而不是它指向的文件。
漂亮又简单 (Nice and Simple)
Simple is good. It means that there is less to remember and less to get confused with. That should mean fewer mistakes.
简单就是好。 这意味着您无需记住,也不会感到困惑。 那应该意味着更少的错误。
翻译自: https://www.howtogeek.com/439500/how-to-use-the-chgrp-command-on-linux/
linux chgrp


 831
831

 被折叠的 条评论
为什么被折叠?


